linux基础命令学习
目录结构
-
基本思路: 一切皆文件
-
树状结构存储. 根目录/
/
|_dev 设备文件(映射为文件,cpu,gpu等)
|_media 媒体文件(**u盘,光驱,linux识别后将设备挂载到该目录下**)
|_boot 启动文件(**启动linux需要使用的一些核心文件,包括一些链接文件和镜像文件**)
|_etc 配置文件(**mysql等配置文件均存放在该目录下,环境变量文件**)
|_mnt 挂载目录(**挂载别的文件系统,可以将外部的存储挂载到/mnt**)
|_opt 安装软件存放的目录(**optional随意可选的 如安装mysql软件前,可以将安装软件先放到该目录下,默认为空**)
|_/usr/local(**安装完软件后,会存放到该目录下,如mysql源码安装后,在目录下会出现/usr/local/mysql**)
|_sbin super指令(系统管理员使用的指令)
|_bin 经常使用的指令(chmod chown copy rm...)
|_selinux 安全相关(security enhanced linux)
|_var 变量目录(存放日志等)
|_usr 资源目录(存放用户安装的程序 Unix Software Resource, 类似win中的Program files目录)
|_lib 动态链接共享文件
|_lost+found 一般是空的,系统非法关机后里面会存放一些文件
|_proc 内核目录(别动)
|_sys (别动)
|_srv 服务启动后需要提取的数据(别动)
|_tmp 存放临时文件
vi vim
- 具有三种模式
- 正常模式,进入vim时候默认模式,可以-删除字符/行, -复制/黏贴
- 插入/编辑模式
- 命令行模式,refresh, exit, 显示行号,字符串查找/替换等
- 常用快捷键
- 拷贝当前行yy, 拷贝当前行向下5行 5yy, 输入单词p进行paste
- 删除当前行dd, 删除当前行线下5行 5dd,
- 查找 / , 单词n向下查找, shift + n 反方向向上查找
- 末行-G 首行-gg
- 撤销 u
- :set nu 显示行号, 取消行号 :set nonu
- 跳到指定行 输入行号如78, 输入shift + g
- :e 刷新文件
关机&重启
- shutdown
- Shutdown -h now 立即关机
- shutdown -h 1 1分钟后关机
- shutdown -r now 立即重启
- halt 等价于关机
- reboot 重启
- sync 同步命令,执行后看不到命令界面变化,会将内存中的数据dump
用户管理
- 用户组: 用户至少隶属于一个组,e.g ylj本身属于ylj组, 相当于role角色
- home: 每个用户都会在/home中有一个目录,e.g ylj home目录在/home/ylj
用户操作
-
添加用户
## 1.添加用户,系统在home目录中新创建一个文件夹[用户名] useradd [用户名] -
删除用户
## 1.删除用户,不删除家目录文件(推荐!!) userdel [用户名] ## 2.删除用户,删除家目录 userdel -r [用户名] -
查询用户
## 查询用户信息 id [用户名] [root@iZbp1flxncfu0h0dxkv75uZ home]# id ylj uid=1000(ylj) gid=1000(ylj) 组=1000(ylj) uid: 用户id gid:所在组id 组: 组名 -
切换用户
## 创建用户 切换用户
[root@iZbp1flxncfu0h0dxkv75uZ home]# useradd zf    //创建用户
[root@iZbp1flxncfu0h0dxkv75uZ home]# ll
总用量 8
drwx------ 2 ylj ylj 4096 12月  5 15:57 ylj
drwx------ 2 zf  zf  4096 12月  5 16:13 zf
[root@iZbp1flxncfu0h0dxkv75uZ home]# su - zf			//切换用户,高权限账户切换低权限用户,无需输密码
[zf@iZbp1flxncfu0h0dxkv75uZ ~]$ cd /root/
-bash: cd: /root/: Permission denied							//低权限账户无法查看
[zf@iZbp1flxncfu0h0dxkv75uZ ~]$ exit							//退出,进入高权限账户
logout
[root@iZbp1flxncfu0h0dxkv75uZ home]# 							//恢复root
组操作
- 组增删
## 添加组
groupadd [组名]
## 删除组
groupdel [组名]
-
创建用户时候添加组
[root@iZbp1flxncfu0h0dxkv75uZ home]# groupadd wudang //创建组 [root@iZbp1flxncfu0h0dxkv75uZ home]# useradd -g wudang zwj //创建用户同时添加到指定组 [root@iZbp1flxncfu0h0dxkv75uZ home]# ll //home目录下增加了人员 总用量 12 drwx------ 2 ylj ylj 4096 12月 5 15:57 ylj drwx------ 2 zf zf 4096 12月 5 16:14 zf drwx------ 2 zwj wudang 4096 12月 5 16:24 zwj [root@iZbp1flxncfu0h0dxkv75uZ home]# id zwj //查询到用户已隶属于指定的组 uid=1002(zwj) gid=1002(wudang) 组=1002(wudang) -
修改用户组
[root@iZbp1flxncfu0h0dxkv75uZ home]# groupadd shaoling				//添加组
[root@iZbp1flxncfu0h0dxkv75uZ home]# usermod -g shaoling zwj  //将zwj修改到该组
[root@iZbp1flxncfu0h0dxkv75uZ home]# id zwj
uid=1002(zwj) gid=1003(shaoling) 组=1003(shaoling)
相关配置文件
-
用户配置文件(存储了用户信息)
/etc/passwd
-
组信息文件(组信息)
/etc/group -
口令配置文件(存储密码和登录信息,加密存储)
/etc/shadow
运行级别(runlevel,target)
Linux 运行级别相当于系统的运行状态,比如win中杀毒的时候要F8进入紧急模式一样
在引入systemctl后,运行级别(runlevel)用target来代替
查看当前target----systemctl get-default
# multi-user.target: analogous to runlevel 3
# graphical.target: analogous to runlevel 5
- 0-关机
- 1-单用户(找回丢失密码)
- 2-多用户无网络
- 3-多用户有网络
- 4-保留
- 5-图形界面
- 6-重启
常用指令
文件目录类
pwd
- 显示当前工作目录的绝对目录
ls
- ls -alh
- -a 包含隐藏文件
- -l 已列表的形式显示
- -h 按人阅读的格式显示 如大小使用M单位等
mkdir
- mkdir -p /home/ylj/test/test
- -p 递归创建,/test不存在时自动创建
rmdir
- rmdir 【空目录】只能删除空目录
rm -rf
- -r recurse递归
- -f 强制
- rm -rf [目录]
touch
- touch 文件名, 文件不存在会自动创建,文件已存在则会刷新文件访问时间
cp
- cp -r source dist
- 递归拷贝文件夹
- cp 源文件 目录文件 , 拷贝的同时可以重命名
- cp aaa.txt bbb/ 将aaa.txt文件拷贝到bbb目录下
- cp -r dir1 dir2/ 将dir1整个目录拷贝到dir2目录下
- \cp -r dir1 dir2/ 将dir1整个目录拷贝到dir2目录下,若重复,则强制覆盖
mv
- mv oldFileName newFileName, 当操作前后的文件都在同一个目录下是 重命名操作
- mv srcFileName dir/dstFileName, 当操作前后的文件不是在同一个目录下市 移动操作
cat
- concatenate 连续
- 只读形式获取文件信息
- cat -n /etc/profile 显示行号
- cat -n /etc/profile | more 分页显示
more
- 基于vi编辑器的文本过滤器,以全屏方式按页显示文本文件内容,more指令中内置了若干快捷键
- 快捷键
- ctr + b 向前翻1页
- ctr + f 向后翻1页
- Space空格键 向后翻1页
- 一次将文件都读入到内存中
less
- 跟more功能类似,分屏查看文件内容,根据显示需要加载内容到内存中,效率更高,适合超大的文件日志
- 快捷键
- space空白键 向下翻页
- [pageDown] 向下翻1页
- [pageUp] 向上翻1页
- / 字符串 向下搜索字符串同vim n向下 N项上(shift + N)
- ?字符串 向上搜索字符串
- q 离开同more
> & >>
-
> 覆盖输出
-
>> 追加输出
-
  ## 例子
  ls -al > file.txt 覆盖输出
  ls -al >> file.txt 追加输出
  cat 文件1 > 文件2  将文件1的内容覆盖输出到文件2,目标文件不存在则创建
  echo "内容" > file.txt
echo & head & tail
-
Echo
## 输出环境变量 echo $PATH -
Head
## 显示文件中前几行 head -n 10 /etc/profile -
tail
## 显示文件中的后几行, 以1000位窗口大小刷新日志
tail -1000f log
ln
-
软链接,类似于win中的快捷方式
## 基本语法 ln -s [源文件或目录] [软连接名] ## 例子1 在/home目录下创建1个软连接linkToRoot, 连接到/root目录 ln -s /root linkToRoot ## 例子2 删除软连接 linkToRoot rm -rf linkToRoot -
硬链接
history
-
查看已经执行过的指令
## 显示所有的历史指令 history -
查看最近执行过的10条指令
history 10 -
直接执行编号为127的clear指令
[root@iZbp1flxncfu0h0dxkv75uZ ~]# history 10 123 cd /root/ 124 ls 125 rm -rf linkToRoot/ 126 rm -rf linkToRoot 127 clear 128 history 129 history 1- 130 history 10 131 clear 132 history 10 [root@iZbp1flxncfu0h0dxkv75uZ ~]# !127 -
持久化
## 将日志立即写入~/.bash_history文件中
history -w
时间日期类
date
-
查看时间
- Date 显示当前时间
- date +%Y 显示当前年份
- date +%m 显示当前月份
- date +%d 显示当前天
- date "+%Y-%m-%d %H:%M:%S" 显示年月日时分秒
-
设置时间
-
Date -s 时间字符串
## 例子
date -s "2018-10-10 11:22:12
-
cal
-
Calendar
# 显示当前日历
cal
# 查看1年日历
cal 2020
搜索类
whereis
-
查找程序相关的文件(二进制文件, 配置文件,man文件等)
whereis nginx
find
-
按文件名,查找在/home目录下文件名为hello.txt文件
## 在指定目录下递归搜索文件 find /root -name hello.txt find 搜索范围 -name 文件名 ## 通配符查找,查找txt文件 find / -name *.txt -
按拥有者,查找/opt目录下,文件拥有者为nobody的文件
find /opt -user nobody find /opt -user root -
按大小, 查找系统中文件大小大于20m的文件(+n -- 大于 , -n -- 小于, n -- 等于)
## 经常适用磁盘清理,在根目录下找到文件大于20m的文件
find / -size +20m
##
locate
-
locate指令可用于快速定位文件路径。locate需要事先建立系统文件索引。
-
locate是基于数据库进行查询,所以运行前,必须使用updatedb创建数据库
## 使用locate 快速定位hello.txt文件所在目录
grep
-
例: 在hello.txt文件中,查找yes所在的行,并且显示行号
cat hello.txt | grep -ni yes
-n 显示行号number
-i 忽略大小写ignore
压缩类
gzip & gunzip
-
该指令压缩后原文件消失,产生新的gz文件
## 压缩例子
gzip hello.txt
## 结果
原文件变成hello.txt.gz, 且体积小了很多
zip & unzip
-
(常用)该指令不会删除原先的目录
## 压缩 zip -r 压缩文件名.zip 需要压缩目录
zip mypackage.zip /root/test2/ --> 打包的目录中会有root
zip mypackage2.zip /test2/*    --> 打包的目录中不会有root
zip -r mypackage2.zip /test2/* --> 递归压缩
## 解压缩 unzip -d [解压的目录] [解压文件]
unzip -d /opt/tmp mypackage2.zip --> 在/opt/tmp下产生解压文件夹test
tar
-
该指令同时支持压缩和解压
- -z 打包的同时压缩
- -c 产生tar包打包文件
- -v 详细信息
- -f 指定压缩有文件名
- -x 解压.tar文件
## 压缩多个文件 将/home/a1.txt, /home/a2.txt 压缩成 a.tar.gz
tar -zcvf [打包压缩文件.tar.gz] [文件1] [文件2] [文件3]。。。
tar -zcvf a.tar.gz a1.txt a2.txt
## 压缩目录 将/home目录压缩成 myhome.tar.gz
tar -zcvf myhome.tar.gz /home/
tar -zcvf myhome.tar.gz /home/*  (* 可不写)
## 解压到当前目录 a.tar.gz到当前目录
tar -zxvf [打包压缩文件.tar.gz]
tar -zxvf a.tar.gz
## 解压到特定目录 /opt/tmp, tmp目录必须已存在
tar -zxvf [打包压缩文件.tar.gz] -C [目标目录]
tar -zxvf a.tar.gz -C /opt/tmp
网络类
wget
## 下载网络资源并且以指定路径和命名保存
wget -O /etc/yum.repos.d/CentOS-Base.repo https://mirrors.aliyun.com/repo/Centos-6.repo
curl
## 下载网络资源并且重命名保存到指定路径
curl -o /etc/yum.repos.d/CentOS-Base.repo https://mirrors.aliyun.com/repo/Centos-7.repo
RPM & YUM
RPM (RedHat Package Manager)
-
  ## 查询已安装软件
  rpm -qa | grep '包名'
  rpm -qa | more

  ## 软件包详细信息, 安装时间,软件描述等
  rpm -qi python

  ## 查询软件包在系统中共安装了哪些文件
  rpm -ql python
卸载
rpm -e python
YUM
-
维护了网络RPM包服务仓库,安装时提供网路下载功能
-
添加了依赖下载功能,原始的rmp包安装检查依赖失败后需要用户手动安装依赖
yum会检查依赖,对缺失依赖自动安装。
-
## 查询yum服务器中是否有软件 yum list | grep xx ## 安装 yum install firefox ## 移除 yum remove firefox ## 查看软件描述 yum info [软件名称 e.g mysql-community-client] -
配置源
vim /etc/yum.repos.d/yum.repos -
缓存源的软件包索引
yum makecache fast -
清除缓存
yum clean all
进程管理
- 基本知识
- 每一个进程,都会对应一个父进程,而这个父进程可以复制多个子进程
- 每个进程有两种方式存在, 前台进程和后台daemon进程
查看进程
-
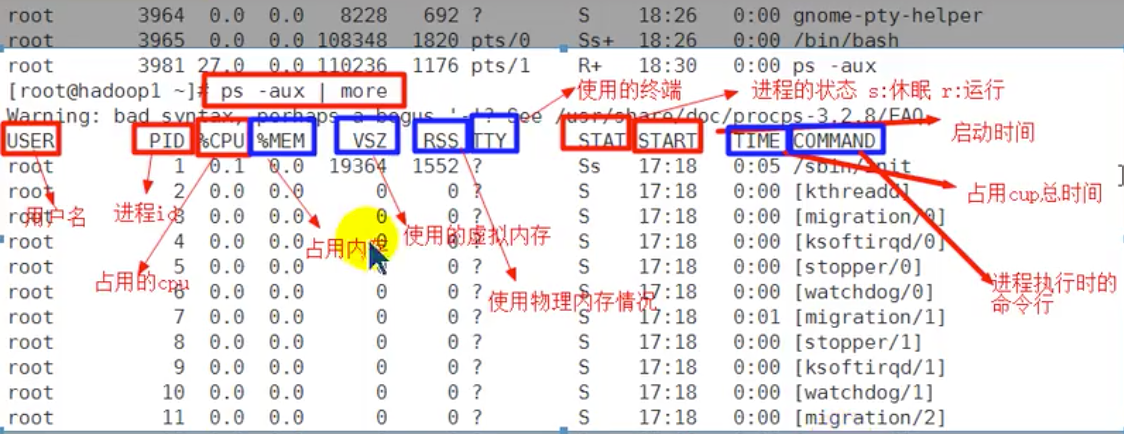
ps ( report a snapshot of the current processes.)
-a : 所有进程信息
-u : 以用户格式显示
-x : 显示后台进程运行的参数
-
pstree 以树状显示进程
-
-
例子
## 查看系统所有进程
ps -aux | grep sshd

## 需要查看进程的父进程PPID
ps -ef | grep sshd
终止进程
-
kill
-
例子
## 例1 踢掉某个非法登录用户 jack
-bash-4.2# ps -aux | grep sshd
root       959  0.0  0.1 112924  2732 ?        Ss   9月09   0:00 /usr/sbin/sshd -D
root     10054  0.1  0.3 157512  5872 ?        Ss   23:42   0:00 sshd: jack [priv]
jack     10066  0.2  0.1 157832  2792 ?        S    23:42   0:00 sshd: jack@pts/3,pts/4
root     10952  0.0  0.0 112824   976 pts/1    S+   23:43   0:00 grep --color=auto sshd
root     26469  0.2  0.3 157836  6384 ?        Ss   22:28   0:09 sshd: root@pts/1,pts/2
-bash-4.2# kill 10066

## 例2 终止远程登录服务sshd, 在适当的时候再次重启
kill 959

## 例3 终止多个gedit 编辑器
killall gedit

## 例4 强制杀死一个终端
kill -9 [PID]
开机流程
- 开机-》 BIOS -》 /boot -》init进程 -》运行级别(决定要启动哪些服务) -》 运行级别对应的服务
进程监控
-
动态监控进程(命令运行期间会更新结果) top, 类似win中任务管理器
top -d 秒数(默认3秒) -i 不显示僵死/闲置进程 -p 要监控的进程PID
-
交互操作
u --> 指定要监控的用户进程
k --> 进入杀死进程模式,输入PID即可杀死
P --> 以CPU使用率排序,默认就有该项
M --> 以内存的使用率排序
N --> 以PID排序
q --> 退出top
网路监控
- netstat -anp | more
- netstat -tunlp
组管理和权限管理
-
文件的拥有者和组 默认是文件创建者 和 文件创建者所在的组 (chmod 改变文件)
## 查看文件所有者 ls -alh [文件] ls -alh ok.txt [tom@iZbp1flxncfu0h0dxkv75uZ ~]$ ls -alh ok.txt -rw-r--r-- 1 tom police 0 12月 6 13:00 ok.txt ## 文件own:tom, 组:police ## 修改文件所有者 -bash-4.2# touch apple.txt ## 创建文件 -bash-4.2# ls -alh apple.txt ## 查看文件权限 -rw-r--r-- 1 root root 0 12月 6 13:05 apple.txt -bash-4.2# chown tom apple.txt ## 修改文件拥有者为tom,但是group还是root -bash-4.2# ls -alh apple.txt -rw-r--r-- 1 tom root 0 12月 6 13:05 apple.txt -bash-4.2# ## 修改文件所在组,默认组为创建者所在组 -bash-4.2# touch apple.txt ## 创建apple.txt -bash-4.2# ls -alh apple.txt ## 默认所有者为root,组root -rw-r--r-- 1 root root 0 12月 6 14:44 apple.txt -bash-4.2# chgrp police apple.txt ## 修改组为police -bash-4.2# ls -alh apple.txt -rw-r--r-- 1 root police 0 12月 6 14:44 apple.txt -
改变用户所在组 (usermod 改变用户)
## 创建一个土匪组(bandit), 将用户tom从police组--》bandit组 -bash-4.2# groupadd bandit ## 创建1个土匪组 -bash-4.2# id tom ## 查看用户tom在哪个组 uid=1003(tom) gid=1004(police) 组=1004(police) -bash-4.2# usermod -g bandit tom ## 将tom修改到土匪组 -bash-4.2# id tom ## uid=1003(tom) gid=1006(bandit) 组=1006(bandit) -
权限管理 (chmod)
- 方式1:通过 + - = 赋予权限rwx
## rwx作用在文件 r->可读写 w->可修改文件内容 x->可执行文件 ## rwx作用在目录 r->可查看目录内容 w->可创建修改删除目录内容 x->可进入该目录 ## 修改文件和目录权限指令 chmod ## chmod u:所有者 g:组 o:其他 a:所有人 chmod u=rwx,g=rx,o=x [文件/目录名] ## 给文件/目录授予权限 chmod o+w [文件/目录名] ## 给文件/目录其他人添加写权限 chmod a-w [文件/目录名] ## 取消所有人的写权限 ## 案例1 ## 给abc.txt 所有者rwx权限,所在组rx权限,其他组rx权限 -bash-4.2# touch abc.txt ## 创建文件 -bash-4.2# ls -al abc.txt ## 查看文件默认权限 -rw-r--r-- 1 root root 0 12月 6 15:16 abc.txt -bash-4.2# chmod u=rwx,g=rx,o=rx abc.txt ## 赋予新的权限 -bash-4.2# ls -al abc.txt ## 再次查看 -rwxr-xr-x 1 root root 0 12月 6 15:16 abc.txt ## 案例2 ## 给abc.txt 所有者取消x权限,给所在组w权限 -bash-4.2# ls -al abc.txt ## 查看权限 -rwxr-xr-x 1 root root 0 12月 6 15:16 abc.txt -bash-4.2# chmod u-x abc.txt ## 给owner撤销x权限 -bash-4.2# ls -al abc.txt -rw-r-xr-x 1 root root 0 12月 6 15:16 abc.txt ## owner权限为rw ## 案例3 ## 给abc.txt 所有用户添加w权限 -bash-4.2# ls -al abc.txt ## 查看权限 -rw-r-xr-x 1 root root 0 12月 6 15:16 abc.txt -bash-4.2# chmod a+w abc.txt ## 给所有的用户添加w权限 -bash-4.2# ls -al abc.txt -rw-rwxrwx 1 root root 0 12月 6 15:16 abc.txt- 用数字421赋予权限(推荐)
## 案例1 ## 给abc.txt 所有者rwx权限,所在组rx权限,其他组rx权限, r=4,w=2,x=1 -bash-4.2# chmod 755 abc.txt-
修改文件所有者(owner)
## 将文件 abc.txt 所有者修改为tom -bash-4.2# ls -al abc.txt -rwxr-xr-x 1 root root 0 12月 6 15:27 abc.txt ## 当前所有者为root -bash-4.2# chown tom abc.txt ## 所有者修改为tom -bash-4.2# ls -al abc.txt -rwxr-xr-x 1 tom root 0 12月 6 15:27 abc.txt ## 查看已经所有者已经改为了tom ## 将目录 /home/test 下所有文件和目录的所有者改为tom -bash-4.2# chown -R tom test/ ## 修改test目录下所有文件和目录own=tom -bash-4.2# ls -ald test/* -rw-r--r-- 1 tom root 0 12月 6 15:38 test/a.txt -rw-r--r-- 1 tom root 0 12月 6 15:38 test/b.txt drwxr-xr-x 2 tom root 4096 12月 6 15:39 test/c -rw-r--r-- 1 tom root 0 12月 6 15:39 test/c.txt -
修改文件所在组(group)
## 将文件 abc.txt 所在组修改为bandit(土匪组)
-bash-4.2# ls -alh abc.txt 											## 查看abc文件所在组
-rwxr-xr-x 1 tom root 0 12月  6 15:27 abc.txt
-bash-4.2# chgrp bandit abc.txt 								## 修改所在组为bandit
-bash-4.2# ls -alh abc.txt 											## 查看修改后的组
-rwxr-xr-x 1 tom bandit 0 12月  6 15:27 abc.txt

## 将目录 /home/test 下所有文件和目录所在组修改为bandit(土匪组)
-bash-4.2# ls -alh test													## 查看当前test目录下文件及目录所在组
总用量 12K
drwxr-xr-x  3 tom  root 4.0K 12月  6 15:39 .
drwxr-xr-x. 7 root root 4.0K 12月  6 15:38 ..
-rw-r--r--  1 tom  root    0 12月  6 15:38 a.txt
-rw-r--r--  1 tom  root    0 12月  6 15:38 b.txt
drwxr-xr-x  2 tom  root 4.0K 12月  6 15:39 c
-rw-r--r--  1 tom  root    0 12月  6 15:39 c.txt
-bash-4.2# chgrp -R bandit test/								## 将test目录下文件&目录所在组->bandit
-bash-4.2# ls -alh test													## 查看修改后目录下文件的所在组
总用量 12K
drwxr-xr-x  3 tom  bandit 4.0K 12月  6 15:39 .
drwxr-xr-x. 7 root root   4.0K 12月  6 15:38 ..
-rw-r--r--  1 tom  bandit    0 12月  6 15:38 a.txt
-rw-r--r--  1 tom  bandit    0 12月  6 15:38 b.txt
drwxr-xr-x  2 tom  bandit 4.0K 12月  6 15:39 c
-rw-r--r--  1 tom  bandit    0 12月  6 15:39 c.txt
定时任务(crontab)
- 安装 yum -y install vixie-cron crontabs
- cron (command run on 在什么时间执行命令)
- 进程 crond守护进程
crontab -e Edit 编辑定时任务 crontab -l 查询定时任务 crontab -r remove 删除当前用户所有的定时任务 service crond restart 重启服务 -
案例
## 案例1 每隔1分钟将当前日期信息,追加到/tmp/mydate.txt文件中
step1: 编写shell脚本 mytask.sh
date >> /tmp/mydate.txt
step2: 编辑crontab -e
*/1 * * * * sh /root/mytask.sh  ## 分 时 日 月 周  *号代表每 /号代表隔  */代表每隔
## 案例2 每隔1分钟将当前日期日历信息,追加到 /home/mycal.txt 文件中 将案例1中shell脚本改为 cal >> /tmp/mycal.txt## 案例3 每天凌晨2点将mysql的testdb数据库备份 mydb.bak step1: 编写shell脚本 dbbak.sh /usr/local/mysql/bin/mysqldump -uroot -proot testdb > /tmp/mydb.bak step2: 给dbbak.sh权限(root可执行) chmod 744 dbbak.sh step3: crontab -e 注册 0 2 * * * sh /root/dbbak.sh
磁盘分区&挂载
分区基础
- MBR分区
- 最多支持4个主分区
- 系统只能安装在主分区且激活
- 扩展分区占用1个主分区
- MBR分区最大只支持2TB硬盘,但拥有最好的兼容性
- GTP分区
- 支持无限多个主分区
- 最大支持18EB容量 1EB=1024PB=1024*1024TB=1024*1024*1024GB
- Win64bit 支持GTP
LINUX对分区的处理
-
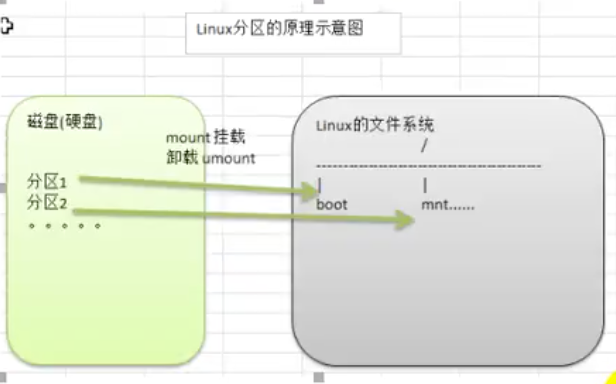
linux采用了一种挂载的方式处理分区,将一个分区挂载到目录树中的一个目录(分区 对应 一个特定目录),
-
在linux的世界中,即使分区也只是在文件系统中的一个文件,可以操作文件的方式操作分区
磁盘占用情况 & 常用文件指令
-
df -lh : 系统整体磁盘占用情况(report file system disk space usage)
-
du -lh [/目录] : 查询指定目录磁盘占用情况, 默认为当前目录
-s : 指定目录占用大小
-a : 含文件
-c : 列出明细同时,增加汇总数
-h : 带计量单位
--max-depth=1 : 子目录深度
## 例1 统计/opt目录下占用空间情况,包含文件,深度为1
du -ach --max-depth=1 /opt

## 例2 统计/home文件夹下文件个数
ls -al /home | grep "^-" | wc -l

## 例3 统计/home文件夹下目录个数
ls -al /home | grep "^d" | wc -l

## 例4 统计文件夹下文件个数,递归统计,包含子文件中
ls -alR /home | grep "^-" | wc -l

## 例5 统计文件夹下目录个数,递归统计,包含子文件中
ls -alR /home | grep "^d" | wc -l

## 例6 以树状显示目录结构
tree [/目录(默认当前)]
硬盘基础
-
linux硬盘分IDE硬盘(并口硬盘)和SCSI硬盘(串口硬盘)
-
IDE硬盘,驱动器标志符为”hdx~“,hd-->hard drive 硬盘驱动器 x->盘号(a为基本盘-第1块盘,b为基本从属盘-第2块盘,c为辅助主盘-第3块盘,d为辅助从属盘-第4块盘), ”~“表示分区,前4个分区用数字1到4表示,它们是主分区或扩展分区,从5开始是逻辑分区
e.g hda3表示第一个IDE硬盘上的第三个主分区,hdb2表示第二个IDE2硬盘上的第二个主分区(扩展分区也是朱分区)
-
SCSI硬盘,标志为"sdx~", "sd"表示SCS硬盘,其余一致
-
查看
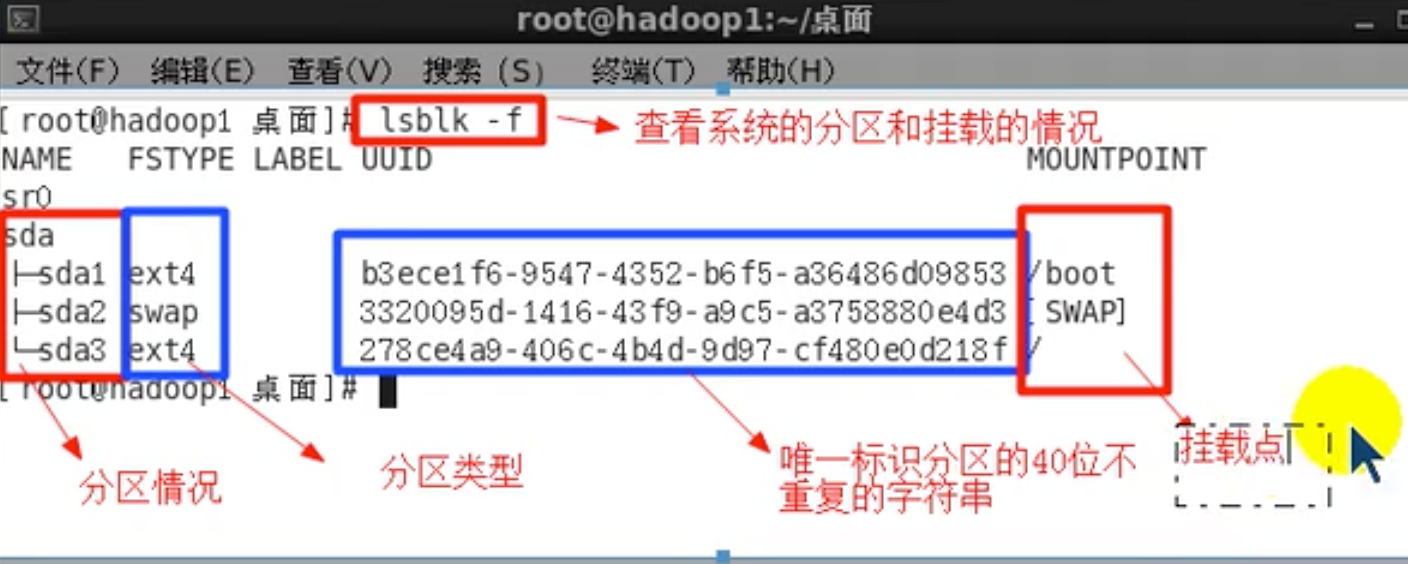
- 查看分区大小 和 挂载点
-
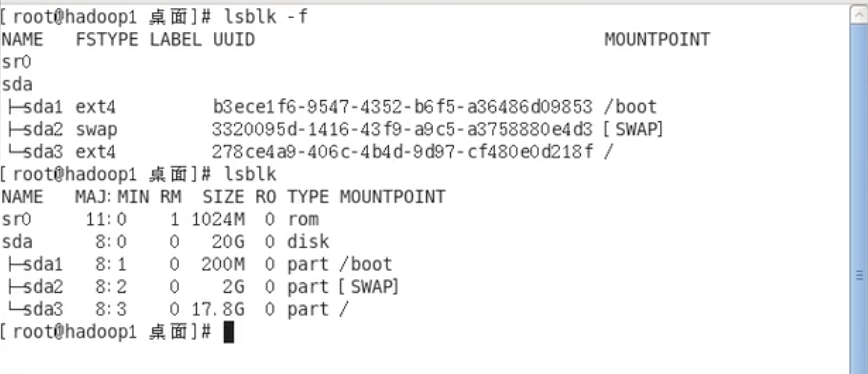
挂载一块硬盘
- 步骤
- 添加SCSI硬盘 添加完成后
lsblk -f--》 命令完成后可以查看到一块sdb硬盘 - 硬盘分区 分区命令
fdisk /dev/sdb--》 完成1个主分区 - 格式化分区 mkfs -t ext4 /dev/sdb1 --》 将sdb1分区格式化为ext4格式
- 创建挂载点(目录 e.g /home/newdisk)
- 挂载, --》 mount /dev/sdb1 /home/newdisk 设备重启后该分区不会自动挂载
- 设置自动挂载
- vim /etc/fstab
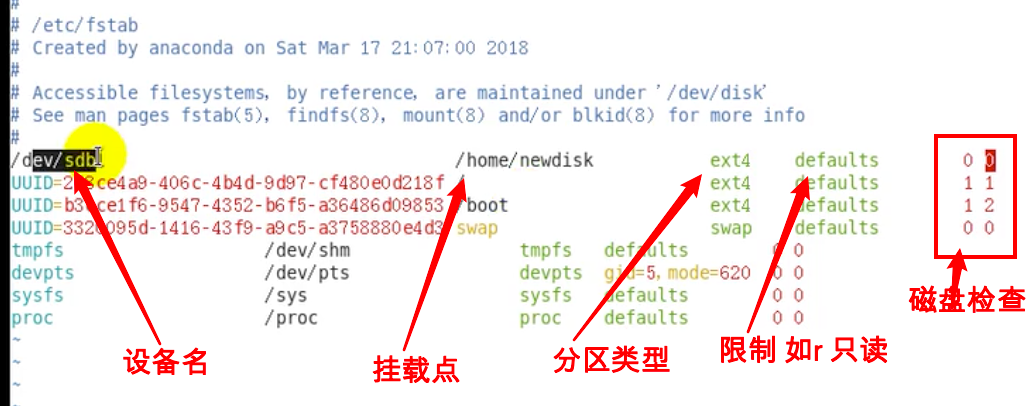
- mount -a (mount auto 自动挂载生效)
- reboot (重启后检查)
- 添加SCSI硬盘 添加完成后
卸载一块硬盘
- umount 设备名/挂载点
- e.g
umount /dev/sdb1或者umount /home/newdist可以达到一样的效果
网路配置
-
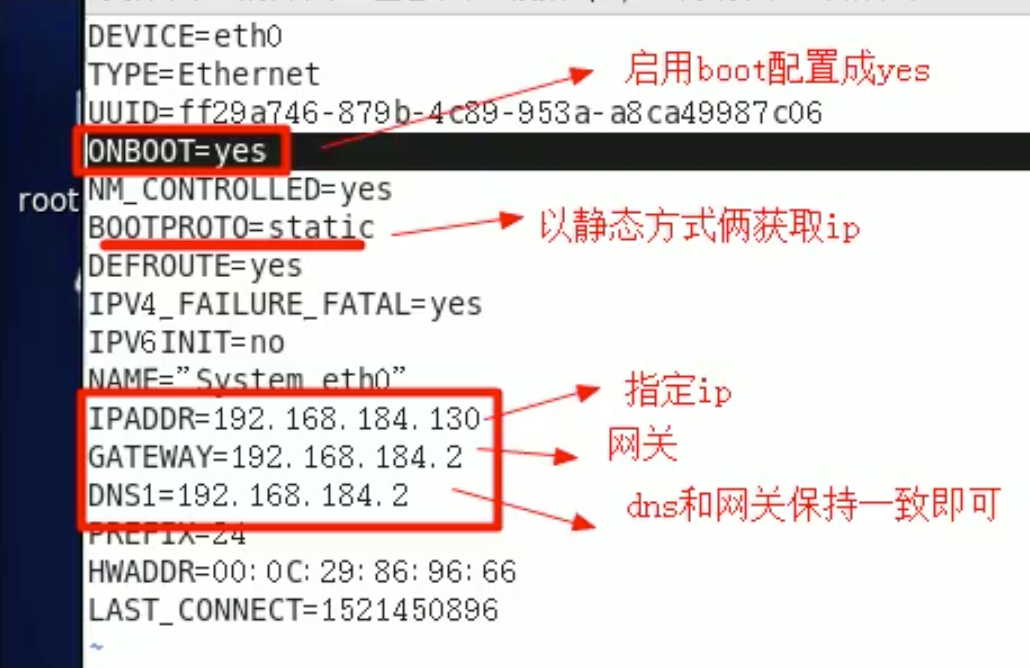
将ip配置为静态的
1. vim /etc/sysconfig/network-scripts/ifcfg-eth0
2. 按下图配置
3. 重启reboot 或 service network restart