
CDN+集中存储环境搭建
一、cdn
部署环境:CentOS6
master:172.16.17.1
slave_telcom:172.16.17.2
slave_unicom:172.16.17.3
1.主服务器配置 172.16.17.1
修改主配置文件:
vi /etc/named.conf
options {
directory "/var/named";
};acl telcomip { 172.16.17.1;172.16.17.2; };
acl unicomip { 172.16.17.3; };view telcom {
match-clients { telcomip; };
zone "ykyk.com" {
type master;
file "ykyk.com.telcom";
notify yes;
also-notify { 172.16.17.2; };
};
};view unicom {
match-clients { unicomip; };
zone "ykyk.com" {
type master;
file "ykyk.com.unicom";
notify yes;
also-notify { 172.16.17.3; };
};
};
配置zone文件:
cd /var/named
[root@cdn_master named]# cp -p named.localhost ykyk.com.telcom
[root@cdn_master named]# cp -p named.localhost ykyk.com.unicom[root@cdn_master named]# cat ykyk.com.telcom
$TTL 1D
@ IN SOA @ rname.invalid. (
0 ; serial
1D ; refresh
1H ; retry
1W ; expire
3H ) ; minimum
NS dns.ykyk.com.
dns A 172.16.17.1
www A 172.16.17.4
[root@cdn_master named]# cat ykyk.com.unicom
$TTL 1D
@ IN SOA @ rname.invalid. (
0 ; serial
1D ; refresh
1H ; retry
1W ; expire
3H ) ; minimum
NS dns.ykyk.com.
dns A 172.16.17.1
www A 172.16.17.5
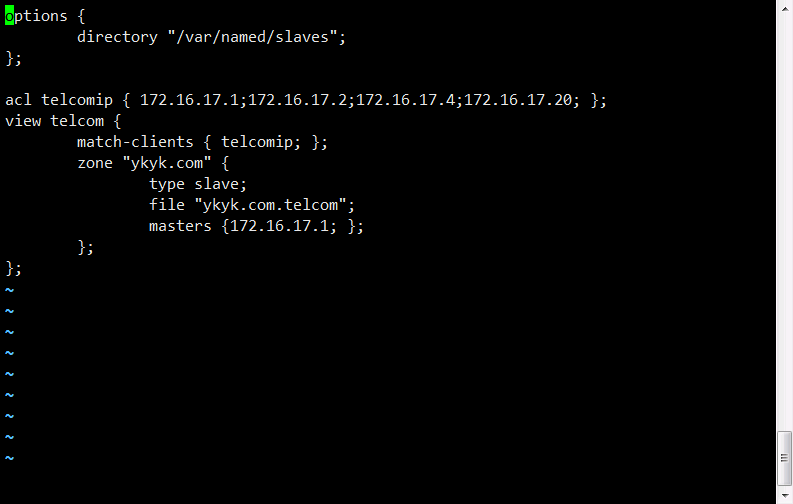
2.从服务器配置---172.16.17.2
[root@cdn_slave_telcom slaves]# cat /etc/named.conf
options {
directory "/var/named/slaves";
};acl telcomip { 172.16.17.1;172.16.17.2; };
view telcom {
match-clients { telcomip; };
zone "ykyk.com" {
type slave;
file "ykyk.com.telcom";
masters {172.16.17.1; };
};
};
[root@cdn_slave_telcom slaves]# /etc/init.d/named restart
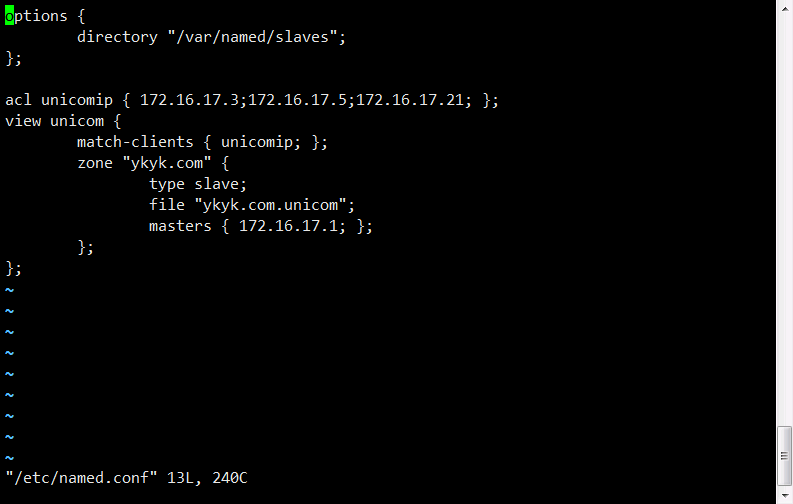
3.从服务器配置----172.16.17.3
[root@cdn_slave_unicom slaves]# cat /etc/named.conf
options {
directory "/var/named/slaves";
};acl unicomip { 172.16.17.3; };
view unicom {
match-clients { unicomip; };
zone "ykyk.com" {
type slave;
file "ykyk.com.unicom";
masters { 172.16.17.1; };
};
};[root@cdn_slave_unicom slaves]# /etc/init.d/named start
至此cdn部署完成。
二、squid反向代理
环境搭建:
squid_telcom:172.16.17.4/192.168.7.10
squid_unicom:172.16.17.5/192.168.7.11
squid_telcom:
/etc/squid/squid.conf
squid_unicom:


至此,squid反向代理服务器部署完成。
内网nginx负载均衡客户端ip 192.168.7.1.
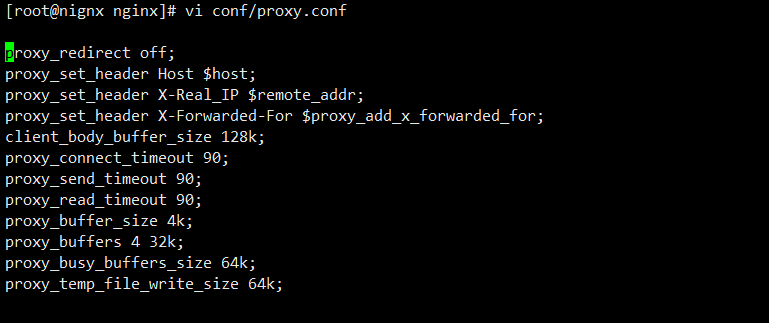
三、nignx负载均衡服务器配置
ip:采用双网卡配置 192.168.7.1/172.16.17.6
安装nginx
nignx版本1.13.8
[root@nignx nginx-1.13.8]# useradd –r –s /sbin/nologin nginx
[root@nignx nginx-1.13.8]# ./configure --user=nginx --group=nginx --prefix=/usr/local/webserver/nginx --with-http_stub_status_module --with-http_ssl_module
make && make install
若:
ln -s /usr/local/lib/libpcre.so.1 /lib64

负载均衡
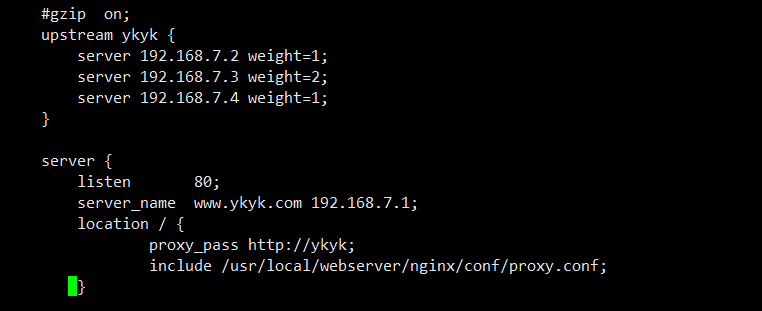
后端apache服务器ip为
apache_1:192.168.7.2.
apache_2:192.168.7.3
apache_3:192.168.7.4
启动nginx
[root@nignx conf]# /usr/local/webserver/nginx/sbin/nginx
至此,nginx配置完毕
四、apache服务器配置
ip
192.168.7.2
192.168.7.3
192.168.7.4
安装软件
[root@apache_1 ~]# yum install httpd -y
[root@apache_2 ~]# yum install httpd -y
[root@apache_3 ~]# yum install httpd –y
配置集群环境
[root@apache_1 ~]# yum install cman rgmanager gfs2-utils lvm2-cluster iscsi-initiator-utils -y
[root@apache_2 ~]# yum install cman rgmanager gfs2-utils lvm2-cluster iscsi-initiator-utils -y
[root@apache_3 ~]# yum install cman rgmanager gfs2-utils lvm2-clust
er iscsi-initiator-utils -y
apache_1.ykyk.com:
[root@apache cluster]# ccs_tool create -2 clusterykyk
[root@apache cluster]# mv cluster.conf{,.bak}
[root@apache cluster]# ccs_tool create clusykyk
[root@apache cluster]# ccs_tool addfence zfence fence_manual
[root@apache cluster]# ccs_tool addnode -n 1 -f zfence apache1
[root@apache cluster]# ccs_tool addnode -n 2 -f zfence apache2
[root@apache cluster]# vi cluster.conf
[root@apache ~]# cd /etc/cluster/
[root@apache cluster]# ccs_tool create -2 clusterykyk
[root@apache cluster]# scp cluster.conf 192.168.7.3:/etc/cluster/
[root@apache cluster]# echo 123456 | passwd --stdin ricci
[root@apache cluster]# /etc/init.d/ricci start
Starting system message bus: [ OK ]
Starting oddjobd: [ OK ]
generating SSL certificates... done
Generating NSS database... done
Starting ricci: [ OK ]apache_2.ykyk.com重复给密码和启动服务
[root@apache_1 send_targets]# /etc/init.d/cman start
Starting cluster:
Checking if cluster has been disabled at boot... [ OK ]
Checking Network Manager... [ OK ]
Global setup... [ OK ]
Loading kernel modules... [ OK ]
Mounting configfs... [ OK ]
Starting cman... [ OK ]
Waiting for quorum... [ OK ]
Starting fenced... [ OK ]
Starting dlm_controld... [ OK ]
Tuning DLM kernel config... [ OK ]
Starting gfs_controld... [ OK ]
Unfencing self... [ OK ]
Joining fence domain... [ OK ]
[root@apache_1 send_targets]# clustat
Cluster Status for clusykyk @ Fri Mar 9 17:22:39 2018
Member Status: QuorateMember Name ID Status
------ ---- ---- ------
apache1 1 Online, Local
apache2 2 Online
[root@apache_1 send_targets]# lvmconf --enable-cluster
[root@apache_1 send_targets]# /etc/init.d/clvmd start
Starting clvmd:
Activating VG(s): 3 logical volume(s) in volume group "vg_min6" now active
clvmd not running on node apache2
[ OK ]
[root@apache_1 send_targets]# fdisk /dev/sdb -l
Disk /dev/sdb: 16.1 GB, 16113323520 bytes
64 heads, 32 sectors/track, 15366 cylinders
Units = cylinders of 2048 * 512 = 1048576 bytes
Sector size (logical/physical): 512 bytes / 512 bytes
I/O size (minimum/optimal): 512 bytes / 512 bytes
Disk identifier: 0x00000000[root@apache_1 send_targets]# pvcreate /dev/sdb
Physical volume "/dev/sdb" successfully created
[root@apache_1 send_targets]# vgcreate vg0 /dev/sdb
Clustered volume group "vg0" successfully created
[root@apache_1 send_targets]# lvcreate -L 10G -n lv1 vg0
Logical volume "lv1" created.
[root@apache_1 send_targets]# lvs
LV VG Attr LSize Pool Origin Data% Meta% Move Log Cpy%Syert
lv1 vg0 -wi-a----- 10.00g
[root@apache_1 send_targets]# mkfs.gfs2 -j 2 -p lock_dlm -t clusykyk:web /dev/
This will destroy any data on /dev/vg0/lv1.
It appears to contain: symbolic link to `../dm-3'Are you sure you want to proceed? [y/n] y
Device: /dev/vg0/lv1
Blocksize: 4096
Device Size 10.00 GB (2621440 blocks)
Filesystem Size: 10.00 GB (2621438 blocks)
Journals: 2
Resource Groups: 40
Locking Protocol: "lock_dlm"
Lock Table: "clusykyk:web"
UUID: 6d3ed1df-7f2f-a50a-550d-d76a208ead6c[root@apache_1 send_targets]# mount /dev/vg0/lv1 /var/www/html/
[root@apache_1 send_targets]# /etc/init.d/httpd start
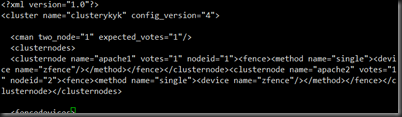
cat /etc/cluster/cluster.conf
<?xml version="1.0"?>
<cluster config_version="9" name="clusykyk">
<clusternodes>
<clusternode name="apache1" nodeid="1" votes="1">
<fence>
<method name="single">
<device name="zfence"/>
</method>
</fence>
</clusternode>
<clusternode name="apache2" nodeid="2" votes="1">
<fence>
<method name="single">
<device name="zfence"/>
</method>
</fence>
</clusternode>
<clusternode name="apache3" nodeid="3" votes="1">
<fence>
<method name="single">
<device name="zfence"/>
</method>
</fence>
</clusternode>
</clusternodes>
<fencedevices>
<fencedevice agent="fence_manual" name="zfence"/>
</fencedevices>
<rm>
<failoverdomains/>
<resources/>
</rm>
</cluster>[root@apache_1 send_targets]# cman_tool version -r
[root@apache_1 send_targets]# clustat
Cluster Status for clusykyk @ Fri Mar 9 17:38:48 2018
Member Status: QuorateMember Name ID Status
------ ---- ---- ------
apache1 1 Online,
apache2 2 Online
apache3 3 Offline[root@apache_1 send_targets]# gfs2_jadd -j 1 /var/www/html/
No such file or directory
[root@apache_1 send_targets]# gfs2_jadd -j 1 /var/www/html
Filesystem: /var/www/htmlOld Journals 2
New Journals 3
在其他两台apache服务器上重复上述操作。
[root@apache_1 send_targets]# echo cluster >/var/www/html/index.html
curl 192.168.7.2
cluster 验证成功
至此,apache服务器配置完成
注意:存储端要先进行配置。
五、存储端
ip 192.168.7.5
[root@storage ~]# yum install scsi-target-utils –y
[root@storage ~]# fdisk /dev/sdb
[root@storage ~]# partx -a /dev/sdb
[root@storage ~]# ls /dev/sdb*
/dev/sdb /dev/sdb1 /dev/sdb2[root@storage ~]# vi /etc/tgt/targets.conf
[root@storage ~]# /etc/init.d/tgtd start
Starting SCSI target daemon: [ OK ][root@storage ~]# tgt-admin -s
Target 1: iqn.2018-09.com.ykyk:web.apache1
System information:
Driver: iscsi
State: ready
I_T nexus information:
LUN information:
LUN: 0
Type: controller
SCSI ID: IET 00010000
SCSI SN: beaf10
Size: 0 MB, Block size: 1
Online: Yes
Removable media: No
Prevent removal: No
Readonly: No
Backing store type: null
Backing store path: None
Backing store flags:
LUN: 1
Type: disk
SCSI ID: IET 00010001
SCSI SN: beaf11
Size: 16113 MB, Block size: 512
Online: Yes
Removable media: No
Prevent removal: No
Readonly: No
Backing store type: rdwr
Backing store path: /dev/sdb2
Backing store flags:
Account information:
ACL information:
ALL

至此,存储端完成。
六、客户端验证
telcom ip :172.16.17.20 dns:172.16.17.2
unicom ip :172.16.17.21 dns:172.16.17.3
将以上两个ip添加dns视图中
验证:
telcom:
[root@clients ~]# nslookup www.ykyk.com 172.16.17.2
Server: 172.16.17.2
Address: 172.16.17.2#53
Name: www.ykyk.com
Address: 172.16.17.4
[root@clients ~]# curl www.ykyk.com
cluster
unicom:
[root@client_unicom ~]# nslookup www.ykyk.com
Server: 172.16.17.3
Address: 172.16.17.3#53
Name: www.ykyk.com
Address: 172.16.17.5
[root@client_unicom ~]# curl www.ykyk.com
cluster

