Reactor 3 学习笔记(1)

Reactor 3 与之前学习的RxJava是同一类(反应式编程)框架,基本概念大致差不多,简单记录一下:
Reactor 3 利用了java 8中的CompletableFuture、Stream、Duration,在此基础上发展出了二个更通用的模型:Flux及Mono.
一、Flux
Flux 简单点讲,就是一个可以发射1到N个元素的异步"发射器",官方给的示例图如下:
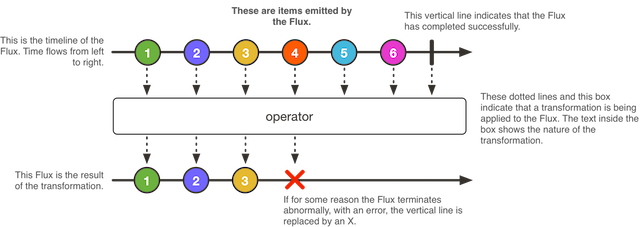
1,2,3...这些颜色各异的小圆,代表正常发射出来的数据;(对应onNext方法)
上右黑色的竖线表示发送完成;(对应onComplete方法)
如果发射过程中出现异常,竖线用大红叉叉表示;(对应onError方法)
二、Mono
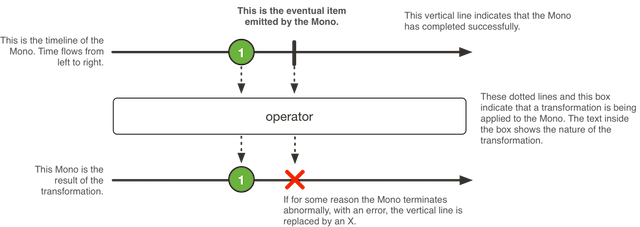
相对Flux而言,Mono最多只能发射1个元素,示例图如下:
三、Gradle依赖
apply plugin: 'java'
apply plugin: 'idea'

repositories {
    maven {
        url "http://maven.aliyun.com/nexus/content/groups/public/"
    }
    mavenCentral()
    jcenter()
}

dependencies {
    compile 'io.projectreactor:reactor-core:3.1.6.RELEASE'
    testCompile('io.projectreactor:reactor-test:3.1.6.RELEASE')
    testCompile('junit:junit:4.8.2')
}
四、常用方法
4.1 、just/fromArray/range
import org.junit.Test;
import reactor.core.publisher.Flux;

public class FluxTest {

    @Test
    public void fluxJustTest() {
        Flux.just("1", "A", 3).subscribe(System.out::println);
    }
}
点击just可以看到源码:
	/**
	 * Create a {@link Flux} that emits the provided elements and then completes.
	 * <p>
	 * <img class="marble" src="https://raw.githubusercontent.com/reactor/reactor-core/v3.1.3.RELEASE/src/docs/marble/justn.png" alt="">
	 * <p>
	 * @param data the elements to emit, as a vararg
	 * @param <T> the emitted data type
	 *
	 * @return a new {@link Flux}
	 */
	@SafeVarargs
	public static <T> Flux<T> just(T... data) {
		return fromArray(data);
	}
注意:注释中给了一个图片地址 https://raw.githubusercontent.com/reactor/reactor-core/v3.1.3.RELEASE/src/docs/marble/justn.png
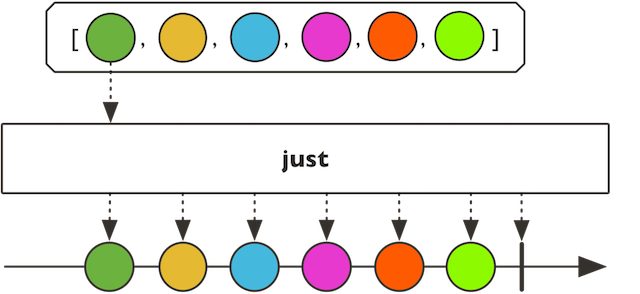
从图上看,就是发射一串数据。最终的输出也是如此:
1
A
3
其它类似的方法还有:fromArray、fromIterable、range 大家可以自行尝试。
4.2、interval
    @Test
    public void fluxIntervalTest() throws InterruptedException {
        Flux.interval(Duration.of(500, ChronoUnit.MILLIS)).subscribe(System.out::println);

        //防止程序过早退出,放一个CountDownLatch拦住
        CountDownLatch latch = new CountDownLatch(1);
        latch.await();
    }
顾名思义就是每隔一定时间,发射一个数据(从0开始),上面的示例表示每隔500毫秒,从0开始递增,发射1个数字,输出如下:
0
1
2
3
...
4.3、empty/never/error
    @Test
    public void fluxEmptyTest() {
        Flux.empty().subscribe(System.out::println);
    }
empty方法几乎啥都不干,就发一个结束消息完事,示意图如下:

empty源码如下:
	public static <T> Flux<T> empty() {
		return FluxEmpty.instance();
	}
与之接近的,还有never方法
	public static <T> Flux<T> never() {
		return FluxNever.instance();
	}
二者区别在于:empty里面至少还有一个结束消息,而never则是真的啥都没有。
还有一个比较特别的方法:error,只包含一个错误消息
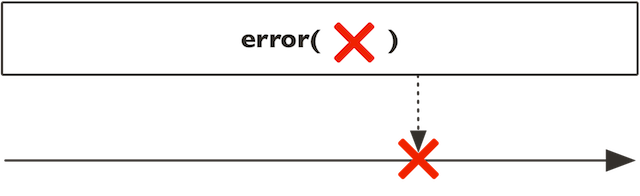
示例代码如下:
Flux.error(new Exception("a wo,something is wrong!")).subscribe(System.out::println);
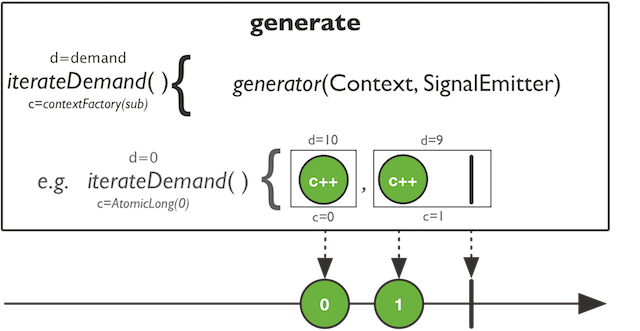
4.4、 generate/create
前面的几个方法,开发者不用显式的调用complete,而generate则需要调用,否则序列就不会终止。
    @Test
    public void fluxGenerateTest() {
        Flux.generate(i -> {
            i.next("AAAAA");
            //i.next("BBBBB");//注意generate中next只能调用1次
            i.complete();
        }).subscribe(System.out::println);

        final Random rnd = new Random();
        Flux.generate(ArrayList::new, (list, item) -> {
            Integer value = rnd.nextInt(100);
            list.add(value);
            item.next(value);
            if (list.size() >= 10) {
                item.complete();
            }
            return list;
        }).subscribe(System.out::println);
    }
输出如下:
AAAAA
85
80
32
19
90
72
0
37
46
33
注:generate中next只能调1次,否则会报错 reactor.core.Exceptions$ErrorCallbackNotImplemented: java.lang.IllegalStateException: More than one call to onNext
create方法则没有next的调用次数限制,见下面的代码:
    @Test
    public void fluxCreateTest() {
        Flux.create(i -> {
            i.next("A");
            i.next("B");
            i.complete();
        }).subscribe(System.out::println);

        final Random rnd = new Random();
        Flux.create(item -> {
            for (int i = 0; i < 10; i++) {
                item.next(i);
            }
        }).subscribe(System.out::println);
    }
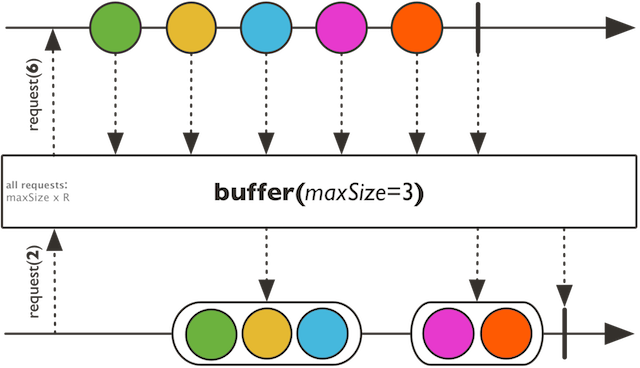
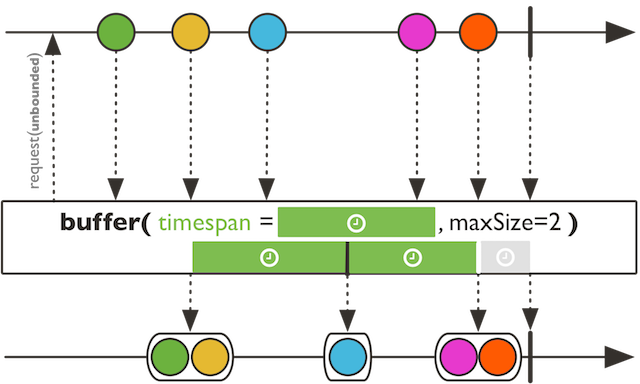
4.5、buffer/bufferTimeout/window/windowTimeout
    @Test
    public void fluxBufferTest() throws InterruptedException {
        Flux.range(0, 10).buffer(3).subscribe(System.out::println);

        System.out.println("--------------");

        Flux.interval(Duration.of(1, ChronoUnit.SECONDS))
                .bufferTimeout(2, Duration.of(2, ChronoUnit.SECONDS))
                .subscribe(System.out::println);

        //防止程序过早退出,放一个CountDownLatch拦住
        CountDownLatch latch = new CountDownLatch(1);
        latch.await();
    }
字面意思理解,buffer指flux产生的数据,先缓冲起来,等缓冲区满了以后,才真正发射,所以上面的代码,第1段的意思是,0-9这10个数字,每次缓存3个,等3个数攒齐后,才输出。
而另一个版本bufferTimeout则不是根据元素的个数来缓冲,而是根据时间,第2段代码的意思是:flux每隔1秒,产生1个递增数字,而缓冲区每2秒才算充满,相当于每凑足2个数字后,才输出。
[0, 1, 2]
[3, 4, 5]
[6, 7, 8]
[9]
--------------
[0, 1]
[2, 3]
[4, 5]
buffer示例图如下:
bufferTimeout示例图如下:
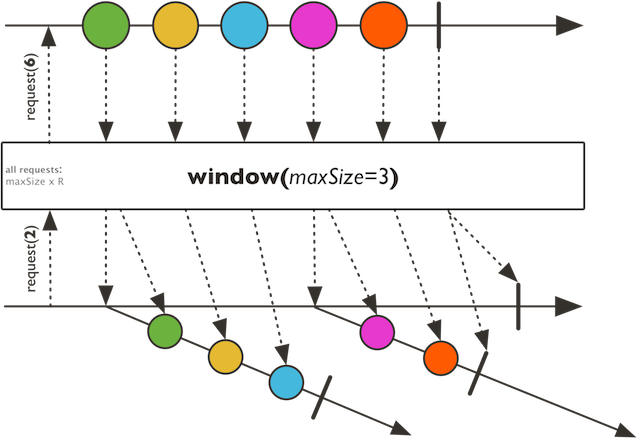
另外还有二个接近的方法window/windowTimeout,只是window/windowTimeout调用后的结果是Flux<Flux<T>>,处理过程中产生的流为UnicastProcessor对象。
window示意图:
windowTimeout示意图:

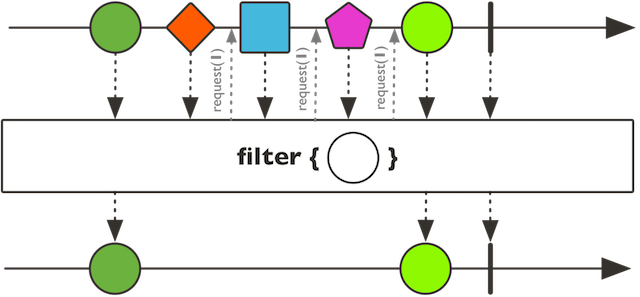
4.6、filter
    @Test
    public void fluxFilterTest() {
        Flux.range(0, 10).filter(c -> c % 2 == 0).subscribe(System.out::println);
    }
输出:
0
2
4
6
8
示意图:
4.7 zipWith
    @Test
    public void fluxZipTest() {
        Flux.just("A", "B").zipWith(Flux.just("1", "2", "3")).subscribe(System.out::println);
    }
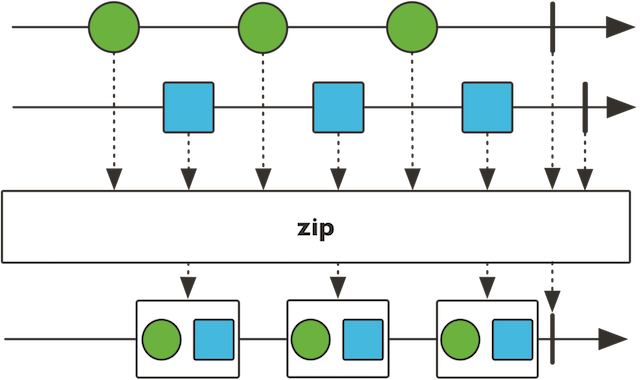
就是把各组元素,按位组合(就算用拉链袋封起来一样,因此得名),注意:这里有一个木桶原则,即 元素最少的"组",决定了最后输出的"组"个数。
上面代码的输出为:
[A,1]
[B,2]
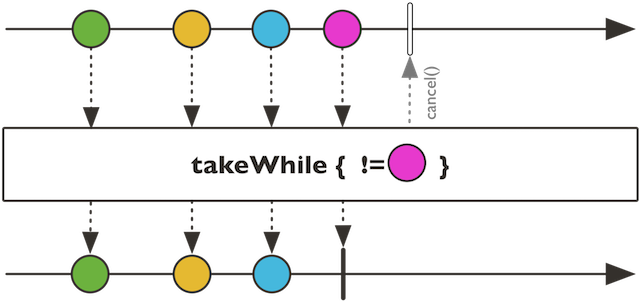
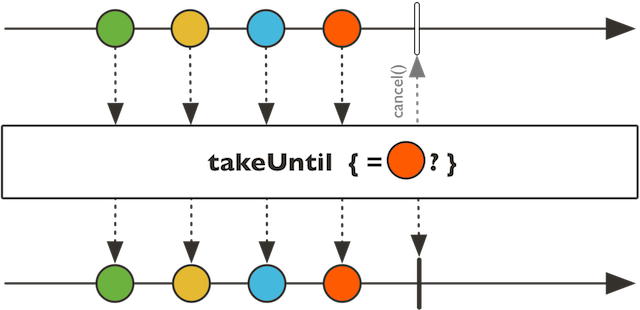
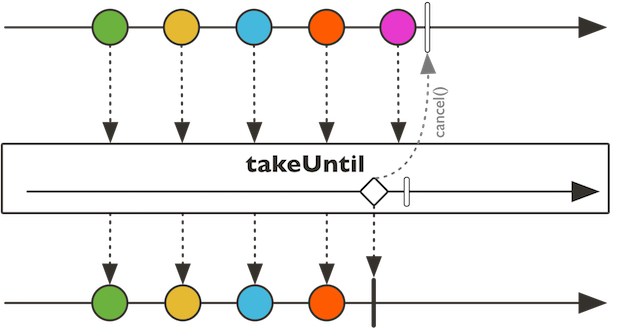
4.8 take/takeLast/takeWhile/takeUntil
    @Test
    public void fluxTakeTest() {
        Flux.range(1, 10).take(3).subscribe(System.out::println);
        System.out.println("--------------");
        Flux.range(1, 10).takeLast(3).subscribe(System.out::println);
        System.out.println("--------------");
        Flux.range(1, 10).takeWhile(c -> c > 1 && c < 5).subscribe(System.out::println);
        System.out.println("--------------");
        Flux.range(1, 10).takeUntil(c -> c > 1 && c < 5).subscribe(System.out::println);
        System.out.println("--------------");
        Flux.range(1, 4).takeUntilOther(Flux.never()).subscribe(System.out::println);
    }
take与takeLast很好理解,就是前n个或后n个。 takeWhile与takeUntil 需要记忆一下:
takeWhile 是先判断条件是否成立,然后再决定是否取元素(换言之,如果一开始条件不成立,就直接终止了);
takeUntil 是先取元素,直到遇到条件成立,才停下
takeUntilOther 则是先取元素,直到别一个Flux序列产生元素
所以上面的输出为:
1
2
3
--------------
8
9
10
--------------
--------------
1
2
--------------
1
2
3
4
注意:takeWhile无输出,因为判断条件一开始就不成立,直接cancel了;而takeUntilOther由于另一个flux使用了never()相当于没有任何元素,所以把前1个序列的元素取完,自然结束。
takeWhile的示意图如下:
takeUntil的示意图如下:
takeUntilOther的示意图如下:
reactor的东西比较多,剩下的写到下篇吧
参考文章:
出处:http://yjmyzz.cnblogs.com
本文版权归作者和博客园共有,欢迎转载,但未经作者同意必须保留此段声明,且在文章页面明显位置给出原文连接,否则保留追究法律责任的权利。

 浙公网安备 33010602011771号