maven/gradle 打包后自动上传到nexus仓库
前提:
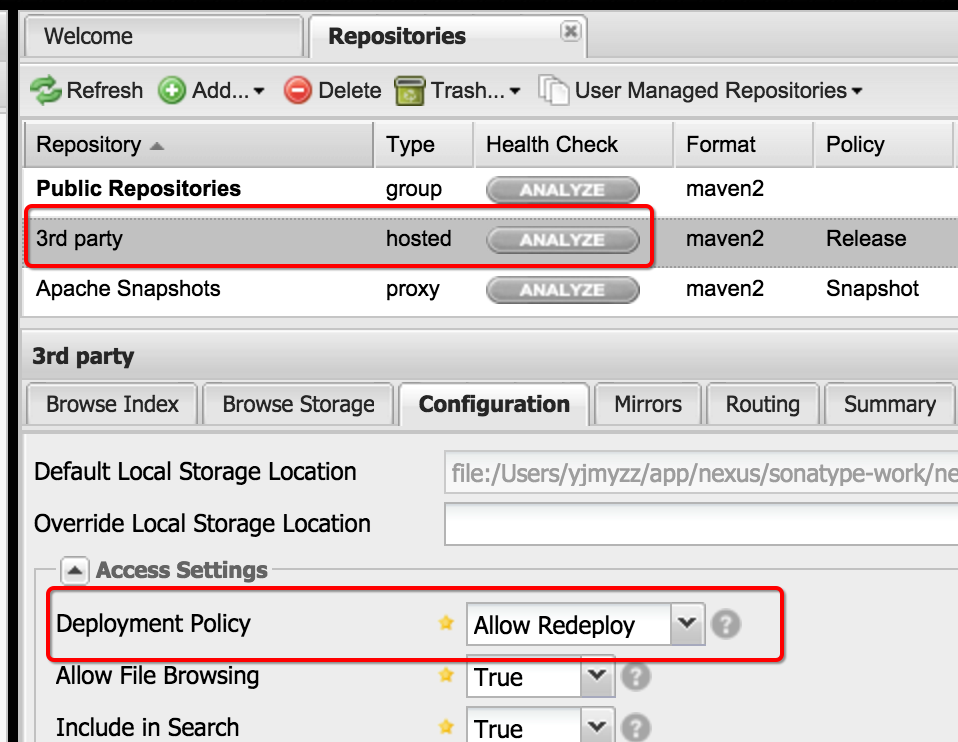
nexus的相关repository必须设置允许redeploy,参考下图:

maven项目:
pom.xml中增加以下节点:
    <distributionManagement>
        <repository>
            <id>nexus-3rd</id>
            <url>http://localhost:8081/nexus/content/repositories/thirdparty/</url>
        </repository>
    </distributionManagement>
一般上传到nexus,为了方便他人查看源码,也会上传源码包,建议在build/plugins节点里再增加以下节点,以便自动生成源码jar包
 1 <plugin>
 2     <groupId>org.apache.maven.plugins</groupId>
 3     <artifactId>maven-source-plugin</artifactId>
 4     <executions>
 5         <execution>
 6             <id>attach-sources</id>
 7             <goals>
 8                 <goal>jar</goal>
 9             </goals>
10         </execution>
11     </executions>
12 </plugin>
上传到nexus时是需要身份验证的,所以还要在$M2_HOME/conf/settings.xml里添加以下内容:
1     <servers>
2         <server>
3             <username>admin</username>
4             <password>admin123</password>
5             <id>nexus-3rd</id>
6         </server>
7     </servers>
注意:这里的id必须与pom.xml中distributionManagement/repository/id保持一致。
最后一步,执行mvn命令:
mvn deploy -Dmaven.test.skip=true
后面的-Dmaven.test.skip=true意为跳过单元测试,可以酌情删减,顺利的话,以输出中会看到类似内容:
...
Uploading: http://localhost:8081/nexus/content/repositories/thirdparty/xxx/xxx.jar
Uploaded: http://localhost:8081/nexus/content/repositories/thirdparty/xxx/xxx.jar (29582 KB at 18829.7 KB/sec)
...
gradle项目:
group 'my-company'
version '1.0'
def artifactId = "my-artifact"

apply plugin: 'java'
apply plugin: 'maven'

...


//打包源代码
task sourcesJar(type: Jar, dependsOn: classes) {
    classifier = 'sources'
    from sourceSets.main.allSource
}

artifacts {
    archives sourcesJar
}

...

//如果希望gradle install,安装到.m2本地仓库,参考下面的内容
install {
    repositories.mavenInstaller {
        pom.version = "$project.version"
        pom.artifactId = "$artifactId"
        pom.groupId = "$project.group"
    }
}

//上传到nexus
uploadArchives {
    repositories {
        mavenDeployer {
            repository(url: "http://localhost:8081/nexus/content/repositories/thirdparty") {
                authentication(userName: "admin", password: "admin123")
            }
            pom.version = "$project.version"
            pom.artifactId = "$artifactId"
            pom.groupId = "$project.group"
        }
    }
}
然后gradle upload即可
不同分支(环境)的管理问题:
实际开发中,不同的环境通常会对应不同的git分支,比如:开发环境对应dev分支,测试环境对应test分支,生产环境对应master分支,dev环境测试通过后,合并到test分支,test分支完成后合并到master分支。
但是这样有一个问题,nexus上的repository并没有区分环境,如果程序员A在日常开发中,把dev分支的artifact上传到了nexus,而部署人员在构建test环境的项目,这时从nexus上取到的就是dev环境里的东西,造成混乱,这里提供2种思路:
1)每个环境都搭一套nexus,各个环境完全隔离
优点:好管理,如果每个环境都通过统一的部署机器构建发布,结合host配置,可以将url也统一固定,只需要各环境部署机上的host配置好就行。
缺点:有点浪费资源
2)nexus只有一套,repository建多个,比如
http://localhost:8081/nexus/content/repositories/thirdparty_dev
http://localhost:8081/nexus/content/repositories/thirdparty_test
http://localhost:8081/nexus/content/repositories/thirdparty_prod
这样相对比较节省资源一点,gradle中可以这样配置:
def env = System.getProperty("env") ?: "local"

uploadArchives {
    repositories {
        mavenDeployer {
            repository(url: "http://localhost:8081/nexus/content/repositories/thirdparty_$env") {
                authentication(userName: "admin", password: "admin123")
            }
            pom.version = "$project.version"
            pom.artifactId = "$artifactId"
            pom.groupId = "$project.group"
        }
    }
}
然后gradle upload -Denv=dev 即可
另外:考虑到maven项目本机缓存的特性,建议在开发阶段将版本号设置成SNAPSHOT,正式发布时,再去掉SNAPSHOT。详情可见园友文章:理解Maven中的SNAPSHOT版本和正式版本
出处:http://yjmyzz.cnblogs.com
本文版权归作者和博客园共有,欢迎转载,但未经作者同意必须保留此段声明,且在文章页面明显位置给出原文连接,否则保留追究法律责任的权利。


