Zend的MVC机制(二)
2012-08-07 13:45 轩脉刃 阅读(1802) 评论(1) 编辑 收藏 举报接着上面的一篇
把代码贴上来
$front = Zend_Controller_Front::getInstance();
Zend_Layout::startMvc(array('layoutPath' => USVN_LAYOUTS_DIR));

$front->setRequest(new Zend_Controller_Request_Http());
$front->throwExceptions(true);
$front->setBaseUrl($config->url->base);

$router = new Zend_Controller_Router_Rewrite();
$routes_config = new USVN_Config_Ini(USVN_ROUTES_CONFIG_FILE, USVN_CONFIG_SECTION);
$router->addConfig($routes_config, 'routes');
$front->setRouter($router);
$front->setControllerDirectory(USVN_CONTROLLERS_DIR);

$front->dispatch();
上一篇把前两句getInstance和startMvc两个函数已经读完了,下面是继续分析后面的代码
setRequest($request) 这里是判断request是否是继承自Zend_Controller_Request_Abstract,如果是的话就把front的_request赋值为它。
这里需要了解下什么是Zend_Controller_Request_Abstract,它是所有request抽象出来的抽象类。Zend已经提供了两个实现类,Zend_Controller_Request_Http和Zend_Controller_Request_Simple,一般我们搭建服务器都是http请求,所以你的项目如果需要重新继承的话,一般都直接继承Zend_Controller_Request_Http。
Zend_controller_Request_Http中我们经常会使用到的getQuery,getCookie,getRequestUri,getBasePath,getParams,getHeader等这些Http通常的选项都已经有了。
继续讲它的基类Zend_Controller_Request_Abstract,这个类的方法包含:
回到代码
$front->setRequest(new Zend_Controller_Request_Http());这里调用了Zend_Controller_Request_Http的构造函数,构造函数在第一次调用的时候是$this->setRequestUri();其中的setRequestUri很多都是直接使用$_SERVER这个php全局变量中的数据来获取requestUri的。
setRequestUri可以学到的是在不同的服务器中如何获取requestUri(特别是在IIS中的$SERVER中不同的变量组合有不同的含义),比如http://172.23.11.160/usvn/item/usvn_test 这个url,它的requestUri就是/usvn/item/usvn_test
$front->throwExceptions(true); 将内部的_throwExceptions标志位设置为true;
$front->setbaseUrl("/usvn")这个做了两件事情,首先是设置front内部的_baseUrl属性,其次调用Request的setBaseUrl,也是设置Zend_Controller_Request_Http的内部_baseUrl属性。
$router = new Zend_Controller_Router_Rewrite();
$routes_config = new USVN_Config_Ini(USVN_ROUTES_CONFIG_FILE, USVN_CONFIG_SECTION);
$router->addConfig($routes_config, 'routes');
$front->setRouter($router);
下面这三行就直接说,实际上就是使用Zend的Router模块使用配置文件,router使用setRouter放入front里面。
最后一句
$front->dispatch();
这个函数也是最核心的一个函数。
这个函数首先注册了一个插件Zend_Controller_Plugin_ErrorHandler,index为100,把插件的顺序放在最后。
第二步存放了一个Helper,Zend_Controller_Action_Helper_ViewRenderer,index为-80
下面实例化了request,request是一个Zend_Controller_Request_Http类型。并将request的baseUrl设置为前面设置过的_baseUrl,就是"/usvn/item/usvn_test"
接着实例化了response,response是一个Zend_Controller_Response_Http();
下面使用plugins来对Request和Response进行设置,首先实际调用了Zend_Controller_Plugin_Broker的setRequest函数,这个函数循环遍历broker管理的所有插件,调用插件的setRequest($request)函数(如果有的话)。
接下来初始化router,和设置router的参数。router已经在前面设置过了,就是Zend_Controller_Router_Rewrite类型
初始化分发器dispatcher,分发器我们是第一次看到,Zend_Controller_Dispatcher_Standard类。分发器以后再说。
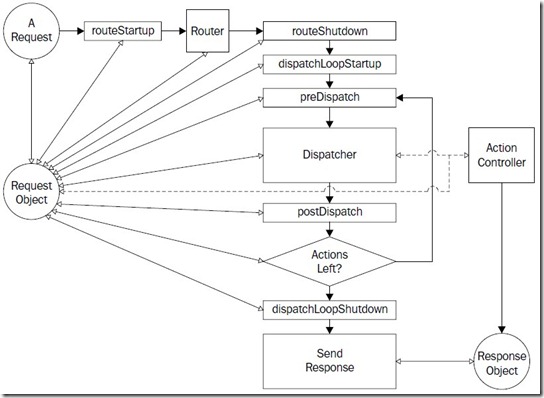
下面的流程:
调用插件的routeStartup对request进行处理
调用router的route处理request
调用插件的routeShutdown对request进行处理
调用插件的dispatchLoopStartup对request进行处理
进入循环分发过程
调用插件的preDispatch对request进行处理
调用dispatcher的dispatch处理request和response
调用插件的postDispatch对request进行处理
跳出循环分发过程
调用插件的dispatchLoopShutdown对request进行处理
发送response
这里借用http://www.cnblogs.com/terryglp/articles/1775778.html 的一个图进行说明
实时了解作者更多技术文章,技术心得,请关注微信公众号“轩脉刃的刀光剑影”
本文基于署名-非商业性使用 3.0许可协议发布,欢迎转载,演绎,但是必须保留本文的署名叶剑峰(包含链接http://www.cnblogs.com/yjf512/),且不得用于商业目的。如您有任何疑问或者授权方面的协商,请与我联系。


