


Spring中的AOP
一:为什么要有AOP?
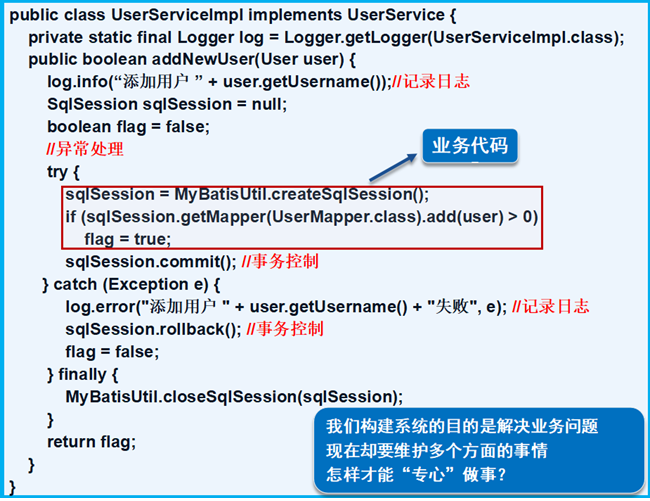
上图的案例是使用MyBatis完成用户添加的经典案例,红色方框中的是具体实现功能的业务代码。那么大家可以看到,仅仅只占整个代码片段的三分之一,那么其余的三分之二呢?
充斥着许多功能代码。如:日志记录、事务提交、事务回滚。。。。这些功能代码和业务代码耦合在一起,分散精力,不得尝失。
AOP的目标:让我们可以“专心做事”,将所有功能代码(日志记录、事务处理)从程序代码中剥离,让用户专心与一点在所要实现的业务上。
7.2 AOP原理
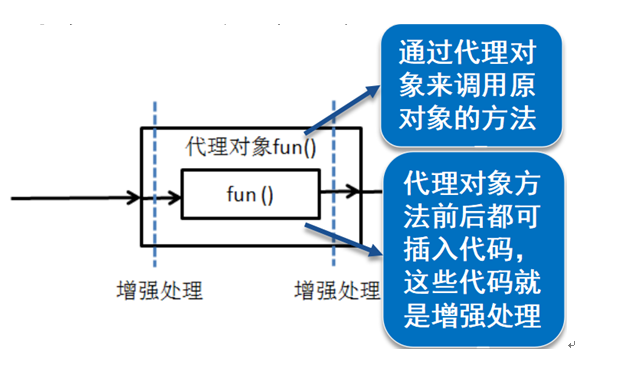
- 将复杂的需求分解出不同方面,将散布在系统中的公共功能集中解决
- 采用代理机制组装起来运行,在不改变原程序的基础上对代码段进行增强处理,增加新的功能。
SpringAOP主要围绕以下概念展开:
- 切面(Aspect)一个关注点的模块化,这个关注点可能会横切多个对象
- 连接点(Joinpoint)程序执行过程中某个特定的连接点
- 通知(Advice) 在切面的某个特的连接点上执行的动作
- 切入点(Pointcut)匹配连接的断言,在Aop中通知和一个切入点表达式关联
- 引入(Intruduction) 在不修改类代码的前提下,为类添加新的方法和属性
- 目标对象(Target Object) 被一个或者多个切面所通知的对象
- Aop代理(AOP Proxy) AOP框架创建的对象,用来实现切面契约(aspect contract)(包括方法执行等)
- 织入(Weaving)把切面连接到其他的应用程序类型或者对象上,并创建一个被通知的对象,
通知类型Advice:
- 前置通知(before advice) 在某个连接点(jion point)之前执行的通知,但不能阻止连接点前的执行(除非抛出一个异常)
- 返回后通知(after returning advice)在某个连接点(jion point)正常执行完后执行通知
- 抛出异常通知(after throwing advice) 在方法异常退出时执行的通知
- 后通知(after(finally) advice)在方法抛出异常退出时候的执行通知(不管正常返回还是异常退出)
- 环绕通知(around advice) 包围一个连接点(jion point)的通知
3. 切点表达式之execution
由于Spring切面粒度最小是达到方法级别,而execution表达式可以用于明确指定方法返回类型,类名,方法名和参数名等与方法相关的部件,并且在Spring中,大部分需要使用AOP的业务场景也只需要达到方法级别即可,因而execution表达式的使用是最为广泛的。如下是execution表达式的语法:
execution(modifiers-pattern? ret-type-pattern declaring-type-pattern?name-pattern(param-pattern) throws-pattern?)
这里问号表示当前项可以有也可以没有,其中各项的语义如下:
- modifiers-pattern:方法的可见性,如public,protected;
- ret-type-pattern:方法的返回值类型,如int,void等;
- declaring-type-pattern:方法所在类的全路径名,如com.spring.Aspect;
- name-pattern:方法名类型,如buisinessService();
- param-pattern:方法的参数类型,如java.lang.String;
- throws-pattern:方法抛出的异常类型,如java.lang.Exception;
- *通配符,该通配符主要用于匹配单个单词,或者是以某个词为前缀或后缀的单词。
- ..通配符,该通配符表示0个或多个项,主要用于declaring-type-pattern和param-pattern中,如果用于declaring-type-pattern中,则表示匹配当前包及其子包,如果用于param-pattern中,则表示匹配0个或多个参数。
其他切点表达式见 https://www.cnblogs.com/zhangxufeng/p/9160869.html
接下来通过一个简单的AOP例子来了解一下AOP的使用方式
现在有一个doSome方法的执行前增加一些功能,类似于(声明日志),方法执行后(提交事务,释放资源等等)
package com.yjc.before;

public class IDoSomeImpl implements IDoSome{
    @Override
    public void doSome() {
        System.out.println("---------我是需要被增强的doSome方法-------------");
    }
}
接下来创建我们的增强类,给doSome方法分别添加前置和后置增强
package com.yjc.before;

import org.springframework.aop.AfterReturningAdvice;
import org.springframework.aop.MethodBeforeAdvice;

import java.lang.reflect.Method;

public class BeforeAdvice implements MethodBeforeAdvice, AfterReturningAdvice {
    @Override
    public void before(Method method, Object[] args, Object target) throws Throwable {
        System.out.println("前置==================================");
    }

    @Override
    public void afterReturning(Object returnValue, Method method, Object[] args, Object target) throws Throwable {
        System.out.println("后置==================================");
    }
}
前置和后置增强方法需要分别实现MethodBeforeAdvice, AfterReturningAdvice这两个接口,还有重写它们的方法
增强类有了之后就需要在我们的Spring的核心配置文件中配置了,使用我们的aop也需要引用依赖
<dependency>
      <groupId>org.aspectj</groupId>
      <artifactId>aspectjweaver</artifactId>
      <version>1.7.0</version>
    </dependency>
<?xml version="1.0" encoding="UTF-8"?>
<beans xmlns="http://www.springframework.org/schema/beans"
       xmlns:xsi="http://www.w3.org/2001/XMLSchema-instance"
       xmlns:con="http://www.springframework.org/schema/aop"
       xsi:schemaLocation="http://www.springframework.org/schema/beans
       http://www.springframework.org/schema/beans/spring-beans.xsd
       http://www.springframework.org/schema/aop
       http://www.springframework.org/schema/aop/spring-aop.xsd">
   <!--把增强类和目标类放入到spring容器中-->
    <bean id="beforeAdvice" class="com.yjc.before.BeforeAdvice"/>
    <bean id="iDoSomeImpl" class="com.yjc.before.IDoSomeImpl"/>
    <con:config>
<!--声明切点表达式,代表before包下的所有方法-->
        <con:pointcut id="pointcut" expression="execution(* *..before.*.*(..))"/>

      <!--织入-->
        <con:advisor advice-ref="beforeAdvice" pointcut-ref="pointcut"/>
    </con:config>
</beans>
编写测试类
package com.yjc.before;

import org.springframework.context.ApplicationContext;
import org.springframework.context.support.ClassPathXmlApplicationContext;

public class BeforeTest {

    public static void main(String[] args) {
        ApplicationContext applicationContext=new ClassPathXmlApplicationContext("com/yjc/before/applicationContext.xml");
    //我的applicationContext.xml文件是放在bao下的,所以需要指向全路径
IDoSome iDoSomeImpl = applicationContext.getBean("iDoSomeImpl", IDoSome.class); iDoSomeImpl.doSome(); } }
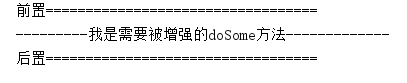
测试成功
