
2. Flink 的 DataSource 数据源
4) 自定义 Source
当然也可以自定义数据源,有两种方式实现:
- 通过实现 SourceFunction 接口来自定义无并行度(也就是并行度只能为 1)的 Source。
- 通过实现 ParallelSourceFunction 接口或者继承 RichParallelSourceFunction 来自定义有并行度的数据源。
代码示例:
 1 package com.it.flink.source
 2
 3 import java.util.Properties
 4
 5 import org.apache.flink.api.common.typeinfo.TypeInformation
 6 import org.apache.flink.streaming.api.scala.{DataStream, StreamExecutionEnvironment, createTuple2TypeInformation, createTypeInformation}
 7 import org.apache.flink.streaming.connectors.kafka.{FlinkKafkaConsumer, KafkaDeserializationSchema}
 8 import org.apache.kafka.clients.consumer.ConsumerRecord
 9 import org.apache.kafka.common.serialization.StringDeserializer
10
11 object SourceFromKafkaByKeyValue {
12   def main(args: Array[String]): Unit = {
13
14     // 1. 初始化流计算的环境
15     val streamEnv = StreamExecutionEnvironment.getExecutionEnvironment
16     streamEnv.setParallelism(1)
17
18     val properties: Properties = new Properties()
19     properties.setProperty("bootstrap.servers", "node1:9092,node2:9092,node3:9092")
20     properties.setProperty("group.id", "fink02")
21     properties.setProperty("key.deserializer", classOf[StringDeserializer].getName)
22     properties.setProperty("value.deserializer", classOf[StringDeserializer].getName)
23     properties.setProperty("auto.offset.reset", "latest")
24
25     val stream: DataStream[(String, String)] = streamEnv.addSource(
26       new FlinkKafkaConsumer[(String, String)]("topic2", new MyKafkaReader, properties))
27     stream.print()
28     streamEnv.execute("SourceFromKafkaByKeyValue")
29   }
30 }
31
32 class MyKafkaReader extends KafkaDeserializationSchema[(String, String)] {
33   override def isEndOfStream(t: (String, String)): Boolean = false
34
35   override def deserialize(consumerRecord: ConsumerRecord[Array[Byte], Array[Byte]]): (String, String) = {
36     if (consumerRecord == null) {
37       return ("null", "null")
38     }
39     var key = ""
40     var value = ""
41     if (consumerRecord.key() != null) {
42       key = new String(consumerRecord.key(), "UTF-8")
43     }
44     if (consumerRecord.value() != null) {
45       value = new String(consumerRecord.value(), "UTF-8")
46     }
47     (key, value)
48   }
49
50   override def getProducedType: TypeInformation[(String, String)] = {
51     createTuple2TypeInformation(createTypeInformation[String], createTypeInformation[String])
52   }
53 }
3. Flink 的 Sink 数据目标
Flink 针对 DataStream 提供了大量的已经实现的数据目标(Sink),包括文件、Kafka、Redis、HDFS、Elasticsearch 等等。
1) 基于 HDFS 的 Sink
首先配置支持 Hadoop FileSystem 的连接器依赖。
<dependency>
  <groupId>org.apache.flink</groupId>
  <artifactId>flink-connector-filesystem_2.12</artifactId>
  <version>1.11.2</version>
</dependency>
Streaming File Sink 能把数据写入 HDFS 中,还可以支持分桶写入,每一个分桶就对应 HDFS 中的一个目录。默认按照小时来分桶,在一个桶内部,会进一步将输出基于滚动策略切分成更小的文件。这有助于防止桶文件变得过大。滚动策略也是可以配置的,默认 策略会根据文件大小和超时时间来滚动文件,超时时间是指没有新数据写入部分文件(part file)的时间。
代码示例:
package com.it.sink

import com.it.flink.source.{MyCustomerSource, StationLog}
import org.apache.flink.api.common.serialization.SimpleStringEncoder
import org.apache.flink.api.scala.createTypeInformation
import org.apache.flink.core.fs.Path
import org.apache.flink.streaming.api.functions.sink.filesystem.StreamingFileSink
import org.apache.flink.streaming.api.functions.sink.filesystem.rollingpolicies.DefaultRollingPolicy
import org.apache.flink.streaming.api.scala.{DataStream, StreamExecutionEnvironment}

/**
 * 每隔10s向hdfs中生成一条数据
 */
object HdfsSink {
  def main(args: Array[String]): Unit = {
    // 1. 初始化流计算的环境
    val streamEnv = StreamExecutionEnvironment.getExecutionEnvironment
    streamEnv.setParallelism(1)
    // 读取数据源
    val stream: DataStream[StationLog] = streamEnv.addSource(new MyCustomerSource)

    // 默认一个小时一个目录(分桶)
    // 设置一个滚动策略
    val rollingPolicy: DefaultRollingPolicy[StationLog, String] = DefaultRollingPolicy.builder()
      .withInactivityInterval(2000) //不活动的分桶等待时间
      .withRolloverInterval(10000) // 每隔10秒生成一个文件
      .build()
    // 创建HDFS的sink

    val hdfsSink: StreamingFileSink[StationLog] = StreamingFileSink.forRowFormat[StationLog](
      new Path("hdfs://node1/temp/MySink001"),
      new SimpleStringEncoder[StationLog]("UTF-8")
    ).withRollingPolicy(rollingPolicy)
      .withBucketCheckInterval(1000) // 检查时间间隔
      .build()
    stream.addSink(hdfsSink)
    streamEnv.execute()
  }
}
2) 基于 Redis 的 Sink
https://bahir.apache.org/docs/flink/current/flink-streaming-redis/
Flink 除了内置的连接器外,还有一些额外的连接器通过 Apache Bahir 发布,包括:
- Apache ActiveMQ (source/sink)
- Apache Flume (sink)
- Redis (sink)
- Akka (sink)
- Netty (source)
这里我用 Redis 来举例,首先需要配置 Redis 连接器的依赖:
<dependency>
  <groupId>org.apache.bahir</groupId>
  <artifactId>flink-connector-redis_2.12</artifactId>
  <version>1.1-SNAPSHOT</version>
</dependency>
接下来我们可以把 WordCount 的结果写入 Redis 中:
package com.it.sink

import org.apache.flink.api.scala.createTypeInformation
import org.apache.flink.streaming.api.scala.{DataStream, StreamExecutionEnvironment}
import org.apache.flink.streaming.connectors.redis.RedisSink
import org.apache.flink.streaming.connectors.redis.common.config.FlinkJedisPoolConfig
import org.apache.flink.streaming.connectors.redis.common.mapper.{RedisCommand, RedisCommandDescription, RedisMapper}

/**
 * 把netcat作为数据源,统计单词数量并存入redis
 */
object RedisSink {
  def main(args: Array[String]): Unit = {
    // 1. 初始化流计算的环境
    val streamEnv = StreamExecutionEnvironment.getExecutionEnvironment
    streamEnv.setParallelism(1)

    val stream: DataStream[String] = streamEnv.socketTextStream("node1", 8888)

    val result: DataStream[(String, Int)] = stream.flatMap(_.split(" "))
      .map((_, 1))
      .keyBy(0)
      .sum(1)

    val config: FlinkJedisPoolConfig = new FlinkJedisPoolConfig.Builder()
      .setDatabase(3)
      .setHost("node3")
      .setPort(6379)
      .build()

    result.addSink(new RedisSink[(String, Int)](config, new RedisMapper[(String, Int)] {

      // 设置redis的命令
      override def getCommandDescription: RedisCommandDescription = {
        new RedisCommandDescription(RedisCommand.HSET, "t_wc")
      }

      override def getKeyFromData(t: (String, Int)): String = {
        t._1
      }

      override def getValueFromData(t: (String, Int)): String = {
        t._2.toString
      }
    }))

    streamEnv.execute()
  }
}
3) 基于 Kafka 的 Sink
由于前面有的课程已经讲过 Flink 的 Kafka 连接器,所以还是一样需要配置 Kafka 连接器的依赖配置,接下我们还是把 WordCout 的结果写入 Kafka:
本案例有netcat作为数据源,将kafka的生产者作为flink的sink
package com.it.sink

import org.apache.flink.api.common.serialization.SimpleStringSchema
import org.apache.flink.api.scala.createTypeInformation
import org.apache.flink.streaming.api.scala.{DataStream, StreamExecutionEnvironment}
import org.apache.flink.streaming.connectors.kafka.FlinkKafkaProducer

object KafkaSinkByString {
  def main(args: Array[String]): Unit = {
    val streamEnv: StreamExecutionEnvironment = StreamExecutionEnvironment.getExecutionEnvironment
    streamEnv.setParallelism(1)

    val stream: DataStream[String] = streamEnv.socketTextStream("node1", 8888)

    val words: DataStream[String] = stream.flatMap(_.split(" "))

    words.addSink(new FlinkKafkaProducer[String]("node1:9092,node2:9092,node3:9092", "t_2020",
      new SimpleStringSchema()))
    streamEnv.execute("KafkaSinkByString")
  }
}

得到结果:
当然 生产中我们更多的是将KeyValue格式的数据写入kafka:
package com.it.sink

import java.lang
import java.util.Properties

import org.apache.flink.api.scala.createTypeInformation
import org.apache.flink.streaming.api.scala.{DataStream, StreamExecutionEnvironment}
import org.apache.flink.streaming.connectors.kafka.{FlinkKafkaProducer, KafkaSerializationSchema}
import org.apache.kafka.clients.producer.ProducerRecord

/**
 * kafka作为sink的第二种 (KV)
 */
object KafkaSinkByKeyValue {
  def main(args: Array[String]): Unit = {
    val streamEnv: StreamExecutionEnvironment = StreamExecutionEnvironment.getExecutionEnvironment
    streamEnv.setParallelism(1)

    val stream: DataStream[String] = streamEnv.socketTextStream("node1", 8888)

    val properties: Properties = new Properties()
    properties.setProperty("bootstrap.servers", "node1:9092,node2:9092,node3:9092")

    val result: DataStream[(String, Int)] = stream.flatMap(_.split(" "))
      .map((_, 1))
      .keyBy(0)
      .sum(1)

    result.addSink(new FlinkKafkaProducer[(String, Int)](
      "t_2020",
      new KafkaSerializationSchema[(String, Int)] {
        override def serialize(t: (String, Int), aLong: lang.Long): ProducerRecord[Array[Byte], Array[Byte]] = {
          new ProducerRecord("t_2020", t._1.getBytes(), t._2.toString.getBytes())
        }
      }, properties, FlinkKafkaProducer.Semantic.EXACTLY_ONCE))

    streamEnv.execute()
  }
}
结果展示,注意加参数:

4) 自定义的 Sink
生产中会用,不太常用
当然你可以自己定义 Sink,有两种实现方式:1、实现 SinkFunction 接口。2、实现RichSinkFunction 类。后者增加了生命周期的管理功能。比如需要在 Sink 初始化的时候创建连接对象,则最好使用第二种。案例需求:把 StationLog 对象写入 Mysql 数据库中。
<dependency>
    <groupId>mysql</groupId>
    <artifactId>mysql-connector-java</artifactId>
    <version>8.0.17</version>
</dependency>
package com.it.sink

import java.sql.{Connection, DriverManager, PreparedStatement}

import com.it.flink.source.{MyCustomerSource, StationLog}
import org.apache.flink.api.scala.createTypeInformation
import org.apache.flink.configuration.Configuration
import org.apache.flink.streaming.api.functions.sink.{RichSinkFunction, SinkFunction}
import org.apache.flink.streaming.api.scala.{DataStream, StreamExecutionEnvironment}

/**
 * 随机生成stationLog对象,写入mysql数据库的表(t_station_log)中
 * 需要自己手动创建表
 */
object CustomerJdbcSink {
  def main(args: Array[String]): Unit = {
    val env: StreamExecutionEnvironment = StreamExecutionEnvironment.getExecutionEnvironment
    env.setParallelism(1)
    val stream: DataStream[StationLog] = env.addSource(new MyCustomerSource)
    stream.addSink(new MyCustomerJdbcSink)
    env.execute()
  }
}

class MyCustomerJdbcSink extends RichSinkFunction[StationLog] {
  var conn: Connection = _
  var pst: PreparedStatement = _

  //生命周期管理,在Sink初始化的时候调用
  override def open(parameters: Configuration): Unit = {
    conn = DriverManager.getConnection("jdbc:mysql://node1/test", "root", "12345678")
    pst = conn.prepareStatement(
      "insert into t_station_log(sid, call_out, call_in, call_type, call_time, duration) " +
        "values(?, ?, ?, ?, ?, ?)")
  }

  override def invoke(value: StationLog, context: SinkFunction.Context[_]): Unit = {
    pst.setString(1, value.sid)
    pst.setString(2, value.callOut)
    pst.setString(3, value.callIn)
    pst.setString(4, value.callType)
    pst.setLong(5, value.callTime)
    pst.setLong(6, value.duration)
    pst.executeUpdate()
  }

  override def close(): Unit = {
    pst.close()
    conn.close()
  }
}
4. DataStream 转换算子
即通过从一个或多个 DataStream 生成新的 DataStream 的过程被称为 Transformation操作。在转换过程中,每种操作类型被定义为不同的 Operator,Flink 程序能够将多个
Transformation 组成一个 DataFlow 的拓扑。
1) Map [DataStream->DataStream]
调 用 用 户 定 义 的 MapFunction 对 DataStream[T] 数 据 进 行 处 理 , 形 成 新 的Data-Stream[T],其中数据格式可能会发生变化,常用作对数据集内数据的清洗和转换。例如将输入数据集中的每个数值全部加 1 处理,并且将数据输出到下游数据集。
| Map DataStream → DataStream |
Takes one element and produces one element. A map function that doubles the values of the input stream: |
2) FlatMap [DataStream->DataStream]
该算子主要应用处理输入一个元素产生一个或者多个元素的计算场景,比较常见的是在经典例子 WordCount 中,将每一行的文本数据切割,生成单词序列如在图所示,对于输入DataStream[String]通过 FlatMap 函数进行处理,字符串数字按逗号切割,然后形成新的整数数据集。FlatMap可以替换Map
| FlatMap DataStream → DataStream |
Takes one element and produces zero, one, or more elements. A flatmap function that splits sentences to words: |
3) Filter [DataStream->DataStream]
该算子将按照条件对输入数据集进行筛选操作,将符合条件的数据集输出,将不符合条件的数据过滤掉。
| Filter DataStream → DataStream |
Evaluates a boolean function for each element and retains those for which the function returns true. A filter that filters out zero values: |
4) KeyBy [DataStream->KeyedStream]
该算子根据指定的 Key 将输入的 DataStream[T]数据格式转换为 KeyedStream[T],也就是在数据集中执行 Partition 操作,将相同的 Key 值的数据放置在相同的分区中。如下图所
示,将白色方块和灰色方块通过颜色的 Key 值重新分区,将数据集分为具有灰色方块的数据集合。
| KeyBy DataStream → KeyedStream |
Logically partitions a stream into disjoint partitions, each partition containing elements of the same key. Internally, this is implemented with hash partitioning. See keys on how to specify keys. This transformation returns a KeyedStream. |
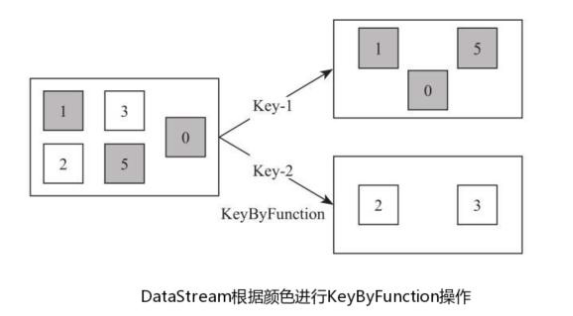
将数据集中第一个参数作为 Key,对数据集进行 KeyBy 函数操作,形成根据 id 分区的KeyedStream 数据集。其中 keyBy 方法输入为 DataStream[T]数据集。
5) Reduce [KeyedStream->DataStream]
| Reduce KeyedStream → DataStream |
A "rolling" reduce on a keyed data stream. Combines the current element with the last reduced value and emits the new value. |
该算子和 MapReduce 中 Reduce 原理基本一致,主要目的是将输入的 KeyedStream 通过传 入 的 用 户 自 定 义 的 ReduceFunction 滚 动 地 进 行 数 据 聚 合 处 理 , 其 中 定 义 的
ReduceFunciton 必须满足运算结合律和交换律。如下代码对传入 keyedStream 数据集中相同的 key 值的数据独立进行求和运算,得到每个 key 所对应的求和值。
val dataStream = env.fromElements(("a", 3), ("d", 4), ("c", 2), ("c",5), ("a", 5))
//指定第一个字段为分区Key
val keyedStream: KeyedStream[(String,Int), Tuple] =dataStream.keyBy(0)
/滚动对第二个字段进行reduce相加求和
val reduceStream = keyedStream.reduce { (t1, t2) =>
(t1._1, t1._2 + t2._2)
}
6) Aggregations[KeyedStream->DataStream]
| Aggregations KeyedStream → DataStream |
Rolling aggregations on a keyed data stream. The difference between min and minBy is that min returns the minimum value, whereas minBy returns the element that has the minimum value in this field (same for max and maxBy). |
Aggregations 是 KeyedDataStream 接口提供的聚合算子,根据指定的字段进行聚合操
作,滚动地产生一系列数据聚合结果。其实是将 Reduce 算子中的函数进行了封装,封装的
聚合操作有sum,min,max 等,这样就不需要用户自己定义 Reduce 函数。
如下代码所示,指定数据集中第一个字段作为 key,用第二个字段作为累加字段,然后滚动
地对第二个字段的数值进行累加并输出。
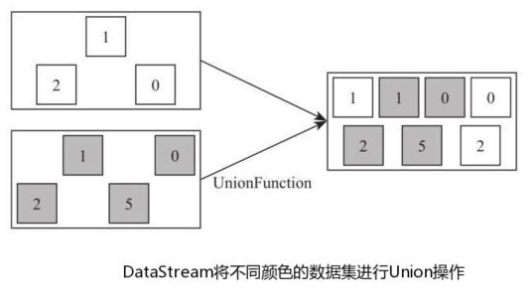
7) Union[DataStream ->DataStream]
| Union DataStream* → DataStream |
Union of two or more data streams creating a new stream containing all the elements from all the streams. Note: If you union a data stream with itself you will get each element twice in the resulting stream. |
Union 算子主要是将两个或者多个输入的数据集合并成一个数据集,需要保证两个数据集的格式一致,输出的数据集的格式和输入的数据集格式保持一致,如图所示,将灰色方块数据集和黑色方块数据集合并成一个大的数据集。
8) Connect,CoMap,CoFlatMap[DataStream ->ConnectedStream->DataStream]
| Connect DataStream,DataStream → ConnectedStreams |
"Connects" two data streams retaining their types, allowing for shared state between the two streams. |
| CoMap, CoFlatMap ConnectedStreams → DataStream |
Similar to map and flatMap on a connected data stream |
Connect 算子主要是为了合并两种或者多种不同数据类型的数据集,合并后会保留原来数据集的数据类型。例如:dataStream1 数据集为(String, Int)元祖类型,dataStream2数据集为 Int 类型,通过 connect 连接算子将两个不同数据类型的流结合在一起,形成格式为 ConnectedStreams 的数据集,其内部数据为[(String, Int), Int]的混合数据类型,保留了两个原始数据集的数据类型。
- Union 之前两个流的类型必须是一样,Connect 可以不一样,在之后的 coMap 中再去调整成为一样的。
- Connect 只能操作两个流,Union 可以操作多个。
9) Split 和 select [DataStream->SplitStream->DataStream]
| Split DataStream → SplitStream |
Split the stream into two or more streams according to some criterion.
|
| Select SplitStream → DataStream |
Select one or more streams from a split stream. |
Split 算子是将一个 DataStream 数据集按照条件进行拆分,形成两个数据集的过程,也是 union 算子的逆向实现。每个接入的数据都会被路由到一个或者多个输出数据集中。
在使用 split 函数中,需要定义 split 函数中的切分逻辑,通过调用 split 函数,然后指定条件判断函数,如下面的代码所示:将根据第二个字段的奇偶性将数据集标记出来,如果是偶数则标记为 even,如果是奇数则标记为 odd,然后通过集合将标记返回,最终生成格式 SplitStream 的数据集。
//创建数据集
val dataStream1: DataStream[(String, Int)] = env.fromElements(("a", 3), ("d", 4), ("c",
2), ("c", 5), ("a", 5))
//合并两个DataStream数据集
val splitedStream: SplitStream[(String, Int)] = dataStream1.split(t => if (t._2 % 2 == 0)
Seq("even") else Seq("odd"))
split 函数本身只是对输入数据集进行标记,并没有将数据集真正的实现切分,因此需要借助 Select 函数根据标记将数据切分成不同的数据集。如下代码所示,通过调用SplitStream 数据集的 select()方法,传入前面已经标记好的标签信息,然后将符合条件的数据筛选出来,形成新的数据集。
//筛选出偶数数据集
val evenStream: DataStream[(String, Int)] = splitedStream.select("even")
//筛选出奇数数据集
val oddStream: DataStream[(String, Int)] = splitedStream.select("odd")
//筛选出奇数和偶数数据集
val allStream: DataStream[(String, Int)] = splitedStream.select("even", "odd")
更多算子请参考:https://ci.apache.org/projects/flink/flink-docs-release-1.11/zh/dev/stream/operators/
5. 函数类和富函数类
前面的所有算子几乎都可以自定义一个函数类、富函数类作为参数。因为 Flink暴露了者两种函数类的接口,常见的函数接口有:
- MapFunction
- FlatMapFunction
- ReduceFunction
- 。。。。。
富函数接口它其他常规函数接口的不同在于:可以获取运行环境的上下文,在上下文环境中可以管理状态(State 在下一章节中提到),并拥有一些生命周期方法,所以可以实现更复杂的功能。富函数的接口有:
- RichMapFunction
- RichFlatMapFunction
- RichFilterFunction
- 。。。。。
1)普通函数类举例:按照指定的时间格式输出每个通话的拨号时间和结束时间。数据如下:
station_4,18600003294,18900004149,busy,1606550754162,0
station_6,18600007904,18900004783,success,1606550754162,20
station_8,18600000183,18900000865,success,1606550754162,10
station_0,18600005712,18900000678,failed,1606550754162,0
station_6,18600002230,18900000053,busy,1606550754163,0
station_0,18600008917,18900008108,barring,1606550754163,0
station_0,18600002944,18900008155,busy,1606550754163,0
station_4,18600004526,18900006991,barring,1606550754163,0
station_5,18600003263,18900006649,barring,1606550754163,0
station_9,18600007853,18900004122,success,1606550754163,60
代码示例:
package com.it.transformation

import java.text.SimpleDateFormat

import com.it.flink.source.StationLog
import org.apache.flink.api.common.functions.MapFunction
import org.apache.flink.api.scala.createTypeInformation
import org.apache.flink.streaming.api.scala.{DataStream, StreamExecutionEnvironment}

object TestFunctionClass {
  def main(args: Array[String]): Unit = {
    val env = StreamExecutionEnvironment.getExecutionEnvironment

    env.setParallelism(1)

    val path: String = getClass.getResource("/station.log").getPath()
    val stream: DataStream[StationLog] = env.readTextFile(path)
      .map(line => {
        val arr: Array[String] = line.split(",")
        StationLog(arr(0), arr(1), arr(2), arr(3), arr(4).toLong, arr(5).toLong)
      })

    val format = new SimpleDateFormat("yyyy-MM-dd HH:mm:ss")
    stream.filter(_.callType.equals("success"))
      .map(new MyMapFunction(format))
      .print()
    env.execute()
  }
}

/**
 * 继承MapFunction实现自定义函数类
 *
 * @param format
 */
class MyMapFunction(format: SimpleDateFormat) extends MapFunction[StationLog, String] {
  override def map(t: StationLog): String = {
    var startTime = t.callTime
    var endTime = t.callTime + t.duration * 1000
    "主叫号码:" + t.callIn + ",被叫号码:" + t.callOut + ",起始时间:" + format.format(startTime) +
      ",结束时间:" + format.format(endTime)
  }
}
结果显示:
主叫号码:18900004783,被叫号码:18600007904,起始时间:2020-11-28 16:05:54,结束时间:2020-11-28 16:06:14
主叫号码:18900000865,被叫号码:18600000183,起始时间:2020-11-28 16:05:54,结束时间:2020-11-28 16:06:04
主叫号码:18900004122,被叫号码:18600007853,起始时间:2020-11-28 16:05:54,结束时间:2020-11-28 16:06:54
使用富函数类方法示例:
/**
 * 把通话成功的电话号码转化成真实的用户姓名,用户姓名保存在mysql数据库
 */
object TestRichFunctionClass {
  def main(args: Array[String]): Unit = {
    val env = StreamExecutionEnvironment.getExecutionEnvironment

    env.setParallelism(1)
    val path: String = getClass.getResource("/station.log").getPath()
    val stream: DataStream[StationLog] = env.readTextFile(path)
      .map(line => {
        val arr: Array[String] = line.split(",")
        StationLog(arr(0), arr(1), arr(2), arr(3), arr(4).toLong, arr(5).toLong)
      })
    stream.filter(_.callType.equals("success"))
      .map(new MyRichMapFunction())
      .print()
    env.execute()

  }
}

class MyRichMapFunction extends RichMapFunction[StationLog, StationLog] {
  var conn: Connection = _
  var pst: PreparedStatement = _

  override def open(parameters: Configuration): Unit = {
    conn = DriverManager.getConnection("jdbc://node1/test", "root", "12345678")
    pst = conn.prepareStatement("select name from t_phone where phone_number=?")
  }

  override def map(in: StationLog): StationLog = {
    //查询主叫用户的名字
    pst.setString(1, in.callOut)
    val set1: ResultSet = pst.executeQuery()
    if (set1.next()) {
      in.callOut = set1.getString(1)
    }
    //查询被叫用户的名字
    pst.setString(1, in.callIn)
    val set2: ResultSet = pst.executeQuery()
    if (set2.next()) {
      in.callIn = set2.getString(1)
    }
    in
  }

  override def close(): Unit = {
    pst.close()
    conn.close()
  }
}
6. 底层 ProcessFunctionAPI
ProcessFunction 是一个低层次的流处理操作,允许返回所有 Stream 的基础构建模块:
- 访问 Event 本身数据(比如:Event 的时间,Event 的当前 Key 等)
- 管理状态 State(仅在 Keyed Stream 中)
- 管理定时器 Timer(包括:注册定时器,删除定时器等)
总而言之,ProcessFunction 是 Flink 最底层的 API,也是功能最强大的。
例如:监控每一个手机,如果在 5 秒内呼叫它的通话都是失败的,发出警告信息。注意:这个案例中会用到状态编程,只要知道状态的意思,不需要掌握。后面的章节中会详细讲解 State 编程。
案例代码:
package com.it.transformation

import com.it.flink.source.StationLog
import org.apache.flink.api.common.state.{ValueState, ValueStateDescriptor}
import org.apache.flink.api.scala.createTypeInformation
import org.apache.flink.streaming.api.functions.KeyedProcessFunction
import org.apache.flink.streaming.api.scala.StreamExecutionEnvironment
import org.apache.flink.util.Collector

/**
 * 监控每一个手机号,如果在5秒内呼叫它的通话都是失败的,发出警告信息
 * 在5秒中内只要有一个呼叫不是fail则不用警告
 */
object TestProcessFunction {
  def main(args: Array[String]): Unit = {
    val env = StreamExecutionEnvironment.getExecutionEnvironment
    //读取文件数据
    val data = env.socketTextStream("node1", 8888)
      .map(line => {
        var arr = line.split(",")
        StationLog(arr(0).trim, arr(1).trim, arr(2).trim, arr(3).trim, arr(4).trim.toLong, arr(5).trim.toLong)
      })
    //处理数据
    data.keyBy(_.callOut)
      .process(new MonitorCallFail())
      .print()
    env.execute()
  }
}

/**
 * 自定义底层类
 */
class MonitorCallFail extends KeyedProcessFunction[String, StationLog, String] {
  // 使用状态对象记录时间
  lazy val timeState: ValueState[Long] = getRuntimeContext
    .getState(new ValueStateDescriptor[Long]("time", classOf[Long]))

  override def processElement(value: StationLog, ctx: KeyedProcessFunction[String, StationLog, String]#Context, out: Collector[String]): Unit = {
    //从状态中取得时间
    var time = timeState.value()
    if (value.callType.equals("fail") && time == 0) { //表示第一次发现呼叫当前手机号是失败的
      //获取当前时间,并注册定时器
      var nowTime = ctx.timerService().currentProcessingTime()
      var onTime = nowTime + 5000L //5秒后触发
      ctx.timerService().registerProcessingTimeTimer(onTime)
      timeState.update(onTime)
    }
    if (!value.callType.equals("fail") && time != 0) { //表示有呼叫成功了,可以取消触发器
      ctx.timerService().deleteProcessingTimeTimer(time)
      timeState.clear()
    }
  }

  //时间到了,执行触发器,发出告警
  override def onTimer(timestamp: Long, ctx: KeyedProcessFunction[String, StationLog, String]#OnTimerContext, out: Collector[String]): Unit = {
    var warnStr = "触发时间:" + timestamp + " 手机号:" + ctx.getCurrentKey
    out.collect(warnStr)
    timeState.clear()
  }
}
7. 侧输出流 Side Output
在 flink 处理数据流时,我们经常会遇到这样的情况:在处理一个数据源时,往往需要将该源中的不同类型的数据做分割处理,如果使用 filter 算子对数据源进行筛选分割的话,势必会造成数据流的多次复制,造成不必要的性能浪费;flink 中的侧输出就是将数据流进行分割,而不对流进行复制的一种分流机制。flink 的侧输出的另一个作用就是对延时迟到的数据进行处理,这样就可以不必丢弃迟到的数据。在后面的章节中会讲到!
案例:根据基站的日志,请把呼叫成功的 Stream(主流)和不成功的 Stream(侧流)分别输出。
sum
 浙公网安备 33010602011771号