前端面试知识总结1
面试技巧 页面布局类 CSS盒子模型类 DOM事件 HTTP协议类 面向对象类 原型链类 通信类 安全类 算法类
面试技巧
1)准备要充分,基础知识要扎实
2)知识要系统,前端知识点太碎,要有整体的把握
3)沟通要简介,一面考基础,不要拖泥带水,一语中的
4)内心要诚实,会就是会,不会就是不会,不要说什么,我看过,但是我忘了,这样子的话很让面试官反感
5)态度要谦虚,一面是基础面,不需要太深入,点到为止,不要一直和面试官深入讲,让他觉得你高傲,目中无人
6)回答要灵活,不要把我说的太死,不要说 “就是这样子” 这类的话。这个尤其要注意,有的人是口头就习惯了这么说,比如,回答某个问题,多用“可以是,可以用”这样的修辞,不要说 “就是” 这样子的修饰语
页面布局类
题目1:假设高度已知,写出三栏布局,其中左栏,右栏宽度各为300px,中间宽度自适应,这里至少要写出5中布局方案

<!DOCTYPE html>
<html lang="en">
<head>
    <meta charset="UTF-8">
    <title>Document</title>
    <style type="text/css">
        *{
            margin: 0px;
            padding: 0px;
        }
        .box div{
            height: 100px;
        }
        .left{
            background: red;
            float: left;
            width: 200px;
        }
        .right{
            background: blue;
            float: right;
            width: 200px;
        }
        .middle{
            background: yellow
        }
    </style>
</head>
<body>
    <div class="box">
        <div class="left">1</div>
        <div class="right">2</div>
        <div class="middle">3</div>
    </div>
</body>
</html>
2)绝对定位

<!DOCTYPE html>
<html lang="en">

<head>
    <meta charset="UTF-8">
    <title>Document</title>
</head>
<style type="text/css">
    *{
        padding: 0px;
        margin:0px;
    }
    .box div{
        position: absolute;
        height: 100px;
    }
    .left{
        left: 0px;
        width: 300px;
        background: red;
    }
    .middle{
        left: 300px;
        right: 300px;
        background: yellow
    }
    .right{
        right: 0px;
        width: 300px;
        background: blue
    }
</style>

<body>
    <div class="box">
        <div class="left"></div>
        <div class="middle"></div>
        <div class="right"></div>
    </div>
</body>

</html>
3)flex布局

<!DOCTYPE html>
<html lang="en">

<head>
    <meta charset="UTF-8">
    <title>Document</title>
</head>
<style type="text/css">
    *{
        padding: 0px;
        margin:0px;
    }
    .box{
        height: 100px;
        display: flex;
    }
    .left{
        flex:0 0 300px;
        background: red;
    }
    .middle{
        background: yellow;
        flex: 1 1 auto
    }
    .right{
        flex:0 0 300px;
        background: blue
    }
</style>

<body>
    <div class="box">
        <div class="left"></div>
        <div class="middle"></div>
        <div class="right"></div>
    </div>
</body>

</html>
4)table-cell布局

<!DOCTYPE html>
<html lang="en">

<head>
    <meta charset="UTF-8">
    <title>Document</title>
</head>
<style type="text/css">
    *{
        padding: 0px;
        margin:0px;
    }
    .box{
        height: 100px;
        display: table;
        width: 100%
    }
    .box div{
        display: table-cell;
    }
    .left{
        background: red;
        width: 300px;
    }
    .middle{
        background: yellow;
    }
    .right{
        background: blue;
        width: 300px;
    }
</style>

<body>
    <div class="box">
        <div class="left"></div>
        <div class="middle"></div>
        <div class="right"></div>
    </div>
</body>

</html>
5)grid布局

<!DOCTYPE html>
<html lang="en">

<head>
    <meta charset="UTF-8">
    <title>Document</title>
</head>
<style type="text/css">
    *{
        padding: 0px;
        margin:0px;
    }
    .box{
        display: grid;
        width: 100%;
        grid-template-rows:100px;
        grid-template-columns:300px auto 300px;
    }
    .left{
        background: red;
    }
    .middle{
        background: yellow;
    }
    .right{
        background: blue;
    }
</style>

<body>
    <div class="box">
        <div class="left"></div>
        <div class="middle"></div>
        <div class="right"></div>
    </div>
</body>

</html>
题目2:这5种方法的特点是什么,各有什么优点缺点
1)浮动布局:缺点是浮动的破坏性和包裹性,会涉及到清除浮动的知识点,优点是兼容性好
2)绝对定位:绝对定位的破坏性,脱离文档流,优点是方便快捷
3)flex布局:解决以上两种布局的不足,在移动端很流行,但是兼容性出现了问题,不支持ie8
4) table布局:单元格约束性太强,麻烦,但是可以解决flex布局不能兼容ie8的问题
5)grid布局:写出来是为了体现你关注热点技术,让面试官看到你的技术追求
题目3:如果高度未知,假如中间的内容很多,撑开了,希望左侧和右侧的高度也随之撑开。以上5种布局,还有哪些可以实现,哪些已经作废
浮动布局,绝对定位,都会出现问题,浮动布局会出现一个文字环绕效果,绝对定位会撑开中间元素,
flex布局和表格布局,还有网格布局,左右两边的宽度会增加,还是可以实现
延伸:怎么样去除浮动布局的文字环绕效果,让内容不影响左右布局,创建BFC等知识点,点击这里
页面布局类总结:语义化掌握到位 页面布局理解深刻 CSS基础知识扎实 思维灵活积极向上 代码书写规范,这些很重要,现场写代码,面试官是很注重代码的规范的
CSS盒模型类
题目1:谈谈你对CSS盒子模型的认识
基本概念:标准模型+IE模型
题目2:标准模型和IE模型的区别
这个我在以前的博客总结过的,点击这里查看
题目3:CSS是如何设置这两种模型的
box-sizing:content-box 标准模型
box-sizing:border-box IE模型
题目4:JS如何设置和获取盒模型对应的宽高
dom.style.width/height 只能取到内联的样式
dom.Currentstyle.width/height只有IE支持
window.getComputedStyle(dom).width/height
dom.getBoundingClientRect().width/height
题目5:根据盒模型解释边距重叠
题目6:BFC的基本概念,工作原理,如何创建,以及使用场景
题目5,6,设计到了BFC的知识,我在别的博客整理过的,点击这里
DOM事件类
题目1:DOM事件的级别
DOM0 elem.onclick=function(){}
DOM2 elem.addEventListener(‘click’,function(){},true)
DOM3 elem.addEventListener(‘keyup’,function(){},true)
题目2:DOM事件模型
捕获和冒泡
题目3:DOM事件流
捕获--目标阶段--冒泡
题目4:描述DOM事件捕获的具体流程
捕获过程 window —document—-html—body—普通元素
题目5:Event事件的常见应用
 event.preventDefault()
    event.stopPropagation()
    event.stopImmediatePropagation()
    event.currentTarget
    event.target
题目6:自定义事件
var eve=new Event(‘custom);
ev.addEventListener(‘custom’,function(){
    console.log(‘custom’);
})
ev.dispatchEvent(eve)
HTTP协议类
题目1:HTTP协议的主要特点
简单快速:每个资源的url是固定的,访问方便
灵活:http协议的的头部可以设置数据类型,完成不同数据类型的传输
无连接:连接一次就会断掉
无状态:客户端和服务端是两种身份
题目2:HTTP报文的组成方法
请求报文:请求行,请求头,空行,请求体
响应报完:状态行,响应头,空行,相应体
POST:传输资源
PUT:更新资源
DELETE:删除资源
HEAD:获得报文首部
2)GET产生的URL地址可以被收藏,而POST不会
3)GET请求会被浏览器主动的缓存,而POST不会,除非手动的设置
4)GET请求只能进行url编码,而POST请求支持多种编码方式
5)GET请求的参数会被完整的保留在浏览器的历史记录里面,而POST请求的参数不会被保留
6)GET请求在url中传输的参数是有长度的限制的,但是POST没有
7)对参数的数据类型,GET只能接受ASCII字符,但是POST没有限制
8)GET比POST更不安全,因为参数暴露在URL上面,不能用来传递敏感的信息
9)GET的参数通过URL传递,而POST的参数放在Request body当中
2xx:成功,请求已经被成功的接受
3xx:重定向,需要完成请求必须更进一步的操作
4xx:客服端的错误,请求的语法有错误,或者请求无法实现
5XX:服务器错误,服务器未能实现合法的请求
206:客户端发送了一个带有Range头的GET请求,服务器完成了他
301:所请求的页面已经转移到了新的页面
302:所请求的页面已经临时的转移到了一个新的url
304:客户端有缓冲的文档,并发出了一个条件下的请求,服务器告诉客户,原来缓冲的文档还可以继续使用
400:客户端语法错醋
401:请求未经授权
403:请求页面的访问被禁用
404:请求的资源不存在
500:服务器发生不可预期的错误,原来的缓冲文档还可以继续的使用
503:请求未完成,服务器临时过载或当机,一段时间后可能恢复正常
题目6:什么事持久连接
题目7:什么是管线化
var obj1={
    name:'lili'
}
var obj2 = new Object({
name:'lucy'
})
这里,我把这两种方法都总结在了一起,因为对象实际上,都是通过Object这个构造函数生成的,上面的方法只是一种简写,语法糖而已
第二种function Obj(){ this.name='jack' }
var obj3=new Obj()
这个就是通过构造函数的方式,生成一个对象,也是很简单的
第三种var obj4={ name:'fack' } var obj5=Object.create(obj4)
console.log(obj5.name) //fack console.log(obj5.hasOwnProperty(name)) //false
这也是创建对象的一种方式,这个Object.create方法,不知道的可以去这里看看
就是说,obj5对象的原型,直接指向了obj4,所以obj5拥有name属性,但是这个是原型链上的属性,不是自己的属性
题目2:原型,构造函数,实例,原型链function M(){ this.age=21 } var obj=new M()
console.log(obj instanceof M) //true console.log(M.prototype instanceof Object) //true console.log(obj instanceof Object) //true
obj的_proto_属性,和M的prototype属性,指向同一个地址,所以 obj instanceof M 为true
M.prototype是一个对象,而找个对象是通过构造函数Object产生的,所以,M.prototype instanceof Object 也是为 true
再看第三行,你就会发现,只要是沿着这一条原型链,都会返回true
题目4:new运算符的工作原理
function newObj(fn){
     var obj=Object.create(fn.prototype)
     fn.apply(obj)
     return obj
}
function M(){
    this.age=21
}
var obj=newObj(M)
console.log(obj)
这个是模拟的构造函数的写法,从这个代码可以看出来new运算符的工作原理
funciton Animal(){
  this.name='name'
}
也许这个说法不是很严谨,在js当中,构造函数充当了类的作用
class Animal2{
  constructor(){
    this.name=name
  }
}
这是ES6当中的新写法,你能写出来,面试官也会喜欢的,体现你的技术追求嘛
var a = new Animal()
var b = new Anima2()
生成实例的方法是一样的,都是构造函数调用,很简单
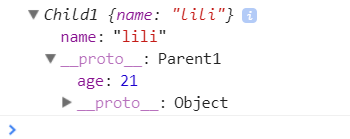
function Parent1(){
    this.age=21
}
function Child1(){
   this.name='lili'
}
Child1.prototype=new Parent1()
var chi=new Child1()
console.log(chi)

直接看这个截图,由于我们 Child1.prototype=new Parent1(),所以,将chi的原型指向了parent1,是实现了继承
这个方法存在问题吗?
  function Parent1() {
        this.frid = [1,2]
    }

    function Child1() {
        this.name = 'lili'
    }
    Child1.prototype = new Parent1()
    var chi = new Child1()
    var chi2 = new Child1()
    chi.frid.push(3)
    console.log(chi2.frid)   //[1,2,3]
看到问题了吧,由于这两个实例对象的原型是同一个引用,当操作一个的时候,另一个也是会发生变化的
我们可以测试的看看
console.log(chi.__proto__===chi2.__proto__) //true
这两个对象的原型,是严格相等的。
2)构造函数实现继承
 function Parent1(){
     this.age=21
 }
 function Child1(){
    Parent1.apply(this)
    this.name='lili'
 }
 var chi=new Child1()
 console.log(chi)

Parent1.apply(this)
这行代码的作用很大,在Child函数里面,执行了Parent函数,而且,将这个Parent函数的上下文,绑定到了this,在这里,这个this表示的是实例对象chi
为什么不这么写?
Parent1.apply(Child1)
  function Parent1(){
        this.age=21
    }

    function Child1(){
        Parent1.apply(Child1)
        this.name='lili'
    }
    var chi=new Child1()
    console.log(chi.age)  //undefined
这相当于,把age这个属性,添加到了Child1上面,但是并不会被Child1的实例对象所拥有
还是回到最开始的正确状态的构造函数实现继承,这种方法的问题是什么?
  function Parent1(){
        this.age=21
    }
    function Child1(){
        Parent1.apply(this)
        this.name='lili'
    }
    Parent1.prototype.sex = function() {}
    var chi=new Child1()
    console.log(chi.sex)   //undefined
可以看到,这个chi实例对象,只能继承 Parent对象的属性,不能继承这个对象原型链上的属性,只能实现部分的继承
  function Parent1() {
        this.frid = [1,2]
    }

    function Child1() {
        Parent1.apply(this)
        this.name = 'lili'
    }
    Child1.prototype = new Parent1()
    var chi = new Child1()
    var chi2 = new Child1()
    chi.frid.push(3)
    console.log(chi.frid)   //[1,2,3]
    console.log(chi2.frid)   //[1,2]
    console.log(chi.__proto__===chi2.__proto__)   //true
这个写法很是神奇啊,两个的原型指向的是同一个对象
这个Parent函数可是执行了两次的啊,发现没有
4)组合继承的优化方式
  function Parent1() {
        this.frid = [1,2]
    }

    function Child1() {
        Parent1.apply(this)
        this.name = 'lili'
    }
    Child1.prototype = Parent1.prototype
    var chi = new Child1()
    var chi2 = new Child1()
    chi.frid.push(3)
    console.log(chi)
    console.log(chi2)
    console.log(chi.__proto__===chi2.__proto__)
这个和构造函数相比,仅仅是多了一行,构造函数继承的方式当中,没办法继承Parent的原型属性,所以我们手动添加
Child1.prototype = Parent1.prototype 这一行表明,Parent的原型添加到了Child的原型上面,所以,可以继承Parent的原型了
但是这个方法还是会出现问题的,请看
  function Parent1() {
        this.frid = [1, 2]
    }

    function Child1() {
        Parent1.apply(this)
        this.name = 'lili'
    }
    Child1.prototype = Parent1.prototype
    var chi = new Child1()
    console.log(chi instanceof Child1)      //true
    console.log(chi instanceof Parent1)     //true
    console.log(chi.constructor == Child1)   //false
    console.log(chi.constructor == Parent1)   //true
chi居然不是Child的直接实例,居然变成了Parent的实例
我们知道,这个函数的prorotype指向的是一个对象,这个对象有一个constructor属性,这个属性又指向了这个函数对象
chi没有自己的constructor属性,所以沿着原型链查找,他的原型对象,也就是 Child1.prototype,但是,找个对象被重新赋值为了 Parent1.prototype,那么Parent1.prototyped的constructor指向什么?
当然是他自己啊—-Parent1
再回头去看看以前的写法,只要的原型链的方式继承,都会改变原来的 constructor 的指向
5)组合继承的优化方式 2
  function Parent1() {
        this.frid = [1,2]
    }

    function Child1() {
        Parent1.apply(this)
        this.name = 'lili'
    }
    Child1.prototype =Object.create(Parent1.prototype)
  Child1.prototype.constructor=Child1
     var chi = new Child1()
    console.log(chi.constructor)
这两行代码,一个都不能少,也许有人好奇了?为什么前面的代码,不直接加一句 Child1.prototype.constructor=Child1呢?
  function Parent1() {
        this.frid = [1,2]
    }

    function Child1() {
        Parent1.apply(this)
        this.name = 'lili'
    }
    Child1.prototype = Parent1.prototype
    Child1.prototype.constructor=Child1
    var chi = new Child1()
    var pat=new Parent1()
    console.log(chi.constructor)
    console.log(pat.constructor)
这个会导致,pat.constructor也变成了 Child 构造函数,显然,是存在问题的
  function Parent1() {
        this.frid = [1,2]
    }

    function Child1() {
        Parent1.apply(this)
        this.name = 'lili'
    }
    Child1.prototype =Object.create(Parent1.prototype)
    Child1.prototype.constructor=Child1
    var chi = new Child1()
    var pat=new Parent1()
    console.log(chi.constructor)   //Child
    console.log(pat.constructor)  //Parent
所以,综合以上,这总方式才是最完美的!!
题目1:什么是同源策略以及限制
同源策略:同一个源才能交互,一个源包含三部分的内容,协议,域名还有端口号,这三个必须完全一样,才是同一个源
限制:
1) Cookie,LocalStorge和IndexDB无法读取
2) DOM无法获得
3) AJAX请求无法发送
题目2:前后端如何通信
Ajax WebScoket CORS
题目3:如何创建ajax
 var xmlhttp;
  if (window.XMLHttpRequest) {
    xmlhttp = new XMLHttpRequest();
  } else {
    xmlhttp = new ActiveXObject("Microsoft.XMLHTTP");
  }
  xmlhttp.onreadystatechange(function() {
    if (xmlhttp.readyState == 4) {
      if (xmlhttp.status >= 200 && xmlhttp.status < 300 || xmlhttp.status = 304){
        alert(xmlhttp.responseText)
      }
    }
  })
  xmlhttp.open('GET', 'url', trur)
  xmlhttp.send(null)
考察 XMLHttpRequest对象的工作流程 ,兼容性处理 事件的触发条件 事件的触发顺序
题目2:攻击原理
题目3:防御措施


