Hbase -- API操作
一、准备工作
1、IDE的pom.xml中添加
<dependency>
    <groupId>org.apache.hbase</groupId>
    <artifactId>hbase-client</artifactId>
    <version>1.2.6</version>
</dependency>
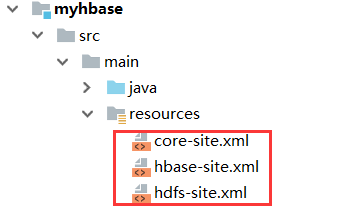
2、IDE的reources中放入centos中Hbase的三个配置文件
core-site.xml
hbase-site.xml
hdfs-site.xml
注:文件路径:/soft/hbase/conf/****

二、Hbase -- API操作
组成部分可大致分为3部
A部分:建立连接
Configuration conf = HBaseConfiguration.create();
Connection conn = ConnectionFactory.createConnection(conf);
B部分:通过连接(conn)
1)获取管理员、库、表描述符:用于创建库、表
//获取管理员:可根据库、表描述创建对应的库、表。
Admin admin = conn.getAdmin();
//获取库描述:可用管理员方法创建库
NamespaceDescriptor ns1 = NamespaceDescriptor.create("ns1").build();
//跟库管理员获取表:可用管理员方法创建表
HTableDescriptor table = new HTableDescriptor(TableName.valueOf("ns1:t1"));
2)获取表对象:用于操作表内数据(如put、get)
//获取t1表对象
Table table = conn.getTable(TableName.valueOf("ns1:t1"));
//获取表对象,可设置“自动刷新功能”
HTable table = (HTable) conn.getTable(TableName.valueOf("ns1:t4"));
C部分:根据获取到的信息执行操作代码(详细代码见后面)
c.1:创建命名空间
c.2:创建表
c.3:对表put(插入)数据
//说明1:表示插入一行,行ID是row,后面是放在该row上的字段和值
//说明2:行ID:row、列族、字段、值,全部都是字节数组的类型

Put p = new Put(row)
put.addColumn(列族,字段,值);
put.addColumn(列族,字段1,值1);
put.addColumn(列族,字段2,值2);
c.4:对表get(获取)数据:通过CellUtil获取
c.5:对表内容查询(scan)并过滤:Filter、过滤器和比较器(重点,另外单独说)
代码部分
c.1:创建命名空间
1 //获取管理员
2 Admin  admin = conn.getAdmin();
3 //通过构建器模式创建名字空间描述符
4 NamespaceDescriptor ns1 = NamespaceDescriptor.create("ns1").build();
5 //创建命名空间ns1
6 admin.createNamespace(ns1);
7 admin.close();
c.2:创建表
 1 //通过连接获取管理员
 2 Admin admin = conn.getAdmin();
 3 TableName tableName = TableName.valueOf("ns1:t1");
 4 //获取表描述符
 5 HTableDescriptor table = new HTableDescriptor(tableName);
 6 //列描述符
 7 HColumnDescriptor f1 = new HColumnDescriptor("f1");
 8 HColumnDescriptor f2 = new HColumnDescriptor("f2");
 9 //表中添加列族
10  table.addFamily(f1);
11 table.addFamily(f2);
12 //创建表
13 admin.createTable(table);
14 admin.close();
c.3:对表put(插入)数据,有下方3种方式(2、3种为优化)
1、普通put:table.put(put); //该方式:每插入一行数据,都会进行一次flushCommits();操作。故在进行批量插入,效率很低,(每次插入都会进行一次rpc通信)
2、批量put:table.put((List<Put>));
3、关闭自动刷新:able.setAutoFlush(false,false);
注:第三种获得表的类需调整为Htable,才能使用这个方法关闭自动刷新:HTable table = (HTable) conn.getTable(TableName.valueOf("ns1:t4"));
 1     /*
 2      *1、普通put:table.put(put)
 3      */
 4     //先建立连接
 5     Configuration conf = HBaseConfiguration.create();
 6     Connection conn = ConnectionFactory.createConnection(conf);
 7
 8     //通过连接得到表
 9     Table table = conn.getTable(TableName.valueOf("ns1:t1"));
10     //获取put对象并添加数据
11     Put put = new Put(Bytes.toBytes("row1"));
12     put.addColumn(Bytes.toBytes("f1"),Bytes.toBytes("name"),Bytes.toBytes("tom"));
13     put.addColumn(Bytes.toBytes("f1"),Bytes.toBytes("id"),Bytes.toBytes("1"));
14     put.addColumn(Bytes.toBytes("f1"),Bytes.toBytes("age"),Bytes.toBytes("20"));
15      //执行put操作
16     table.put(put);
17     table.close();
18     conn.close();
19
20
21     /*
22      *2、批量put:table.put(List<Put>)
23      */
24     //先建立连接
25     Configuration conf = HBaseConfiguration.create();
26     Connection conn = ConnectionFactory.createConnection(conf);
27
28     //通过连接得到表
29     Table table = conn.getTable(TableName.valueOf("ns1:t3"));
30     List<Put> list = new ArrayList<Put>();
31     //获取put对象并添加数据
32     for (int i = 1; i < 100000; i++) {
33         Put put = new Put(Bytes.toBytes("row" + i));
34         put.addColumn(Bytes.toBytes("f1"), Bytes.toBytes("name"), Bytes.toBytes("tom" + i));
35         put.addColumn(Bytes.toBytes("f1"), Bytes.toBytes("id"), Bytes.toBytes(i + ""));
36         put.addColumn(Bytes.toBytes("f1"), Bytes.toBytes("age"), Bytes.toBytes(i % 50 + ""));
37         //执行put操作
38         list.add(put);
39     }
40     table.put(list);
41     table.close();
42
43
44     /*
45      *3、关闭自动刷新:table.setAutoFlush(false,false);
46      */
47     //先建立连接
48     Configuration conf = HBaseConfiguration.create();
49     Connection conn = ConnectionFactory.createConnection(conf);
50     //通过连接得到表
51     HTable table = (HTable) conn.getTable(TableName.valueOf("ns1:t4"));
52     //设置不自动刷新
53     table.setAutoFlush(false,false);
54     //获取put对象并添加数据
55     for (int i = 1; i < 100000; i++) {
56         Put put = new Put(Bytes.toBytes("row" + i));
57         put.addColumn(Bytes.toBytes("f1"), Bytes.toBytes("name"), Bytes.toBytes("tom" + i));
58         put.addColumn(Bytes.toBytes("f1"), Bytes.toBytes("id"), Bytes.toBytes(i + ""));
59         put.addColumn(Bytes.toBytes("f1"), Bytes.toBytes("age"), Bytes.toBytes(i % 50 + ""));
60         //执行put操作
61         table.put(put);
62     }
63     //提交刷新操作
64     table.flushCommits();
65     table.close();
66     conn.close();
c.4:对表get(获取)数据
 1 /*
 2  *get数据
 3  */
 4 //先建立连接
 5 Configuration conf = HBaseConfiguration.create();
 6 Connection conn = ConnectionFactory.createConnection(conf);
 7
 8 Table table = conn.getTable(TableName.valueOf("ns1:t1"));
 9
10 Get get = new Get(Bytes.toBytes("row1"));
11 //通过get得到结果集
12 Result result = table.get(get);
13 //通过listCells可以得到一行中所有的cell(K-V)
14 List<Cell> cells = result.listCells();
15 for (Cell cell : cells) {
16     String cf = Bytes.toString(CellUtil.cloneFamily(cell));
17     String col = Bytes.toString(CellUtil.cloneQualifier(cell));
18     String val = Bytes.toString(CellUtil.cloneValue(cell));
19     System.out.println(cf + "/" + col + "/" + val);
20 }


