

Vue3的学习---10
10. Vuex
10.1 Vuex简介
10.1.1 Vuex概述
Vuex 是 Vue.js 应用程序的状态管理模式 + 库。它作为中央存储库,用于管理应用程序中所有组件的状态,并以可预测的方式进行状态变更。Vuex 的设计理念是基于 Flux 架构,主要由以下几个核心概念组成:
- State(状态):
- 存储应用程序的所有状态数据。
- 单一状态树,即一个对象包含了所有应用层级的状态。
- Getter(获取器):
- 从 store 中的 state 中派生出一些状态,例如对列表进行过滤并计数。
- 类似于 Vue 组件中的计算属性。
- Mutation(变更):
- 唯一可以更改 state 的方法。
- 必须是同步函数。
- Action(动作):
- 类似于 mutation,但可以包含任意异步操作。
- 提交的是 mutation,而不是直接变更状态。
- Module(模块):
- 将 store 分割成模块,每个模块拥有自己的 state、mutation、action、getter,甚至是嵌套子模块。
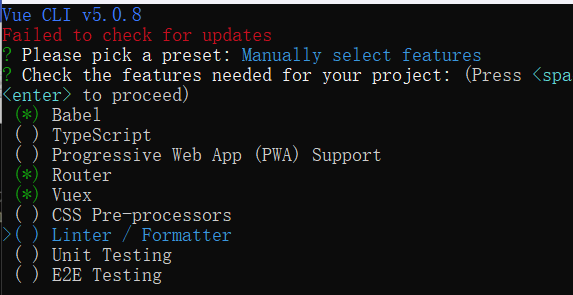
10.1.2 如何在Vue-cli中引入Vue
-
在搭建Vue-cli工程时,选择添加Vuex模块,就可以在工程中引用Vuex模块了。
-
在src文件夹中会出现一个store文件夹,此文件夹中有一个index.js文件,这就是Vuex模块的js文件。
import { createStore } from 'vuex'

export default createStore({
  state: {
  },
  getters: {
  },
  mutations: {
  },
  actions: {
  },
  modules: {
  }
})
10.2 Vuex的使用
10.2.1 state的使用
-
在store文件夹中的index.js文件中写入如下代码
import { createStore } from 'vuex' export default createStore({ state: { num: 100 }, getters: { }, mutations: { }, actions: { }, modules: { } }) -
在两个组件中都添入如下代码
<template>
  <div>
    <p>{{ $store.state.num }}</p>
  </div>
</template>
10.2.2 getter的使用
-
在store文件夹中的index.js文件中写入如下代码
import { createStore } from 'vuex' export default createStore({ state: { num: 100 }, getters: { newNum(state) { return state.num + 10 } }, mutations: { }, actions: { }, modules: { } }) -
在两个组件中都添入如下代码
<template>
  <div>
    <p>{{ $store.getters.newNum }}</p>
  </div>
</template>
10.2.3 mutation的使用
-
在store文件夹中的index.js文件中写入如下代码
import { createStore } from 'vuex' export default createStore({ state: { num: 100 }, getters: { newNum(state) { return state.num + 10 } }, mutations: { addMethod(state, param) { state.num += param } }, actions: { }, modules: { } }) -
修改HomeView组件中的代码
<template>
  <div class="home">
    <img alt="Vue logo" src="../assets/logo.png">
    <p>{{ $store.state.num }}</p>
    <p>{{ $store.getters.newNum }}</p>
    <button @click="change">change</button>
  </div>
</template>

<script>
export default {
  name: 'HomeView',
  methods: {
    change() {
      // commit就是调用mutations里的方法,第一个参数为方法名,第二个参数为传递的参数
      this.$store.commit('addMethod', 9)
    }
  }
}
10.2.4 action的使用
-
在store文件夹中的index.js文件中写入如下代码
import { createStore } from 'vuex' export default createStore({ state: { num: 100 }, getters: { newNum(state) { return state.num + 10 } }, mutations: { addMethod(state, param) { state.num += param } }, actions: { }, modules: { } }) -
修改HomeView组件中的代码
<template>
  <div class="home">
    <img alt="Vue logo" src="../assets/logo.png">
    <p>{{ $store.state.num }}</p>
    <p>{{ $store.getters.newNum }}</p>
    <button @click="change">change</button>
  </div>
</template>

<script>
export default {
  name: 'HomeView',
  methods: {
    change() {
      // dispatch是调用actions里的方法,第一个参数为方法名,第二个参数为传递的参数
      this.$store.dispatch('addMethod', 9)
    }
  }
}
</script>
10.2.5 总结
- state:存放全局共享数据。使用形式:
$store.state.num - getters:计算属性。使用形式:
$store.getters.newnum - mutations:处理同步数据的方法。使用形式:
$state.commit('addMethod', 9) - actions:处理异步数据的方法。使用形式:
$state.dispatch('addMethod', 9)- 先使用
$state.commit('addMethod', 9)的方式调用Vuex中的actions - actions再使用commit方法调用Vuex中的mutations
- 先使用


【推荐】编程新体验,更懂你的AI,立即体验豆包MarsCode编程助手
【推荐】凌霞软件回馈社区,博客园 & 1Panel & Halo 联合会员上线
【推荐】抖音旗下AI助手豆包,你的智能百科全书,全免费不限次数
【推荐】博客园社区专享云产品让利特惠,阿里云新客6.5折上折
【推荐】轻量又高性能的 SSH 工具 IShell:AI 加持,快人一步
· Deepseek官网太卡,教你白嫖阿里云的Deepseek-R1满血版
· 2分钟学会 DeepSeek API,竟然比官方更好用!
· .NET 使用 DeepSeek R1 开发智能 AI 客户端
· DeepSeek本地性能调优
· 一文掌握DeepSeek本地部署+Page Assist浏览器插件+C#接口调用+局域网访问!全攻略