FPGA图像处理——镜像&旋转
一、镜像
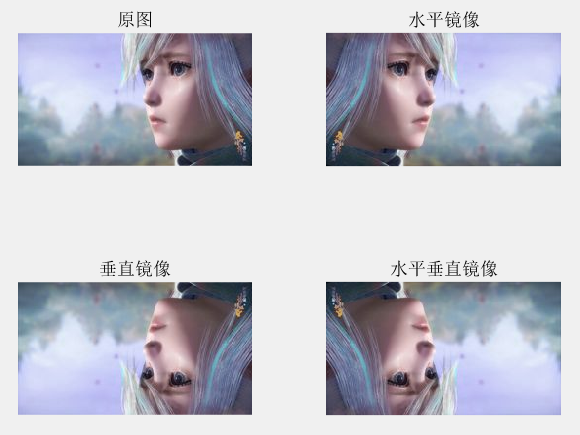
镜像变换分为水平镜像和竖直镜像。水平镜像即将图像左半部分和右半部分以图像竖直中轴线为中心轴进行对换;而竖直镜像则是将图像上半部分和下半部分以图像水平中轴线为中心轴进行对换,如图所示。
 具体变换关系参考:
FPGA实现图像几何变换:镜像
二、旋转
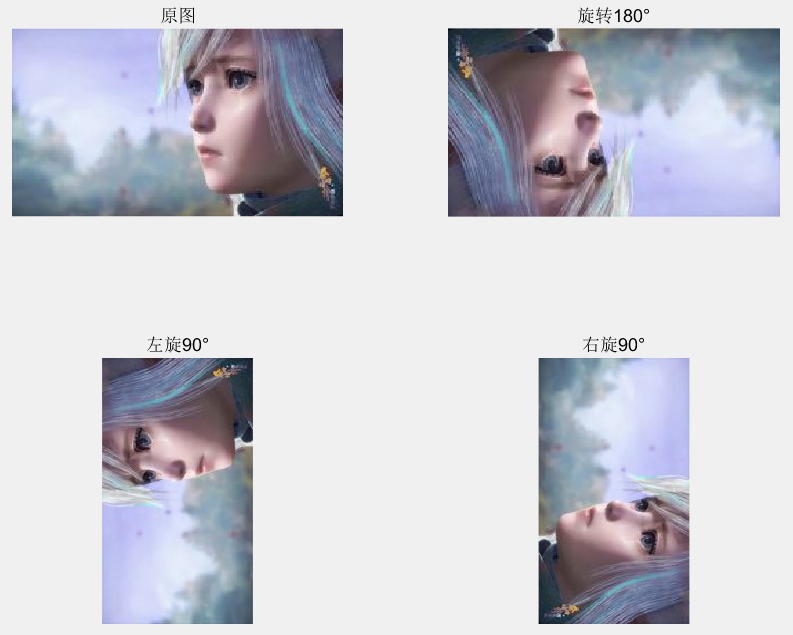
旋转一般是指将图像围绕某一指定点旋转一定的角度。 旋转通常也会改变图像的大小,和图像平移的处理一样,可以把转出显示区域的图像截去,也可以改变输出图像的大小以扩展显示范围。
具体可参考:
FPGA实现图像几何变换:旋转
本次只讨论90°整数倍旋转,对应MATLAB旋转核为 'loose',因为本次实验处理的是长宽不等的矩形图片(与方形图片有点区别 'crop' ),如图所示。
三、镜像&旋转的FPGA实现
本文是基于上面两个博客基础上做出一定更改,因为90度的旋转对图像地址操作与镜像类似,所以将两者整合起来,外部引入两个按键key分别对镜像、旋转模式进行选择,并将旋转后的新坐标接入镜像的老坐标,除此之外对于旋转90度后的矩形图片的显示区域做出适应处理。
本次实验图片尺寸:240*136(宽*高),LCD为4.3寸的显示分辨率480*272。
代码如下:
 1 module mirror(
 2             input clk,
 3             input rst_n,
 4             input  [1:0]    mirror_mode,    //镜像模式输入
 5             input  [1:0]    rotate_mode,    //旋转模式输入
 6             input  [15:0]    data_in,        //RGB565数据输入
 7             input  [10:0]    hcount,            //LCD显示的行计数
 8             input  [10:0]    vcount,            //场计数
 9             output [15:0]    read_addr,        //生成的读RAM地址
10             output [15:0]    data_out        //显示的数据
11              );
12
13 localparam COL          =  240;     //图像行像素个数
14 localparam ROW          =  136;     //图像场像素个数
15
16 wire    display_value        //显示区域有效标志位
17 wire     [8:0]    cnt_col;    //显示区域图片的行坐标
18 wire     [8:0]    cnt_row;
19 reg     [8:0]    mirror_x;    //镜像后的行坐标
20 reg     [8:0]    mirror_y;
21 reg     [8:0]    rotate_x;    //旋转后的行坐标
22 reg     [8:0]    rotate_y;
23
24 //对于480*272显示面板,图片240*136要显示到正中央,对于90度旋转,显示区域的行场坐标需重新计算:
25 assign cnt_col = (rotate_mode==0||rotate_mode==2) ? (hcount >= 120 ? hcount-120 : 0) : (hcount >= 172 ? hcount-172 : 0);
26 assign cnt_row = (rotate_mode==0||rotate_mode==2) ? (vcount >= 68 ? vcount-68 : 0) : (vcount >= 16 ? vcount-16 : 0);
27
28
29 //---------------------------------------------------
30 //==========================================================================
31 //==    镜像操作,读地址重规划
32 //==========================================================================
33 always @(*) begin
34     case(mirror_mode)
35         2'b00   : begin                                     //原图
36                     mirror_x = rotate_x;
37                     mirror_y = rotate_y;
38                   end
39         2'b01   : begin                                     //水平镜像
40                     mirror_x = (COL-1) - rotate_x;
41                     mirror_y = rotate_y;
42                   end
43         2'b10   : begin                                     //垂直镜像
44                     mirror_x = rotate_x;
45                     mirror_y = (ROW-1) - rotate_y;
46                   end
47         2'b11   : begin                                     //水平垂直镜像
48                     mirror_x = (COL-1) - rotate_x;
49                     mirror_y = (ROW-1) - rotate_y;
50                   end
51         default : begin
52                     mirror_x = rotate_x;
53                     mirror_y = rotate_y;
54                   end
55     endcase
56 end
57
58 //==========================================================================
59 //==    90°旋转操作
60 //==========================================================================
61 always @(*) begin
62     case(rotate_mode)
63         2'b00   : begin                                     //原图
64                     rotate_x = cnt_col;
65                     rotate_y = cnt_row;
66                   end
67         2'b01   : begin                                     //右转90度,
68                     rotate_x = cnt_row;
69                     rotate_y = (ROW-1) - cnt_col;
70                   end
71         2'b10   : begin                                     //旋转180度,相当于原图水平、垂直镜像
72                     rotate_x = (COL-1) - cnt_col;
73                     rotate_y = (ROW-1) - cnt_row;
74                   end
75         2'b11   : begin                                     //左转90度(右转270度),右转90度后水平、垂直镜像
76                     rotate_x = (COL-1) - cnt_row;
77                     rotate_y = cnt_col;
78                   end
79         default : begin
80                     rotate_x = cnt_col;
81                     rotate_y = cnt_row;
82                   end
83     endcase
84 end
85
86 //rotate_mode==0||rotate_mode==2旋转时显示宽高对调,重新定义显示区域
87 assign display_value =  (rotate_mode==0||rotate_mode==2) ? (hcount >= 120 && hcount < 360) && (vcount >= 68 && vcount < 204)
88  : (hcount >= 172 && hcount < 308) && (vcount >= 16 && vcount < 256);
89
90 assign read_addr = mirror_y * COL + mirror_x;    //RAM中读取的像素地址
91 assign data_out = display_value ? data_in : 0;    //显示区域外为黑
92
93 endmodule
代码中,两个按键key在顶层模块中进行模式计数将结果作为该模块输入(注意该模块时钟clk是LCD屏的像素时钟,在顶层模块中例化了50MHz的按键去抖动模块,避免在该模块中重新写去抖模块。第一次忘了这茬,在该模块直接用50MHz去抖模块,忘了时钟不同造成按键检测失灵)
注:代码中hcount由另一个LCD驱动模块生成(类似经典的color_bar模块),读入的data_in是read_addr 地址的,比hcount晚了一个时钟,在LCD驱动模块中另外做了行场有效同步处理,本篇文章暂不介绍。
四、实验现象
https://www.bilibili.com/video/BV1Rh411e7hF?share_source=copy_web
参考资料:[1] OpenS Lee:FPGA开源工作室(公众号)
[2] 咸鱼FPGA : FPGA实现图像几何变换:镜像&旋转

