Hadoop生态圈-基于yum源的方式部署Cloudera Manager5.15.1
Hadoop生态圈-基于yum源的方式部署Cloudera Manager5.15.1
作者:尹正杰
版权声明:原创作品,谢绝转载!否则将追究法律责任。
我之前分享过关于离线方式部署Cloudera Manager5.15.1的笔记。本篇博客给大家分享基于yum源的方式部署Cloudera Manager。由于我的台式机内存有限,本次实验就采用三台虚拟机进行实验。
一.集群大数据生态圈集群环境准备(温馨提示:最好保持集群中的每台机器的硬件配置和软件配置都一致。即每台机器最好都配置一致!)
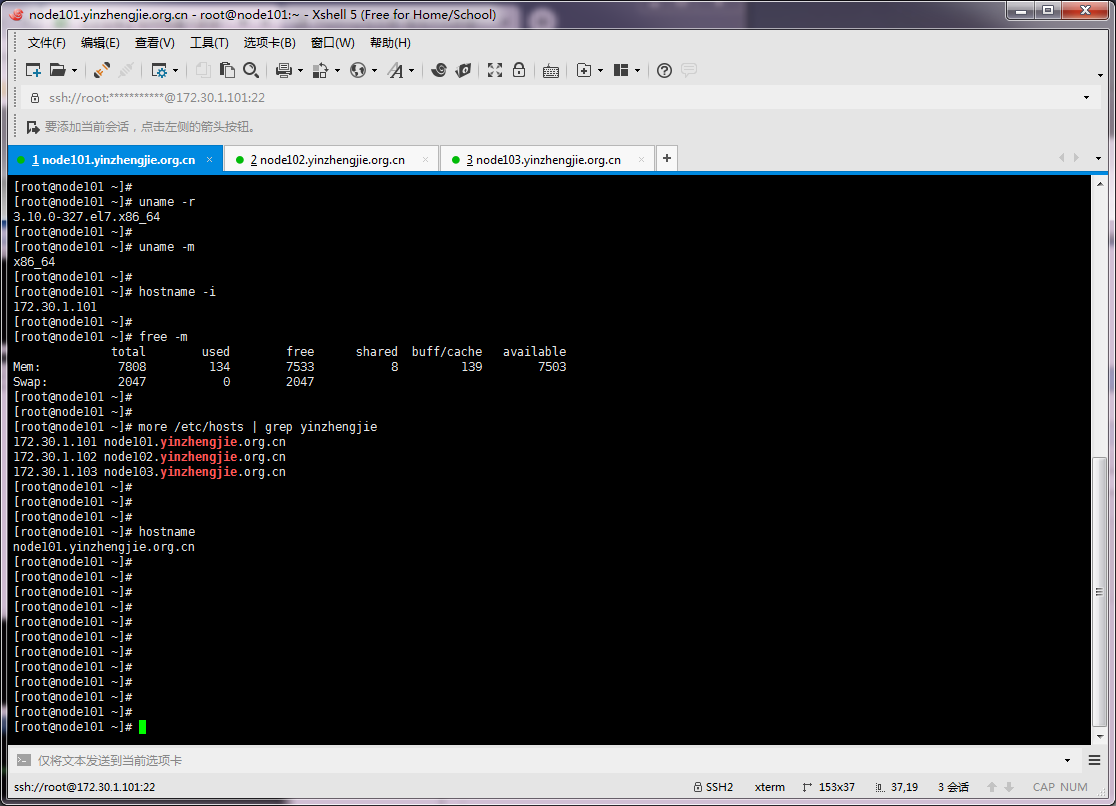
1>.3台主机配置以及主机名与IP对应关系
[root@node101 ~]# cat /etc/redhat-release
CentOS Linux release 7.2.1511 (Core)
[root@node101 ~]#
[root@node101 ~]#
[root@node101 ~]# uname -r
3.10.0-327.el7.x86_64
[root@node101 ~]#
[root@node101 ~]# uname -m
x86_64
[root@node101 ~]#
[root@node101 ~]# hostname -i
172.30.1.101
[root@node101 ~]#
[root@node101 ~]# free -m
              total        used        free      shared  buff/cache   available
Mem:           7808         134        7533           8         139        7503
Swap:          2047           0        2047
[root@node101 ~]#
[root@node101 ~]#
[root@node101 ~]# more /etc/hosts | grep yinzhengjie
172.30.1.101 node101.yinzhengjie.org.cn
172.30.1.102 node102.yinzhengjie.org.cn
172.30.1.103 node103.yinzhengjie.org.cn
[root@node101 ~]#
[root@node101 ~]#
[root@node101 ~]#
[root@node101 ~]# hostname
node101.yinzhengjie.org.cn
[root@node101 ~]#
2>.配置Windows的主机名与IP地址的映射关系
Windows的主机名配置文件路径在:“C:\Windows\System32\drivers\etc”,在该目录下有一个hosts的配置文件,我们对其进行编辑如下: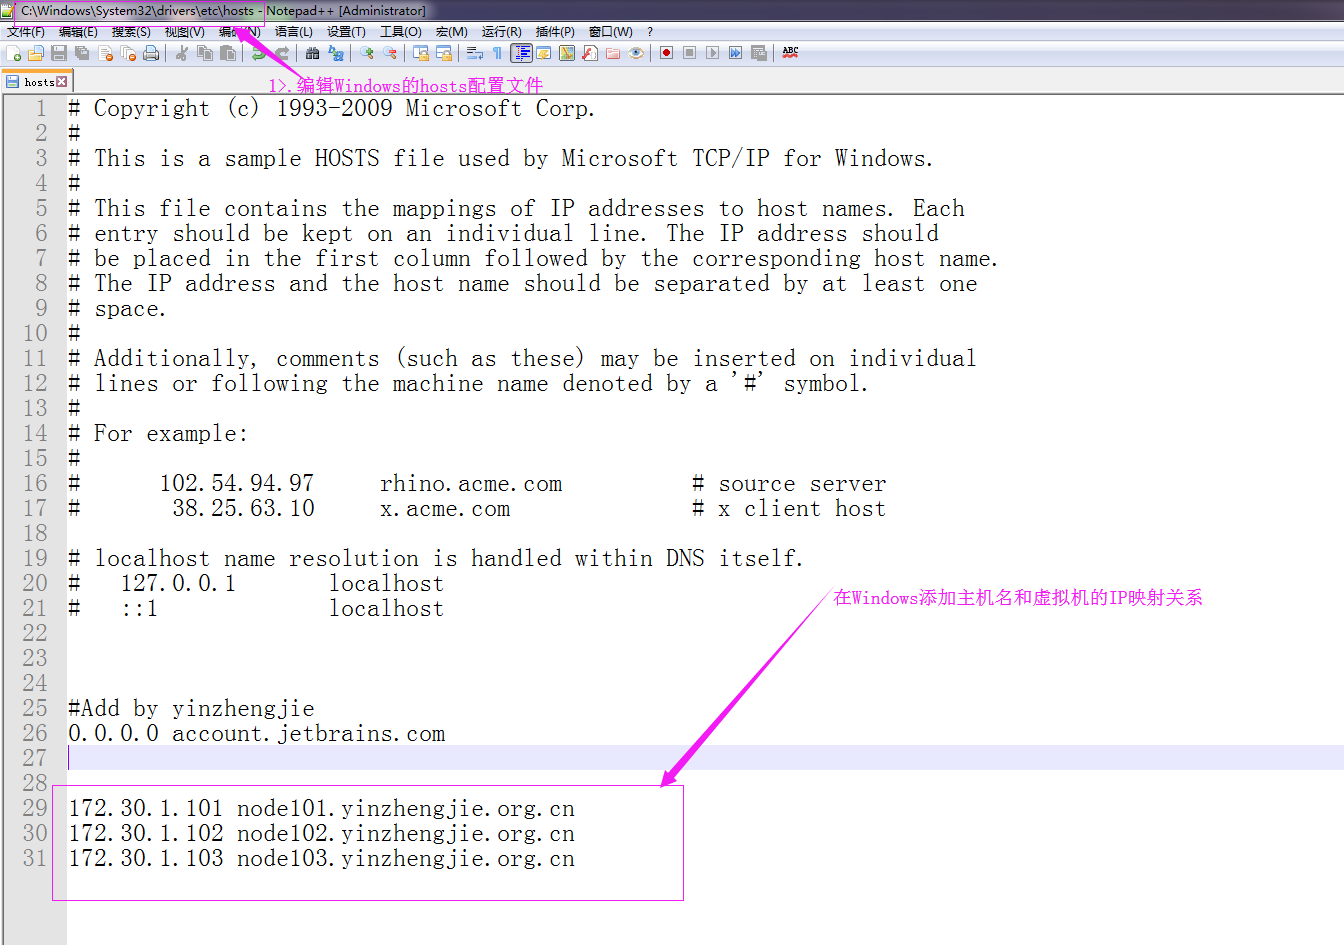
3>.创建部署集群的管理用户并配置sudo权限为无秘钥登录(温馨提示:这个步骤可以不做,咱们可以直接使用root用户来部署即可,我推荐使用root用户,用普通用户的话对某些敏感文件都需要加sudo关键字,尽管我这里教大家配置无需密码验证我觉得麻烦,因此这里只是告诉大家一个配置管理用户的方法!而接下来的实验我都是以root用户来配置的!如果你非要用普通用户的话,需要按照我下面的步骤配置即可,如果遇到权限问题,直接使用sudo提权即可!)
[root@node101 ~]# useradd yinzhengjie                                              #创建一个普通用户
[root@node101 ~]#
[root@node101 ~]# echo "yinzhengjie" | passwd yinzhengjie --stdin                             #为用户创建密码
Changing password for user yinzhengjie.
passwd: all authentication tokens updated successfully.
[root@node101 ~]#
[root@node101 ~]# chmod u+w /etc/sudoers                                                    #添加些的权限
[root@node101 ~]#
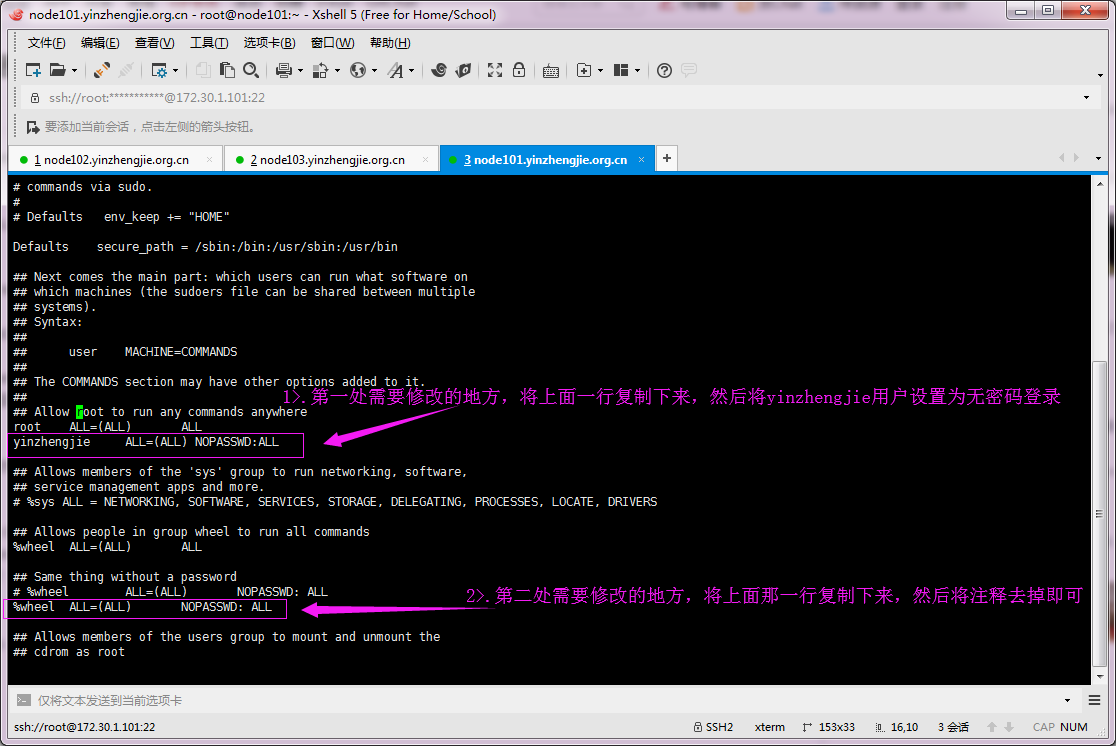
[root@node101 ~]# vi /etc/sudoers                                                            #具体修改的内容参考下图
[root@node101 ~]#
[root@node101 ~]# gpasswd -a yinzhengjie wheel                                                #将你的用户(普通用户)调整至wheel用户组里面,这样就可以以后用户执行sudo就不用输入密码了.
Adding user yinzhengjie to group wheel
[root@node101 ~]#
[root@node101 ~]# chmod 440 /etc/sudoers                                                    #将对文件写的权限关闭掉
[root@node101 ~]#
[root@node101 ~]# ll /etc/sudoers
-r--r----- 1 root root 4255 Oct  1 07:57 /etc/sudoers
[root@node101 ~]#
[root@node101 ~]# id yinzhengjie                                                    #查看“yinzhengjie”用户的id信息
uid=1000(yinzhengjie) gid=1000(yinzhengjie) groups=1000(yinzhengjie),10(wheel)
[root@node101 ~]#
[root@node101 ~]# su yinzhengjie                                                            #接下来,我们进行测试
[yinzhengjie@node101 root]$
[yinzhengjie@node101 root]$ sudo useradd test                                                #执行你想要执行的任何命令吧,只需要前面加个sudo,并且不需要输入root密码!
[yinzhengjie@node101 root]$ sudo userdel -r test
[yinzhengjie@node101 root]$
创建“yinzhengjie”用户后,想要给这个用户配置管理员权限,就得使用vi编辑“/etc/sudoers”配置文件,并修改以下两处。
4>.配置ssh无秘钥登录

[root@node101 ~]# ssh-keygen -t rsa -P '' -f ~/.ssh/id_rsa
Generating public/private rsa key pair.
Created directory '/root/.ssh'.
Your identification has been saved in /root/.ssh/id_rsa.
Your public key has been saved in /root/.ssh/id_rsa.pub.
The key fingerprint is:
eb:ee:5b:4b:21:d6:24:d4:2c:2d:a5:a3:b9:63:14:4f root@node101.yinzhengjie.org.cn
The key's randomart image is:
+--[ RSA 2048]----+
|        .=.      |
|       .o.+      |
|      . Eo.      |
|       * =       |
|      + S o      |
|     . o o .     |
|      + . o      |
|     . o o .     |
|       o=..      |
+-----------------+
[root@node101 ~]#

[root@node101 ~]# ssh-copy-id root@node101.yinzhengjie.org.cn
The authenticity of host 'node101.yinzhengjie.org.cn (172.30.1.101)' can't be established.
ECDSA key fingerprint is b6:44:e8:e7:76:d4:c2:4c:e0:02:7e:9c:d8:59:d8:13.
Are you sure you want to continue connecting (yes/no)? yes
/usr/bin/ssh-copy-id: INFO: attempting to log in with the new key(s), to filter out any that are already installed
/usr/bin/ssh-copy-id: INFO: 1 key(s) remain to be installed -- if you are prompted now it is to install the new keys
root@node101.yinzhengjie.org.cn's password:

Number of key(s) added: 1

Now try logging into the machine, with:   "ssh 'root@node101.yinzhengjie.org.cn'"
and check to make sure that only the key(s) you wanted were added.

[root@node101 ~]#

[root@node101 ~]# ssh-copy-id root@node102.yinzhengjie.org.cn
The authenticity of host 'node102.yinzhengjie.org.cn (172.30.1.102)' can't be established.
ECDSA key fingerprint is b6:44:e8:e7:76:d4:c2:4c:e0:02:7e:9c:d8:59:d8:13.
Are you sure you want to continue connecting (yes/no)? yes
/usr/bin/ssh-copy-id: INFO: attempting to log in with the new key(s), to filter out any that are already installed
/usr/bin/ssh-copy-id: INFO: 1 key(s) remain to be installed -- if you are prompted now it is to install the new keys
root@node102.yinzhengjie.org.cn's password:

Number of key(s) added: 1

Now try logging into the machine, with:   "ssh 'root@node102.yinzhengjie.org.cn'"
and check to make sure that only the key(s) you wanted were added.

[root@node101 ~]#

[root@node101 ~]# ssh-copy-id root@node103.yinzhengjie.org.cn
The authenticity of host 'node103.yinzhengjie.org.cn (172.30.1.103)' can't be established.
ECDSA key fingerprint is b6:44:e8:e7:76:d4:c2:4c:e0:02:7e:9c:d8:59:d8:13.
Are you sure you want to continue connecting (yes/no)? yes
/usr/bin/ssh-copy-id: INFO: attempting to log in with the new key(s), to filter out any that are already installed
/usr/bin/ssh-copy-id: INFO: 1 key(s) remain to be installed -- if you are prompted now it is to install the new keys
root@node103.yinzhengjie.org.cn's password:

Number of key(s) added: 1

Now try logging into the machine, with:   "ssh 'root@node103.yinzhengjie.org.cn'"
and check to make sure that only the key(s) you wanted were added.

[root@node101 ~]#
5>.编写集群的管理脚本

[root@node101 ~]# vi /usr/local/bin/xcall.sh
[root@node101 ~]#
[root@node101 ~]# chmod +x /usr/local/bin/xcall.sh
[root@node101 ~]#
[root@node101 ~]# more `which xcall.sh`
#!/bin/bash
#@author :yinzhengjie
#blog:http://www.cnblogs.com/yinzhengjie
#EMAIL:y1053419035@qq.com


#判断用户是否传参
if [ $# -lt 1 ];then
        echo "请输入参数"
        exit
fi

#获取用户输入的命令
cmd=$@

for (( i=101;i<=103;i++ ))
do
        #使终端变绿色
        tput setaf 2
        echo ============= node${i}.yinzhengjie.org.cn : $cmd ============
        #使终端变回原来的颜色,即白灰色
        tput setaf 7
        #远程执行命令
        ssh node${i}.yinzhengjie.org.cn  $cmd
        #判断命令是否执行成功
        if [ $? == 0 ];then
                echo "命令执行成功"
        fi
done
[root@node101 ~]#
[root@node101 ~]# xcall.sh ls -d /home/yinzhengjie/
============= node101.yinzhengjie.org.cn : ls -d /home/yinzhengjie/ ============
/home/yinzhengjie/
命令执行成功
============= node102.yinzhengjie.org.cn : ls -d /home/yinzhengjie/ ============
/home/yinzhengjie/
命令执行成功
============= node103.yinzhengjie.org.cn : ls -d /home/yinzhengjie/ ============
/home/yinzhengjie/
命令执行成功
[root@node101 ~]#

[root@node101 ~]# xcall.sh "yum -y install rsync"                                      #很显然,我已经安装成功啦!如果初次安装的话不会提示你已经安装成功哟!
============= node101.yinzhengjie.org.cn : yum -y install rsync ============
Loaded plugins: fastestmirror
Repodata is over 2 weeks old. Install yum-cron? Or run: yum makecache fast
Determining fastest mirrors
 * base: mirrors.huaweicloud.com
 * extras: mirrors.tuna.tsinghua.edu.cn
 * updates: mirrors.tuna.tsinghua.edu.cn
Package rsync-3.1.2-4.el7.x86_64 already installed and latest version
Nothing to do
命令执行成功
============= node102.yinzhengjie.org.cn : yum -y install rsync ============
Loaded plugins: fastestmirror
Repodata is over 2 weeks old. Install yum-cron? Or run: yum makecache fast
Determining fastest mirrors
 * base: mirror.bit.edu.cn
 * extras: mirrors.tuna.tsinghua.edu.cn
 * updates: mirrors.tuna.tsinghua.edu.cn
Package rsync-3.1.2-4.el7.x86_64 already installed and latest version
Nothing to do
命令执行成功
============= node103.yinzhengjie.org.cn : yum -y install rsync ============
Loaded plugins: fastestmirror
Repodata is over 2 weeks old. Install yum-cron? Or run: yum makecache fast
Determining fastest mirrors
 * base: mirrors.huaweicloud.com
 * extras: mirrors.tuna.tsinghua.edu.cn
 * updates: mirrors.tuna.tsinghua.edu.cn
Package rsync-3.1.2-4.el7.x86_64 already installed and latest version
Nothing to do
命令执行成功
[root@node101 ~]#

[root@node101 ~]# vi /usr/local/bin/xrsync.sh
[root@node101 ~]#
[root@node101 ~]#
[root@node101 ~]# chmod +x /usr/local/bin/xrsync.sh
[root@node101 ~]#
[root@node101 ~]#
[root@node101 ~]# more `which xrsync.sh`
#!/bin/bash
#@author :yinzhengjie
#blog:http://www.cnblogs.com/yinzhengjie
#EMAIL:y1053419035@qq.com

#判断用户是否传参
if [ $# -lt 1 ];then
    echo "请输入参数";
    exit
fi


#获取文件路径
file=$@

#获取子路径
filename=`basename $file`

#获取父路径
dirpath=`dirname $file`

#获取完整路径
cd $dirpath
fullpath=`pwd -P`

#同步文件到DataNode
for (( i=102;i<=103;i++ ))
do
    #使终端变绿色
    tput setaf 2
    echo =========== node${i}.yinzhengjie.org.cn : $file ===========
    #使终端变回原来的颜色,即白灰色
    tput setaf 7
    #远程执行命令
    rsync -lr $filename `whoami`@node${i}.yinzhengjie.org.cn:$fullpath
    #判断命令是否执行成功
    if [ $? == 0 ];then
        echo "命令执行成功"
    fi
done
[root@node101 ~]#

[root@node101 ~]# xrsync.sh /etc/hosts
=========== node102.yinzhengjie.org.cn : /etc/hosts ===========
命令执行成功
=========== node103.yinzhengjie.org.cn : /etc/hosts ===========
命令执行成功
[root@node101 ~]#
6>.关闭集群的防火墙

[root@node101 ~]# xcall.sh systemctl stop firewalld
============= node101.yinzhengjie.org.cn : systemctl stop firewalld ============
命令执行成功
============= node102.yinzhengjie.org.cn : systemctl stop firewalld ============
命令执行成功
============= node103.yinzhengjie.org.cn : systemctl stop firewalld ============
命令执行成功
[root@node101 ~]#

[root@node101 ~]# xcall.sh systemctl disable firewalld
============= node101.yinzhengjie.org.cn : systemctl disable firewalld ============
Removed symlink /etc/systemd/system/multi-user.target.wants/firewalld.service.
Removed symlink /etc/systemd/system/dbus-org.fedoraproject.FirewallD1.service.
命令执行成功
============= node102.yinzhengjie.org.cn : systemctl disable firewalld ============
Removed symlink /etc/systemd/system/multi-user.target.wants/firewalld.service.
Removed symlink /etc/systemd/system/dbus-org.fedoraproject.FirewallD1.service.
命令执行成功
============= node103.yinzhengjie.org.cn : systemctl disable firewalld ============
Removed symlink /etc/systemd/system/multi-user.target.wants/firewalld.service.
Removed symlink /etc/systemd/system/dbus-org.fedoraproject.FirewallD1.service.
命令执行成功
[root@node101 ~]#
7>.禁用集群的selinux

[root@node101 ~]# xcall.sh setenforce 0                               #很显然,我已经禁用了selinux,如果你没有禁用的话,selinux设置为0,也是临时的关闭哟!
============= node101.yinzhengjie.org.cn : setenforce 0 ============
setenforce: SELinux is disabled
============= node102.yinzhengjie.org.cn : setenforce 0 ============
setenforce: SELinux is disabled
============= node103.yinzhengjie.org.cn : setenforce 0 ============
setenforce: SELinux is disabled
[root@node101 ~]#

[root@node101 ~]# xcall.sh sed -i 's#SELINUX=enforcing#SELINUX=disabled#' /etc/selinux/config
============= node101.yinzhengjie.org.cn : sed -i s#SELINUX=enforcing#SELINUX=disabled# /etc/selinux/config ============
命令执行成功
============= node102.yinzhengjie.org.cn : sed -i s#SELINUX=enforcing#SELINUX=disabled# /etc/selinux/config ============
命令执行成功
============= node103.yinzhengjie.org.cn : sed -i s#SELINUX=enforcing#SELINUX=disabled# /etc/selinux/config ============
命令执行成功
[root@node101 ~]#
8>.禁用IPV6(每台服务器都需要禁用ipv6,我下面就举例了一台的案例)
1>.编辑/etc/sysctl.conf配置,增加net.ipv6.conf.all.disable_ipv6=1
[root@node101 ~]# cat /etc/sysctl.conf  | grep -v ^#
[root@node101 ~]#
[root@node101 ~]# echo "#Add by yinzhengjie" >> /etc/sysctl.conf
[root@node101 ~]#
[root@node101 ~]# echo "net.ipv6.conf.all.disable_ipv6=1" >> /etc/sysctl.conf
You have new mail in /var/spool/mail/root
[root@node101 ~]#
[root@node101 ~]#
[root@node101 ~]# cat /etc/sysctl.conf  | grep -v ^#
net.ipv6.conf.all.disable_ipv6=1
[root@node101 ~]#
[root@node101 ~]#

2>.编辑/etc/sysconfig/network配置,增加 NETWORKING_IPV6=no
[root@node101 ~]# cat /etc/sysconfig/network
# Created by anaconda
[root@node101 ~]#
[root@node101 ~]#
[root@node101 ~]# cat /etc/sysconfig/network | grep -v ^#
[root@node101 ~]#
[root@node101 ~]# echo "#Add by yinzhengjie" >> /etc/sysconfig/network
You have new mail in /var/spool/mail/root
[root@node101 ~]#
[root@node101 ~]# echo "NETWORKING_IPV6=no" >> /etc/sysconfig/network
[root@node101 ~]#
[root@node101 ~]# cat /etc/sysconfig/network | grep -v ^#
NETWORKING_IPV6=no
[root@node101 ~]#
[root@node101 ~]#

3>.在配置网卡信息上再次禁用ipv6
[root@node101 ~]# cat  /etc/sysconfig/network-scripts/ifcfg-bond0
DEVICE=bond0
BOOTPROTO=static
ONBOOT=yes
BONDING_OPTS="miimon=100 mode=4"
IPADDR=172.30.1.101
NETMASK=255.255.255.0
GATEWAY=172.30.1.254
[root@node101 ~]#
[root@node101 ~]#
[root@node101 ~]# echo NETWORKING_IPV6=no >> /etc/sysconfig/network-scripts/ifcfg-bond0
[root@node101 ~]#
[root@node101 ~]# cat  /etc/sysconfig/network-scripts/ifcfg-bond0 (我之所以修改这个配置文件是因为我的服务器双网卡做的事bound)
DEVICE=bond0
BOOTPROTO=static
ONBOOT=yes
BONDING_OPTS="miimon=100 mode=4"
IPADDR=172.30.1.101
NETMASK=255.255.255.0
GATEWAY=172.30.1.254
NETWORKING_IPV6=no
[root@node101 ~]#

4>.执行sysctl -p或者reboot重启命令
[root@node101 ~]# sysctl -p
net.ipv6.conf.all.disable_ipv6 = 1
[root@node101 ~]#
9>.卸载jdk
[root@node102 ~]# rpm -aq | grep java                  #查看操作系统下载的安装包
tzdata-java-2018e-3.el7.noarch
[root@node102 ~]#
[root@node102 ~]# rpm -e --nodeps tzdata-java-2018e-3.el7.noarch    #使用rpm工具卸载上面安装的软件
[root@node102 ~]#
[root@node102 ~]# rpm -aq | grep java                  #再次验证,是否卸载成功啦!
[root@node102 ~]#
[root@node102 ~]#
10>.设置文件打开数据和用户最大进程数(针对每个版本Cloudera版本参数设置可能会有一些小的的偏差,我这里给的是相对来说统统的配置。)
[root@node101 ~]# ulimit -n                                          #查看默认指定同一时间最多可开启的文件数,这个值显然是不合理的,我们必须得修改它!
1024
[root@node103 ~]#
[root@node101 ~]# ulimit -u                                          #查看默认用户最多可开启的程序数目,这个貌似是根据你的机器配置会有相应的变化
31152
[root@node101 ~]#
[root@node101 ~]# ulimit -a                                           #显示目前资源限制的设定
core file size          (blocks, -c) 0                                 #core文件的最大值为100 blocks。
data seg size           (kbytes, -d) unlimited                          #进程的数据段可以任意大。
scheduling priority             (-e) 0                                    #指定调度优先级
file size               (blocks, -f) unlimited                            #文件可以任意大。
pending signals                 (-i) 31152                            #最多有31152个待处理的信号。
max locked memory       (kbytes, -l) 64                               #一个任务锁住的物理内存的最大值为64KB。
max memory size         (kbytes, -m) unlimited                    #一个任务的常驻物理内存的最大值。
open files                      (-n) 1024                               #一个任务最多可以同时打开1024的文件。
pipe size            (512 bytes, -p) 8                                   #管道的最大空间为4096字节。
POSIX message queues     (bytes, -q) 819200                         #POSIX的消息队列的最大值为819200字节。
real-time priority              (-r) 0                                  #指定实时优先级
stack size              (kbytes, -s) 8192                            #进程的栈的最大值为8192字节。
cpu time               (seconds, -t) unlimited                      #进程使用的CPU时间。
max user processes              (-u) 31152                          #当前用户同时打开的进程(包括线程)的最大个数为31152。
virtual memory          (kbytes, -v) unlimited                     #没有限制进程的最大地址空间。
file locks                      (-x) unlimited                        #所能锁住的文件的最大个数没有限制。
[root@node101 ~]#
[root@node101 ~]# vi /etc/security/limits.conf                   #往里面配置相应的参数,我这里就做了6项优化
[root@node101 ~]# cat /etc/security/limits.conf  | grep -v ^# | grep -v ^$
*        soft    nofile        32768
*         hard    nofile        1048576
*        soft    nproc        65536
*        hard    nproc        unlimited
*        soft    memlock        unlimited
*        hard    memlock        unlimited
[root@node101 ~]#
[root@node101 ~]# reboot                                   #按照上面的配置完成后,需要重启操作系统

Connection closed by foreign host.

Disconnected from remote host(node101.yinzhengjie.org.cn) at 12:23:03.

Type `help' to learn how to use Xshell prompt.
[d:\~]$

Connecting to 172.30.1.101:22...
Connection established.
To escape to local shell, press 'Ctrl+Alt+]'.

Last login: Mon Oct  1 07:50:21 2018 from 172.30.1.1
[root@node101 ~]#
[root@node101 ~]# ulimit -a                                #重启操作系统后,再次查看目前资源限制的设定,来我们一起找一下不同吧
core file size          (blocks, -c) 0
data seg size           (kbytes, -d) unlimited
scheduling priority             (-e) 0
file size               (blocks, -f) unlimited
pending signals                 (-i) 31152
max locked memory       (kbytes, -l) unlimited            #这个值发生变化了,之前是64,现在是没有限制啦!
max memory size         (kbytes, -m) unlimited
open files                      (-n) 32768                    #这个值发生了变化,之前是1024!
pipe size            (512 bytes, -p) 8
POSIX message queues     (bytes, -q) 819200
real-time priority              (-r) 0
stack size              (kbytes, -s) 8192
cpu time               (seconds, -t) unlimited
max user processes              (-u) unlimited            #这个值也发生了变化,之前是31152,现在是没有限制
virtual memory          (kbytes, -v) unlimited
file locks                      (-x) unlimited
[root@node101 ~]#
想要了解更多ulimit的小技巧,可参考:https://www.cnblogs.com/yinzhengjie/p/9734489.html。
11>.时间同步
详情请参考:https://www.cnblogs.com/yinzhengjie/p/9480665.html。
二.构建平台并搭建配置本地yum源
1>.Cloudera manager安装方式
1.1>.基于bin文件方式安装
下载地址:http://archive.cloudera.com/cm5/installer/
1.2>.基于rpm包方式安装
下载地址:http://archive.cloudera.com/cm5/redhat/7/x86_64/cm/
1.3>.基于yum源的方式安装(本篇博客采取的安装方式,因为这种方式安装很简单)
下载地址:http://archive.cloudera.com/cm5/repo-as-tarball/
2>.启动Http服务(当然,你也可以选取nginx来提点http服务)

[root@node101 ~]# yum -y install httpd
Loaded plugins: fastestmirror
Loading mirror speeds from cached hostfile
 * base: mirrors.huaweicloud.com
 * extras: mirrors.tuna.tsinghua.edu.cn
 * updates: mirrors.tuna.tsinghua.edu.cn
Resolving Dependencies
--> Running transaction check
---> Package httpd.x86_64 0:2.4.6-80.el7.centos.1 will be installed
--> Processing Dependency: httpd-tools = 2.4.6-80.el7.centos.1 for package: httpd-2.4.6-80.el7.centos.1.x86_64
--> Processing Dependency: /etc/mime.types for package: httpd-2.4.6-80.el7.centos.1.x86_64
--> Processing Dependency: libaprutil-1.so.0()(64bit) for package: httpd-2.4.6-80.el7.centos.1.x86_64
--> Processing Dependency: libapr-1.so.0()(64bit) for package: httpd-2.4.6-80.el7.centos.1.x86_64
--> Running transaction check
---> Package apr.x86_64 0:1.4.8-3.el7_4.1 will be installed
---> Package apr-util.x86_64 0:1.5.2-6.el7 will be installed
---> Package httpd-tools.x86_64 0:2.4.6-80.el7.centos.1 will be installed
---> Package mailcap.noarch 0:2.1.41-2.el7 will be installed
--> Finished Dependency Resolution

Dependencies Resolved

=========================================================================================================================================================
 Package                             Arch                           Version                                        Repository                       Size
=========================================================================================================================================================
Installing:
 httpd                               x86_64                         2.4.6-80.el7.centos.1                          updates                         2.7 M
Installing for dependencies:
 apr                                 x86_64                         1.4.8-3.el7_4.1                                base                            103 k
 apr-util                            x86_64                         1.5.2-6.el7                                    base                             92 k
 httpd-tools                         x86_64                         2.4.6-80.el7.centos.1                          updates                          90 k
 mailcap                             noarch                         2.1.41-2.el7                                   base                             31 k

Transaction Summary
=========================================================================================================================================================
Install  1 Package (+4 Dependent packages)

Total download size: 3.0 M
Installed size: 10 M
Downloading packages:
(1/5): apr-1.4.8-3.el7_4.1.x86_64.rpm                                                                                             | 103 kB  00:00:00
(2/5): httpd-tools-2.4.6-80.el7.centos.1.x86_64.rpm                                                                               |  90 kB  00:00:00
(3/5): apr-util-1.5.2-6.el7.x86_64.rpm                                                                                            |  92 kB  00:00:00
(4/5): mailcap-2.1.41-2.el7.noarch.rpm                                                                                            |  31 kB  00:00:00
(5/5): httpd-2.4.6-80.el7.centos.1.x86_64.rpm                                                                                     | 2.7 MB  00:00:00
---------------------------------------------------------------------------------------------------------------------------------------------------------
Total                                                                                                                    6.5 MB/s | 3.0 MB  00:00:00
Running transaction check
Running transaction test
Transaction test succeeded
Running transaction
  Installing : apr-1.4.8-3.el7_4.1.x86_64                                                                                                            1/5
  Installing : apr-util-1.5.2-6.el7.x86_64                                                                                                           2/5
  Installing : httpd-tools-2.4.6-80.el7.centos.1.x86_64                                                                                              3/5
  Installing : mailcap-2.1.41-2.el7.noarch                                                                                                           4/5
  Installing : httpd-2.4.6-80.el7.centos.1.x86_64                                                                                                    5/5
  Verifying  : mailcap-2.1.41-2.el7.noarch                                                                                                           1/5
  Verifying  : httpd-tools-2.4.6-80.el7.centos.1.x86_64                                                                                              2/5
  Verifying  : apr-util-1.5.2-6.el7.x86_64                                                                                                           3/5
  Verifying  : apr-1.4.8-3.el7_4.1.x86_64                                                                                                            4/5
  Verifying  : httpd-2.4.6-80.el7.centos.1.x86_64                                                                                                    5/5

Installed:
  httpd.x86_64 0:2.4.6-80.el7.centos.1

Dependency Installed:
  apr.x86_64 0:1.4.8-3.el7_4.1      apr-util.x86_64 0:1.5.2-6.el7      httpd-tools.x86_64 0:2.4.6-80.el7.centos.1      mailcap.noarch 0:2.1.41-2.el7

Complete!
[root@node101 ~]#

[root@node101 ~]# systemctl start httpd                      #启动Apache服务
[root@node101 ~]#
[root@node101 ~]# systemctl enable httpd                  #设置Apache的开启自启
Created symlink from /etc/systemd/system/multi-user.target.wants/httpd.service to /usr/lib/systemd/system/httpd.service.
[root@node101 ~]#
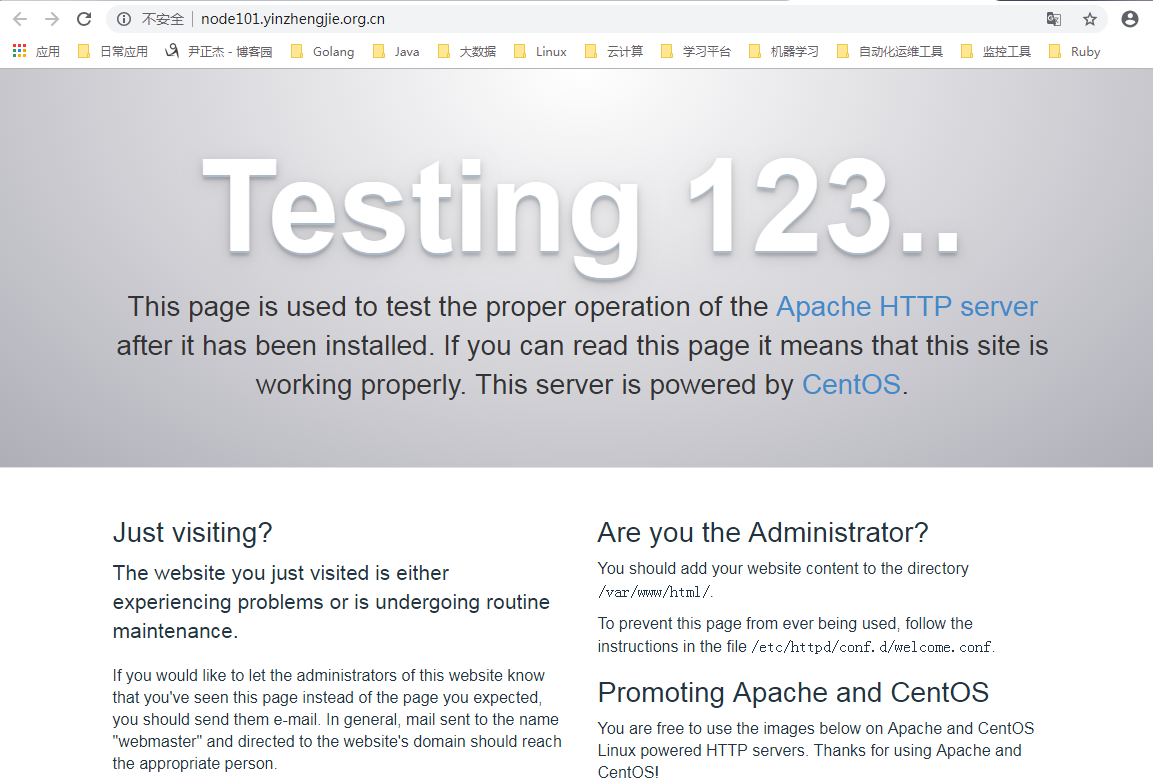
启动成功后,我们可以访问webUI来查看是否真实启动,如下图:
3>.下载CM资源文件并安装到Apache的webUI路径中
[root@node101 ~]# mkdir -pv /yinzhengjie/download/ && cd /yinzhengjie/download
mkdir: created directory ‘/yinzhengjie’
mkdir: created directory ‘/yinzhengjie/download/’
[root@node101 download]#
[root@node101 download]# yum -y install wget                #安装下载工具wget,如果你已经装了这一步骤可以省略
[root@node101 download]#
[root@node101 download]# wget http://archive.cloudera.com/cm5/repo-as-tarball/5.15.1/cm5.15.1-centos7.tar.gz            #下载cm的安装包
--2018-10-01 15:01:49--  http://archive.cloudera.com/cm5/repo-as-tarball/5.15.1/cm5.15.1-centos7.tar.gz
Resolving archive.cloudera.com (archive.cloudera.com)... 151.101.108.167
Connecting to archive.cloudera.com (archive.cloudera.com)|151.101.108.167|:80... connected.
HTTP request sent, awaiting response... 200 OK
Length: 1038457027 (990M) [application/x-tar]
Saving to: ‘cm5.15.1-centos7.tar.gz’

100%[=============================================================================================================>] 1,038,457,027  902KB/s   in 30m 30s

2018-10-01 15:12:19 (554 KB/s) - ‘cm5.15.1-centos7.tar.gz’ saved [1038457027/1038457027]

[root@node101 download]# ll
total 1014120
-rw-r--r-- 1 root root 1038457027 Aug 22 22:51 cm5.15.1-centos7.tar.gz
[root@node101 download]#
[root@node101 download]# mkdir -pv /yinzhengjie/softwares
mkdir: created directory ‘/yinzhengjie/softwares’
[root@node101 download]#
[root@node101 download]# tar -zxf cm5.15.1-centos7.tar.gz -C /yinzhengjie/softwares/                    #将下载后的文件进行解压
[root@node101 download]#
[root@node101 download]# cd /yinzhengjie/softwares/cm/5.15.1/RPMS/x86_64/                                #进入到解压后的CM的rpm工具包中
[root@node101 x86_64]# ll
total 1016664
-rw-rw-r-- 1 1106 592   9857532 Jul 31 18:05 cloudera-manager-agent-5.15.1-1.cm5151.p0.3.el7.x86_64.rpm
-rw-rw-r-- 1 1106 592 787321332 Jul 31 18:05 cloudera-manager-daemons-5.15.1-1.cm5151.p0.3.el7.x86_64.rpm
-rw-rw-r-- 1 1106 592      8712 Jul 31 18:05 cloudera-manager-server-5.15.1-1.cm5151.p0.3.el7.x86_64.rpm
-rw-rw-r-- 1 1106 592     10616 Jul 31 18:05 cloudera-manager-server-db-2-5.15.1-1.cm5151.p0.3.el7.x86_64.rpm
-rw-rw-r-- 1 1106 592  30603956 Jul 31 18:05 enterprise-debuginfo-5.15.1-1.cm5151.p0.3.el7.x86_64.rpm
-rw-rw-r-- 1 1106 592      1066 Jul 31 18:12 generated_index.html
-rw-rw-r-- 1 1106 592  71204325 Jul 31 18:05 jdk-6u31-linux-amd64.rpm
-rw-rw-r-- 1 1106 592 142039186 Jul 31 18:05 oracle-j2sdk1.7-1.7.0+update67-1.x86_64.rpm
[root@node101 x86_64]#
[root@node101 x86_64]# mv ./*  /var/www/html/cm-5.15.1/                        #将资源安装到Apache的webUI目录中
[root@node101 x86_64]#
[root@node101 x86_64]# cd /var/www/html/cm-5.15.1/
[root@node101 cm-5.15.1]#
[root@node101 cm-5.15.1]# ll
total 1016664
-rw-rw-r-- 1 1106 592   9857532 Jul 31 18:05 cloudera-manager-agent-5.15.1-1.cm5151.p0.3.el7.x86_64.rpm
-rw-rw-r-- 1 1106 592 787321332 Jul 31 18:05 cloudera-manager-daemons-5.15.1-1.cm5151.p0.3.el7.x86_64.rpm
-rw-rw-r-- 1 1106 592      8712 Jul 31 18:05 cloudera-manager-server-5.15.1-1.cm5151.p0.3.el7.x86_64.rpm
-rw-rw-r-- 1 1106 592     10616 Jul 31 18:05 cloudera-manager-server-db-2-5.15.1-1.cm5151.p0.3.el7.x86_64.rpm
-rw-rw-r-- 1 1106 592  30603956 Jul 31 18:05 enterprise-debuginfo-5.15.1-1.cm5151.p0.3.el7.x86_64.rpm
-rw-rw-r-- 1 1106 592      1066 Jul 31 18:12 generated_index.html
-rw-rw-r-- 1 1106 592  71204325 Jul 31 18:05 jdk-6u31-linux-amd64.rpm
-rw-rw-r-- 1 1106 592 142039186 Jul 31 18:05 oracle-j2sdk1.7-1.7.0+update67-1.x86_64.rpm
[root@node101 cm-5.15.1]#
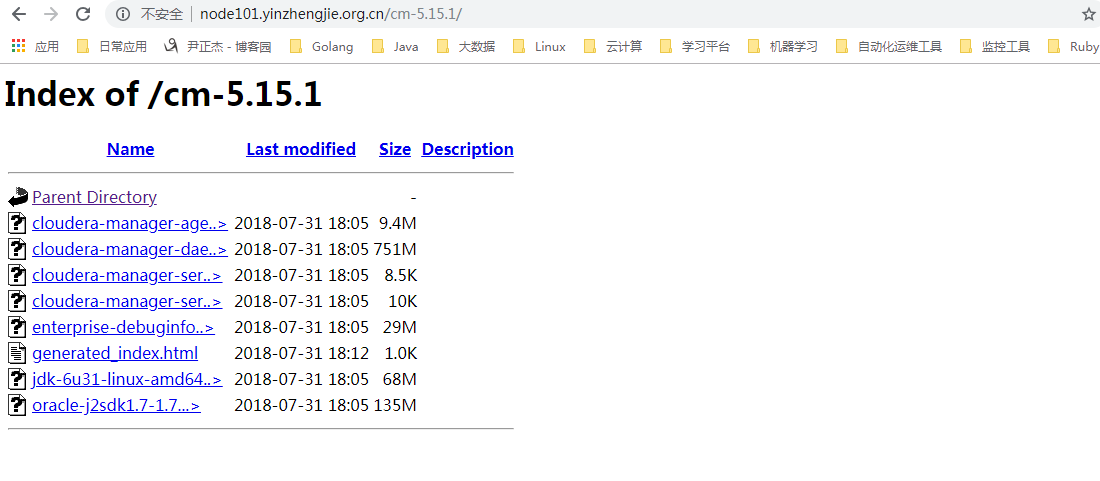
配置成功后,我们可以在wen目录上看到相应的信息。
4>.创建repodata数据文件

[root@node101 cm-5.15.1]# yum -y install createrepo
Loaded plugins: fastestmirror
Loading mirror speeds from cached hostfile
 * base: mirrors.huaweicloud.com
 * extras: mirrors.tuna.tsinghua.edu.cn
 * updates: mirrors.tuna.tsinghua.edu.cn
Resolving Dependencies
--> Running transaction check
---> Package createrepo.noarch 0:0.9.9-28.el7 will be installed
--> Processing Dependency: python-deltarpm for package: createrepo-0.9.9-28.el7.noarch
--> Processing Dependency: libxml2-python for package: createrepo-0.9.9-28.el7.noarch
--> Processing Dependency: deltarpm for package: createrepo-0.9.9-28.el7.noarch
--> Running transaction check
---> Package deltarpm.x86_64 0:3.6-3.el7 will be installed
---> Package libxml2-python.x86_64 0:2.9.1-6.el7_2.3 will be installed
---> Package python-deltarpm.x86_64 0:3.6-3.el7 will be installed
--> Finished Dependency Resolution

Dependencies Resolved

=========================================================================================================================================================
 Package                                  Arch                            Version                                    Repository                     Size
=========================================================================================================================================================
Installing:
 createrepo                               noarch                          0.9.9-28.el7                               base                           94 k
Installing for dependencies:
 deltarpm                                 x86_64                          3.6-3.el7                                  base                           82 k
 libxml2-python                           x86_64                          2.9.1-6.el7_2.3                            base                          247 k
 python-deltarpm                          x86_64                          3.6-3.el7                                  base                           31 k

Transaction Summary
=========================================================================================================================================================
Install  1 Package (+3 Dependent packages)

Total download size: 454 k
Installed size: 2.0 M
Downloading packages:
(1/4): deltarpm-3.6-3.el7.x86_64.rpm                                                                                              |  82 kB  00:00:00
(2/4): python-deltarpm-3.6-3.el7.x86_64.rpm                                                                                       |  31 kB  00:00:00
(3/4): createrepo-0.9.9-28.el7.noarch.rpm                                                                                         |  94 kB  00:00:00
(4/4): libxml2-python-2.9.1-6.el7_2.3.x86_64.rpm                                                                                  | 247 kB  00:00:09
---------------------------------------------------------------------------------------------------------------------------------------------------------
Total                                                                                                                     49 kB/s | 454 kB  00:00:09
Running transaction check
Running transaction test
Transaction test succeeded
Running transaction
  Installing : deltarpm-3.6-3.el7.x86_64                                                                                                             1/4
  Installing : python-deltarpm-3.6-3.el7.x86_64                                                                                                      2/4
  Installing : libxml2-python-2.9.1-6.el7_2.3.x86_64                                                                                                 3/4
  Installing : createrepo-0.9.9-28.el7.noarch                                                                                                        4/4
  Verifying  : createrepo-0.9.9-28.el7.noarch                                                                                                        1/4
  Verifying  : libxml2-python-2.9.1-6.el7_2.3.x86_64                                                                                                 2/4
  Verifying  : deltarpm-3.6-3.el7.x86_64                                                                                                             3/4
  Verifying  : python-deltarpm-3.6-3.el7.x86_64                                                                                                      4/4

Installed:
  createrepo.noarch 0:0.9.9-28.el7

Dependency Installed:
  deltarpm.x86_64 0:3.6-3.el7                 libxml2-python.x86_64 0:2.9.1-6.el7_2.3                 python-deltarpm.x86_64 0:3.6-3.el7

Complete!
[root@node101 cm-5.15.1]#
[root@node101 cm-5.15.1]# pwd
/var/www/html/cm-5.15.1
[root@node101 cm-5.15.1]# ll
total 1016664
-rw-rw-r-- 1 1106 592   9857532 Jul 31 18:05 cloudera-manager-agent-5.15.1-1.cm5151.p0.3.el7.x86_64.rpm
-rw-rw-r-- 1 1106 592 787321332 Jul 31 18:05 cloudera-manager-daemons-5.15.1-1.cm5151.p0.3.el7.x86_64.rpm
-rw-rw-r-- 1 1106 592      8712 Jul 31 18:05 cloudera-manager-server-5.15.1-1.cm5151.p0.3.el7.x86_64.rpm
-rw-rw-r-- 1 1106 592     10616 Jul 31 18:05 cloudera-manager-server-db-2-5.15.1-1.cm5151.p0.3.el7.x86_64.rpm
-rw-rw-r-- 1 1106 592  30603956 Jul 31 18:05 enterprise-debuginfo-5.15.1-1.cm5151.p0.3.el7.x86_64.rpm
-rw-rw-r-- 1 1106 592      1066 Jul 31 18:12 generated_index.html
-rw-rw-r-- 1 1106 592  71204325 Jul 31 18:05 jdk-6u31-linux-amd64.rpm
-rw-rw-r-- 1 1106 592 142039186 Jul 31 18:05 oracle-j2sdk1.7-1.7.0+update67-1.x86_64.rpm
[root@node101 cm-5.15.1]#
[root@node101 cm-5.15.1]# createrepo .            #生成数据目录,我们看在webUI中查看相应的数据目录
Spawning worker 0 with 4 pkgs
Spawning worker 1 with 3 pkgs
Workers Finished
Saving Primary metadata
Saving file lists metadata
Saving other metadata
Generating sqlite DBs
Sqlite DBs complete
[root@node101 cm-5.15.1]#
[root@node101 cm-5.15.1]# ll
total 1016668
-rw-rw-r-- 1 1106  592   9857532 Jul 31 18:05 cloudera-manager-agent-5.15.1-1.cm5151.p0.3.el7.x86_64.rpm
-rw-rw-r-- 1 1106  592 787321332 Jul 31 18:05 cloudera-manager-daemons-5.15.1-1.cm5151.p0.3.el7.x86_64.rpm
-rw-rw-r-- 1 1106  592      8712 Jul 31 18:05 cloudera-manager-server-5.15.1-1.cm5151.p0.3.el7.x86_64.rpm
-rw-rw-r-- 1 1106  592     10616 Jul 31 18:05 cloudera-manager-server-db-2-5.15.1-1.cm5151.p0.3.el7.x86_64.rpm
-rw-rw-r-- 1 1106  592  30603956 Jul 31 18:05 enterprise-debuginfo-5.15.1-1.cm5151.p0.3.el7.x86_64.rpm
-rw-rw-r-- 1 1106  592      1066 Jul 31 18:12 generated_index.html
-rw-rw-r-- 1 1106  592  71204325 Jul 31 18:05 jdk-6u31-linux-amd64.rpm
-rw-rw-r-- 1 1106  592 142039186 Jul 31 18:05 oracle-j2sdk1.7-1.7.0+update67-1.x86_64.rpm
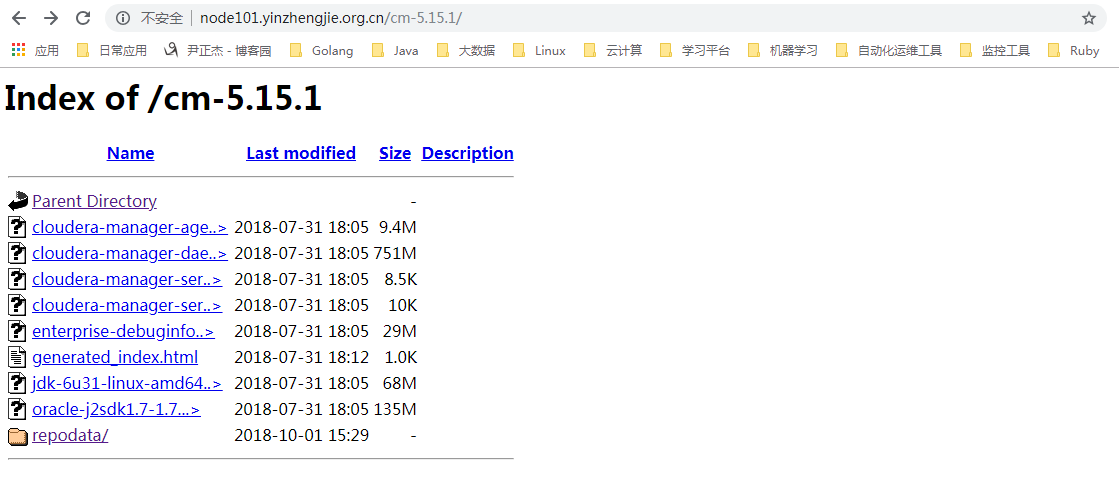
drwxr-xr-x 2 root root      4096 Oct  1 15:29 repodata                            #温馨提示:注意看这里,发现没有?这个目录是新生成的!
[root@node101 cm-5.15.1]#
再次查看webUI是否有repodata目录生成:
5>.配置集群各机器本地yum源
[root@node101 ~]# cd /etc/yum.repos.d/
[root@node101 yum.repos.d]#
[root@node101 yum.repos.d]# ll                                        #下面是默认的repo源
total 28
-rw-r--r--. 1 root root 1664 Dec  9  2015 CentOS-Base.repo
-rw-r--r--. 1 root root 1309 Dec  9  2015 CentOS-CR.repo
-rw-r--r--. 1 root root  649 Dec  9  2015 CentOS-Debuginfo.repo
-rw-r--r--. 1 root root  290 Dec  9  2015 CentOS-fasttrack.repo
-rw-r--r--. 1 root root  630 Dec  9  2015 CentOS-Media.repo
-rw-r--r--. 1 root root 1331 Dec  9  2015 CentOS-Sources.repo
-rw-r--r--. 1 root root 1952 Dec  9  2015 CentOS-Vault.repo
[root@node101 yum.repos.d]#
[root@node101 yum.repos.d]# mkdir repo-backup
[root@node101 yum.repos.d]# mv ./*.repo repo-backup/            #备份默认的repo源,为了防止你操作失败可以还原之前的状态!
[root@node101 yum.repos.d]# ll
total 4
drwxr-xr-x 2 root root 4096 Oct  1 15:50 repo-backup
[root@node101 yum.repos.d]#
[root@node101 yum.repos.d]# vi yinzhengjie-cm.repo
[root@node101 yum.repos.d]# ll
total 8
drwxr-xr-x 2 root root 4096 Oct  1 15:50 repo-backup
-rw-r--r-- 1 root root  204 Oct  1 15:58 yinzhengjie-cm.repo
[root@node101 yum.repos.d]#
[root@node101 yum.repos.d]# more yinzhengjie-cm.repo             #这个配置参考自:可参考:http://archive.cloudera.com/cm5/redhat/7/x86_64/cm/cloudera-manager.repo
[yinzhengjie-cm]
# Packages for Cloudera Manager, Version 5, on RedHat or CentOS 7 x86_64
name=Cloudera Manager
baseurl=https://node101.yinzhengjie.org.cn/cm-5.15.1
enabled = 1
gpgcheck = 0
[root@node101 yum.repos.d]#
[root@node101 yum.repos.d]# xrsync.sh /etc/yum.repos.d/yinzhengjie-cm.repo             #将配置同步到其它两个节点中
=========== node102.yinzhengjie.org.cn : /etc/yum.repos.d/yinzhengjie-cm.repo ===========
命令执行成功
=========== node103.yinzhengjie.org.cn : /etc/yum.repos.d/yinzhengjie-cm.repo ===========
命令执行成功
[root@node101 yum.repos.d]#
三.Cloudera Manager服务安装详解
1>.Cloudera Manager服务架构设计
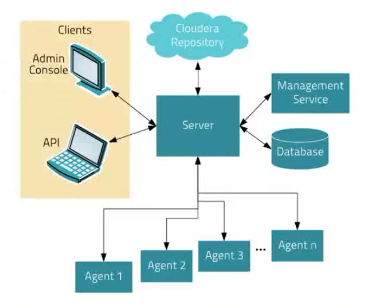
1.1>.Agent 1 .. .Agent n:
所有的Agent相当于集群。Agent部署在每一台服务器上,Server的控制命令最终由Agent来完成,而Agent通过Python调用shell脚本来控制具体的启动或者停止的脚本执行。
1.2>.Server
相当于Cloudera Manager的主节点,它可以管理整个集群。它主要负责以下几件事情:
第一:处理软件和服务器的逻辑关系;
第二:处理服务的安装配置,启动,停止等;
第三:控制对应的角色的启动和停止;
第四:管理集群(每一台Agent)
1.3>.Database
需要关系型数据库存储数据。
1.4>.Management Server
对整个集群运行的硬件和软件做一些预警,监控,报告等。当你的图标没有出来的时候,你就得考虑它是否正常启动了。
1.5>.Cloudera Repository
Cloudera官网的支持,可以下载软件包。
1.6>.Clients
通过webUI或者调用对应的API来控制Server。如果你是通过webUI界面点击了某个操作,比如让某个集群停止或启动,首先这个指令会发送给Server端,然后Server端根据自己的记录去找相应的Agent执行相应的脚本来停止或者启动应用。默认Server端会想Agent发送五次指令,如果这五次指令Agent都没有相应,则Server端判定Agent端存在故障。
2>.安装PostgreSQL数据库
PostgreSQL是Cloudera Manager默认使用的数据库。它负责存储信息内容包括:
2.1>.保存平台所有的配置信息(比如对各个组件的参数配置等等),便于各个节点获取数据库的配置信息;
2.2>.所有节点的监控状态(各个节点将自己的状态信息存储到数据库中,以便主服务从数据库中获取数据信息,从而达到监控的目的);
数据库主要有以上两个功能,具体安装步骤如下:

[root@node101 packages]# yum -y install postgresql
Loaded plugins: fastestmirror
base                                                                                                                                                                                           | 3.6 kB  00:00:00
extras                                                                                                                                                                                         | 3.4 kB  00:00:00
updates                                                                                                                                                                                        | 3.4 kB  00:00:00
Loading mirror speeds from cached hostfile
 * base: mirrors.tuna.tsinghua.edu.cn
 * extras: mirrors.tuna.tsinghua.edu.cn
 * updates: mirrors.tuna.tsinghua.edu.cn
Resolving Dependencies
--> Running transaction check
---> Package postgresql.x86_64 0:9.2.24-1.el7_5 will be installed
--> Processing Dependency: postgresql-libs(x86-64) = 9.2.24-1.el7_5 for package: postgresql-9.2.24-1.el7_5.x86_64
--> Processing Dependency: libpq.so.5()(64bit) for package: postgresql-9.2.24-1.el7_5.x86_64
--> Running transaction check
---> Package postgresql-libs.x86_64 0:9.2.24-1.el7_5 will be installed
--> Finished Dependency Resolution

Dependencies Resolved

======================================================================================================================================================================================================================
 Package                                                 Arch                                           Version                                                 Repository                                       Size
======================================================================================================================================================================================================================
Installing:
 postgresql                                              x86_64                                         9.2.24-1.el7_5                                          updates                                         3.0 M
Installing for dependencies:
 postgresql-libs                                         x86_64                                         9.2.24-1.el7_5                                          updates                                         234 k

Transaction Summary
======================================================================================================================================================================================================================
Install  1 Package (+1 Dependent package)

Total download size: 3.3 M
Installed size: 17 M
Downloading packages:
(1/2): postgresql-libs-9.2.24-1.el7_5.x86_64.rpm                                                                                                                                               | 234 kB  00:00:00
(2/2): postgresql-9.2.24-1.el7_5.x86_64.rpm                                                                                                                                                    | 3.0 MB  00:00:05
----------------------------------------------------------------------------------------------------------------------------------------------------------------------------------------------------------------------
Total                                                                                                                                                                                 631 kB/s | 3.3 MB  00:00:05
Running transaction check
Running transaction test
Transaction test succeeded
Running transaction
  Installing : postgresql-libs-9.2.24-1.el7_5.x86_64                                                                                                                                                              1/2
  Installing : postgresql-9.2.24-1.el7_5.x86_64                                                                                                                                                                   2/2
  Verifying  : postgresql-libs-9.2.24-1.el7_5.x86_64                                                                                                                                                              1/2
  Verifying  : postgresql-9.2.24-1.el7_5.x86_64                                                                                                                                                                   2/2

Installed:
  postgresql.x86_64 0:9.2.24-1.el7_5

Dependency Installed:
  postgresql-libs.x86_64 0:9.2.24-1.el7_5

Complete!
[root@node101 packages]#
3>.安装Cloudera manager Server

[root@node101 ~]# cd /yinzhengjie/download/
[root@node101 download]# wget http://archive.cloudera.com/cm5/installer/5.15.1/cloudera-manager-installer.bin
--2018-10-01 16:44:49--  http://archive.cloudera.com/cm5/installer/5.15.1/cloudera-manager-installer.bin
Resolving archive.cloudera.com (archive.cloudera.com)... 151.101.72.167
Connecting to archive.cloudera.com (archive.cloudera.com)|151.101.72.167|:80... connected.
HTTP request sent, awaiting response... 200 OK
Length: 521199 (509K) [application/octet-stream]
Saving to: ‘cloudera-manager-installer.bin’

100%[============================================================================================================================================================================>] 521,199      599KB/s   in 0.8s

2018-10-01 16:44:50 (599 KB/s) - ‘cloudera-manager-installer.bin’ saved [521199/521199]

[root@node101 download]# ll
total 1014632
-rw-r--r-- 1 root root     521199 Aug 22 22:50 cloudera-manager-installer.bin
-rw-r--r-- 1 root root 1038457027 Aug 22 22:51 cm5.15.1-centos7.tar.gz
[root@node101 download]#
[root@node101 download]# pwd
/yinzhengjie/download
[root@node101 download]#
[root@node101 download]# ll
total 1014632
-rwxr-xr-x 1 root root     521199 Aug 22 22:50 cloudera-manager-installer.bin
-rw-r--r-- 1 root root 1038457027 Aug 22 22:51 cm5.15.1-centos7.tar.gz
[root@node101 download]#
[root@node101 download]# chmod +x cloudera-manager-installer.bin
[root@node101 download]#
[root@node101 download]# ./cloudera-manager-installer.bin --skip_repo_package=1      #注意,后面的参数必须要写,目的是为了防止cm去官网下载repo,我们之前的操作依据将repo下载到本地了,这里跳过验证即可
[root@node101 download]#
关于安装的详细步骤请参考:https://www.cnblogs.com/yinzhengjie/p/9735095.html。安装成功后,可以访问webUI界面,如下图: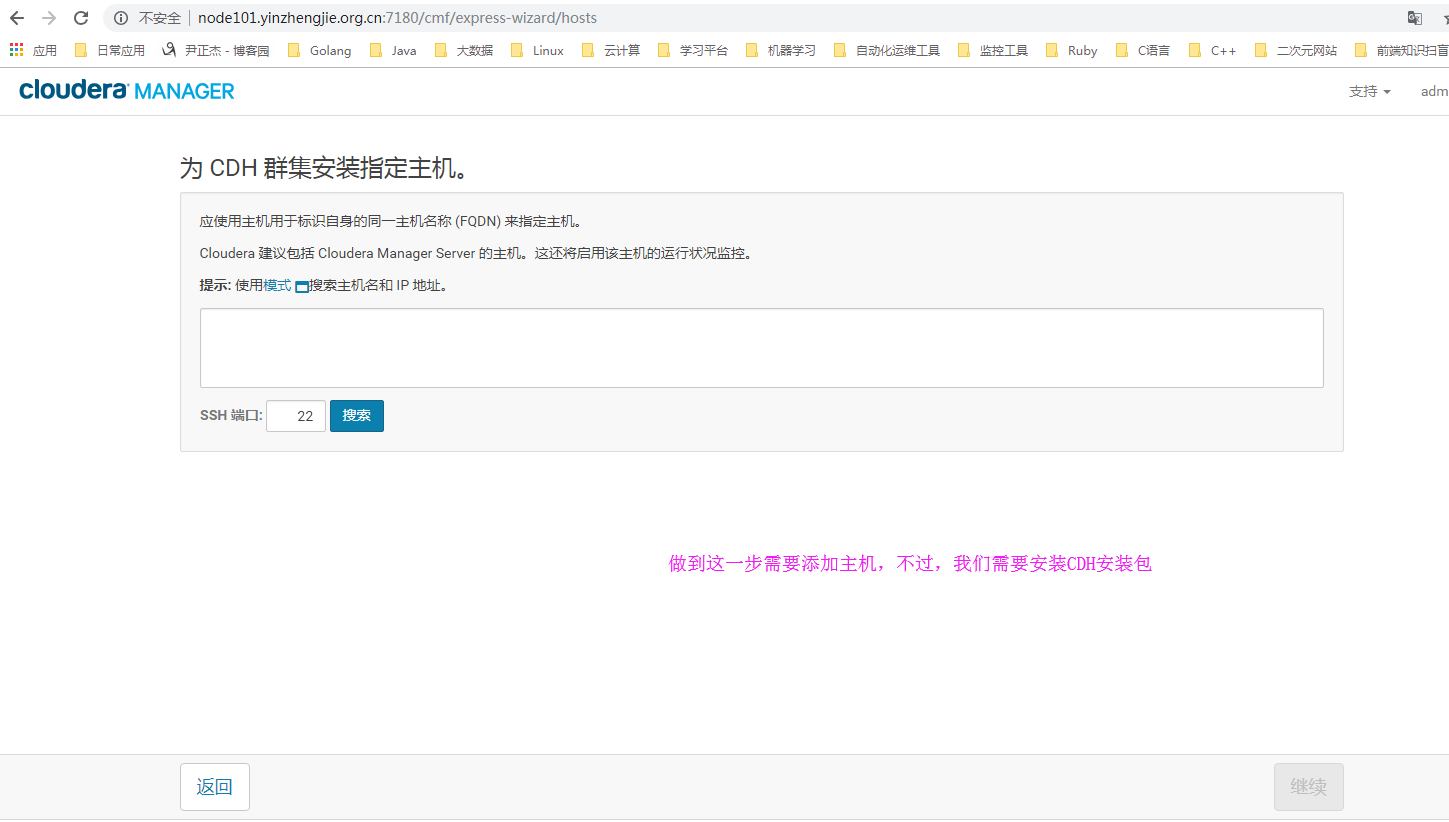

[root@node101 ~]# systemctl cloudera-scm-server status
Unknown operation 'cloudera-scm-server'.
[root@node101 ~]#
[root@node101 ~]# systemctl status cloudera-scm-server
● cloudera-scm-server.service - LSB: Cloudera SCM Server
   Loaded: loaded (/etc/rc.d/init.d/cloudera-scm-server; bad; vendor preset: disabled)
   Active: active (exited) since Mon 2018-10-01 17:34:01 CST; 45min ago
     Docs: man:systemd-sysv-generator(8)
  Process: 4088 ExecStart=/etc/rc.d/init.d/cloudera-scm-server start (code=exited, status=0/SUCCESS)

Oct 01 17:33:56 node101.yinzhengjie.org.cn systemd[1]: Starting LSB: Cloudera SCM Server...
Oct 01 17:33:56 node101.yinzhengjie.org.cn cloudera-scm-server[4088]: /etc/rc.d/init.d/cloudera-scm-server: line 109: pstree: command not found
Oct 01 17:33:56 node101.yinzhengjie.org.cn su[4110]: (to cloudera-scm) root on none
Oct 01 17:34:01 node101.yinzhengjie.org.cn cloudera-scm-server[4088]: Starting cloudera-scm-server: [  OK  ]
Oct 01 17:34:01 node101.yinzhengjie.org.cn systemd[1]: Started LSB: Cloudera SCM Server.
Hint: Some lines were ellipsized, use -l to show in full.
[root@node101 ~]#

[root@node101 ~]# systemctl cloudera-scm-server status
Unknown operation 'cloudera-scm-server'.
[root@node101 ~]#
[root@node101 ~]# systemctl status cloudera-scm-server
● cloudera-scm-server.service - LSB: Cloudera SCM Server
   Loaded: loaded (/etc/rc.d/init.d/cloudera-scm-server; bad; vendor preset: disabled)
   Active: active (exited) since Mon 2018-10-01 17:34:01 CST; 45min ago
     Docs: man:systemd-sysv-generator(8)
  Process: 4088 ExecStart=/etc/rc.d/init.d/cloudera-scm-server start (code=exited, status=0/SUCCESS)

Oct 01 17:33:56 node101.yinzhengjie.org.cn systemd[1]: Starting LSB: Cloudera SCM Server...
Oct 01 17:33:56 node101.yinzhengjie.org.cn cloudera-scm-server[4088]: /etc/rc.d/init.d/cloudera-scm-server: line 109: pstree: command not found
Oct 01 17:33:56 node101.yinzhengjie.org.cn su[4110]: (to cloudera-scm) root on none
Oct 01 17:34:01 node101.yinzhengjie.org.cn cloudera-scm-server[4088]: Starting cloudera-scm-server: [  OK  ]
Oct 01 17:34:01 node101.yinzhengjie.org.cn systemd[1]: Started LSB: Cloudera SCM Server.
Hint: Some lines were ellipsized, use -l to show in full.
[root@node101 ~]#
[root@node101 ~]# systemctl stop cloudera-scm-server
[root@node101 ~]#
[root@node101 ~]# systemctl status cloudera-scm-server
● cloudera-scm-server.service - LSB: Cloudera SCM Server
   Loaded: loaded (/etc/rc.d/init.d/cloudera-scm-server; bad; vendor preset: disabled)
   Active: inactive (dead) since Mon 2018-10-01 18:21:18 CST; 2s ago
     Docs: man:systemd-sysv-generator(8)
  Process: 5894 ExecStop=/etc/rc.d/init.d/cloudera-scm-server stop (code=exited, status=0/SUCCESS)
  Process: 5792 ExecStart=/etc/rc.d/init.d/cloudera-scm-server start (code=exited, status=0/SUCCESS)

Oct 01 18:19:58 node101.yinzhengjie.org.cn systemd[1]: Starting LSB: Cloudera SCM Server...
Oct 01 18:19:58 node101.yinzhengjie.org.cn cloudera-scm-server[5792]: /etc/rc.d/init.d/cloudera-scm-server: line 109: pstree: command not found
Oct 01 18:19:58 node101.yinzhengjie.org.cn su[5814]: (to cloudera-scm) root on none
Oct 01 18:20:03 node101.yinzhengjie.org.cn systemd[1]: Started LSB: Cloudera SCM Server.
Oct 01 18:20:03 node101.yinzhengjie.org.cn cloudera-scm-server[5792]: Starting cloudera-scm-server: [  OK  ]
Oct 01 18:21:15 node101.yinzhengjie.org.cn systemd[1]: Stopping LSB: Cloudera SCM Server...
Oct 01 18:21:16 node101.yinzhengjie.org.cn cloudera-scm-server[5894]: /etc/rc.d/init.d/cloudera-scm-server: line 109: pstree: command not found
Oct 01 18:21:18 node101.yinzhengjie.org.cn cloudera-scm-server[5894]: Stopping cloudera-scm-server: [  OK  ]
Oct 01 18:21:18 node101.yinzhengjie.org.cn systemd[1]: Stopped LSB: Cloudera SCM Server.
Hint: Some lines were ellipsized, use -l to show in full.
[root@node101 ~]#

[root@node101 ~]# systemctl status cloudera-scm-server
● cloudera-scm-server.service - LSB: Cloudera SCM Server
   Loaded: loaded (/etc/rc.d/init.d/cloudera-scm-server; bad; vendor preset: disabled)
   Active: inactive (dead) since Mon 2018-10-01 18:21:18 CST; 2s ago
     Docs: man:systemd-sysv-generator(8)
  Process: 5894 ExecStop=/etc/rc.d/init.d/cloudera-scm-server stop (code=exited, status=0/SUCCESS)
  Process: 5792 ExecStart=/etc/rc.d/init.d/cloudera-scm-server start (code=exited, status=0/SUCCESS)

Oct 01 18:19:58 node101.yinzhengjie.org.cn systemd[1]: Starting LSB: Cloudera SCM Server...
Oct 01 18:19:58 node101.yinzhengjie.org.cn cloudera-scm-server[5792]: /etc/rc.d/init.d/cloudera-scm-server: line 109: pstree: command not found
Oct 01 18:19:58 node101.yinzhengjie.org.cn su[5814]: (to cloudera-scm) root on none
Oct 01 18:20:03 node101.yinzhengjie.org.cn systemd[1]: Started LSB: Cloudera SCM Server.
Oct 01 18:20:03 node101.yinzhengjie.org.cn cloudera-scm-server[5792]: Starting cloudera-scm-server: [  OK  ]
Oct 01 18:21:15 node101.yinzhengjie.org.cn systemd[1]: Stopping LSB: Cloudera SCM Server...
Oct 01 18:21:16 node101.yinzhengjie.org.cn cloudera-scm-server[5894]: /etc/rc.d/init.d/cloudera-scm-server: line 109: pstree: command not found
Oct 01 18:21:18 node101.yinzhengjie.org.cn cloudera-scm-server[5894]: Stopping cloudera-scm-server: [  OK  ]
Oct 01 18:21:18 node101.yinzhengjie.org.cn systemd[1]: Stopped LSB: Cloudera SCM Server.
Hint: Some lines were ellipsized, use -l to show in full.
[root@node101 ~]#
[root@node101 ~]# systemctl start cloudera-scm-server
[root@node101 ~]#
[root@node101 ~]# systemctl status cloudera-scm-server
● cloudera-scm-server.service - LSB: Cloudera SCM Server
   Loaded: loaded (/etc/rc.d/init.d/cloudera-scm-server; bad; vendor preset: disabled)
   Active: active (exited) since Mon 2018-10-01 18:21:33 CST; 53s ago
     Docs: man:systemd-sysv-generator(8)
  Process: 5894 ExecStop=/etc/rc.d/init.d/cloudera-scm-server stop (code=exited, status=0/SUCCESS)
  Process: 5939 ExecStart=/etc/rc.d/init.d/cloudera-scm-server start (code=exited, status=0/SUCCESS)

Oct 01 18:21:28 node101.yinzhengjie.org.cn systemd[1]: Starting LSB: Cloudera SCM Server...
Oct 01 18:21:28 node101.yinzhengjie.org.cn cloudera-scm-server[5939]: /etc/rc.d/init.d/cloudera-scm-server: line 109: pstree: command not found
Oct 01 18:21:28 node101.yinzhengjie.org.cn su[5961]: (to cloudera-scm) root on none
Oct 01 18:21:33 node101.yinzhengjie.org.cn cloudera-scm-server[5939]: Starting cloudera-scm-server: [  OK  ]
Oct 01 18:21:33 node101.yinzhengjie.org.cn systemd[1]: Started LSB: Cloudera SCM Server.
Hint: Some lines were ellipsized, use -l to show in full.
[root@node101 ~]#
4>.下载parcels包并配置到CM主服务器目录下(“/opt/cloudera/parcel-repo/”)

[root@node101 ~]# mkdir -pv /yinzhengjie/softwares/parcels
mkdir: created directory ‘/yinzhengjie/softwares/parcels’
[root@node101 ~]#
[root@node101 ~]# cd /yinzhengjie/softwares/parcels/
[root@node101 parcels]#
[root@node101 parcels]# ll
total 0
[root@node101 parcels]#
[root@node101 parcels]# wget http://archive.cloudera.com/cdh5/parcels/5.15.1/CDH-5.15.1-1.cdh5.15.1.p0.4-el7.parcel.sha1        #下载CDH校验包
--2018-10-01 18:26:21--  http://archive.cloudera.com/cdh5/parcels/5.15.1/CDH-5.15.1-1.cdh5.15.1.p0.4-el7.parcel.sha1
Resolving archive.cloudera.com (archive.cloudera.com)... 151.101.108.167
Connecting to archive.cloudera.com (archive.cloudera.com)|151.101.108.167|:80... connected.
HTTP request sent, awaiting response... 200 OK
Length: 41 [binary/octet-stream]
Saving to: ‘CDH-5.15.1-1.cdh5.15.1.p0.4-el7.parcel.sha1’

100%[=====================================================================================================>] 41          --.-K/s   in 0s

2018-10-01 18:26:22 (2.72 MB/s) - ‘CDH-5.15.1-1.cdh5.15.1.p0.4-el7.parcel.sha1’ saved [41/41]

[root@node101 parcels]#

[root@node101 parcels]#
[root@node101 parcels]# wget http://archive.cloudera.com/cdh5/parcels/5.15.1/CDH-5.15.1-1.cdh5.15.1.p0.4-el7.parcel                #下载CDH安装包
--2018-10-01 18:26:42--  http://archive.cloudera.com/cdh5/parcels/5.15.1/CDH-5.15.1-1.cdh5.15.1.p0.4-el7.parcel
Resolving archive.cloudera.com (archive.cloudera.com)... 151.101.228.167
Connecting to archive.cloudera.com (archive.cloudera.com)|151.101.228.167|:80... connected.
HTTP request sent, awaiting response... 200 OK
Length: 2120090032 (2.0G) [binary/octet-stream]
Saving to: ‘CDH-5.15.1-1.cdh5.15.1.p0.4-el7.parcel’

100%[=====================================================================================================>] 41          9.17 MB/s   in 0s

2018-10-01 18:43:01 (3.07 MB/s) - ‘CDH-5.15.1-1.cdh5.15.1.p0.4-el7.parcel’ saved [41/41]

[root@node101 parcels]#
[root@node101 parcels]# ll
total 2070408
-rw-r--r-- 1 root root 2120090032 Aug 23 03:54 CDH-5.15.1-1.cdh5.15.1.p0.4-el7.parcel
-rw-r--r-- 1 root root         41 Sep 13 01:44 CDH-5.15.1-1.cdh5.15.1.p0.4-el7.parcel.sha1
[root@node101 parcels]#

[root@node101 parcels]# ll
total 2070408
-rw-r--r-- 1 root root 2120090032 Aug 23 03:54 CDH-5.15.1-1.cdh5.15.1.p0.4-el7.parcel
-rw-r--r-- 1 root root         41 Sep 13 01:44 CDH-5.15.1-1.cdh5.15.1.p0.4-el7.parcel.sha1
[root@node101 parcels]#
[root@node101 parcels]# mv CDH-5.15.1-1.cdh5.15.1.p0.4-el7.parcel.sha1 CDH-5.15.1-1.cdh5.15.1.p0.4-el7.parcel.sha
[root@node101 parcels]#
[root@node101 parcels]# ll
total 2070408
-rw-r--r-- 1 root root 2120090032 Aug 23 03:54 CDH-5.15.1-1.cdh5.15.1.p0.4-el7.parcel
-rw-r--r-- 1 root root         41 Sep 13 01:44 CDH-5.15.1-1.cdh5.15.1.p0.4-el7.parcel.sha
[root@node101 parcels]#
[root@node101 parcels]# pwd
/yinzhengjie/softwares/parcels
[root@node101 parcels]# ll
total 2070408
-rw-r--r-- 1 root root 2120090032 Aug 23 03:54 CDH-5.15.1-1.cdh5.15.1.p0.4-el7.parcel
-rw-r--r-- 1 root root         41 Sep 13 01:44 CDH-5.15.1-1.cdh5.15.1.p0.4-el7.parcel.sha
[root@node101 parcels]#
[root@node101 parcels]# mv * /opt/cloudera/parcel-repo/                #将资源拷贝到parcel-repo目录下
[root@node101 parcels]#
[root@node101 parcels]# ll
total 0
[root@node101 parcels]#
[root@node101 parcels]#
[root@node101 parcels]# ll /opt/cloudera/parcel-repo/
total 2070408
-rw-r--r-- 1 root root 2120090032 Aug 23 03:54 CDH-5.15.1-1.cdh5.15.1.p0.4-el7.parcel
-rw-r--r-- 1 root root         41 Sep 13 01:44 CDH-5.15.1-1.cdh5.15.1.p0.4-el7.parcel.sha
[root@node101 parcels]#
5>.检查本地源并安装Cloudera manager agent端
详情强参考:https://www.cnblogs.com/yinzhengjie/p/9735451.html
6>.
本文来自博客园,作者:尹正杰,转载请注明原文链接:https://www.cnblogs.com/yinzhengjie/p/9734108.html,个人微信: "JasonYin2020"(添加时请备注来源及意图备注,有偿付费)
当你的才华还撑不起你的野心的时候,你就应该静下心来学习。当你的能力还驾驭不了你的目标的时候,你就应该沉下心来历练。问问自己,想要怎样的人生。


