
Nacos基于MySQL作为数据源实战案例
作者:尹正杰
版权声明:原创作品,谢绝转载!否则将追究法律责任。
目录
一 Nacos支持MySQL作为数据源
1.Nacos支持MySQL作为数据源的起始版本
Nacos 0.7-版本之前,在单机模式时nacos使用嵌入式数据库实现数据的存储,不方便观察数据存储的基本情况。

Nacos 0.7+版本增加了支持MySQL数据源能力,本章节就会介绍Nacos基于MySQL实现数据存储。
2.Nacos基于MySQL数据存储流程说明
具体的操作步骤如下:
	- 1.安装数据库,版本要求:5.6.5+
	- 2.创建数据库nacos和用户nacos,并授权
	- 3.执行数据库初始化脚本 mysql-schema.sql
	- 4.修改conf/application.properties文件,增加支持MySQL数据源配置(目前只支持mysql),添加mysql数据源的url、用户名和密码。
二.Nacos基于MySQL作为数据源实战案例
1.部署MySQL服务
  1.安装MySQL服务
[root@master231 ~]# apt update && apt -y install mysql-server

  2.默认安装后会启动病监听本地回环地址
[root@master231 ~]# ss -ntl | grep 3306
LISTEN 0      151              127.0.0.1:3306       0.0.0.0:*
LISTEN 0      70               127.0.0.1:33060      0.0.0.0:*

  3.修改MySQL监听的IP地址范围
[root@master231 ~]# sed -i '/127.0.0.1/s/^/#/' /etc/mysql/mysql.conf.d/mysqld.cnf
[root@master231 ~]# systemctl restart mysql.service
[root@master231 ~]# ss -ntl | grep 3306
LISTEN 0      151                      *:3306             *:*
LISTEN 0      70                       *:33060            *:*
[root@master231 ~]#
2.创建授权用户
[root@master231 ~]# mysql
Welcome to the MySQL monitor.  Commands end with ; or \g.
Your MySQL connection id is 8
Server version: 8.0.41-0ubuntu0.22.04.1 (Ubuntu)

Copyright (c) 2000, 2025, Oracle and/or its affiliates.

Oracle is a registered trademark of Oracle Corporation and/or its
affiliates. Other names may be trademarks of their respective
owners.

Type 'help;' or '\h' for help. Type '\c' to clear the current input statement.

mysql> CREATE DATABASE nacos;
Query OK, 1 row affected (0.01 sec)

mysql> CREATE USER nacos IDENTIFIED  WITH  mysql_native_password by 'yinzhengjie';
Query OK, 0 rows affected (0.00 sec)

mysql> GRANT ALL ON nacos.* TO nacos;
Query OK, 0 rows affected (0.00 sec)

mysql>
3.导入Nacos的表结构
[root@master231 ~]# mysql -unacos -pyinzhengjie nacos < /yinzhengjie/softwares/nacos/conf/mysql-schema.sql
4.修改Nacos的配置文件
[root@master231 ~]# vim /yinzhengjie/softwares/nacos/conf/application.properties
...
spring.sql.init.platform=mysql
db.num=1
db.url.0=jdbc:mysql://127.0.0.1:3306/nacos?
characterEncoding=utf8&connectTimeout=1000&socketTimeout=3000&autoReconnect=true&useUnicode=true&useSSL=false&serverTimezone=UTC
db.user.0=nacos
db.password.0=yinzhengjie
5.重启Nacos服务
[root@master231 ~]# /yinzhengjie/softwares/nacos/bin/shutdown.sh
[root@master231 ~]# /yinzhengjie/softwares/nacos/bin/startup.sh -m standalone
[root@master231 ~]# ss -ntl | grep 8848
LISTEN 0      100                      *:8848             *:*
[root@master231 ~]#
[root@master231 ~]# tail -100f /yinzhengjie/softwares/nacos/logs/start.out
...
2025-02-08 11:45:28,379 INFO Nacos started successfully in stand alone mode. use external storage
6.访问Nacos的WebUI
http://10.0.0.231:8848/nacos
7.验证配置是否生效
[root@worker232 ~]# curl -s -X POST "http://10.0.0.231:8848/nacos/v1/cs/configs?dataId=blog&group=k8s&content=https://www.cnblogs.com/yinzhengjie" | more
true
[root@worker232 ~]#
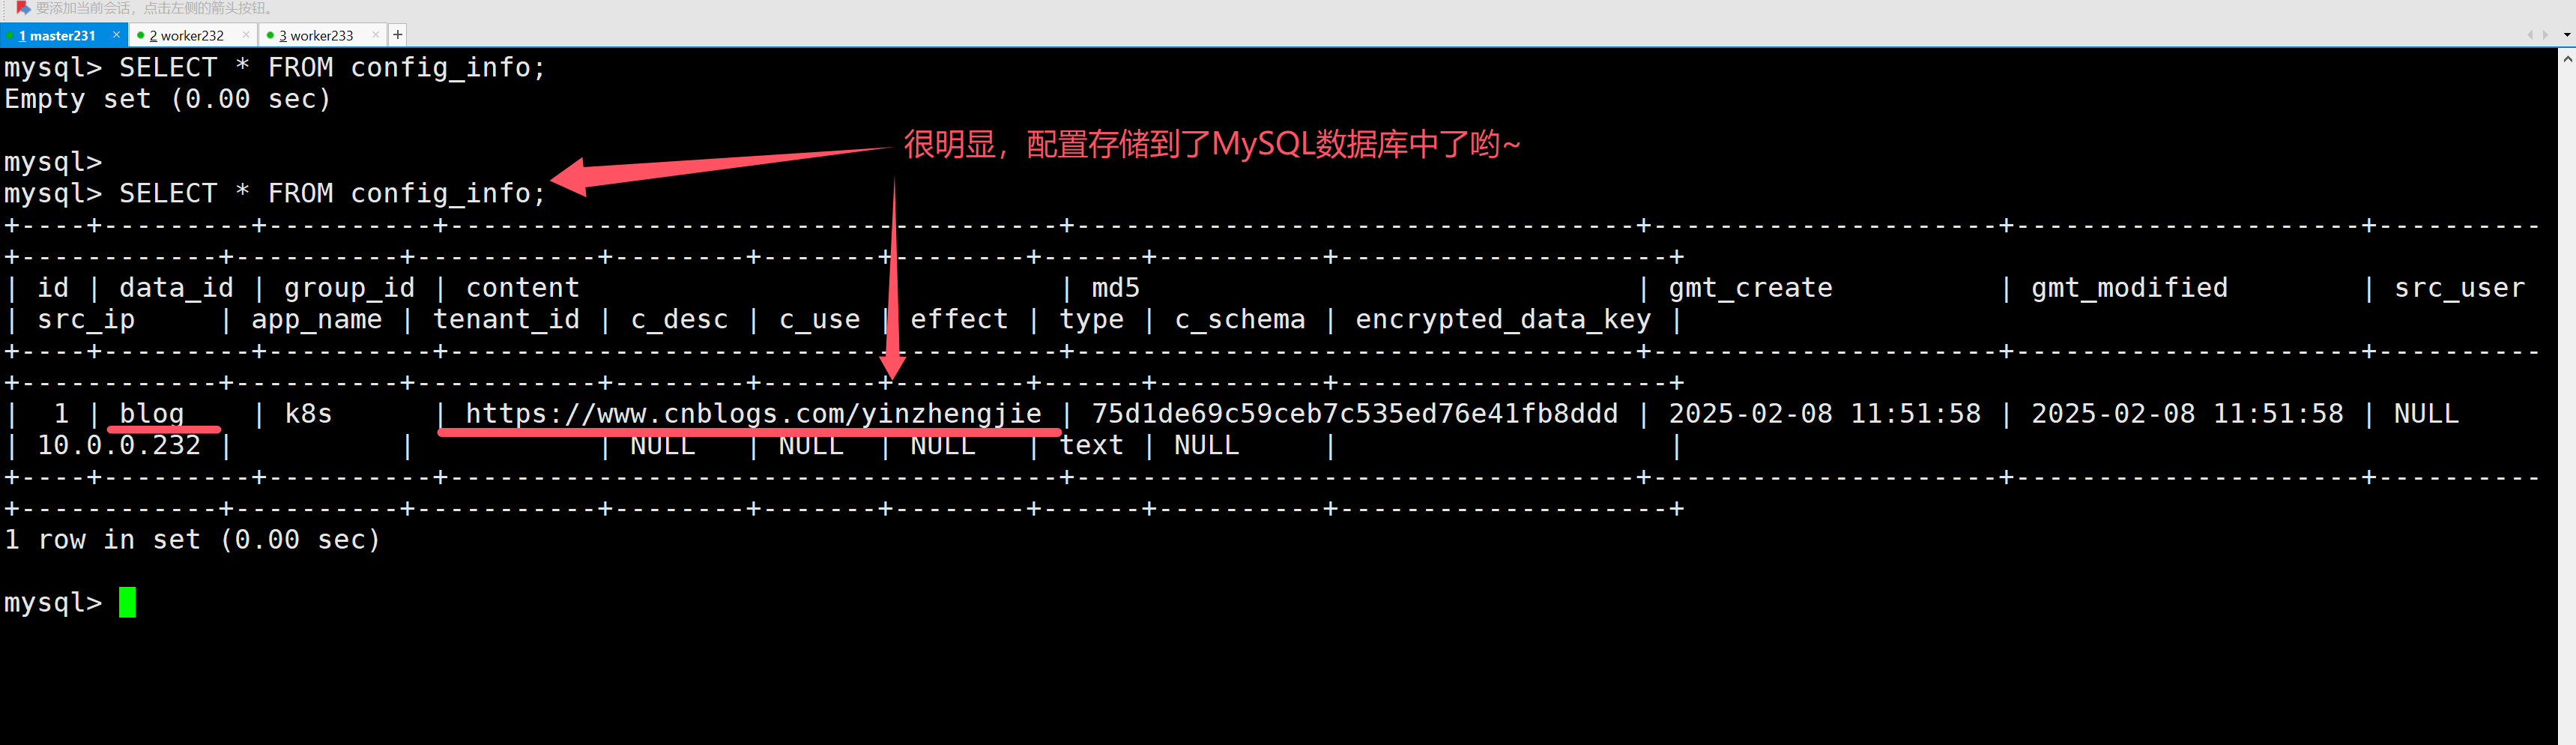
温馨提示:
如上图所示,我们命令行添加配置后,观察MySQL数据库是否有记录。
本文来自博客园,作者:尹正杰,转载请注明原文链接:https://www.cnblogs.com/yinzhengjie/p/18704219,个人微信: "JasonYin2020"(添加时请备注来源及意图备注,有偿付费)
当你的才华还撑不起你的野心的时候,你就应该静下心来学习。当你的能力还驾驭不了你的目标的时候,你就应该沉下心来历练。问问自己,想要怎样的人生。

 浙公网安备 33010602011771号