逻辑卷管理(Logical Volume Manager,LVM)快速入门指南
一.Logical Volume Manager(逻辑卷管理)概述
1.什么是LVM
LVM是Logical Volume Manager(逻辑卷管理)的简写,它是Linux环境下对磁盘分区进行管理的一种机制。

它由Heinz Mauelshagen在Linux 2.4内核上实现,最新版本为:稳定版1.0.5,开发版 1.1.0-rc2,以及LVM2开发版。

我们学习的Ceph底层就用到了LVM技术栈。

还有一个经典的使用场景就是默认的根分区不够用时,就可以使用lvm技术进行扩容啦~
2.LVM相关术语
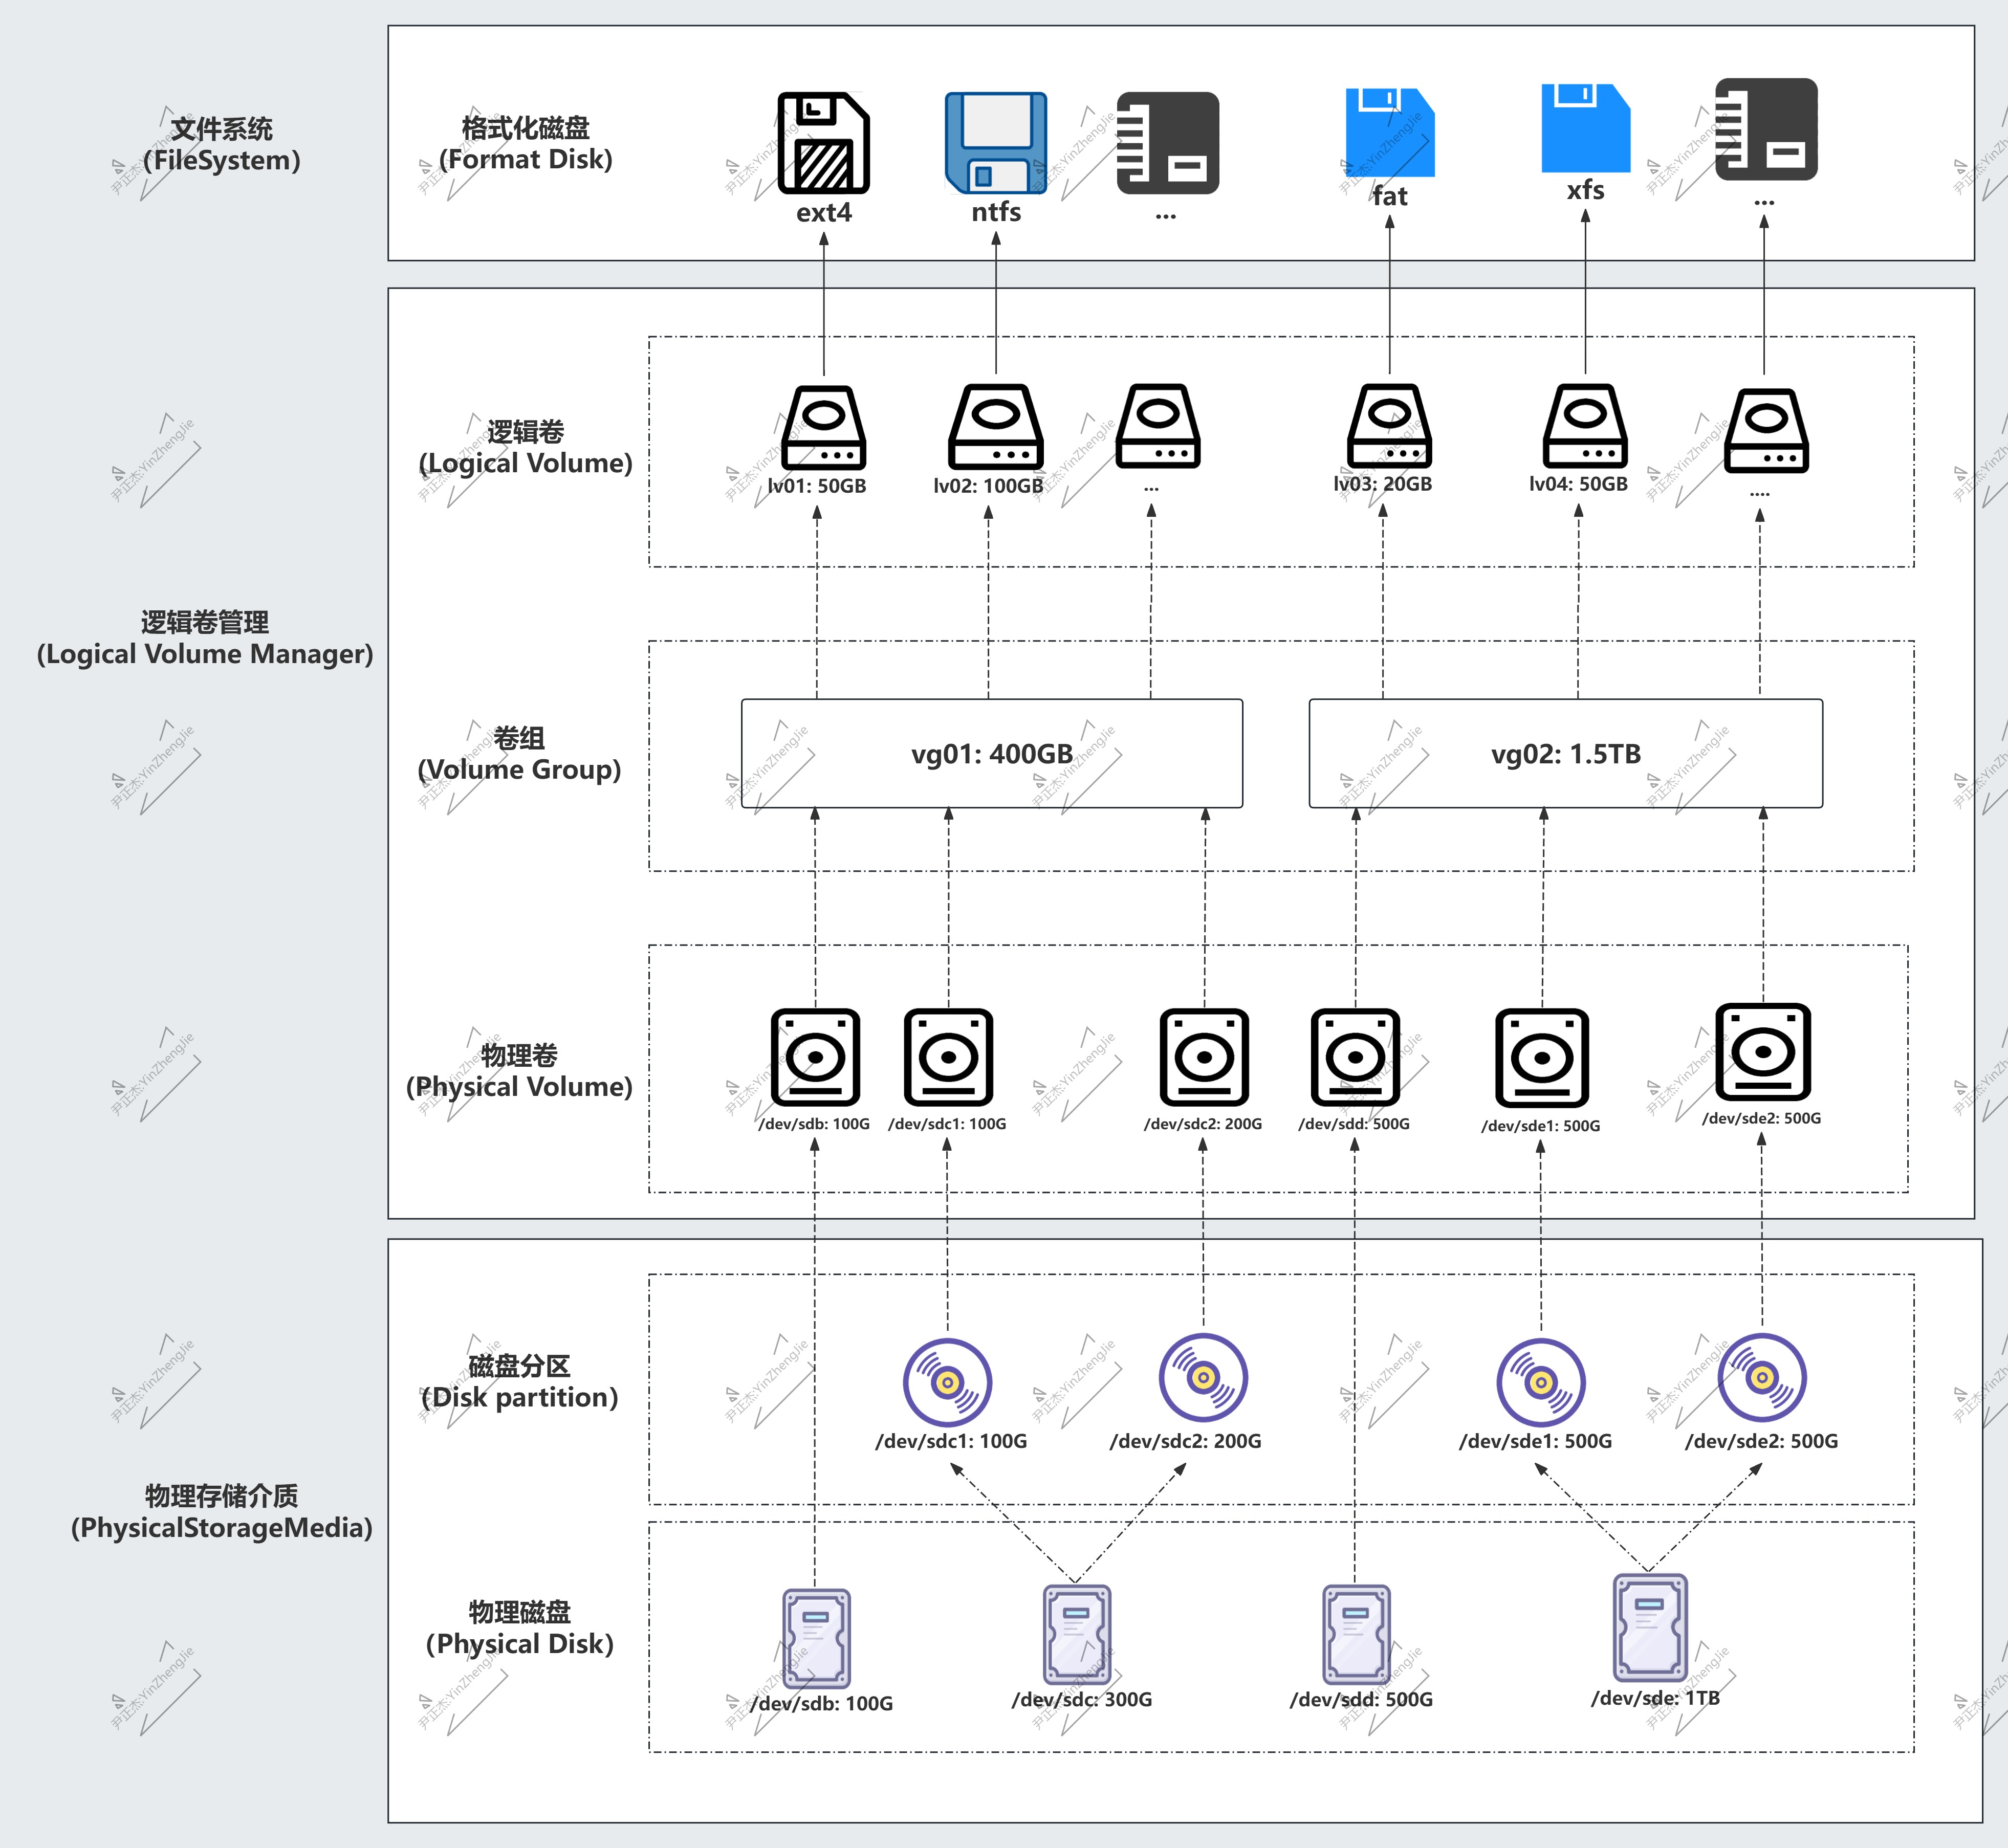
物理存储介质(PhysicalStorageMedia):
	指系统的物理存储设备:磁盘(/dev/hda,/dev/sda)或者分区(/dev/sdb1,/dev/sdb2)等,是存储系统最底层的存储单元。

物理卷(Physical Volume,PV):
	指磁盘分区或从逻辑上与磁盘分区具有同样功能的设备(如RAID),是LVM的基本存储逻辑块。

卷组(Volume Group,VG):
	类似于非LVM系统中的物理磁盘,其由一个或多个物理卷PV组成。可以在卷组上创建一个或多个LV(逻辑卷)。

逻辑卷(Logical Volume,LV):
	类似于非LVM系统中的磁盘分区,逻辑卷建立在卷组VG之上。
	在逻辑卷LV之上可以建立文件系统(比如/home或者/usr等)。

物理块(Physical Extent,PE):
	PE是物理卷PV的基本划分单元,具有唯一编号的PE是可以被LVM寻址的最小单元。
	PE的大小是可配置的,默认为4MB。所以物理卷(PV)由大小等同的基本单元PE组成。

逻辑块(Logical Extent,LE)
	逻辑卷LV也被划分为可被寻址的基本单位,称为LE。在同一个卷组中,LE的大小和PE是相同的,并且一一对应。
3.LVM的优缺点
优点:
	- 1.文件系统可以跨多个磁盘,因此文件系统大小不会受物理磁盘的限制;
	- 2.可以在系统运行的状态下动态的扩展文件系统的大小;
	- 3.可以增加新的磁盘到LVM的存储池中;
	- 4.可以以镜像的方式冗余重要的数据到多个物理磁盘;
	- 5.可以方便的导出整个卷组到另外一台机器;

缺点:
	- 1.在从卷组中移除一个磁盘的时候必须使用reducevg命令(这个命令要求root权限,并且不允许在快照卷组中使用);
	- 2.当卷组(VG)中的一个磁盘损坏时,整个卷组都会受到影响;
	- 3.因为加入了额外的操作,存贮性能受到影响;
二.LVM实战案例
1.环境准备
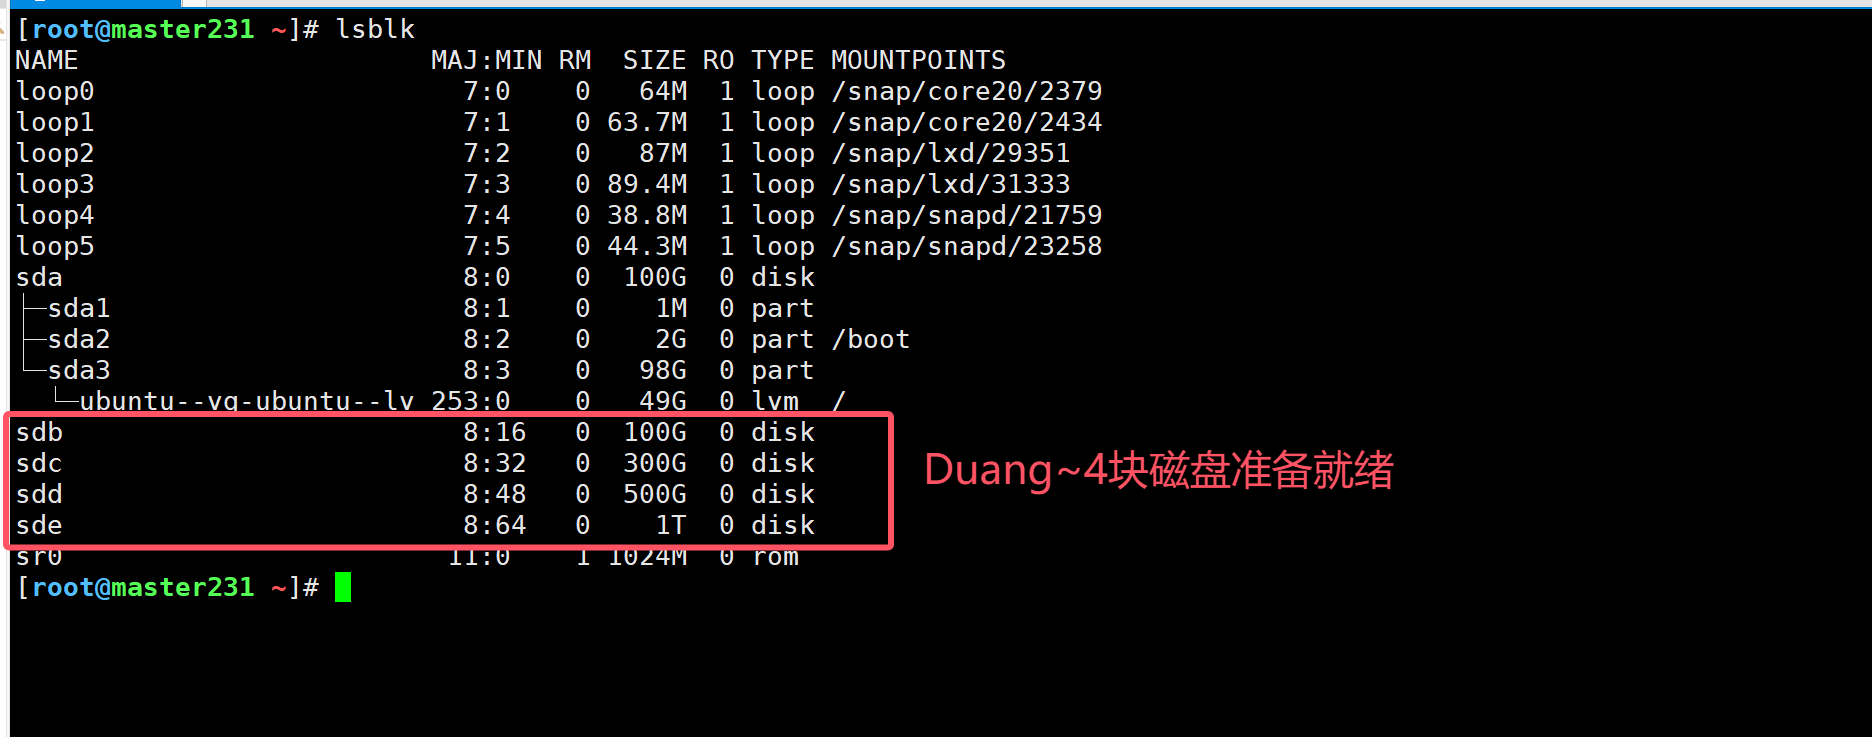
如上图所示,我添加了4块物理设备用来模拟测试LVM案例。
2.对磁盘分区
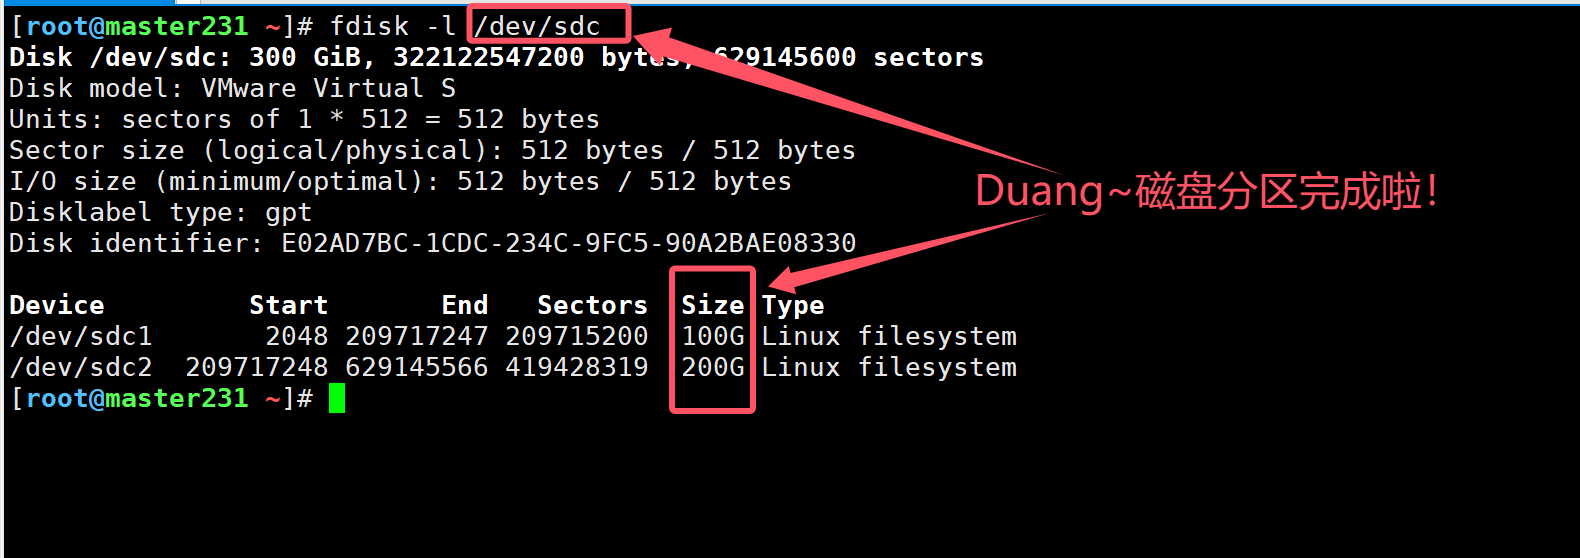
2.1 对/dev/sdc进行分区
[root@master231 ~]# fdisk /dev/sdc

Welcome to fdisk (util-linux 2.37.2).
Changes will remain in memory only, until you decide to write them.
Be careful before using the write command.

Device does not contain a recognized partition table.
Created a new DOS disklabel with disk identifier 0x5823985b.

Command (m for help): p
Disk /dev/sdc: 300 GiB, 322122547200 bytes, 629145600 sectors
Disk model: VMware Virtual S
Units: sectors of 1 * 512 = 512 bytes
Sector size (logical/physical): 512 bytes / 512 bytes
I/O size (minimum/optimal): 512 bytes / 512 bytes
Disklabel type: dos
Disk identifier: 0x5823985b

Command (m for help): g
Created a new GPT disklabel (GUID: E02AD7BC-1CDC-234C-9FC5-90A2BAE08330).

Command (m for help): n
Partition number (1-128, default 1):
First sector (2048-629145566, default 2048):
Last sector, +/-sectors or +/-size{K,M,G,T,P} (2048-629145566, default 629145566): +100G

Created a new partition 1 of type 'Linux filesystem' and of size 100 GiB.

Command (m for help): n
Partition number (2-128, default 2):
First sector (209717248-629145566, default 209717248):
Last sector, +/-sectors or +/-size{K,M,G,T,P} (209717248-629145566, default 629145566):

Created a new partition 2 of type 'Linux filesystem' and of size 200 GiB.

Command (m for help): p
Disk /dev/sdc: 300 GiB, 322122547200 bytes, 629145600 sectors
Disk model: VMware Virtual S
Units: sectors of 1 * 512 = 512 bytes
Sector size (logical/physical): 512 bytes / 512 bytes
I/O size (minimum/optimal): 512 bytes / 512 bytes
Disklabel type: gpt
Disk identifier: E02AD7BC-1CDC-234C-9FC5-90A2BAE08330

Device         Start       End   Sectors  Size Type
/dev/sdc1       2048 209717247 209715200  100G Linux filesystem
/dev/sdc2  209717248 629145566 419428319  200G Linux filesystem

Command (m for help): w
The partition table has been altered.
Calling ioctl() to re-read partition table.
Syncing disks.

[root@master231 ~]#
[root@master231 ~]# fdisk -l /dev/sdc
Disk /dev/sdc: 300 GiB, 322122547200 bytes, 629145600 sectors
Disk model: VMware Virtual S
Units: sectors of 1 * 512 = 512 bytes
Sector size (logical/physical): 512 bytes / 512 bytes
I/O size (minimum/optimal): 512 bytes / 512 bytes
Disklabel type: gpt
Disk identifier: E02AD7BC-1CDC-234C-9FC5-90A2BAE08330

Device         Start       End   Sectors  Size Type
/dev/sdc1       2048 209717247 209715200  100G Linux filesystem
/dev/sdc2  209717248 629145566 419428319  200G Linux filesystem
[root@master231 ~]#
2.2 对/dev/sde进行分区

[root@master231 ~]# fdisk /dev/sde

Welcome to fdisk (util-linux 2.37.2).
Changes will remain in memory only, until you decide to write them.
Be careful before using the write command.

Device does not contain a recognized partition table.
Created a new DOS disklabel with disk identifier 0x2ac167b3.

Command (m for help): p
Disk /dev/sde: 1 TiB, 1099511627776 bytes, 2147483648 sectors
Disk model: VMware Virtual S
Units: sectors of 1 * 512 = 512 bytes
Sector size (logical/physical): 512 bytes / 512 bytes
I/O size (minimum/optimal): 512 bytes / 512 bytes
Disklabel type: dos
Disk identifier: 0x2ac167b3

Command (m for help): g
Created a new GPT disklabel (GUID: EF74D46C-5A58-CD49-858F-88ACCD891DFB).

Command (m for help): n
Partition number (1-128, default 1):
First sector (2048-2147483614, default 2048):
Last sector, +/-sectors or +/-size{K,M,G,T,P} (2048-2147483614, default 2147483614): +500G

Created a new partition 1 of type 'Linux filesystem' and of size 500 GiB.

Command (m for help): n
Partition number (2-128, default 2):
First sector (1048578048-2147483614, default 1048578048):
Last sector, +/-sectors or +/-size{K,M,G,T,P} (1048578048-2147483614, default 2147483614):

Created a new partition 2 of type 'Linux filesystem' and of size 524 GiB.

Command (m for help): p
Disk /dev/sde: 1 TiB, 1099511627776 bytes, 2147483648 sectors
Disk model: VMware Virtual S
Units: sectors of 1 * 512 = 512 bytes
Sector size (logical/physical): 512 bytes / 512 bytes
I/O size (minimum/optimal): 512 bytes / 512 bytes
Disklabel type: gpt
Disk identifier: EF74D46C-5A58-CD49-858F-88ACCD891DFB

Device          Start        End    Sectors  Size Type
/dev/sde1        2048 1048578047 1048576000  500G Linux filesystem
/dev/sde2  1048578048 2147483614 1098905567  524G Linux filesystem

Command (m for help): w
The partition table has been altered.
Calling ioctl() to re-read partition table.
Syncing disks.

[root@master231 ~]#
[root@master231 ~]# fdisk -l /dev/sde
Disk /dev/sde: 1 TiB, 1099511627776 bytes, 2147483648 sectors
Disk model: VMware Virtual S
Units: sectors of 1 * 512 = 512 bytes
Sector size (logical/physical): 512 bytes / 512 bytes
I/O size (minimum/optimal): 512 bytes / 512 bytes
Disklabel type: gpt
Disk identifier: EF74D46C-5A58-CD49-858F-88ACCD891DFB

Device          Start        End    Sectors  Size Type
/dev/sde1        2048 1048578047 1048576000  500G Linux filesystem
/dev/sde2  1048578048 2147483614 1098905567  524G Linux filesystem
[root@master231 ~]#
2.3 检查磁盘分区情况
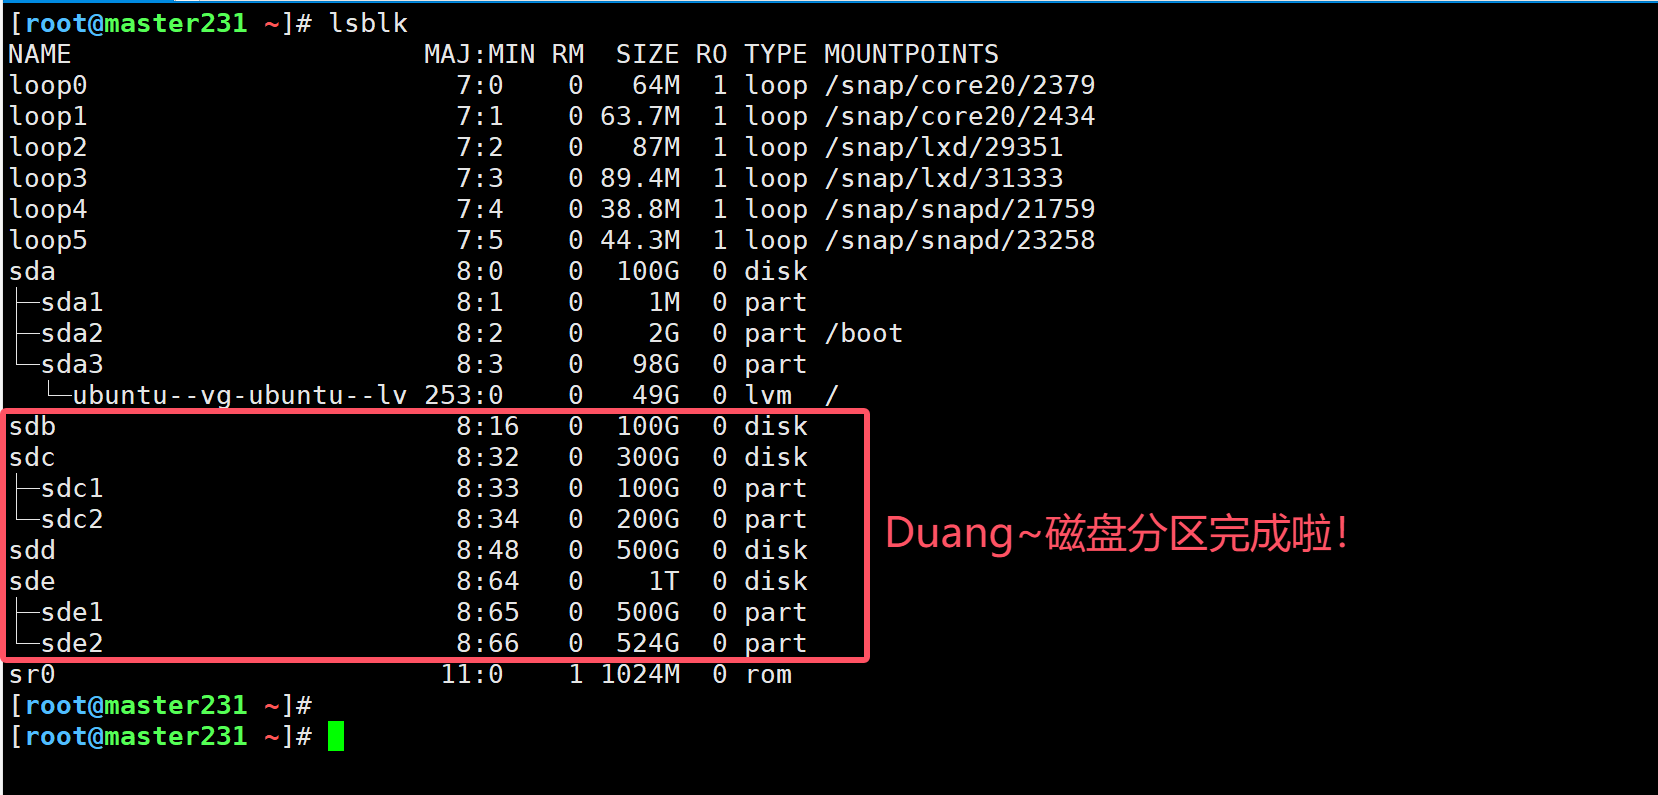
[root@master231 ~]# lsblk
NAME                      MAJ:MIN RM  SIZE RO TYPE MOUNTPOINTS
loop0                       7:0    0   64M  1 loop /snap/core20/2379
loop1                       7:1    0 63.7M  1 loop /snap/core20/2434
loop2                       7:2    0   87M  1 loop /snap/lxd/29351
loop3                       7:3    0 89.4M  1 loop /snap/lxd/31333
loop4                       7:4    0 38.8M  1 loop /snap/snapd/21759
loop5                       7:5    0 44.3M  1 loop /snap/snapd/23258
sda                         8:0    0  100G  0 disk
├─sda1                      8:1    0    1M  0 part
├─sda2                      8:2    0    2G  0 part /boot
└─sda3                      8:3    0   98G  0 part
  └─ubuntu--vg-ubuntu--lv 253:0    0   49G  0 lvm  /
sdb                         8:16   0  100G  0 disk
sdc                         8:32   0  300G  0 disk
├─sdc1                      8:33   0  100G  0 part
└─sdc2                      8:34   0  200G  0 part
sdd                         8:48   0  500G  0 disk
sde                         8:64   0    1T  0 disk
├─sde1                      8:65   0  500G  0 part
└─sde2                      8:66   0  524G  0 part
sr0                        11:0    1 1024M  0 rom
[root@master231 ~]#
3.创建pv
3.1 查看现有的pv列表
[root@master231 ~]# pvs
  PV         VG        Fmt  Attr PSize   PFree
  /dev/sda3  ubuntu-vg lvm2 a--  <98.00g 49.00g
[root@master231 ~]#
3.2 创建pv
[root@master231 ~]# pvcreate /dev/sdb /dev/sdc{1,2} /dev/sdd /dev/sde{1,2}
  Physical volume "/dev/sdb" successfully created.
  Physical volume "/dev/sdc1" successfully created.
  Physical volume "/dev/sdc2" successfully created.
  Physical volume "/dev/sdd" successfully created.
  Physical volume "/dev/sde1" successfully created.
  Physical volume "/dev/sde2" successfully created.
[root@master231 ~]#
3.3 再次查看pv列表

[root@master231 ~]# pvs
  PV         VG        Fmt  Attr PSize    PFree
  /dev/sda3  ubuntu-vg lvm2 a--   <98.00g   49.00g
  /dev/sdb             lvm2 ---   100.00g  100.00g
  /dev/sdc1            lvm2 ---   100.00g  100.00g
  /dev/sdc2            lvm2 ---  <200.00g <200.00g
  /dev/sdd             lvm2 ---   500.00g  500.00g
  /dev/sde1            lvm2 ---   500.00g  500.00g
  /dev/sde2            lvm2 ---  <524.00g <524.00g
[root@master231 ~]#
4.创建vg
4.1 查看现有的vg列表
[root@master231 ~]# vgs
  VG        #PV #LV #SN Attr   VSize   VFree
  ubuntu-vg   1   1   0 wz--n- <98.00g 49.00g
[root@master231 ~]#
4.2 创建vg
[root@master231 ~]# vgcreate vg01 /dev/sdb /dev/sdc1 /dev/sdc2
  Volume group "vg01" successfully created
[root@master231 ~]#
[root@master231 ~]# vgcreate vg02 /dev/sdd /dev/sde1 /dev/sde2
  Volume group "vg02" successfully created
[root@master231 ~]#
4.3 再次查看vg列表

[root@master231 ~]# vgs
  VG        #PV #LV #SN Attr   VSize    VFree
  ubuntu-vg   1   1   0 wz--n-  <98.00g   49.00g
  vg01        3   0   0 wz--n- <399.99g <399.99g
  vg02        3   0   0 wz--n-   <1.49t   <1.49t
[root@master231 ~]#
5.创建lv
5.1 查看现有的lv列表
[root@master231 ~]# lvs
  LV        VG        Attr       LSize   Pool Origin Data%  Meta%  Move Log Cpy%Sync Convert
  ubuntu-lv ubuntu-vg -wi-ao---- <49.00g
[root@master231 ~]#
5.2 创建lv
[root@master231 ~]# lvcreate vg01 --name lv01 --size 50G
  Logical volume "lv01" created.
[root@master231 ~]#
[root@master231 ~]# lvcreate vg01 --name lv02 --size 100G
  Logical volume "lv02" created.
[root@master231 ~]#
[root@master231 ~]# lvcreate vg02 --name lv03 --size 20G
  Logical volume "lv03" created.
[root@master231 ~]#
[root@master231 ~]# lvcreate vg02 --name lv04 --size 50G
  Logical volume "lv04" created.
[root@master231 ~]#


温馨提示:
	上述案例是从不同的vg中创建lv案例。
5.3 再次查看lv列表
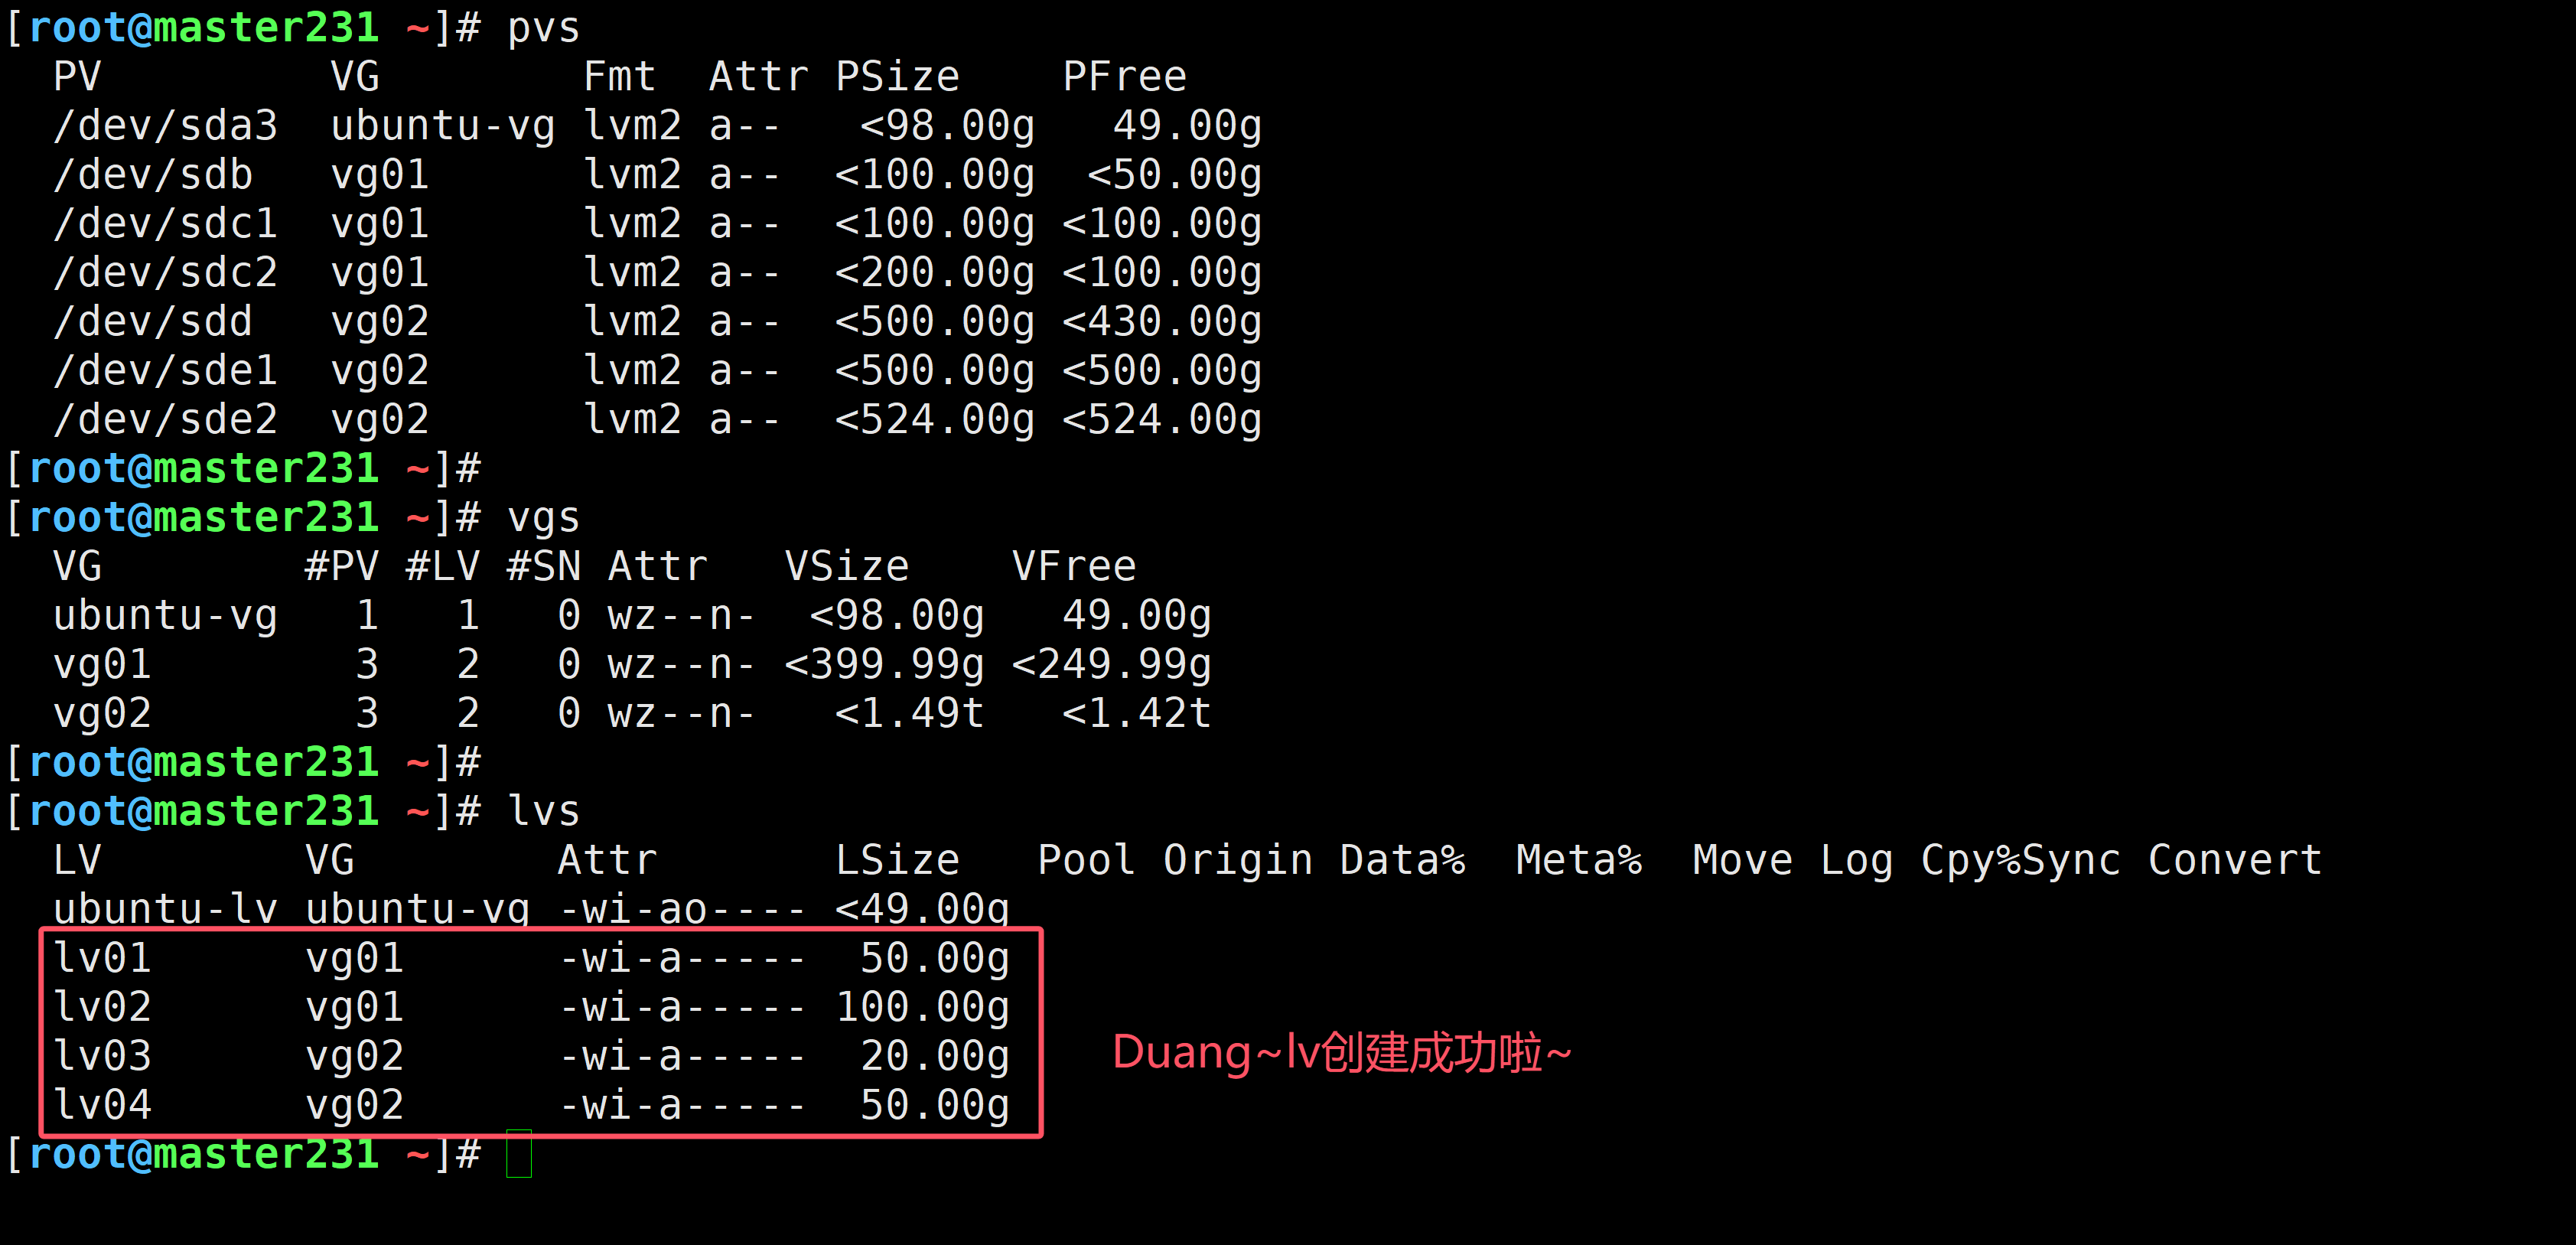
[root@master231 ~]# pvs
  PV         VG        Fmt  Attr PSize    PFree
  /dev/sda3  ubuntu-vg lvm2 a--   <98.00g   49.00g
  /dev/sdb   vg01      lvm2 a--  <100.00g  <50.00g
  /dev/sdc1  vg01      lvm2 a--  <100.00g <100.00g
  /dev/sdc2  vg01      lvm2 a--  <200.00g <100.00g
  /dev/sdd   vg02      lvm2 a--  <500.00g <430.00g
  /dev/sde1  vg02      lvm2 a--  <500.00g <500.00g
  /dev/sde2  vg02      lvm2 a--  <524.00g <524.00g
[root@master231 ~]#
[root@master231 ~]# vgs
  VG        #PV #LV #SN Attr   VSize    VFree
  ubuntu-vg   1   1   0 wz--n-  <98.00g   49.00g
  vg01        3   2   0 wz--n- <399.99g <249.99g
  vg02        3   2   0 wz--n-   <1.49t   <1.42t
[root@master231 ~]#
[root@master231 ~]# lvs
  LV        VG        Attr       LSize   Pool Origin Data%  Meta%  Move Log Cpy%Sync Convert
  ubuntu-lv ubuntu-vg -wi-ao---- <49.00g
  lv01      vg01      -wi-a-----  50.00g
  lv02      vg01      -wi-a----- 100.00g
  lv03      vg02      -wi-a-----  20.00g
  lv04      vg02      -wi-a-----  50.00g
[root@master231 ~]#
6.格式化lv设备
6.1 查看lv的设备存储路径
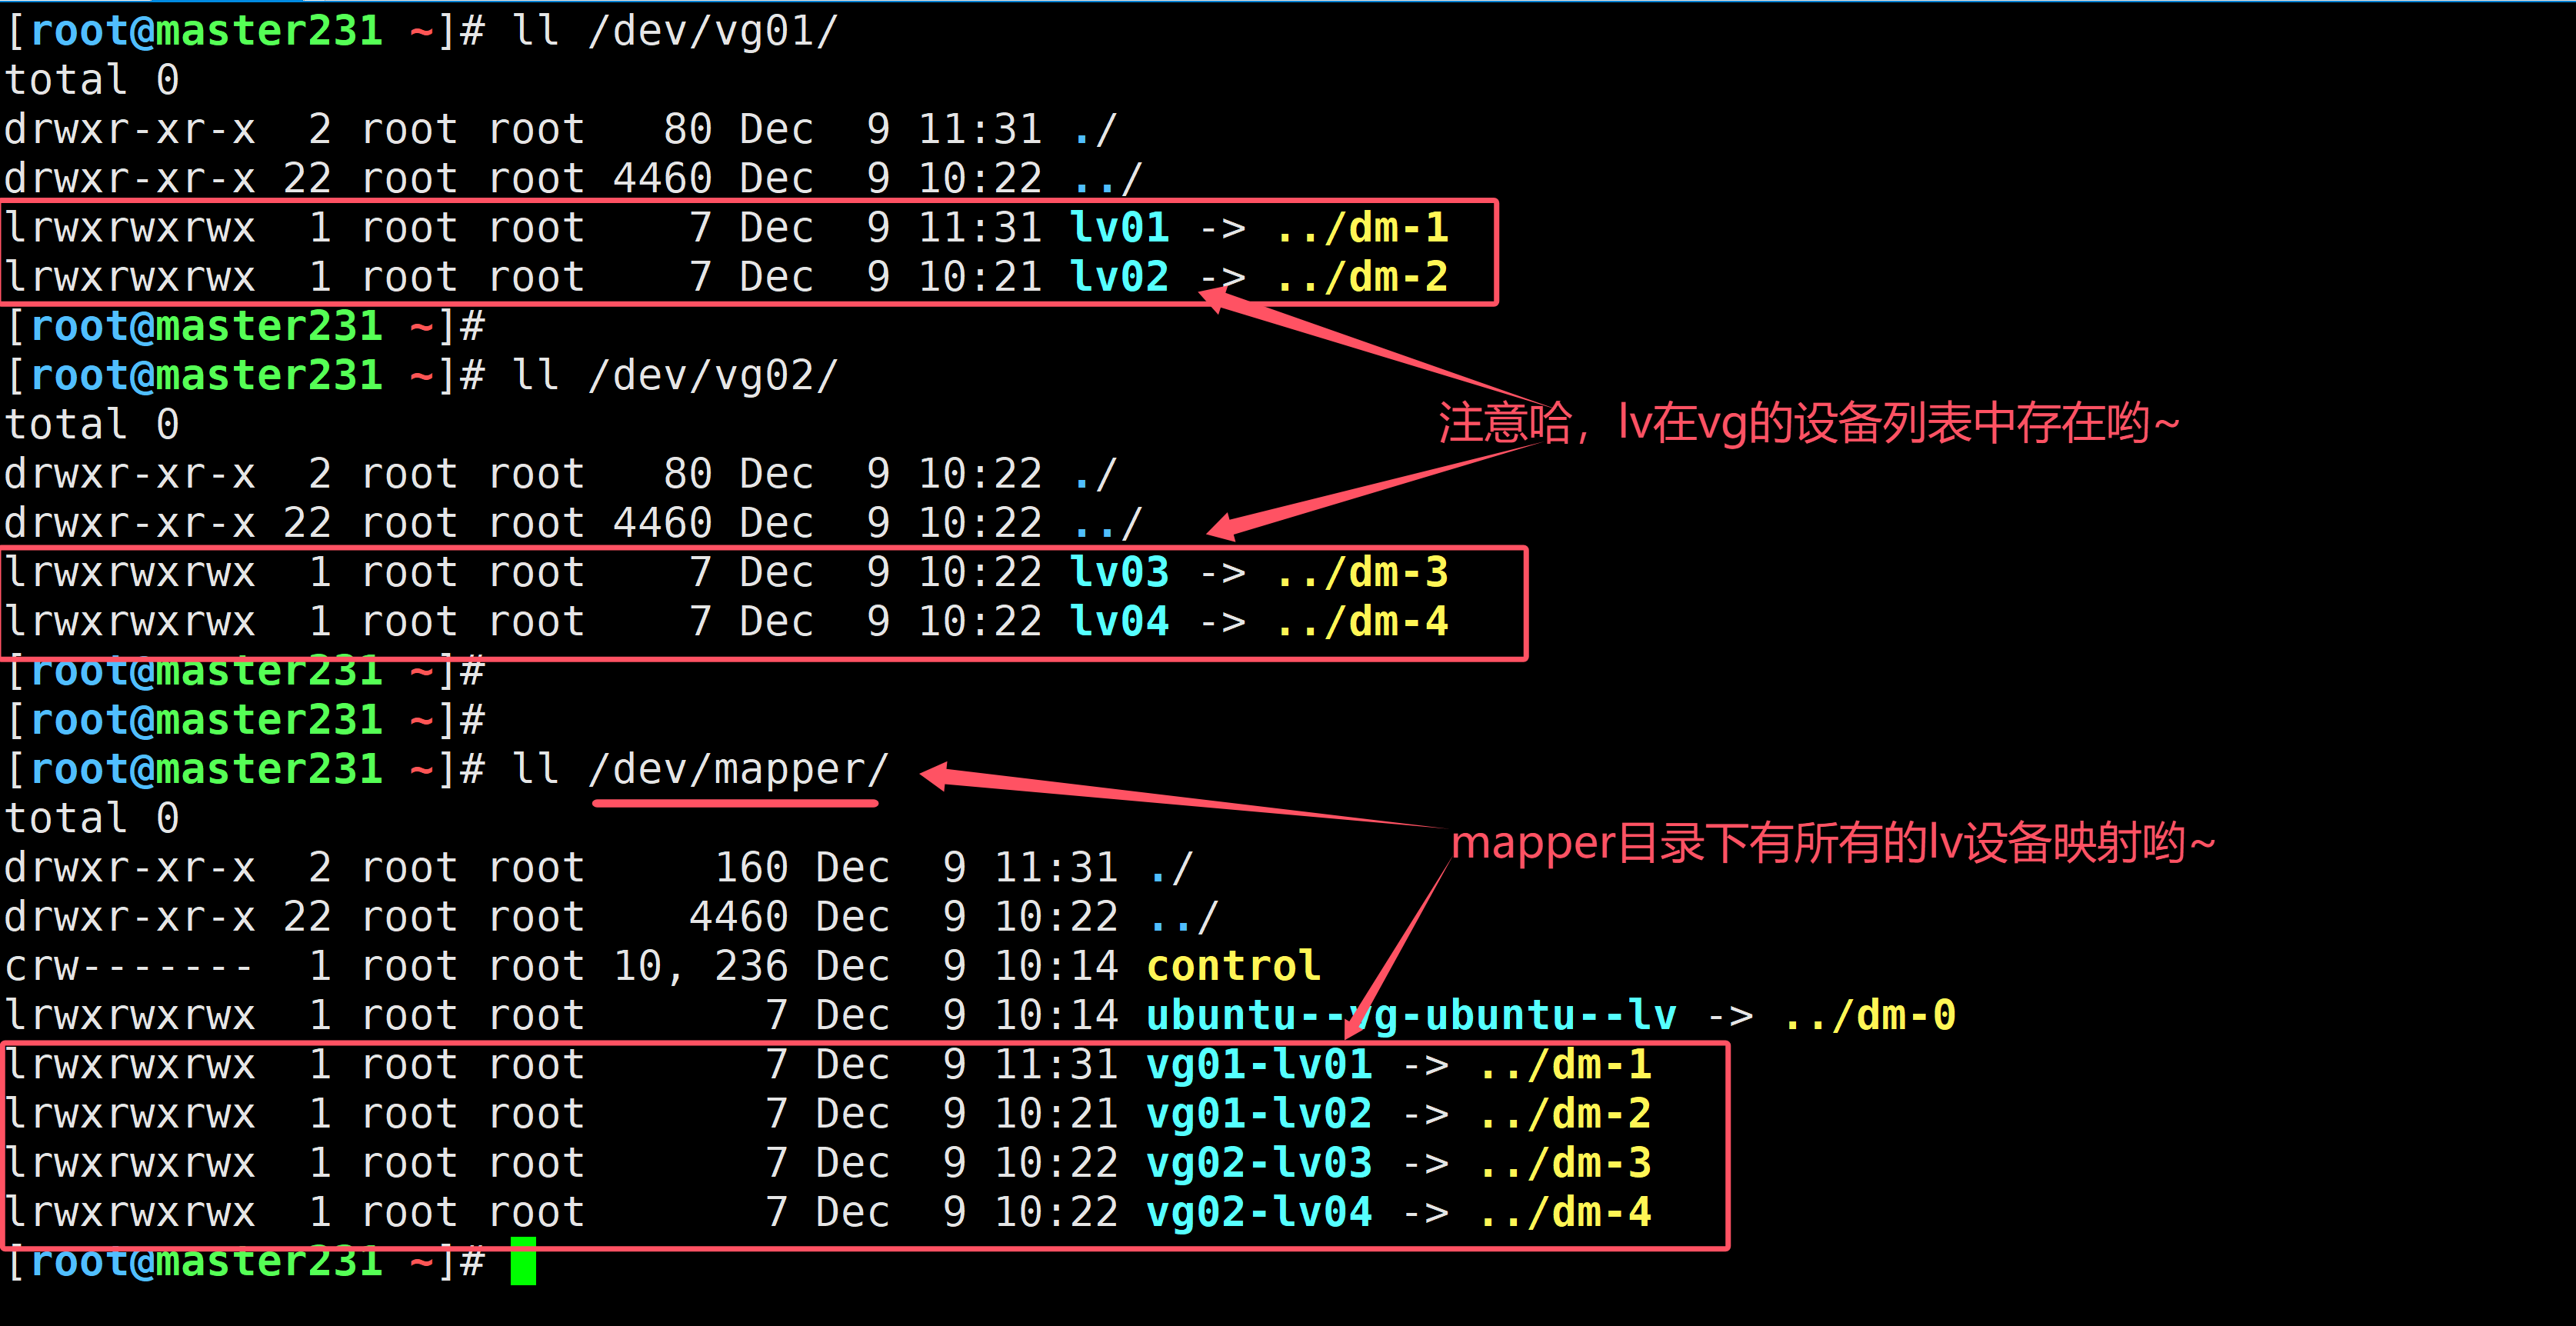
[root@master231 ~]# ll /dev/vg01/
total 0
drwxr-xr-x  2 root root   80 Dec  9 11:31 ./
drwxr-xr-x 22 root root 4460 Dec  9 10:22 ../
lrwxrwxrwx  1 root root    7 Dec  9 11:31 lv01 -> ../dm-1
lrwxrwxrwx  1 root root    7 Dec  9 10:21 lv02 -> ../dm-2
[root@master231 ~]#
[root@master231 ~]# ll /dev/vg02/
total 0
drwxr-xr-x  2 root root   80 Dec  9 10:22 ./
drwxr-xr-x 22 root root 4460 Dec  9 10:22 ../
lrwxrwxrwx  1 root root    7 Dec  9 10:22 lv03 -> ../dm-3
lrwxrwxrwx  1 root root    7 Dec  9 10:22 lv04 -> ../dm-4
[root@master231 ~]#
[root@master231 ~]#
[root@master231 ~]# ll /dev/mapper/
total 0
drwxr-xr-x  2 root root     160 Dec  9 11:31 ./
drwxr-xr-x 22 root root    4460 Dec  9 10:22 ../
crw-------  1 root root 10, 236 Dec  9 10:14 control
lrwxrwxrwx  1 root root       7 Dec  9 10:14 ubuntu--vg-ubuntu--lv -> ../dm-0
lrwxrwxrwx  1 root root       7 Dec  9 11:31 vg01-lv01 -> ../dm-1
lrwxrwxrwx  1 root root       7 Dec  9 10:21 vg01-lv02 -> ../dm-2
lrwxrwxrwx  1 root root       7 Dec  9 10:22 vg02-lv03 -> ../dm-3
lrwxrwxrwx  1 root root       7 Dec  9 10:22 vg02-lv04 -> ../dm-4
[root@master231 ~]#
6.2 格式化lv设备
	1.格式化为ext4文件系统
[root@master231 ~]# mkfs.ext4 /dev/vg01/lv01
mke2fs 1.46.5 (30-Dec-2021)
Creating filesystem with 13107200 4k blocks and 3276800 inodes
Filesystem UUID: 013455e2-b3a2-4c56-b820-b55b9fc93fc8
Superblock backups stored on blocks:
	32768, 98304, 163840, 229376, 294912, 819200, 884736, 1605632, 2654208,
	4096000, 7962624, 11239424

Allocating group tables: done
Writing inode tables: done
Creating journal (65536 blocks): done
Writing superblocks and filesystem accounting information: done

[root@master231 ~]#


	2.格式化为ntfs文件系统(速度较慢)
[root@master231 ~]# mkfs.ntfs /dev/vg01/lv02
Cluster size has been automatically set to 4096 bytes.
Initializing device with zeroes: 100% - Done.
Creating NTFS volume structures.
mkntfs completed successfully. Have a nice day.
[root@master231 ~]#


	3.格式化为fat件系统
[root@master231 ~]# mkfs.fat /dev/vg02/lv03
mkfs.fat 4.2 (2021-01-31)
[root@master231 ~]#


	4.格式化为xfs文件系统
[root@master231 ~]# mkfs.xfs /dev/vg02/lv04
meta-data=/dev/vg02/lv04         isize=512    agcount=4, agsize=3276800 blks
         =                       sectsz=512   attr=2, projid32bit=1
         =                       crc=1        finobt=1, sparse=1, rmapbt=0
         =                       reflink=1    bigtime=0 inobtcount=0
data     =                       bsize=4096   blocks=13107200, imaxpct=25
         =                       sunit=0      swidth=0 blks
naming   =version 2              bsize=4096   ascii-ci=0, ftype=1
log      =internal log           bsize=4096   blocks=6400, version=2
         =                       sectsz=512   sunit=0 blks, lazy-count=1
realtime =none                   extsz=4096   blocks=0, rtextents=0
[root@master231 ~]#
7.挂载lv设备
7.1 创建挂载点
[root@master231 ~]# mkdir -pv /yinzhengjie/fs/{ext4,ntfs,fat,xfs}
7.2 挂载lv设备
[root@master231 ~]# mount /dev/vg01/lv01 /yinzhengjie/fs/ext4/
[root@master231 ~]# mount /dev/vg01/lv02 /yinzhengjie/fs/ntfs/
[root@master231 ~]# mount /dev/vg02/lv03 /yinzhengjie/fs/fat/
[root@master231 ~]# mount /dev/vg02/lv04 /yinzhengjie/fs/xfs/
[root@master231 ~]#
7.3 查看lv设备挂载信息
[root@master231 ~]# mount | grep yinzhengjie
/dev/mapper/vg01-lv01 on /yinzhengjie/fs/ext4 type ext4 (rw,relatime)
/dev/mapper/vg01-lv02 on /yinzhengjie/fs/ntfs type fuseblk (rw,relatime,user_id=0,group_id=0,allow_other,blksize=4096)
/dev/mapper/vg02-lv03 on /yinzhengjie/fs/fat type vfat (rw,relatime,fmask=0022,dmask=0022,codepage=437,iocharset=iso8859-1,shortname=mixed,errors=remount-ro)
/dev/mapper/vg02-lv04 on /yinzhengjie/fs/xfs type xfs (rw,relatime,attr2,inode64,logbufs=8,logbsize=32k,noquota)
[root@master231 ~]#
[root@master231 ~]# df -h | grep yinzhengjie
/dev/mapper/vg01-lv01               49G   24K   47G   1% /yinzhengjie/fs/ext4
/dev/mapper/vg01-lv02              100G   68M  100G   1% /yinzhengjie/fs/ntfs
/dev/mapper/vg02-lv03               20G   16K   20G   1% /yinzhengjie/fs/fat
/dev/mapper/vg02-lv04               50G  390M   50G   1% /yinzhengjie/fs/xfs
[root@master231 ~]#
三.LVM扩展案例
1.扩展lv案例
1.1 扩容到指定大小ext4案例
	1.扩容前查看
[root@master231 ~]# df -h | grep yinzhengjie
/dev/mapper/vg01-lv01               49G   24K   47G   1% /yinzhengjie/fs/ext4
/dev/mapper/vg01-lv02              100G   68M  100G   1% /yinzhengjie/fs/ntfs
/dev/mapper/vg02-lv03               20G   16K   20G   1% /yinzhengjie/fs/fat
/dev/mapper/vg02-lv04               50G  390M   50G   1% /yinzhengjie/fs/xfs
[root@master231 ~]#
[root@master231 ~]# vgs
  VG        #PV #LV #SN Attr   VSize    VFree
  ubuntu-vg   1   1   0 wz--n-  <98.00g   49.00g
  vg01        3   2   0 wz--n- <399.99g <249.99g
  vg02        3   2   0 wz--n-   <1.49t   <1.42t
[root@master231 ~]#

	2.开始扩容
[root@master231 ~]# lvextend /dev/mapper/vg01-lv01 --size 150G
  Size of logical volume vg01/lv01 changed from 50.00 GiB (12800 extents) to 150.00 GiB (38400 extents).
  Logical volume vg01/lv01 successfully resized.
[root@master231 ~]#
[root@master231 ~]# vgs
  VG        #PV #LV #SN Attr   VSize    VFree
  ubuntu-vg   1   1   0 wz--n-  <98.00g   49.00g
  vg01        3   2   0 wz--n- <399.99g <149.99g  # vg01的确少了100Gi
  vg02        3   2   0 wz--n-   <1.49t   <1.42t
[root@master231 ~]#
[root@master231 ~]#
[root@master231 ~]# df -h | grep yinzhengjie
/dev/mapper/vg01-lv01               49G   24K   47G   1% /yinzhengjie/fs/ext4  # 但是挂载并没有刷新
/dev/mapper/vg01-lv02              100G   68M  100G   1% /yinzhengjie/fs/ntfs
/dev/mapper/vg02-lv03               20G   16K   20G   1% /yinzhengjie/fs/fat
/dev/mapper/vg02-lv04               50G  390M   50G   1% /yinzhengjie/fs/xfs
[root@master231 ~]#
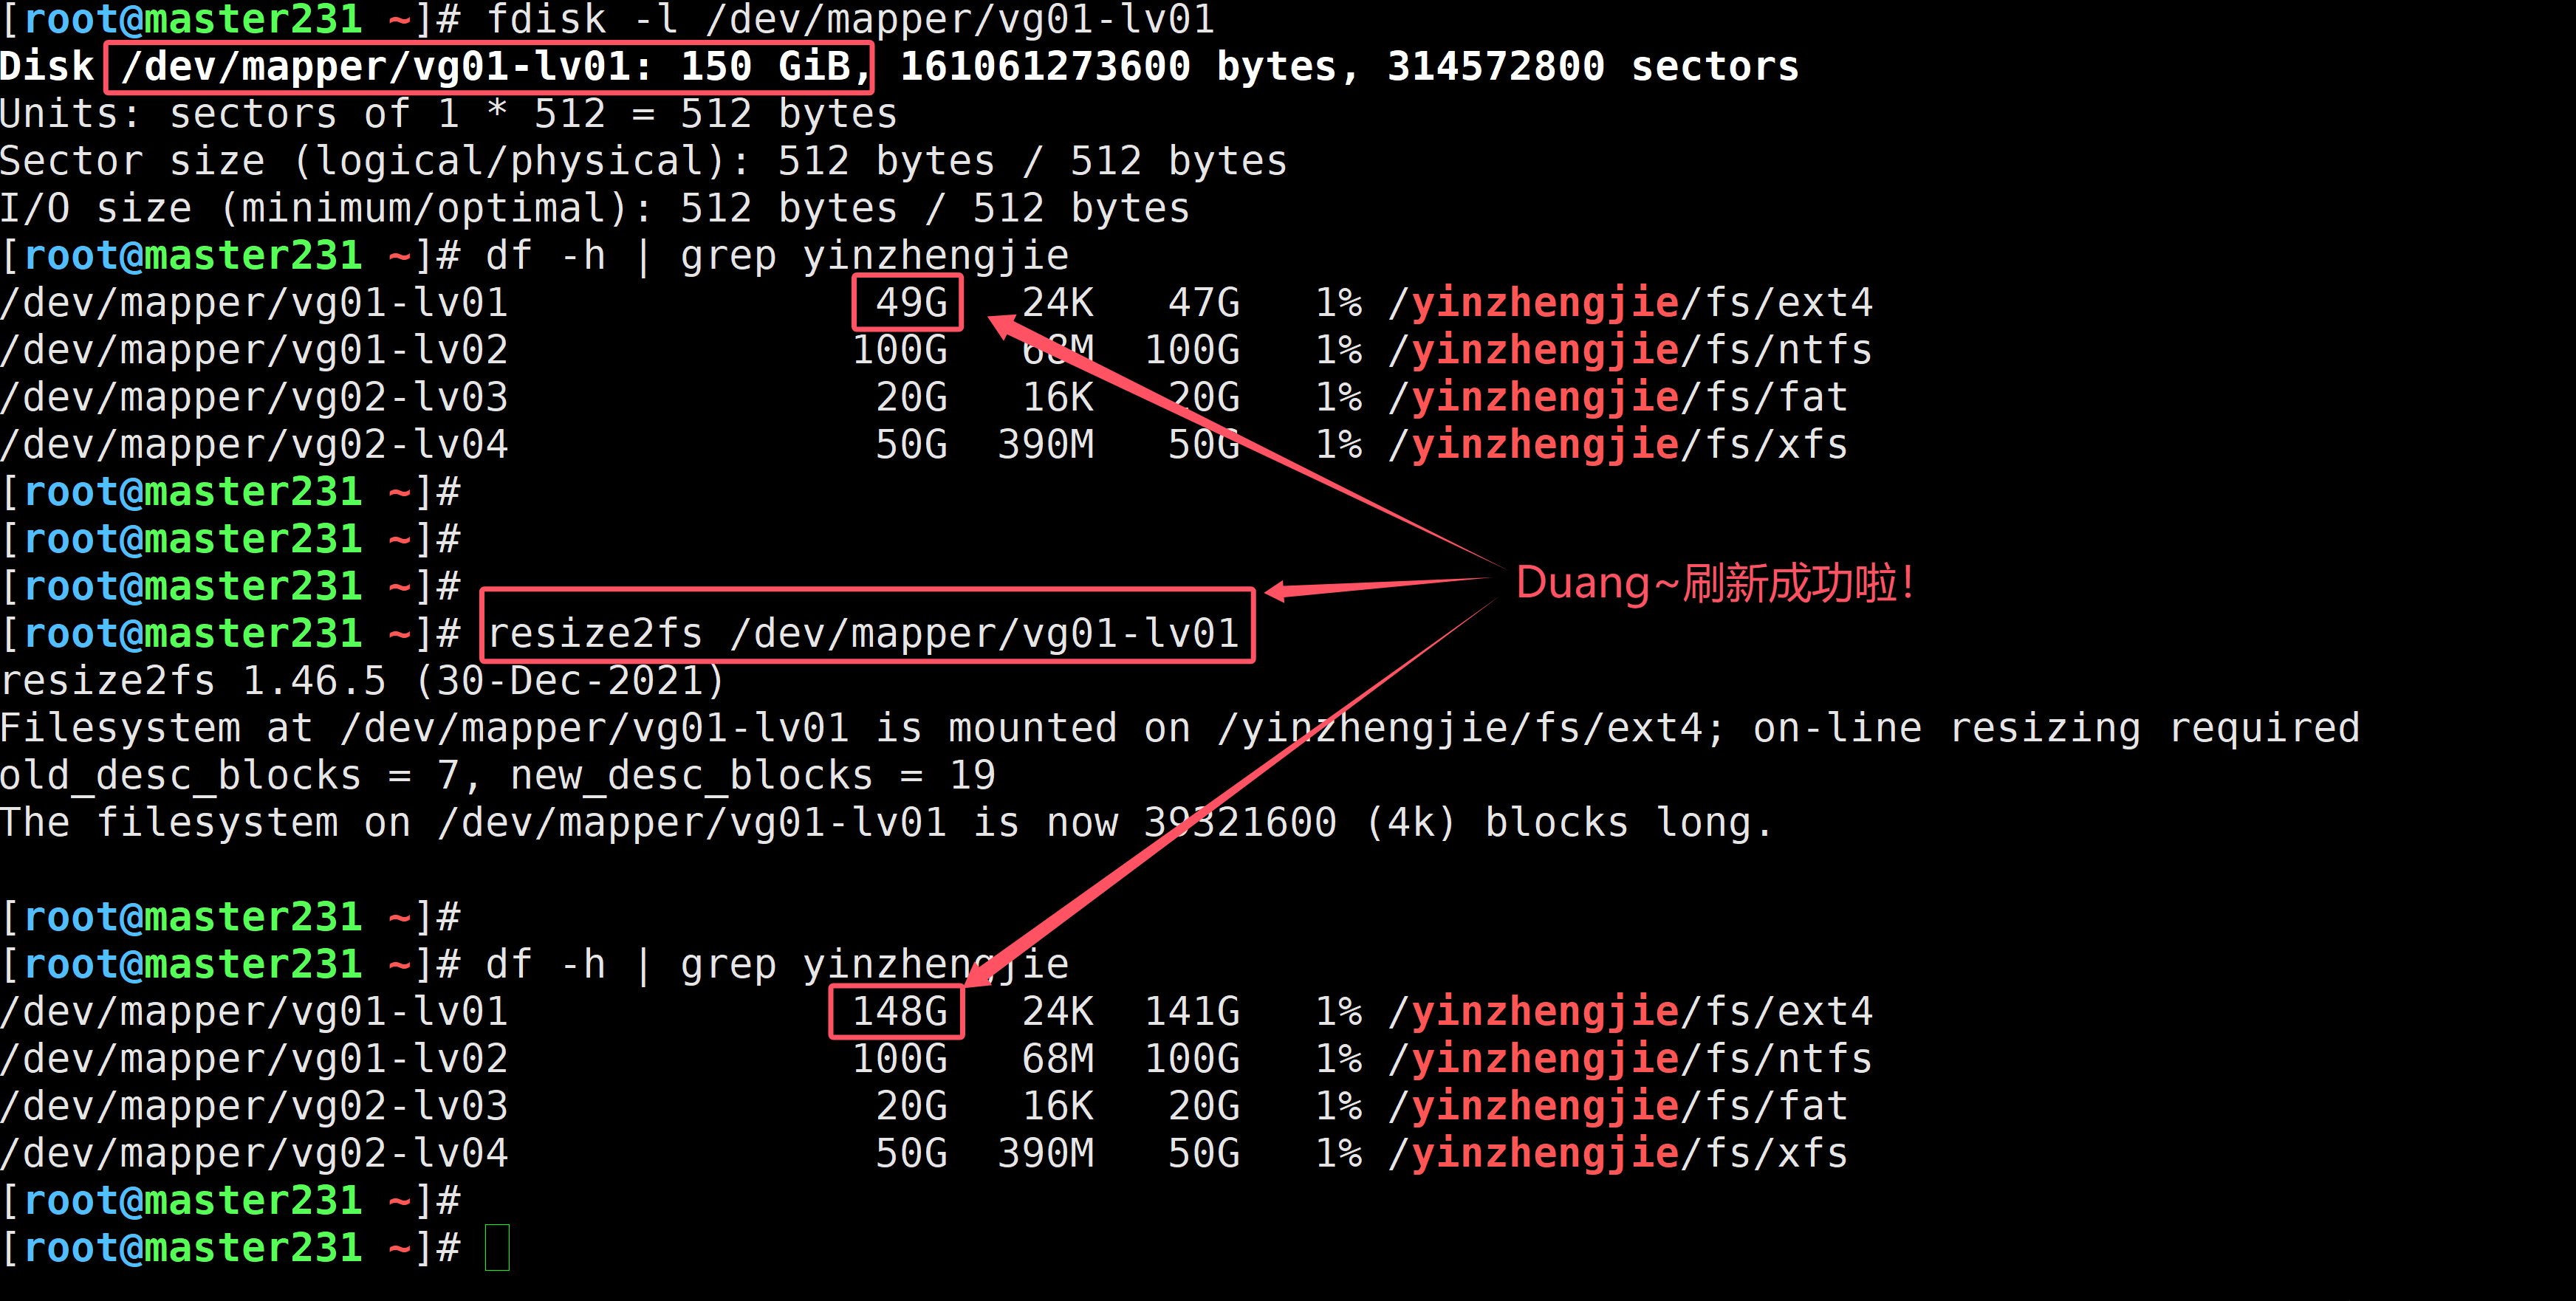
[root@master231 ~]# fdisk -l /dev/mapper/vg01-lv01   # 查看设备大小已经扩容成功了
Disk /dev/mapper/vg01-lv01: 150 GiB, 161061273600 bytes, 314572800 sectors
Units: sectors of 1 * 512 = 512 bytes
Sector size (logical/physical): 512 bytes / 512 bytes
I/O size (minimum/optimal): 512 bytes / 512 bytes
[root@master231 ~]#


	3.使用resize2fs工具刷新最新的挂载表
[root@master231 ~]# resize2fs /dev/mapper/vg01-lv01
resize2fs 1.46.5 (30-Dec-2021)
Filesystem at /dev/mapper/vg01-lv01 is mounted on /yinzhengjie/fs/ext4; on-line resizing required
old_desc_blocks = 7, new_desc_blocks = 19
The filesystem on /dev/mapper/vg01-lv01 is now 39321600 (4k) blocks long.

[root@master231 ~]#
[root@master231 ~]# df -h | grep yinzhengjie
/dev/mapper/vg01-lv01              148G   24K  141G   1% /yinzhengjie/fs/ext4  # Duang~很明显刷新成功啦!
/dev/mapper/vg01-lv02              100G   68M  100G   1% /yinzhengjie/fs/ntfs
/dev/mapper/vg02-lv03               20G   16K   20G   1% /yinzhengjie/fs/fat
/dev/mapper/vg02-lv04               50G  390M   50G   1% /yinzhengjie/fs/xfs
[root@master231 ~]#
1.2 剩余空间全部扩容xfs案例
	1.扩容前查看
[root@master231 ~]# vgs
  VG        #PV #LV #SN Attr   VSize    VFree
  ubuntu-vg   1   1   0 wz--n-  <98.00g   49.00g
  vg01        3   2   0 wz--n- <399.99g <149.99g
  vg02        3   2   0 wz--n-   <1.49t   <1.42t
[root@master231 ~]#


	2.将vg剩余的所有空间扩容到指定的lv
[root@master231 ~]# lvextend /dev/mapper/vg02-lv04 -l +100%FREE
  Size of logical volume vg02/lv04 changed from 50.00 GiB (12800 extents) to <1.47 TiB (385021 extents).
  Logical volume vg02/lv04 successfully resized.
[root@master231 ~]#
[root@master231 ~]# vgs
  VG        #PV #LV #SN Attr   VSize    VFree
  ubuntu-vg   1   1   0 wz--n-  <98.00g 49.00g
  vg01        3   2   0 wz--n- <399.99g <149.99g
  vg02        3   2   0 wz--n-   <1.49t     0  # 很明显,vg已经全部使用完了
[root@master231 ~]#
[root@master231 ~]# fdisk -l /dev/mapper/vg02-lv04
Disk /dev/mapper/vg02-lv04: 1.47 TiB, 1614895120384 bytes, 3154092032 sectors
Units: sectors of 1 * 512 = 512 bytes
Sector size (logical/physical): 512 bytes / 512 bytes
I/O size (minimum/optimal): 512 bytes / 512 bytes
[root@master231 ~]#

	3.自动扩展XFS文件系统到最大的可用大小
[root@master231 ~]# df -h | grep yinzhengjie
/dev/mapper/vg01-lv01              148G   24K  141G   1% /yinzhengjie/fs/ext4
/dev/mapper/vg02-lv03               20G   16K   20G   1% /yinzhengjie/fs/fat
/dev/mapper/vg02-lv04               50G  390M   50G   1% /yinzhengjie/fs/xfs  # 注意,挂载的大小并没有变化!
/dev/mapper/vg01-lv02              100G   68M  100G   1% /yinzhengjie/fs/ntfs
[root@master231 ~]#
[root@master231 ~]# xfs_growfs /yinzhengjie/fs/xfs/
meta-data=/dev/mapper/vg02-lv04  isize=512    agcount=4, agsize=3276800 blks
         =                       sectsz=512   attr=2, projid32bit=1
         =                       crc=1        finobt=1, sparse=1, rmapbt=0
         =                       reflink=1    bigtime=0 inobtcount=0
data     =                       bsize=4096   blocks=13107200, imaxpct=25
         =                       sunit=0      swidth=0 blks
naming   =version 2              bsize=4096   ascii-ci=0, ftype=1
log      =internal log           bsize=4096   blocks=6400, version=2
         =                       sectsz=512   sunit=0 blks, lazy-count=1
realtime =none                   extsz=4096   blocks=0, rtextents=0
data blocks changed from 13107200 to 394261504
[root@master231 ~]#
[root@master231 ~]# df -h | grep yinzhengjie
/dev/mapper/vg01-lv01              148G   24K  141G   1% /yinzhengjie/fs/ext4
/dev/mapper/vg02-lv03               20G   16K   20G   1% /yinzhengjie/fs/fat
/dev/mapper/vg02-lv04              1.5T   11G  1.5T   1% /yinzhengjie/fs/xfs  # Duang~成功啦!
/dev/mapper/vg01-lv02              100G   68M  100G   1% /yinzhengjie/fs/ntfs
[root@master231 ~]#
[root@master231 ~]#
2.扩展vg案例
2.1 实验环境准备
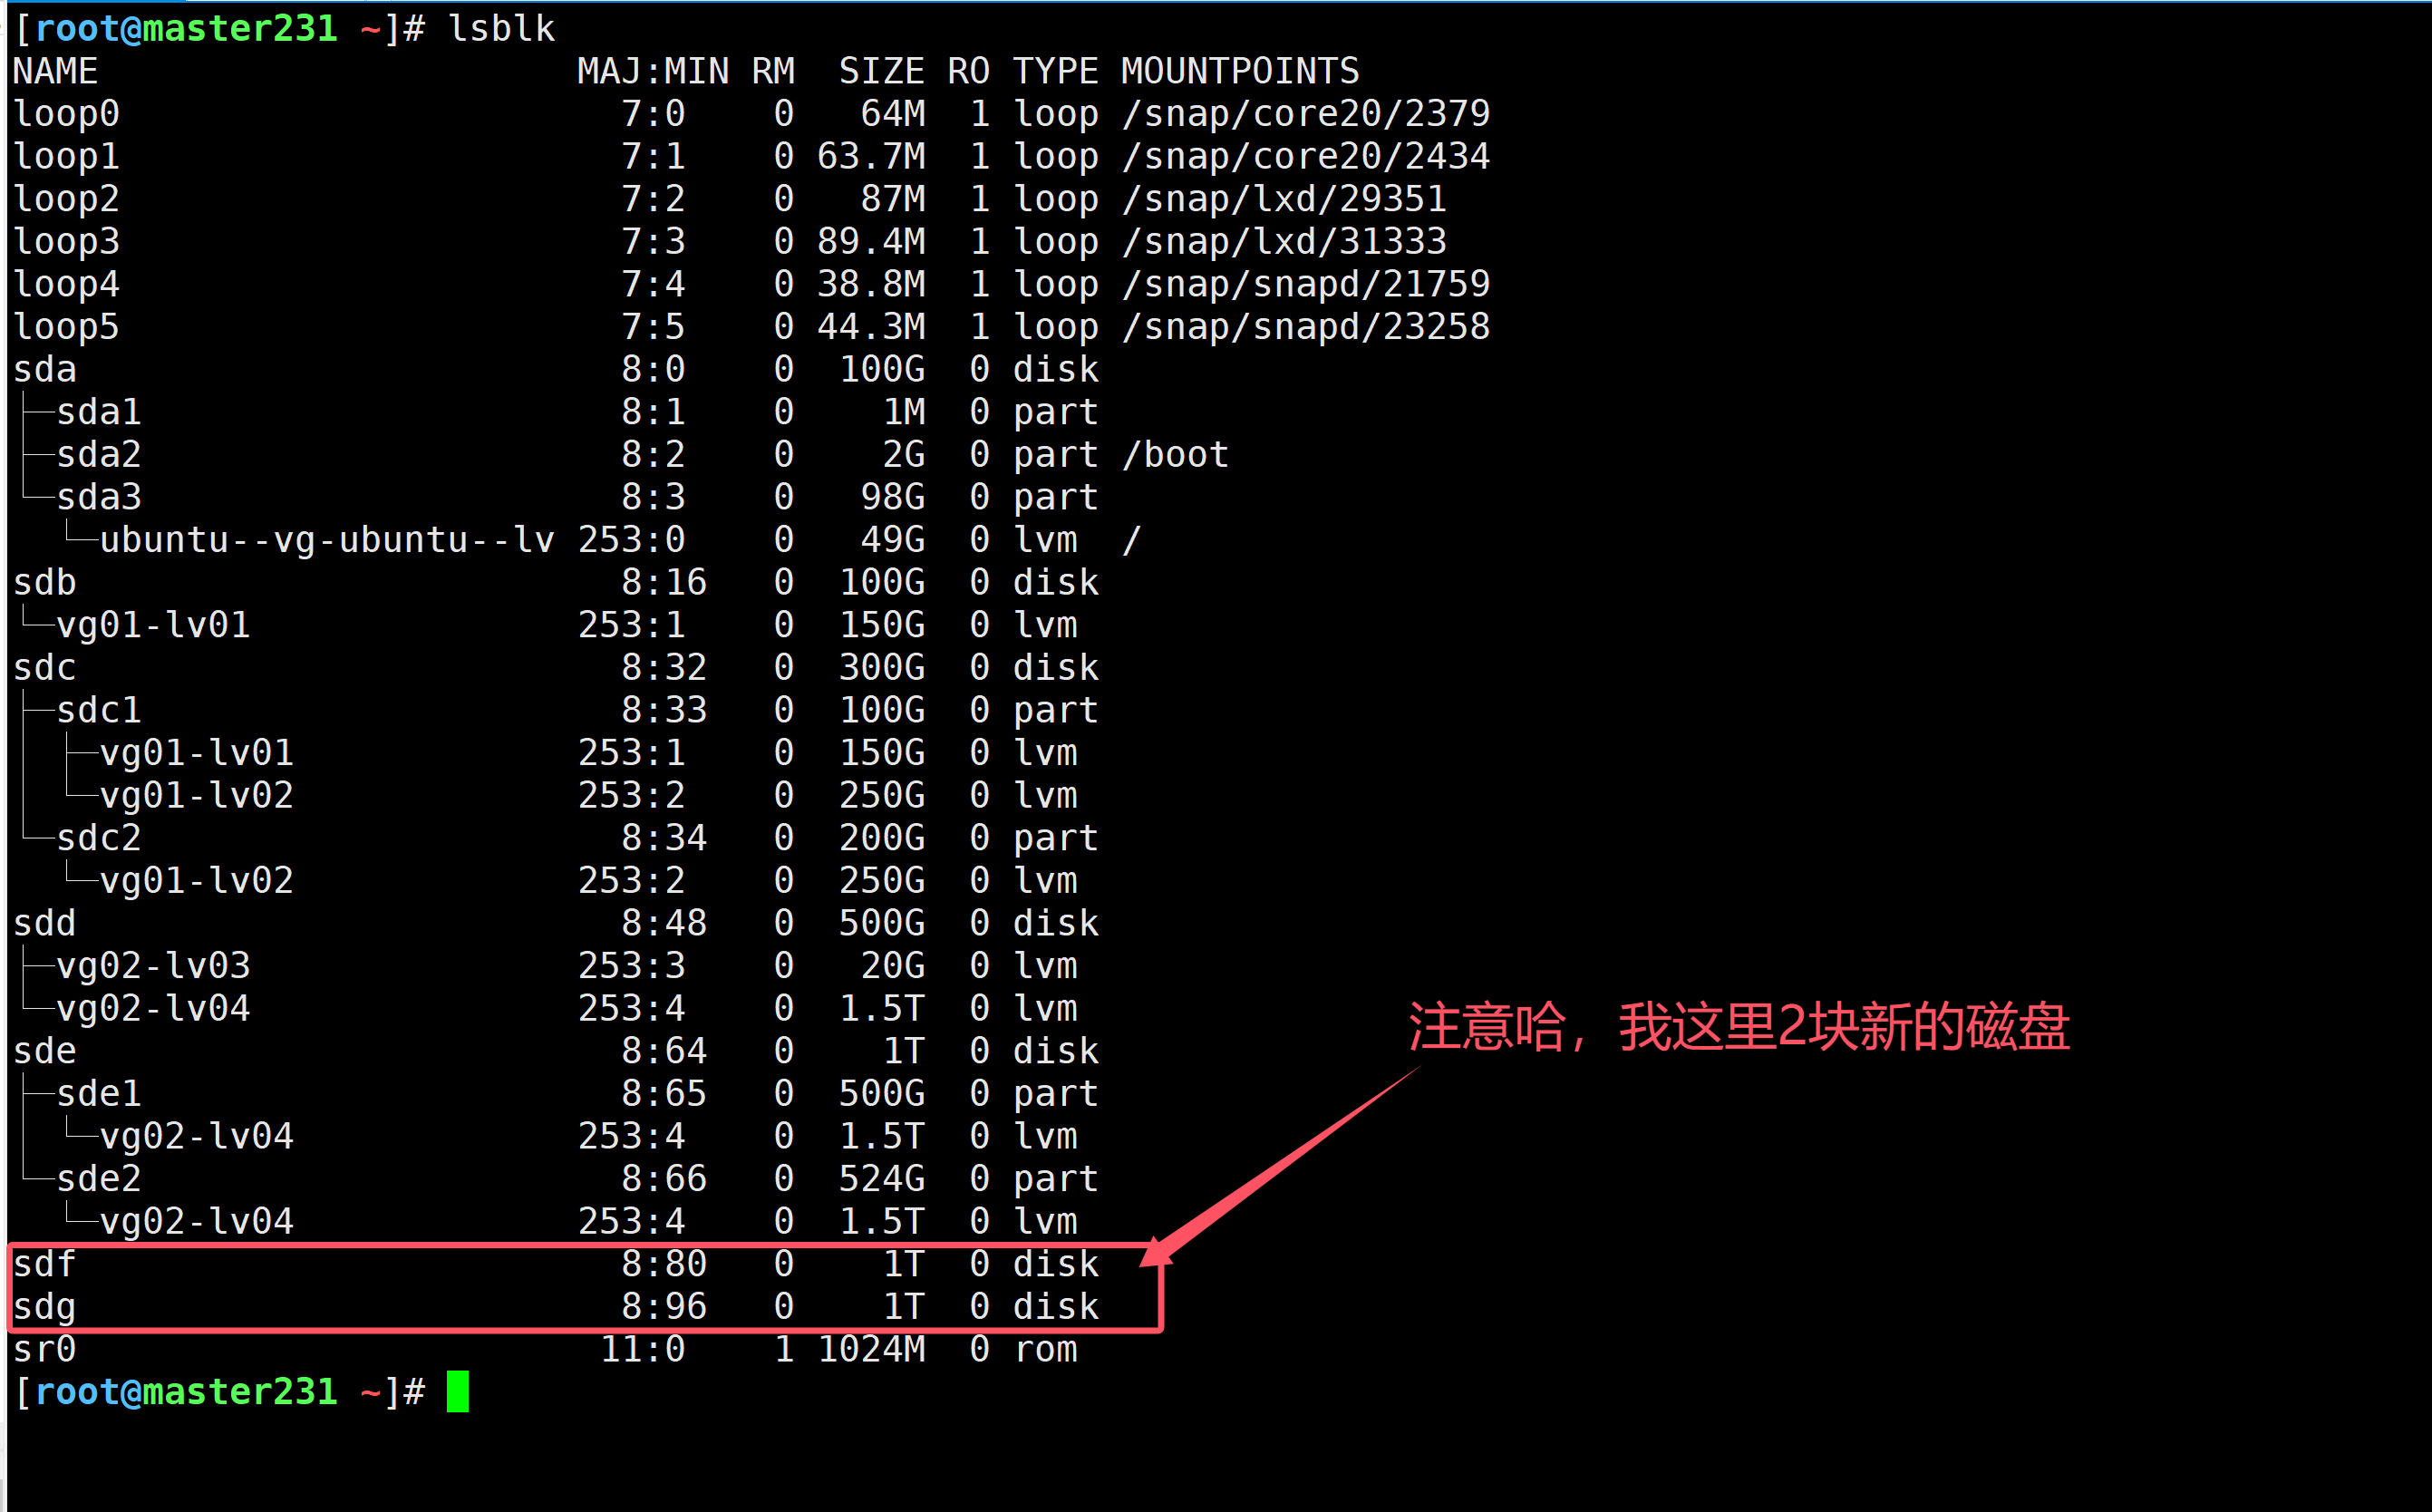
如上图所示,我新增了2个1TB的硬盘。
2.2 扩容vg案例
	1.查看现有的vg列表
[root@master231 ~]# vgs
  VG        #PV #LV #SN Attr   VSize    VFree
  ubuntu-vg   1   1   0 wz--n-  <98.00g 49.00g
  vg01        3   2   0 wz--n- <399.99g <149.99g
  vg02        3   2   0 wz--n-   <1.49t     0
[root@master231 ~]#


	2.创建pv
[root@master231 ~]# pvcreate /dev/sdf /dev/sdg
  Physical volume "/dev/sdf" successfully created.
  Physical volume "/dev/sdg" successfully created.
[root@master231 ~]#


	3.将pv加入到vg中
[root@master231 ~]# vgextend vg02 /dev/sdf /dev/sdg
  Volume group "vg02" successfully extended
[root@master231 ~]#
[root@master231 ~]# vgs
  VG        #PV #LV #SN Attr   VSize    VFree
  ubuntu-vg   1   1   0 wz--n-  <98.00g 49.00g
  vg01        3   2   0 wz--n- <399.99g <149.99g
  vg02        5   2   0 wz--n-   <3.49t <2.00t  # Duang~扩容成功啦!
[root@master231 ~]#
3.移除现有的vg
3.1 卸载设备
[root@master231 ~]# umount /yinzhengjie/fs/ext4/
[root@master231 ~]# umount /yinzhengjie/fs/fat/
[root@master231 ~]# umount /yinzhengjie/fs/ntfs/
[root@master231 ~]# umount /yinzhengjie/fs/xfs/
[root@master231 ~]# df -h | grep yinzhengjie
[root@master231 ~]#
3.2 移除vg列表等待所有lv
[root@master231 ~]# lvs
  LV        VG        Attr       LSize    Pool Origin Data%  Meta%  Move Log Cpy%Sync Convert
  ubuntu-lv ubuntu-vg -wi-ao----  <49.00g
  lv01      vg01      -wi-a-----  150.00g
  lv02      vg01      -wi-a----- <249.99g
  lv03      vg02      -wi-a-----   20.00g
  lv04      vg02      -wi-a-----   <1.47t
[root@master231 ~]#
[root@master231 ~]# lvremove vg01 --force
  Logical volume "lv01" successfully removed
  Logical volume "lv02" successfully removed
[root@master231 ~]#
[root@master231 ~]# lvremove vg02 --force
  Logical volume "lv03" successfully removed
  Logical volume "lv04" successfully removed
[root@master231 ~]#
[root@master231 ~]# lvs
  LV        VG        Attr       LSize   Pool Origin Data%  Meta%  Move Log Cpy%Sync Convert
  ubuntu-lv ubuntu-vg -wi-ao---- <49.00g
[root@master231 ~]#
3.3 移除所有的vg
[root@master231 ~]# vgs
  VG        #PV #LV #SN Attr   VSize    VFree
  ubuntu-vg   1   1   0 wz--n-  <98.00g   49.00g
  vg01        3   0   0 wz--n- <399.99g <399.99g
  vg02        5   0   0 wz--n-   <3.49t   <3.49t
[root@master231 ~]#
[root@master231 ~]# vgremove vg01
  Volume group "vg01" successfully removed
[root@master231 ~]#
[root@master231 ~]# vgremove vg02
  Volume group "vg02" successfully removed
[root@master231 ~]#
[root@master231 ~]# vgs
  VG        #PV #LV #SN Attr   VSize   VFree
  ubuntu-vg   1   1   0 wz--n- <98.00g 49.00g
[root@master231 ~]#
本文来自博客园,作者:尹正杰,转载请注明原文链接:https://www.cnblogs.com/yinzhengjie/p/18594123,个人微信: "JasonYin2020"(添加时请备注来源及意图备注,有偿付费)
当你的才华还撑不起你的野心的时候,你就应该静下心来学习。当你的能力还驾驭不了你的目标的时候,你就应该沉下心来历练。问问自己,想要怎样的人生。


