Istio服务质量上篇
作者:尹正杰
版权声明:原创作品,谢绝转载!否则将追究法律责任。
目录
一.流量注入
1.Istio注入原理图解
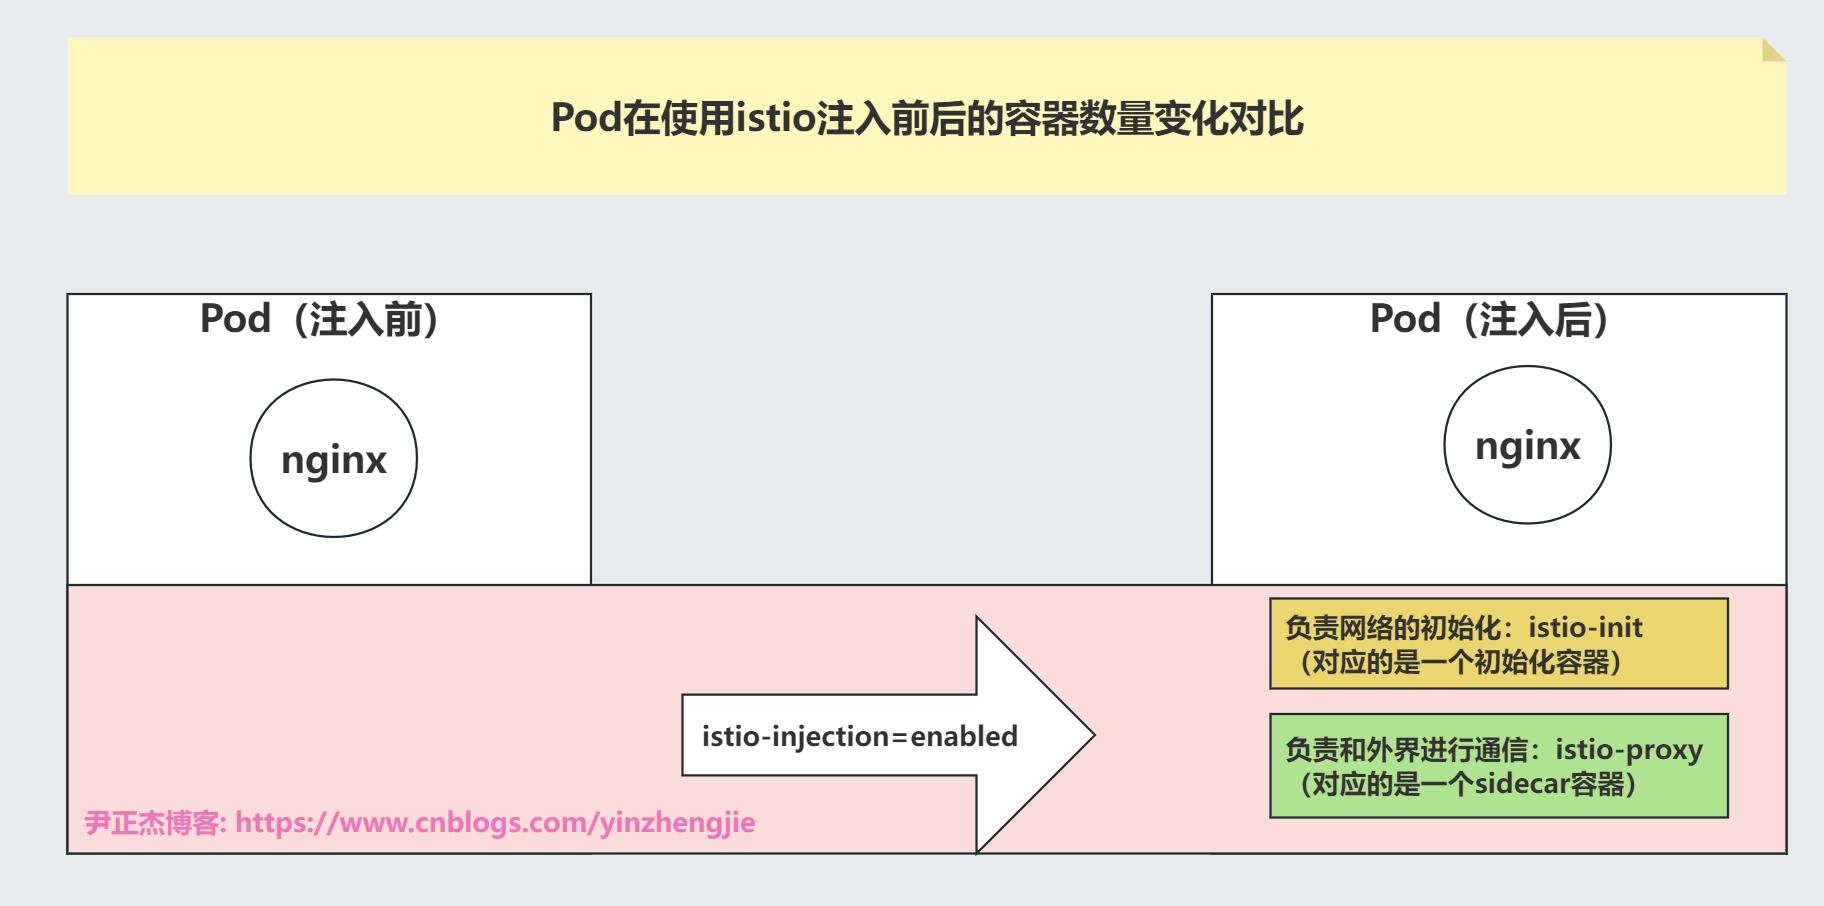
如上图所示,在正常情况下,我们单独运行一个Pod,其并没有其他的容器运行。

但是我们使用Istio向这个pod注入时会注入两个容器,一个是启动时负责网络的初始化工作,另一个是负责外界通信的sidecar容器。

注入后,最后只会保留原有的业务容器和一个名为Istio-proxy的容器运行。具体流程工作流程如下图所示。

温馨提示:
	Istio在注入的时候会删除原有的Pod,以便于创建新的Pod更新资源清单,与此同时,标签也会随之变化。
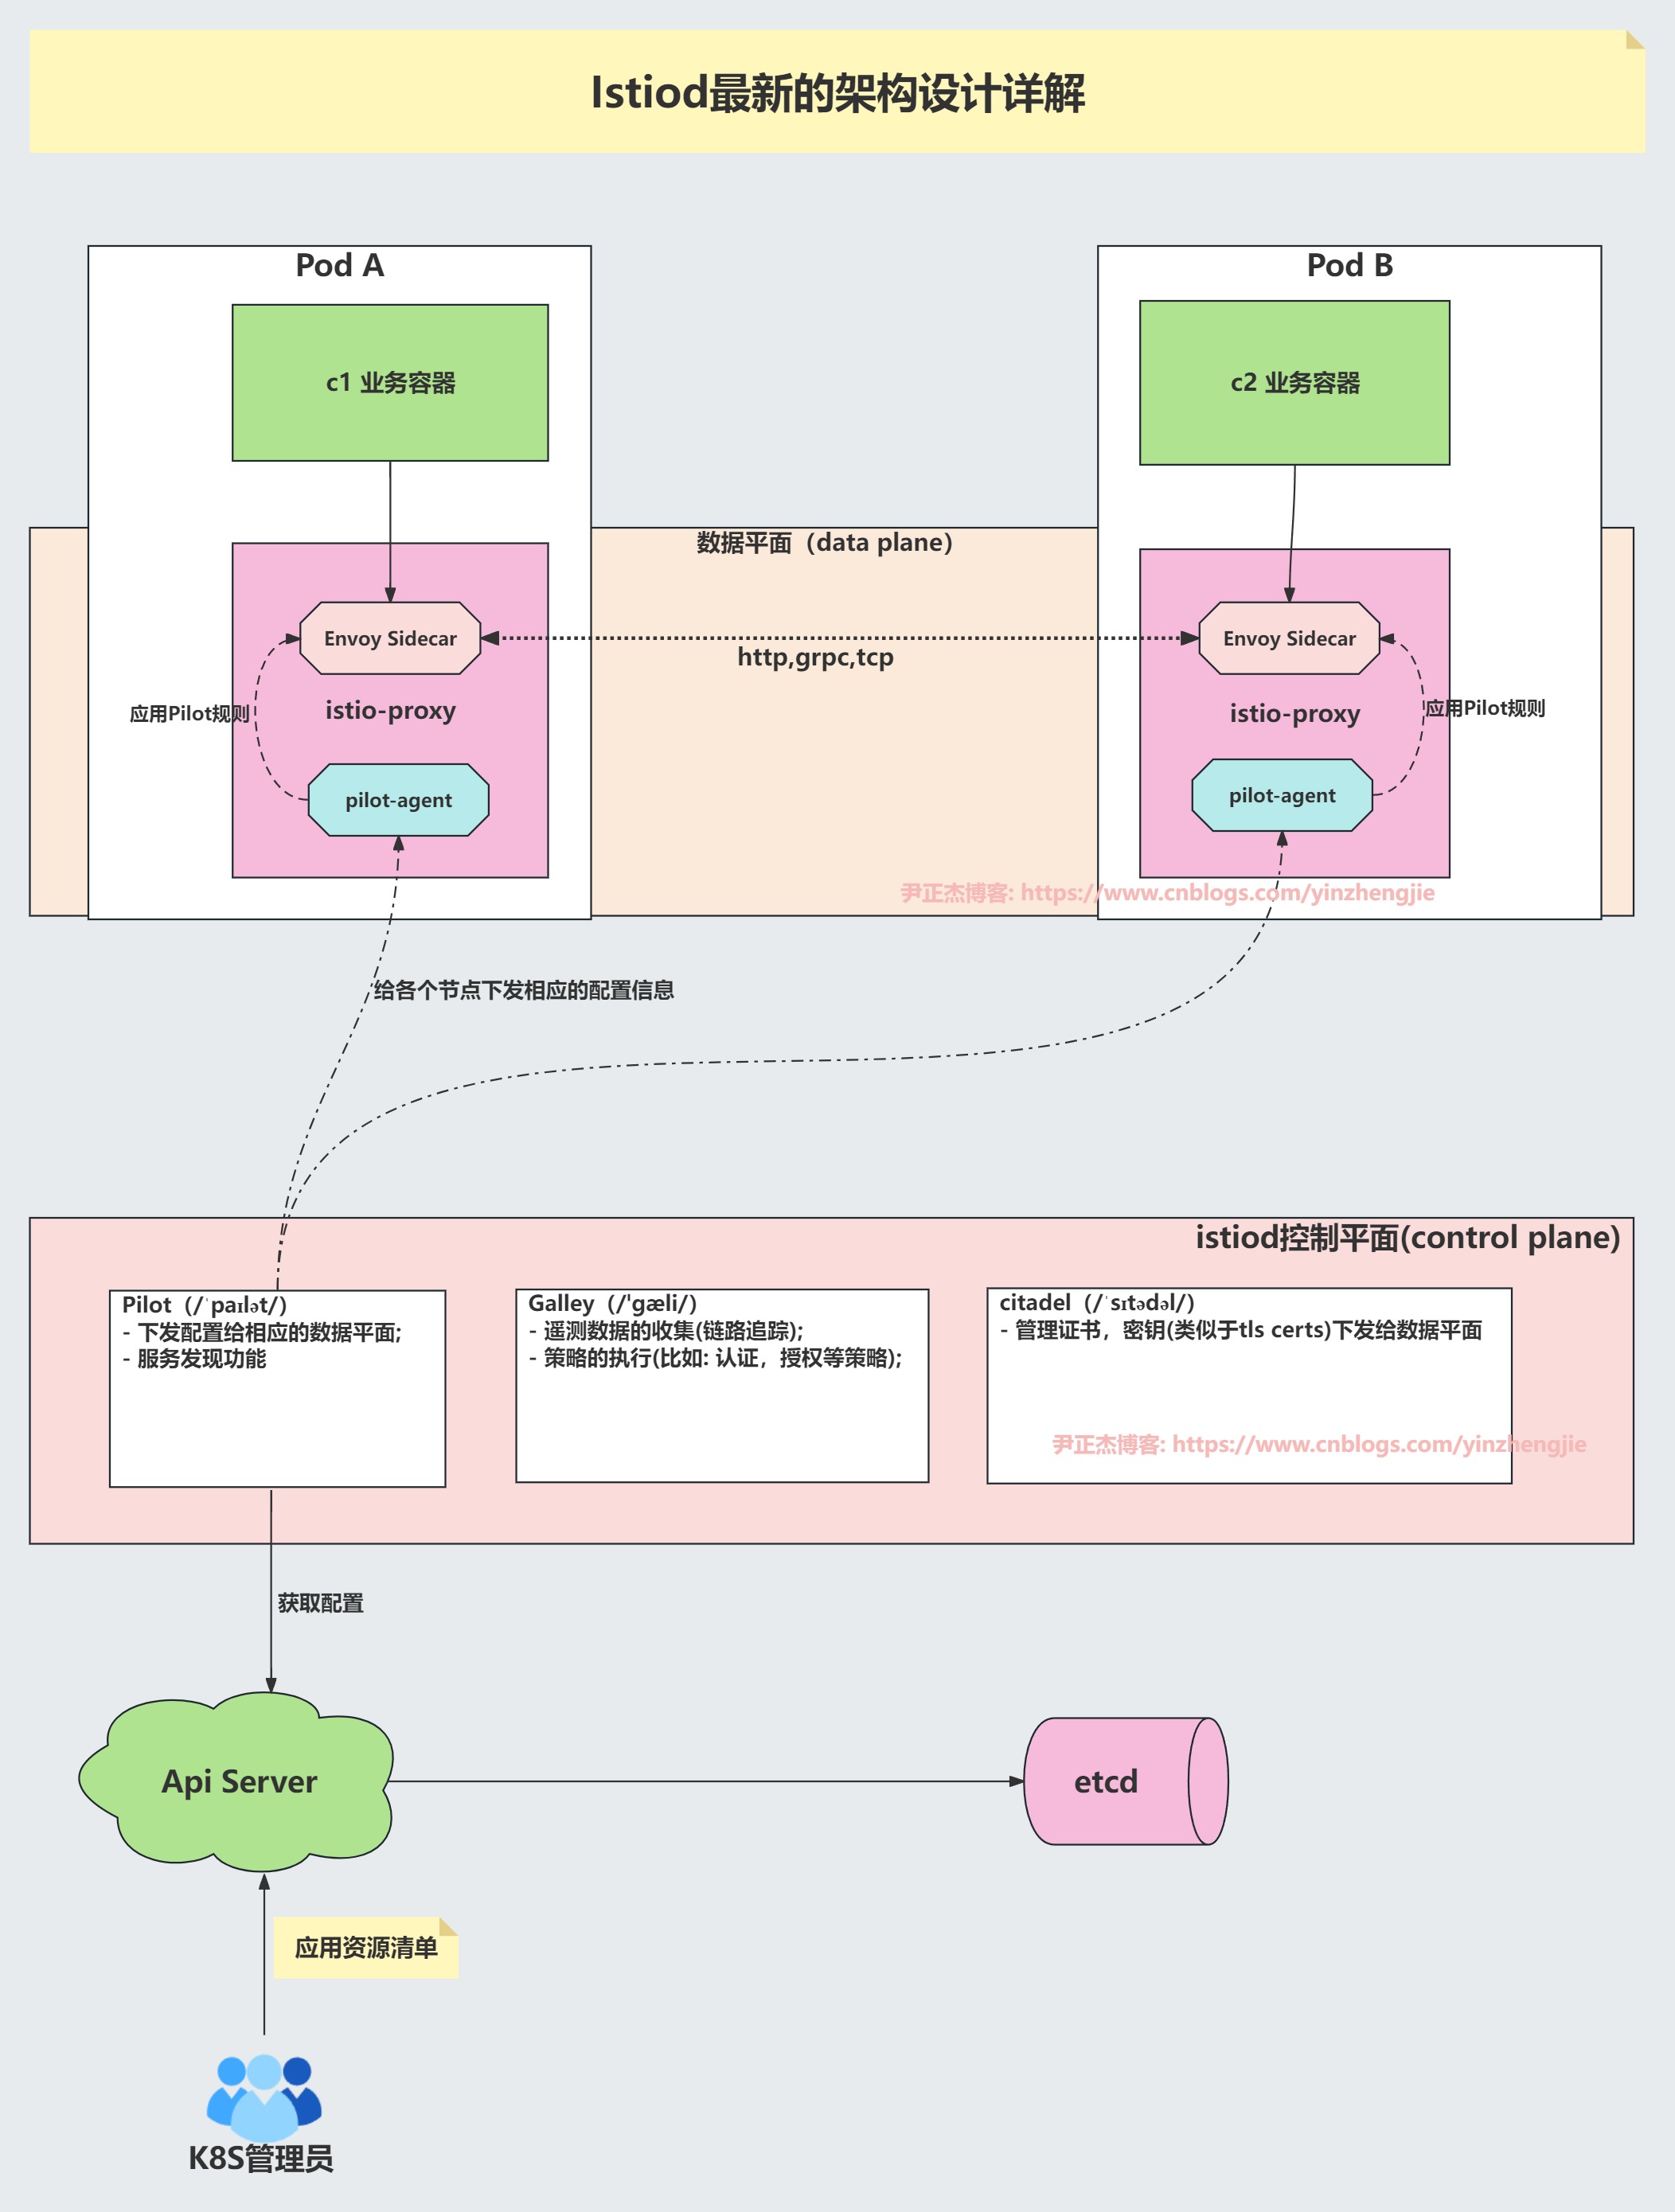
2.手动注入案例
	1.创建测试Pod
[root@master241 ~]# cat deploy-apps.yaml
apiVersion: v1
kind: Namespace
metadata:
  name: yinzhengjie

---

apiVersion: apps/v1
kind: Deployment
metadata:
  name: deploy-apps
  namespace: yinzhengjie
spec:
  replicas: 3
  selector:
    matchLabels:
      app: v1
  template:
    metadata:
      labels:
        app: v1
    spec:
      containers:
      - name: c1
        image: registry.cn-hangzhou.aliyuncs.com/yinzhengjie-k8s/apps:v1
        ports:
        - containerPort: 80
[root@master241 ~]#
[root@master241 ~]# kubectl get pods -n yinzhengjie
NAME                           READY   STATUS    RESTARTS   AGE
deploy-apps-5f45c6f4b4-5vhb4   1/1     Running   0          10s
deploy-apps-5f45c6f4b4-9sj4p   1/1     Running   0          10s
deploy-apps-5f45c6f4b4-9tmkm   1/1     Running   0          10s
[root@master241 ~]#
[root@master241 ~]# kubectl apply -f deploy-apps.yaml
namespace/yinzhengjie created
deployment.apps/deploy-apps created
[root@master241 ~]#


	2.手动注入Pod
[root@master241 ~]# kubectl get pods -n yinzhengjie --show-labels
NAME                           READY   STATUS    RESTARTS   AGE   LABELS
deploy-apps-5f45c6f4b4-5vhb4   1/1     Running   0          12s   app=v1,pod-template-hash=5f45c6f4b4
deploy-apps-5f45c6f4b4-9sj4p   1/1     Running   0          12s   app=v1,pod-template-hash=5f45c6f4b4
deploy-apps-5f45c6f4b4-9tmkm   1/1     Running   0          12s   app=v1,pod-template-hash=5f45c6f4b4
[root@master241 ~]#
[root@master241 ~]# istioctl kube-inject -f deploy-apps.yaml | kubectl -n yinzhengjie  apply -f -
namespace/yinzhengjie unchanged
deployment.apps/deploy-apps configured
[root@master241 ~]#
[root@master241 ~]# kubectl get pods -n yinzhengjie --show-labels
NAME                           READY   STATUS    RESTARTS   AGE   LABELS
deploy-apps-548b56cf95-94lrq   2/2     Running   0          49s   app=v1,pod-template-hash=548b56cf95,security.istio.io/tlsMode=istio,service.istio.io/canonical-name=v1,service.istio.io/canonical-revision=latest
deploy-apps-548b56cf95-mhg44   2/2     Running   0          54s   app=v1,pod-template-hash=548b56cf95,security.istio.io/tlsMode=istio,service.istio.io/canonical-name=v1,service.istio.io/canonical-revision=latest
deploy-apps-548b56cf95-rlr77   2/2     Running   0          44s   app=v1,pod-template-hash=548b56cf95,security.istio.io/tlsMode=istio,service.istio.io/canonical-name=v1,service.istio.io/canonical-revision=latest
[root@master241 ~]#
3.原理剖析细节部分
	1.查看注入后的资源清单,我直截取了关键字段,大家可以看到多出来了相关的配置
[root@master241 ~]# kubectl -n yinzhengjie get pods deploy-apps-548b56cf95-rlr77 -o yaml
apiVersion: v1
kind: Pod
metadata:
  ...
  name: deploy-apps-548b56cf95-rlr77
  namespace: yinzhengjie
  ...
spec:
  containers:
  - image: registry.cn-hangzhou.aliyuncs.com/yinzhengjie-k8s/apps:v1
    name: c1
    ...
  - args:
    ...
    image: docker.io/istio/proxyv2:1.17.8
    name: istio-proxy
    ...
  initContainers:
  - args:
    - istio-iptables
    - -p
    - "15001"
    - -z
    - "15006"
    - -u
    - "1337"
    - -m
    - REDIRECT
    - -i
    - '*'
    - -x
    - ""
    - -b
    - '*'
    - -d
    - 15090,15021,15020
    - --log_output_level=default:info
    image: docker.io/istio/proxyv2:1.17.8
    name: istio-init
    ...
  ...
status:
  ...
[root@master241 ~]#


	2.查看istio-proxy和业务容器c1的网络IP地址
[root@master241 ~]# kubectl -n yinzhengjie exec -it deploy-apps-548b56cf95-rlr77 -c c1 -- ifconfig
eth0      Link encap:Ethernet  HWaddr 66:B8:20:A5:80:02
          inet addr:10.100.1.35  Bcast:10.100.1.255  Mask:255.255.255.0
          inet6 addr: fe80::64b8:20ff:fea5:8002/64 Scope:Link
          UP BROADCAST RUNNING MULTICAST  MTU:1450  Metric:1
          RX packets:4505 errors:0 dropped:0 overruns:0 frame:0
          TX packets:3968 errors:0 dropped:0 overruns:0 carrier:0
          collisions:0 txqueuelen:0
          RX bytes:716322 (699.5 KiB)  TX bytes:4086232 (3.8 MiB)

lo        Link encap:Local Loopback
          inet addr:127.0.0.1  Mask:255.0.0.0
          inet6 addr: ::1/128 Scope:Host
          UP LOOPBACK RUNNING  MTU:65536  Metric:1
          RX packets:2338 errors:0 dropped:0 overruns:0 frame:0
          TX packets:2338 errors:0 dropped:0 overruns:0 carrier:0
          collisions:0 txqueuelen:1000
          RX bytes:5138923 (4.9 MiB)  TX bytes:5138923 (4.9 MiB)

[root@master241 ~]#
[root@master241 ~]# kubectl -n yinzhengjie exec -it deploy-apps-548b56cf95-rlr77 -c istio-proxy -- ifconfig
eth0: flags=4163<UP,BROADCAST,RUNNING,MULTICAST>  mtu 1450
        inet 10.100.1.35  netmask 255.255.255.0  broadcast 10.100.1.255
        inet6 fe80::64b8:20ff:fea5:8002  prefixlen 64  scopeid 0x20<link>
        ether 66:b8:20:a5:80:02  txqueuelen 0  (Ethernet)
        RX packets 4541  bytes 719526 (719.5 KB)
        RX errors 0  dropped 0  overruns 0  frame 0
        TX packets 3998  bytes 4089196 (4.0 MB)
        TX errors 0  dropped 0 overruns 0  carrier 0  collisions 0

lo: flags=73<UP,LOOPBACK,RUNNING>  mtu 65536
        inet 127.0.0.1  netmask 255.0.0.0
        inet6 ::1  prefixlen 128  scopeid 0x10<host>
        loop  txqueuelen 1000  (Local Loopback)
        RX packets 2356  bytes 5141593 (5.1 MB)
        RX errors 0  dropped 0  overruns 0  frame 0
        TX packets 2356  bytes 5141593 (5.1 MB)
        TX errors 0  dropped 0 overruns 0  carrier 0  collisions 0

[root@master241 ~]#


	3.查看istio-proxy和业务容器c1的进程信息
[root@master241 ~]# kubectl -n yinzhengjie exec -it deploy-apps-548b56cf95-rlr77 -c c1 -- netstat -ntlp
Active Internet connections (only servers)
Proto Recv-Q Send-Q Local Address           Foreign Address         State       PID/Program name
tcp        0      0 0.0.0.0:15006           0.0.0.0:*               LISTEN      -
tcp        0      0 0.0.0.0:15006           0.0.0.0:*               LISTEN      -
tcp        0      0 0.0.0.0:15021           0.0.0.0:*               LISTEN      -
tcp        0      0 0.0.0.0:15021           0.0.0.0:*               LISTEN      -
tcp        0      0 0.0.0.0:80              0.0.0.0:*               LISTEN      1/nginx: master pro
tcp        0      0 0.0.0.0:15090           0.0.0.0:*               LISTEN      -
tcp        0      0 0.0.0.0:15090           0.0.0.0:*               LISTEN      -
tcp        0      0 127.0.0.1:15000         0.0.0.0:*               LISTEN      -
tcp        0      0 0.0.0.0:15001           0.0.0.0:*               LISTEN      -
tcp        0      0 0.0.0.0:15001           0.0.0.0:*               LISTEN      -
tcp        0      0 127.0.0.1:15004         0.0.0.0:*               LISTEN      -
tcp        0      0 :::15020                :::*                    LISTEN      -
tcp        0      0 :::80                   :::*                    LISTEN      1/nginx: master pro
[root@master241 ~]#
[root@master241 ~]# kubectl -n yinzhengjie exec -it deploy-apps-548b56cf95-rlr77 -c istio-proxy -- netstat -ntlp
Active Internet connections (only servers)
Proto Recv-Q Send-Q Local Address           Foreign Address         State       PID/Program name
tcp        0      0 0.0.0.0:15006           0.0.0.0:*               LISTEN      14/envoy
tcp        0      0 0.0.0.0:15006           0.0.0.0:*               LISTEN      14/envoy
tcp        0      0 0.0.0.0:15021           0.0.0.0:*               LISTEN      14/envoy
tcp        0      0 0.0.0.0:15021           0.0.0.0:*               LISTEN      14/envoy
tcp        0      0 0.0.0.0:80              0.0.0.0:*               LISTEN      -
tcp        0      0 0.0.0.0:15090           0.0.0.0:*               LISTEN      14/envoy
tcp        0      0 0.0.0.0:15090           0.0.0.0:*               LISTEN      14/envoy
tcp        0      0 127.0.0.1:15000         0.0.0.0:*               LISTEN      14/envoy
tcp        0      0 0.0.0.0:15001           0.0.0.0:*               LISTEN      14/envoy
tcp        0      0 0.0.0.0:15001           0.0.0.0:*               LISTEN      14/envoy
tcp        0      0 127.0.0.1:15004         0.0.0.0:*               LISTEN      1/pilot-agent
tcp6       0      0 :::15020                :::*                    LISTEN      1/pilot-agent
tcp6       0      0 :::80                   :::*                    LISTEN      -
[root@master241 ~]#
[root@master241 ~]# kubectl -n yinzhengjie exec -it deploy-apps-548b56cf95-rlr77 -c istio-proxy -- ps -ef
UID          PID    PPID  C STIME TTY          TIME CMD
istio-p+       1       0  0 13:27 ?        00:00:04 /usr/local/bin/pilot-agent p
istio-p+      14       1  0 13:27 ?        00:00:15 /usr/local/bin/envoy -c etc/
istio-p+      49       0  0 14:08 pts/0    00:00:00 ps -ef
[root@master241 ~]#
[root@master241 ~]# kubectl -n yinzhengjie exec -it deploy-apps-548b56cf95-rlr77 -c c1 -- ps -ef
PID   USER     TIME  COMMAND
    1 root      0:00 nginx: master process nginx -g daemon off;
   32 nginx     0:00 nginx: worker process
   33 nginx     0:00 nginx: worker process
   57 root      0:00 ps -ef
[root@master241 ~]#


	4.查看istio-init初始化容器的日志都做了哪些工作
[root@master241 ~]# kubectl -n yinzhengjie logs deploy-apps-548b56cf95-rlr77 -c istio-init
2024-03-11T13:27:56.773482Z	info	Istio iptables environment:
ENVOY_PORT=
INBOUND_CAPTURE_PORT=
ISTIO_INBOUND_INTERCEPTION_MODE=
ISTIO_INBOUND_TPROXY_ROUTE_TABLE=
ISTIO_INBOUND_PORTS=
ISTIO_OUTBOUND_PORTS=
ISTIO_LOCAL_EXCLUDE_PORTS=
ISTIO_EXCLUDE_INTERFACES=
ISTIO_SERVICE_CIDR=
ISTIO_SERVICE_EXCLUDE_CIDR=
ISTIO_META_DNS_CAPTURE=
INVALID_DROP=

2024-03-11T13:27:56.773642Z	info	Istio iptables variables:
PROXY_PORT=15001
PROXY_INBOUND_CAPTURE_PORT=15006
PROXY_TUNNEL_PORT=15008
PROXY_UID=1337
PROXY_GID=1337
INBOUND_INTERCEPTION_MODE=REDIRECT
INBOUND_TPROXY_MARK=1337
INBOUND_TPROXY_ROUTE_TABLE=133
INBOUND_PORTS_INCLUDE=*
INBOUND_PORTS_EXCLUDE=15090,15021,15020
OUTBOUND_OWNER_GROUPS_INCLUDE=*
OUTBOUND_OWNER_GROUPS_EXCLUDE=
OUTBOUND_IP_RANGES_INCLUDE=*
OUTBOUND_IP_RANGES_EXCLUDE=
OUTBOUND_PORTS_INCLUDE=
OUTBOUND_PORTS_EXCLUDE=
KUBE_VIRT_INTERFACES=
ENABLE_INBOUND_IPV6=false
DNS_CAPTURE=false
DROP_INVALID=false
CAPTURE_ALL_DNS=false
DNS_SERVERS=[],[]
NETWORK_NAMESPACE=
CNI_MODE=false
HOST_NSENTER_EXEC=false
EXCLUDE_INTERFACES=

2024-03-11T13:27:56.773822Z	info	Running iptables-restore with the following input:
* nat
-N ISTIO_INBOUND
-N ISTIO_REDIRECT
-N ISTIO_IN_REDIRECT
-N ISTIO_OUTPUT
-A ISTIO_INBOUND -p tcp --dport 15008 -j RETURN
-A ISTIO_REDIRECT -p tcp -j REDIRECT --to-ports 15001
-A ISTIO_IN_REDIRECT -p tcp -j REDIRECT --to-ports 15006
-A PREROUTING -p tcp -j ISTIO_INBOUND
-A ISTIO_INBOUND -p tcp --dport 15090 -j RETURN
-A ISTIO_INBOUND -p tcp --dport 15021 -j RETURN
-A ISTIO_INBOUND -p tcp --dport 15020 -j RETURN
-A ISTIO_INBOUND -p tcp -j ISTIO_IN_REDIRECT
-A OUTPUT -p tcp -j ISTIO_OUTPUT
-A ISTIO_OUTPUT -o lo -s 127.0.0.6/32 -j RETURN
-A ISTIO_OUTPUT -o lo ! -d 127.0.0.1/32 -m owner --uid-owner 1337 -j ISTIO_IN_REDIRECT
-A ISTIO_OUTPUT -o lo -m owner ! --uid-owner 1337 -j RETURN
-A ISTIO_OUTPUT -m owner --uid-owner 1337 -j RETURN
-A ISTIO_OUTPUT -o lo ! -d 127.0.0.1/32 -m owner --gid-owner 1337 -j ISTIO_IN_REDIRECT
-A ISTIO_OUTPUT -o lo -m owner ! --gid-owner 1337 -j RETURN
-A ISTIO_OUTPUT -m owner --gid-owner 1337 -j RETURN
-A ISTIO_OUTPUT -d 127.0.0.1/32 -j RETURN
-A ISTIO_OUTPUT -j ISTIO_REDIRECT
COMMIT
2024-03-11T13:27:56.773857Z	info	Running command: iptables-restore --noflush
2024-03-11T13:27:56.791702Z	info	Running ip6tables-restore with the following input:

2024-03-11T13:27:56.791826Z	info	Running command: ip6tables-restore --noflush
2024-03-11T13:27:56.795429Z	info	Running command: iptables-save
2024-03-11T13:27:56.803831Z	info	Command output:
# Generated by iptables-save v1.8.7 on Mon Mar 11 13:27:56 2024
*nat
:PREROUTING ACCEPT [0:0]
:INPUT ACCEPT [0:0]
:OUTPUT ACCEPT [0:0]
:POSTROUTING ACCEPT [0:0]
:ISTIO_INBOUND - [0:0]
:ISTIO_IN_REDIRECT - [0:0]
:ISTIO_OUTPUT - [0:0]
:ISTIO_REDIRECT - [0:0]
-A PREROUTING -p tcp -j ISTIO_INBOUND
-A OUTPUT -p tcp -j ISTIO_OUTPUT
-A ISTIO_INBOUND -p tcp -m tcp --dport 15008 -j RETURN
-A ISTIO_INBOUND -p tcp -m tcp --dport 15090 -j RETURN
-A ISTIO_INBOUND -p tcp -m tcp --dport 15021 -j RETURN
-A ISTIO_INBOUND -p tcp -m tcp --dport 15020 -j RETURN
-A ISTIO_INBOUND -p tcp -j ISTIO_IN_REDIRECT
-A ISTIO_IN_REDIRECT -p tcp -j REDIRECT --to-ports 15006
-A ISTIO_OUTPUT -s 127.0.0.6/32 -o lo -j RETURN
-A ISTIO_OUTPUT ! -d 127.0.0.1/32 -o lo -m owner --uid-owner 1337 -j ISTIO_IN_REDIRECT
-A ISTIO_OUTPUT -o lo -m owner ! --uid-owner 1337 -j RETURN
-A ISTIO_OUTPUT -m owner --uid-owner 1337 -j RETURN
-A ISTIO_OUTPUT ! -d 127.0.0.1/32 -o lo -m owner --gid-owner 1337 -j ISTIO_IN_REDIRECT
-A ISTIO_OUTPUT -o lo -m owner ! --gid-owner 1337 -j RETURN
-A ISTIO_OUTPUT -m owner --gid-owner 1337 -j RETURN
-A ISTIO_OUTPUT -d 127.0.0.1/32 -j RETURN
-A ISTIO_OUTPUT -j ISTIO_REDIRECT
-A ISTIO_REDIRECT -p tcp -j REDIRECT --to-ports 15001
COMMIT
# Completed on Mon Mar 11 13:27:56 2024

[root@master241 ~]#
二.流量管理之路由(权重路由模拟灰度发布)
1.什么是流量管理
所谓的流量管理就是管理流量请求的分发,比如: 负载均衡器,灰度发布,lvs,nginx,haproxy等之类的技术栈。
2.编写资源清单
[root@master241 01-route]# cat 01-deploy-apps.yaml
apiVersion: v1
kind: Namespace
metadata:
  name: yinzhengjie

---

apiVersion: apps/v1
# 注意,创建pod建议使用deploy资源,不要使用rc资源,否则istioctl可能无法手动注入。
kind: Deployment
metadata:
  name: apps-v1
  namespace: yinzhengjie
spec:
  replicas: 1
  selector:
    matchLabels:
      app: xiuxian01
      version: v1
      auther: yinzhengjie
  template:
    metadata:
      labels:
        app: xiuxian01
        version: v1
        auther: yinzhengjie
    spec:
      containers:
      - name: c1
        ports:
        - containerPort: 80
        #image: registry.cn-hangzhou.aliyuncs.com/yinzhengjie-k8s/apps:v1
        image: busybox
        command: ["/bin/sh","-c","echo 'c1' > /var/www/index.html;httpd -f -p 80 -h /var/www"]
---

apiVersion: apps/v1
kind: Deployment
metadata:
  name: apps-v2
  namespace: yinzhengjie
spec:
  replicas: 1
  selector:
    matchLabels:
      app: xiuxian02
      version: v2
      auther: yinzhengjie
  template:
    metadata:
      labels:
        app: xiuxian02
        version: v2
        auther: yinzhengjie
    spec:
      containers:
      - name: c2
        ports:
        - containerPort: 80
        # image: registry.cn-hangzhou.aliyuncs.com/yinzhengjie-k8s/apps:v2
        image: busybox
        command: ["/bin/sh","-c","echo 'c2' > /var/www/index.html;httpd -f -p 80 -h /var/www"]
[root@master241 01-route]#
[root@master241 01-route]# cat 02-svc-apps.yaml
apiVersion: v1
kind: Service
metadata:
  name: apps-svc-v1
  namespace: yinzhengjie
spec:
  selector:
    version: v1
  ports:
  - protocol: TCP
    port: 80
    targetPort: 80
    name: http

---

apiVersion: v1
kind: Service
metadata:
  name: apps-svc-v2
  namespace: yinzhengjie
spec:
  selector:
    version: v2
  ports:
  - protocol: TCP
    port: 80
    targetPort: 80
    name: http

---

apiVersion: v1
kind: Service
metadata:
  name: apps-svc-all
  namespace: yinzhengjie
spec:
  selector:
    auther: yinzhengjie
  ports:
  - protocol: TCP
    port: 80
    targetPort: 80
    name: http

[root@master241 01-route]#
[root@master241 01-route]# cat 03-deploy-client.yaml
apiVersion: apps/v1
kind: Deployment
metadata:
  name: apps-client
  namespace: yinzhengjie
spec:
  replicas: 1
  selector:
    matchLabels:
      app: client-test
  template:
    metadata:
      labels:
        app: client-test
    spec:
      containers:
      - name: c1
        image: registry.cn-hangzhou.aliyuncs.com/yinzhengjie-k8s/apps:v1
        command:
        - tail
        - -f
        - /etc/hosts
[root@master241 01-route]#
[root@master241 01-route]#
[root@master241 01-route]# cat 04-vs-apps-svc-all.yaml
apiVersion: networking.istio.io/v1beta1
# apiVersion: networking.istio.io/v1alpha3
kind: VirtualService
metadata:
  name: apps-svc-all-vs
  namespace: yinzhengjie
spec:
  # 指定vs关联的后端svc名称
  hosts:
  - apps-svc-all
  # 配置http配置
  http:
    # 定义路由信息
  - route:
      # 定义目标
    - destination:
        host: apps-svc-v1
      # 指定权重
      weight: 90
    - destination:
        host: apps-svc-v2
      weight: 10
[root@master241 01-route]#
3.手动注入Istio-proxy
	1.注入前
[root@master241 yinzhengjie]# kubectl get pods -n yinzhengjie
NAME                          READY   STATUS    RESTARTS   AGE
apps-client-f84c89565-kmqkv   1/1     Running   0          31s
apps-v1-9bff7546c-fsnmn       1/1     Running   0          32s
apps-v2-6c957bf64b-lz65z      1/1     Running   0          32s
[root@master241 yinzhengjie]#


	2.开始手动注入
[root@master241 yinzhengjie]# istioctl kube-inject -f 03-deploy-client.yaml | kubectl -n yinzhengjie apply -f -
deployment.apps/apps-client configured
[root@master241 yinzhengjie]#
[root@master241 yinzhengjie]# istioctl kube-inject -f 01-deploy-apps.yaml | kubectl -n yinzhengjie apply -f -
namespace/yinzhengjie unchanged
deployment.apps/apps-v1 configured
deployment.apps/apps-v2 configured
[root@master241 yinzhengjie]#


	3.注入后
[root@master241 yinzhengjie]# kubectl get pods -n yinzhengjie
NAME                          READY   STATUS        RESTARTS   AGE
apps-client-5cc67d864-g2r2v   2/2     Running       0          41s
apps-v1-85c976498b-5qp59      2/2     Running       0          30s
apps-v2-5bb84548fc-65r7x      2/2     Running       0          30s
[root@master241 yinzhengjie]#
4.开始测试
[root@master241 yinzhengjie]# kubectl -n yinzhengjie exec -it apps-client-5cc67d864-g2r2v -- sh
/ #
/ # while true; do curl http://apps-svc-all;sleep 0.1;done
c1
c1
c1
c1
c1
c1
c1
c1
c1
c2
...
5.可能会出现的问题
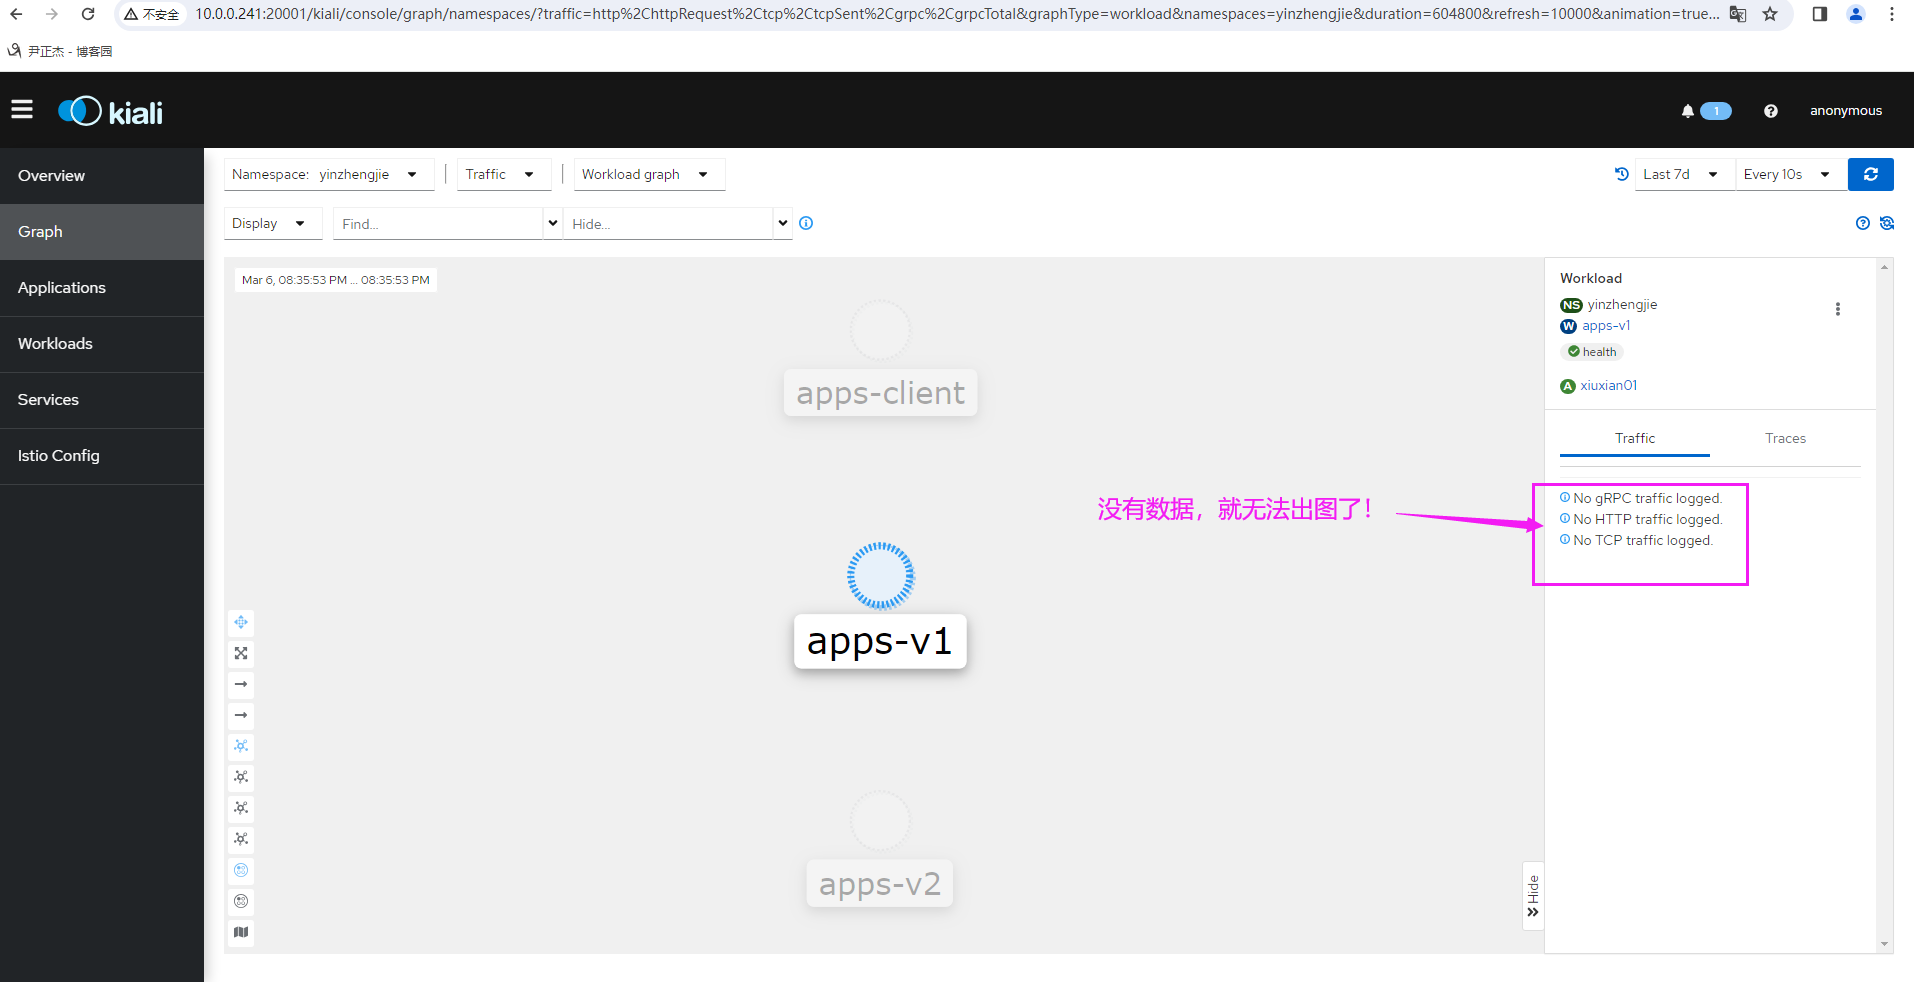
无论怎么测试都不出数据!!!!很奇怪!!!


我怀疑是需要添加网关信息??

建议参考官方的:配置案例。。。。。。

[root@master241 istio-1.17.8]# cat  samples/bookinfo/networking/bookinfo-gateway.yaml
三.流量管理之基于用户匹配(定向路由模拟A/B测试)
1.编写资源清单
[root@master241 02-match]# cat 01-deploy-apps.yaml
apiVersion: v1
kind: Namespace
metadata:
  name: yinzhengjie

---

apiVersion: apps/v1
# 注意,创建pod建议使用deploy资源,不要使用rc资源,否则istioctl可能无法手动注入。
kind: Deployment
metadata:
  name: apps-v1
  namespace: yinzhengjie
spec:
  replicas: 1
  selector:
    matchLabels:
      app: xiuxian01
      version: v1
      auther: yinzhengjie
  template:
    metadata:
      labels:
        app: xiuxian01
        version: v1
        auther: yinzhengjie
    spec:
      containers:
      - name: c1
        ports:
        - containerPort: 80
        #image: registry.cn-hangzhou.aliyuncs.com/yinzhengjie-k8s/apps:v1
        image: busybox
        command: ["/bin/sh","-c","echo 'c1' > /var/www/index.html;httpd -f -p 80 -h /var/www"]
---

apiVersion: apps/v1
kind: Deployment
metadata:
  name: apps-v2
  namespace: yinzhengjie
spec:
  replicas: 1
  selector:
    matchLabels:
      app: xiuxian02
      version: v2
      auther: yinzhengjie
  template:
    metadata:
      labels:
        app: xiuxian02
        version: v2
        auther: yinzhengjie
    spec:
      containers:
      - name: c2
        ports:
        - containerPort: 80
        # image: registry.cn-hangzhou.aliyuncs.com/yinzhengjie-k8s/apps:v2
        image: busybox
        command: ["/bin/sh","-c","echo 'c2' > /var/www/index.html;httpd -f -p 80 -h /var/www"]
[root@master241 02-match]#
[root@master241 02-match]#
[root@master241 02-match]# cat 02-svc-apps.yaml
apiVersion: v1
kind: Service
metadata:
  name: apps-svc-v1
  namespace: yinzhengjie
spec:
  selector:
    version: v1
  ports:
  - protocol: TCP
    port: 80
    targetPort: 80
    name: http

---

apiVersion: v1
kind: Service
metadata:
  name: apps-svc-v2
  namespace: yinzhengjie
spec:
  selector:
    version: v2
  ports:
  - protocol: TCP
    port: 80
    targetPort: 80
    name: http

---

apiVersion: v1
kind: Service
metadata:
  name: apps-svc-all
  namespace: yinzhengjie
spec:
  selector:
    auther: yinzhengjie
  ports:
  - protocol: TCP
    port: 80
    targetPort: 80
    name: http

[root@master241 02-match]#
[root@master241 02-match]#
[root@master241 02-match]# cat 03-deploy-client.yaml
apiVersion: apps/v1
kind: Deployment
metadata:
  name: apps-client
  namespace: yinzhengjie
spec:
  replicas: 1
  selector:
    matchLabels:
      app: client-test
  template:
    metadata:
      labels:
        app: client-test
    spec:
      containers:
      - name: c1
        image: registry.cn-hangzhou.aliyuncs.com/yinzhengjie-k8s/apps:v1
        command:
        - tail
        - -f
        - /etc/hosts
[root@master241 02-match]#
[root@master241 02-match]#
[root@master241 02-match]# cat 04-vs-apps-svc-all.yaml
apiVersion: networking.istio.io/v1beta1
kind: VirtualService
metadata:
  name: apps-svc-all-vs
  namespace: yinzhengjie
spec:
  hosts:
  - apps-svc-all
  http:
    # 定义匹配规则
  - match:
      # 基于header信息匹配将其进行路由,header信息自定义即可。
    - headers:
        # 匹配用户名包含"jasonyin"的用户,这个KEY是咱们自定义的。
        yinzhengjie-username:
          # "eaxct"关键词是包含,也可以使用"prefix"进行前缀匹配。
          exact: jasonyin
    route:
    - destination:
        host: apps-svc-v1
  - route:
    - destination:
        host: apps-svc-v2
[root@master241 02-match]#
2.手动注入
istioctl kube-inject -f 03-deploy-client.yaml | kubectl -n yinzhengjie apply -f -
istioctl kube-inject -f 01-deploy-apps.yaml | kubectl -n yinzhengjie apply -f -
kubectl get all -n yinzhengjie
3.开始测试
[root@master241 yinzhengjie]# kubectl -n yinzhengjie exec -it apps-client-5cc67d864-g2r2v -- sh
/ #
/ # while true; do curl -H  "yinzhengjie-username:jasonyin" http://apps-svc-all;sleep 0.1;done  # 添加用户认证的header信息
c1
c1
c1
c1
c1
c1
c1
...


/ # while true; do curl  http://apps-svc-all;sleep 0.1;done  # 不添加用户认证
c2
c2
c2
c2
c2
c2
c2
...
四.流量治理之bookInfo基于用户匹配案例
1.创建DestinationRule,VirtualService资源
	1.创建DestinationRule资源
[root@master241 istio-1.17.8]# kubectl apply -f samples/bookinfo/networking/destination-rule-all.yaml
destinationrule.networking.istio.io/productpage created
destinationrule.networking.istio.io/reviews created
destinationrule.networking.istio.io/ratings created
destinationrule.networking.istio.io/details created
[root@master241 istio-1.17.8]#
[root@master241 istio-1.17.8]# kubectl get dr
NAME          HOST          AGE
details       details       5s
productpage   productpage   5s
ratings       ratings       5s
reviews       reviews       5s
[root@master241 istio-1.17.8]#


	2.创建VirtualService资源
[root@master241 istio-1.17.8]# kubectl apply -f samples/bookinfo/networking/virtual-service-all-v1.yaml
virtualservice.networking.istio.io/productpage created
virtualservice.networking.istio.io/reviews configured
virtualservice.networking.istio.io/ratings created
virtualservice.networking.istio.io/details created
[root@master241 istio-1.17.8]#
[root@master241 istio-1.17.8]# kubectl get vs
NAME          GATEWAYS               HOSTS             AGE
bookinfo      ["bookinfo-gateway"]   ["*"]             4d8h
details                              ["details"]       6s
productpage                          ["productpage"]   6s
ratings                              ["ratings"]       6s
[root@master241 istio-1.17.8]#
2.编写VirtualService的资源清单
	1.编写资源清单
[root@master241 03-match-bookinfo]# cat 01-vs-bookinfo-reviews
apiVersion: networking.istio.io/v1beta1
kind: VirtualService
metadata:
  name: reviews
  namespace: default
spec:
  hosts:
  - reviews
  http:
  - match:
    - headers:
        end-user:
          exact: yinzhengjie
    route:
      # 匹配DestinationRule规则
    - destination:
        # 在官方的"samples/bookinfo/networking/destination-rule-all.yaml"文件中有相应的记录
        # 如下所示,在官方的资源清单的确找到 了名称为"reviews"的estinationRule资源,我将其记录部分如下:
        #   apiVersion: networking.istio.io/v1alpha3
        #   kind: DestinationRule
        #   metadata:
        #     name: reviews
        #   spec:
        #     host: reviews
        #     subsets:
        #     - name: v1
        #       labels:
        #         version: v1
        #     - name: v2
        #       labels:
        #         version: v2
        #     - name: v3
        #       labels:
        #         version: v3
        #
        host: reviews
        # 这个subset是指官方的reviews的DestinationRule规则subsets列表中一个名为v2的名称。
        # 具体的资源清单可以参考上面我抄写官方的代码进行参考,只不过v2对应的dr资源会去基于标签来匹配pod。
        subset: v2
  - route:
    - destination:
        host: reviews
[root@master241 03-match-bookinfo]#


	2.创建资源
[root@master241 03-match-bookinfo]# kubectl apply -f 01-vs-bookinfo-reviews
virtualservice.networking.istio.io/reviews created
[root@master241 03-match-bookinfo]#
[root@master241 03-match-bookinfo]# kubectl get vs
NAME          GATEWAYS               HOSTS             AGE
bookinfo      ["bookinfo-gateway"]   ["*"]             4d8h
details                              ["details"]       2m29s
productpage                          ["productpage"]   2m29s
ratings                              ["ratings"]       2m29s
reviews                              ["reviews"]       2s
[root@master241 03-match-bookinfo]#
3.访问测试
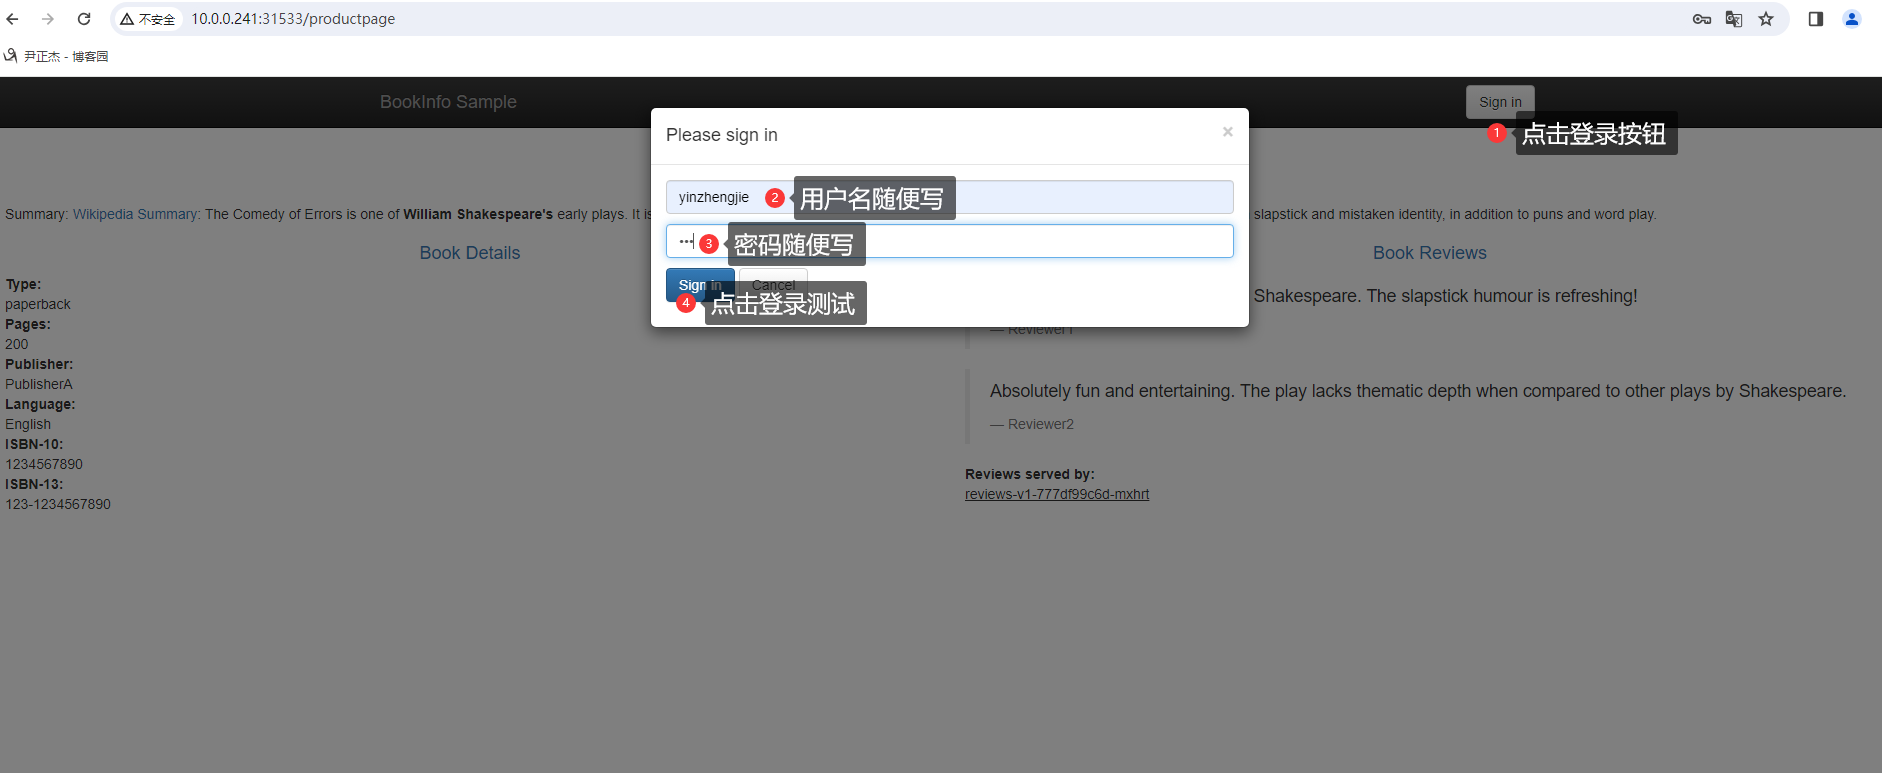
	1.查看svc的NodePort端口,若未指定,使用"kubectl edit svc"命令修改类型即可
[root@master241 03-match-bookinfo]# kubectl get svc productpage
NAME          TYPE       CLUSTER-IP      EXTERNAL-IP   PORT(S)          AGE
productpage   NodePort   10.200.92.185   <none>        9080:31533/TCP   4d8h
[root@master241 03-match-bookinfo]#


	2.如上图所示,我们点击登录按钮进行测试
http://10.0.0.241:31533/productpage


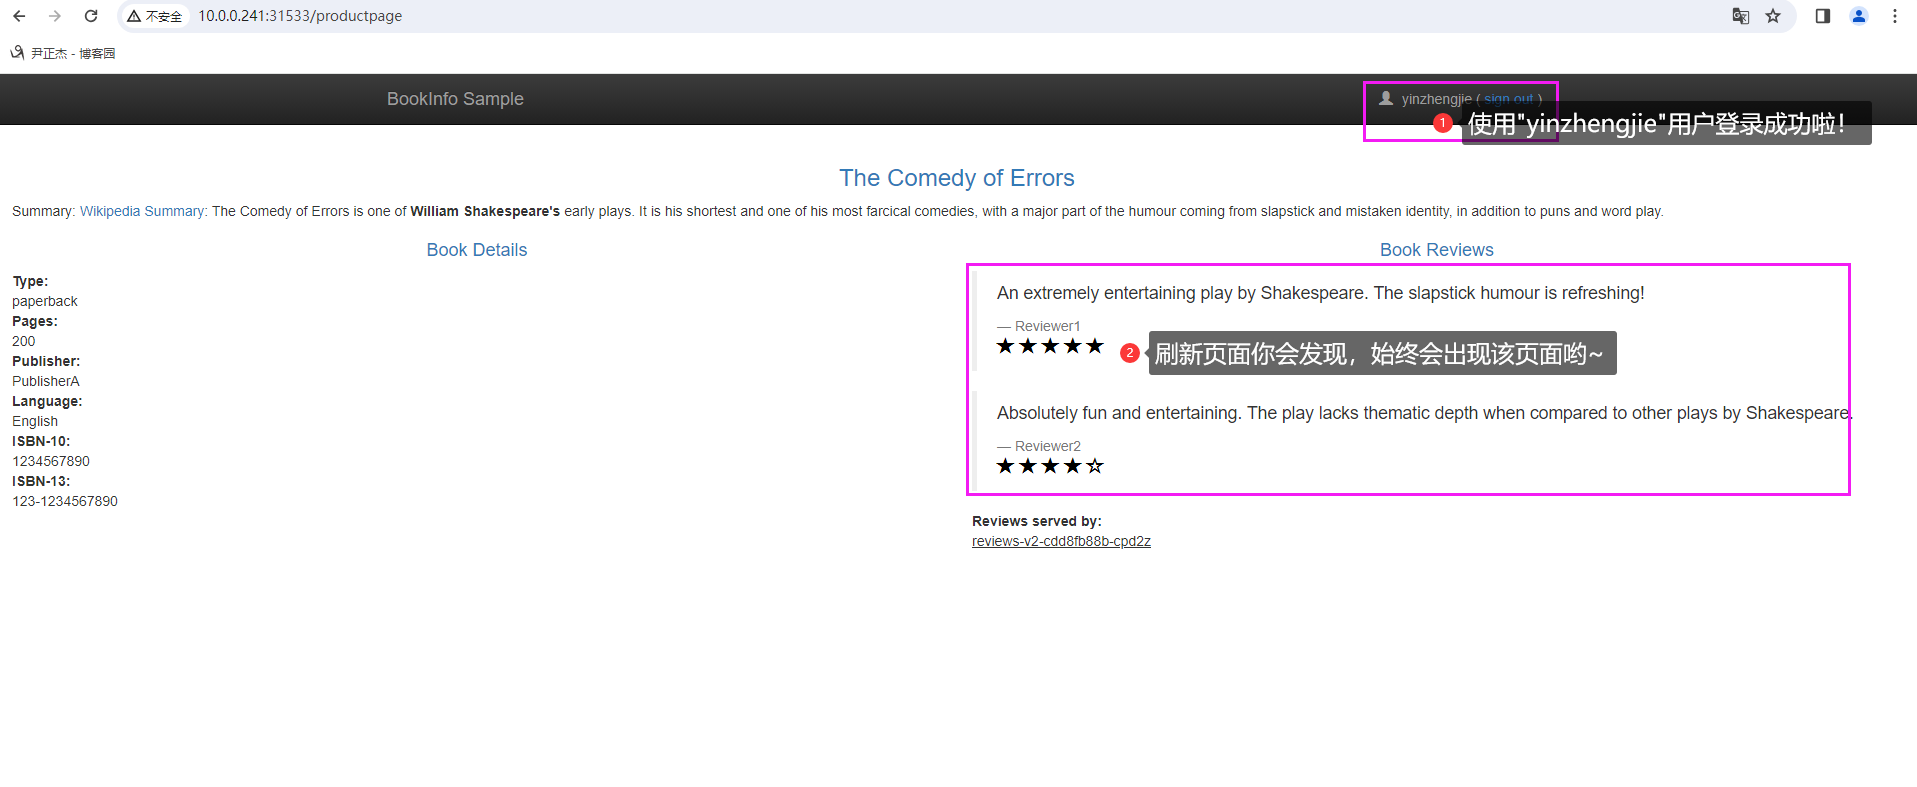
	3.如下图所示,不难发现我们已经登录成功啦
本文来自博客园,作者:尹正杰,转载请注明原文链接:https://www.cnblogs.com/yinzhengjie/p/18078024,个人微信: "JasonYin2020"(添加时请备注来源及意图备注,有偿付费)
当你的才华还撑不起你的野心的时候,你就应该静下心来学习。当你的能力还驾驭不了你的目标的时候,你就应该沉下心来历练。问问自己,想要怎样的人生。


