NoSQL数据库Mongodb副本集架构(Replica Set)高可用部署
NoSQL数据库Mongodb副本集架构(Replica Set)高可用部署
作者:尹正杰
版权声明:原创作品,谢绝转载!否则将追究法律责任。
MongoDB 是一个基于分布式文件存储的数据库。由 C++ 语言编写。旨在为 WEB 应用提供可扩展的高性能数据存储解决方案。MongoDB 是一个介于关系数据库和非关系数据库之间的产品,是非关系数据库当中功能最丰富,最像关系数据库的。
Mongodb是时下流行的NoSql数据库,它的存储方式是文档式存储,并不是Key-Value形式。关于Mongodb的特点,这里就不多介绍了,大家可以去看看官方说明:https://docs.mongodb.com/manual/。mongodb有几种部署方式(Replica Set / Sharding / Master-Slaver),这里采用的是副本集架构(Replica Set)。这种部署方式也是生成环境经常使用的,如果你对其它的部署方式感兴趣的话大家可以去自行百度。
一.架构介绍
为了防止单点故障就需要引副本(Replication),当发生硬件故障或者其它原因造成的宕机时,可以使用副本进行恢复,最好能够自动的故障转移(failover)。有时引入副本是为了读写分离,将读的请求分流到副本上,减轻主(Primary)的读压力。而Mongodb的Replica Set都能满足这些要求。
Replica Set的一堆mongod的实例集合,它们有着同样的数据内容。包含三类角色:
主节点(Primary):接收所有的写请求,然后把修改同步到所有Secondary。一个Replica Set只能有一个Primary节点,当Primary挂掉后,其他Secondary或者Arbiter节点会重新选举出来一个主节点。默认读请求也是发到Primary节点处理的,需要转发到Secondary需要客户端修改一下连接配置。
副本节点(Secondary):与主节点保持同样的数据集。当主节点挂掉的时候,参与选主。
仲裁者(Arbiter):不保有数据,不参与选主,只进行选主投票。使用Arbiter可以减轻数据存储的硬件需求,Arbiter跑起来几乎没什么大的硬件资源需求,但重要的一点是,在生产环境下它和其他数据节点不要部署在同一台机器上。
注意,一个自动failover的Replica Set节点数必须为奇数,目的是选主投票的时候要有一个大多数才能进行选主决策。
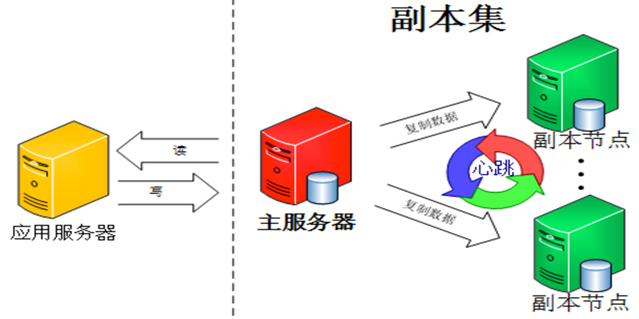
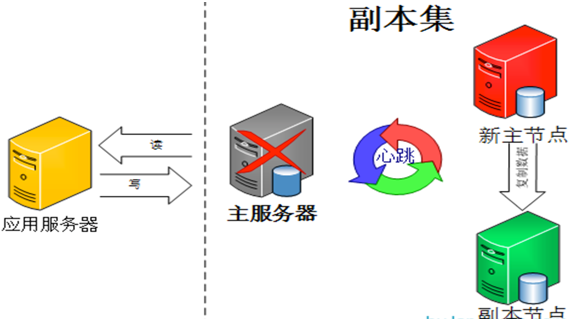
由图可以看到客户端连接到整个副本集,不关心具体哪一台机器是否挂掉。主服务器负责整个副本集的读写,副本集定期同步数据备份,一但主节点挂掉,副本节点就会选举一个新的主服务器,这一切对于应用服务器不需要关心。我们看一下主服务器挂掉后的架构:
副本集中的副本节点在主节点挂掉后通过心跳机制检测到后,就会在集群内发起主节点的选举机制,自动选举一位新的主服务器。
二.准备环境
1>.操作系统环境
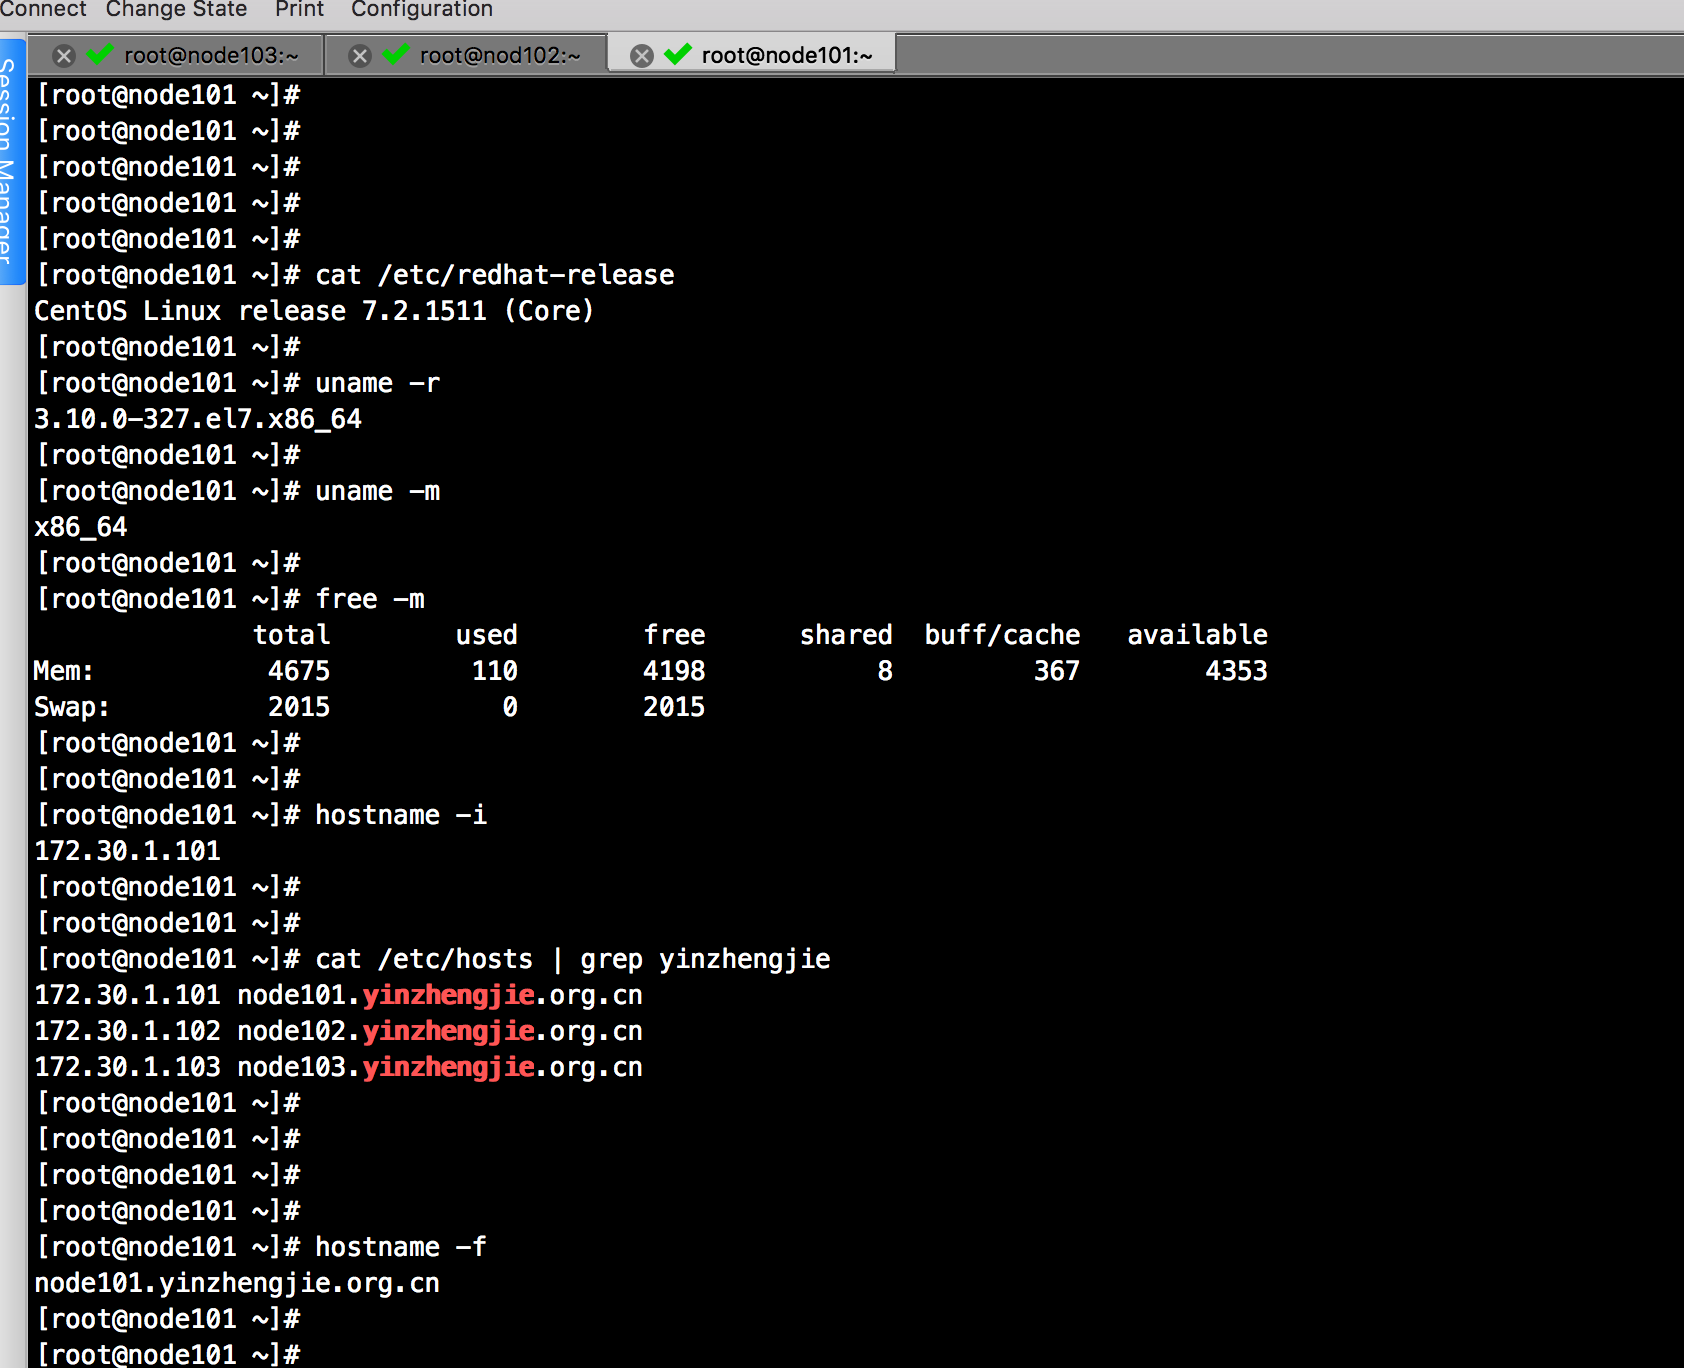
准备3台配置完全一致的虚拟机(当然IP的配置不能相同!)。内存分配4G即可,主机名需要提前配置好,我的配置环境如下:

2>.各个主机配置免密登陆(在“node101.yinzhengjie.org.cn”上操作)

[root@node101 ~]# ssh-keygen -t rsa -P '' -f ~/.ssh/id_rsa
Generating public/private rsa key pair.
Created directory '/root/.ssh'.
Your identification has been saved in /root/.ssh/id_rsa.
Your public key has been saved in /root/.ssh/id_rsa.pub.
The key fingerprint is:
d1:90:58:b3:ca:97:0e:91:f2:15:23:73:7d:05:d4:53 root@node101.yinzhengjie.org.cn
The key's randomart image is:
+--[ RSA 2048]----+
|      ooBo .o+..E|
|      .=.B. . o  |
|    . o + ..   . |
|     + + o       |
|      = S        |
|       +         |
|        .        |
|                 |
|                 |
+-----------------+
[root@node101 ~]#
[root@node101 ~]#
[root@node101 ~]#
[root@node101 ~]#
[root@node101 ~]# ll  ~/.ssh/id_rsa
-rw-------. 1 root root 1675 Dec  5 02:35 /root/.ssh/id_rsa
[root@node101 ~]#
[root@node101 ~]# cat  ~/.ssh/id_rsa
-----BEGIN RSA PRIVATE KEY-----
MIIEogIBAAKCAQEAwtFCswPu3AOKXa2TzJRBKG/LC8knCtLE54zMVUaMwbWH0fdV
xHpa8n+V15W3HwLFBZDgyNmnPvZkVJUvTYqf5QaLsxm5J0JAxlmBkY/ayByeULLw
SVIXM/hqBulYnbUViVhGEmBbpI3ASjFVXQyiihyNhzoPZBjdiexnTh7aYJDjQ8qL
IZyQu+rjeoqju839dUmm4RfmqgaPsa717CNxqUgUdviTdK2meV4hA7HtKAxMTpYK
JcEAu3lvh9NRT2k8HSMvEaN/WVUF8SrNN1oUC4aFSO9tDmY3euBCccYf+RqSlzys
m5dxCFDk94cEhsvIzfdzUB4usPs1inUHcQ9pqQIDAQABAoIBAAWbPA4myNLwDyVO
/3fdtFpTjUZTjZoUIrJ/LMovc5GHhdcXBRLYapGb9lXz6wcrbzwPxUhCazu2n4CH
oorauGtA2vhWfyuQDokmvkHQH/2uRSgRXjTd9ej69yInyPMQ6QPA1JNmznxXz/bS
oKBC4tKSq8f+db7tsEJt2TM4VBR/Sg0x77LhZA70MC2+vv+9AoIKVVdZ/KNud+Dk
r2c+Hmo4r7I4G2Oqaj33f7RXFsILIwl0SBvpag4GPhwnOuphXDr3DQ1v5j+4x0rx
3JE+HmlpU66XveUuy7pMurdbOCajwPQgLkDo5W7bBUMIlBS/nZvInncVdDPzWFHO
ZlUh8dkCgYEA6Ykewa0oN96XLPdqbADHRqpzxL7zXJJ644Hh2HygyhR0xw3bOI57
IjkYje9e5PVUcXWuOj/oOMfKal2jW/78bnEgukX1JgkX8RHT9zsgZ0AGEpquHkjv
NrB1qrdbEwnNpSLB8pwGveD9zf89yzocZE+5CUBfnsuAgZqPYkjPMwcCgYEA1Y6x
o1ZxxsPGZIk+hZPuynemdZYnQWp3Z9ynVv902x1/sxcn/uZ+0DZDLQbqGA+2WdEg
EQZ9BwKTCkThoPBJKEzR3Ck122ahqSKCEQRGwK0h05uaA3KSTGIbujGaoBfDWG6f
3fTSWZnTNaObmcOhxTgsMRegy/kWOIgYqdX04c8CgYA9rsf+49uBljtb1yW2zSXV
VmQpjT3+L3ph6QZcBd76QRjvEovajlebnHUN2DG6S8o4BZs1K3gMt0iRe5YQUHMg
QKUiTiQIHdLDC7Bu1qEiZFi2RUDEIwN78HPD2ZYmmypD+cA8clWdhXXEGSybJwgk
vqHi/avD54BTux0wGocPtQKBgFY2Ud4nsqzUMg46HaRdUSQpY2jK4jQVX/js6h1D
6Y/fe8L30SylLoKttTbDONPX2/ysYO6emPCwiF236wJGnrIHOR1RAa3947tc8/cc
q9dyzVoY0fccVJVDcgAbsFl63mCf4CgBgr2rTMm1r8ZGZNMyVxzGdiKB/wd5YcOG
XWKfAoGAYpvjXzEYzr7Y7KKlZBR3gUZZwfngYYgf8g1L42oB1un1NUajiMCyPsm6
oxKrFj6a8SH1xy1U0S7QbPK7osjR5qU7SMsqgziouBl1UmAT5WVKoik4UvHLlKC3
hB0HxUvfVYM5lV3BaggVTC/EOAOsa+jqfbrwjBxjn/kmmv2FtLk=
-----END RSA PRIVATE KEY-----
[root@node101 ~]#
[root@node101 ~]#

[root@node101 ~]# ssh-copy-id root@node101.yinzhengjie.org.cn
The authenticity of host 'node101.yinzhengjie.org.cn (172.30.1.101)' can't be established.
ECDSA key fingerprint is e5:24:dc:52:ee:e6:ed:83:de:45:39:a8:c4:14:27:e7.
Are you sure you want to continue connecting (yes/no)? yes
/usr/bin/ssh-copy-id: INFO: attempting to log in with the new key(s), to filter out any that are already installed
/usr/bin/ssh-copy-id: INFO: 1 key(s) remain to be installed -- if you are prompted now it is to install the new keys
root@node101.yinzhengjie.org.cn's password:

Number of key(s) added: 1

Now try logging into the machine, with:   "ssh 'root@node101.yinzhengjie.org.cn'"
and check to make sure that only the key(s) you wanted were added.

[root@node101 ~]#
[root@node101 ~]# ssh node101.yinzhengjie.org.cn
Last login: Wed Dec  5 02:42:08 2018 from 172.30.1.2
[root@node101 ~]# who
root     pts/0        2018-12-05 02:42 (172.30.1.2)
root     pts/1        2018-12-05 02:49 (node101.yinzhengjie.org.cn)
[root@node101 ~]#
[root@node101 ~]# logout
Connection to node101.yinzhengjie.org.cn closed.
[root@node101 ~]#

[root@node101 ~]# ssh-copy-id root@node102.yinzhengjie.org.cn
/usr/bin/ssh-copy-id: INFO: attempting to log in with the new key(s), to filter out any that are already installed
/usr/bin/ssh-copy-id: INFO: 1 key(s) remain to be installed -- if you are prompted now it is to install the new keys
root@node102.yinzhengjie.org.cn's password:

Number of key(s) added: 1

Now try logging into the machine, with:   "ssh 'root@node102.yinzhengjie.org.cn'"
and check to make sure that only the key(s) you wanted were added.

[root@node101 ~]#
[root@node101 ~]# ssh node102.yinzhengjie.org.cn
Last login: Wed Dec  5 02:51:08 2018 from 172.30.1.101
[root@nod102 ~]#
[root@nod102 ~]# who
root     pts/0        2018-12-05 01:29 (172.30.1.2)
root     pts/1        2018-12-05 02:51 (172.30.1.101)
[root@nod102 ~]#
[root@nod102 ~]# logout
Connection to node102.yinzhengjie.org.cn closed.
[root@node101 ~]#

[root@node101 ~]# ssh-copy-id root@node103.yinzhengjie.org.cn
/usr/bin/ssh-copy-id: INFO: attempting to log in with the new key(s), to filter out any that are already installed
/usr/bin/ssh-copy-id: INFO: 1 key(s) remain to be installed -- if you are prompted now it is to install the new keys
root@node103.yinzhengjie.org.cn's password:

Number of key(s) added: 1

Now try logging into the machine, with:   "ssh 'root@node103.yinzhengjie.org.cn'"
and check to make sure that only the key(s) you wanted were added.

[root@node101 ~]#
[root@node101 ~]# ssh node103.yinzhengjie.org.cn
Last login: Wed Dec  5 02:52:15 2018 from 172.30.1.101
[root@node103 ~]#
[root@node103 ~]#
[root@node103 ~]# who
root     pts/0        2018-12-05 01:27 (172.30.1.2)
root     pts/1        2018-12-05 02:52 (172.30.1.101)
[root@node103 ~]#
[root@node103 ~]# logout
Connection to node103.yinzhengjie.org.cn closed.
[root@node101 ~]#
3>.编写集群管理脚本
在配置FQDN和免密钥登陆后,咱们就可以编写一些集群的管理脚本,便于我们下发文件到其他节点中。

[root@node101 ~]# vi /usr/local/bin/xcall.sh              #我们创建该脚本时,直接就把它放在默认的“PATH”环境变量中。因此编辑好后只要有执行权限就可以在任意路径调用它啦!
[root@node101 ~]#
[root@node101 ~]#
[root@node101 ~]# cat /usr/local/bin/xcall.sh
#!/bin/bash
#@author :yinzhengjie
#blog:http://www.cnblogs.com/yinzhengjie
#EMAIL:y1053419035@qq.com


#判断用户是否传参
if [ $# -lt 1 ];then
        echo "请输入参数"
        exit
fi

#获取用户输入的命令
cmd=$@

for (( i=101;i<=103;i++ ))
do
        #使终端变绿色
        tput setaf 2
        echo ============= node${i}.yinzhengjie.org.cn : $cmd ============
        #使终端变回原来的颜色,即白灰色
        tput setaf 7
        #远程执行命令
        ssh node${i}.yinzhengjie.org.cn  $cmd
        #判断命令是否执行成功
        if [ $? == 0 ];then
                echo "命令执行成功"
        fi
done
[root@node101 ~]#
[root@node101 ~]#
[root@node101 ~]# chmod +x /usr/local/bin/xcall.sh              #别忘记添加执行权限哟!
[root@node101 ~]#
[root@node101 ~]# xcall.sh cat /etc/redhat-release              #我们在这里可以测试一些咱们的脚本是否好使~
============= node101.yinzhengjie.org.cn : cat /etc/redhat-release ============
CentOS Linux release 7.2.1511 (Core)
命令执行成功
============= node102.yinzhengjie.org.cn : cat /etc/redhat-release ============
CentOS Linux release 7.2.1511 (Core)
命令执行成功
============= node103.yinzhengjie.org.cn : cat /etc/redhat-release ============
CentOS Linux release 7.2.1511 (Core)
命令执行成功
[root@node101 ~]#
[root@node101 ~]#

[root@node101 ~]# xcall.sh "yum -y install rsync"
============= node101.yinzhengjie.org.cn : yum -y install rsync ============
Loaded plugins: fastestmirror
Loading mirror speeds from cached hostfile
 * base: mirrors.huaweicloud.com
 * extras: mirrors.huaweicloud.com
 * updates: mirrors.163.com
Resolving Dependencies
--> Running transaction check
---> Package rsync.x86_64 0:3.1.2-4.el7 will be installed
--> Finished Dependency Resolution

Dependencies Resolved

================================================================================
 Package         Arch             Version                  Repository      Size
================================================================================
Installing:
 rsync           x86_64           3.1.2-4.el7              base           403 k

Transaction Summary
================================================================================
Install  1 Package

Total download size: 403 k
Installed size: 815 k
Downloading packages:
Running transaction check
Running transaction test
Transaction test succeeded
Running transaction
  Installing : rsync-3.1.2-4.el7.x86_64                                     1/1
  Verifying  : rsync-3.1.2-4.el7.x86_64                                     1/1

Installed:
  rsync.x86_64 0:3.1.2-4.el7

Complete!
命令执行成功
============= node102.yinzhengjie.org.cn : yum -y install rsync ============
Loaded plugins: fastestmirror
Repodata is over 2 weeks old. Install yum-cron? Or run: yum makecache fast
http://mirrors.njupt.edu.cn/centos/7.6.1810/os/x86_64/repodata/bc140c8149fc43a5248fccff0daeef38182e49f6fe75d9b46db1206dc25a6c1c-c7-x86_64-comps.xml.gz: [Errno 12] Timeout on http://10.10.254.10/cache/5/02/mirrors.njupt.edu.cn/033b2636ff3cf3103169fa739764fdd7/bc140c8149fc43a5248fccff0daeef38182e49f6fe75d9b46db1206dc25a6c1c-c7-x86_64-comps.xml.gz: (28, 'Connection timed out after 30682 milliseconds')
Trying other mirror.
http://mirrors.njupt.edu.cn/centos/7.6.1810/updates/x86_64/repodata/8e273c72093a2cfc3f3b2baccfb2b01f7f4bcdc1bb72d53e38074068a756f1c6-primary.sqlite.bz2: [Errno 12] Timeout on http://10.10.254.10/cache/4/02/mirrors.njupt.edu.cn/c35de49cce30395fb97f6c41a56fbad5/8e273c72093a2cfc3f3b2baccfb2b01f7f4bcdc1bb72d53e38074068a756f1c6-primary.sqlite.bz2: (28, 'Connection timed out after 30672 milliseconds')
Trying other mirror.
Determining fastest mirrors
 * base: mirrors.huaweicloud.com
 * extras: mirrors.huaweicloud.com
 * updates: mirrors.neusoft.edu.cn
Resolving Dependencies
--> Running transaction check
---> Package rsync.x86_64 0:3.1.2-4.el7 will be installed
--> Finished Dependency Resolution

Dependencies Resolved

================================================================================
 Package         Arch             Version                  Repository      Size
================================================================================
Installing:
 rsync           x86_64           3.1.2-4.el7              base           403 k

Transaction Summary
================================================================================
Install  1 Package

Total download size: 403 k
Installed size: 815 k
Downloading packages:
Running transaction check
Running transaction test
Transaction test succeeded
Running transaction
  Installing : rsync-3.1.2-4.el7.x86_64                                     1/1
  Verifying  : rsync-3.1.2-4.el7.x86_64                                     1/1

Installed:
  rsync.x86_64 0:3.1.2-4.el7

Complete!
命令执行成功
============= node103.yinzhengjie.org.cn : yum -y install rsync ============
Loaded plugins: fastestmirror
Repodata is over 2 weeks old. Install yum-cron? Or run: yum makecache fast
http://mirrors.njupt.edu.cn/centos/7.6.1810/os/x86_64/repodata/6614b3605d961a4aaec45d74ac4e5e713e517debb3ee454a1c91097955780697-primary.sqlite.bz2: [Errno 12] Timeout on http://10.10.254.10/cache/5/02/mirrors.njupt.edu.cn/fa6cd86bdbaedbbfedfbfa6d45952cd2/6614b3605d961a4aaec45d74ac4e5e713e517debb3ee454a1c91097955780697-primary.sqlite.bz2: (28, 'Connection timed out after 30867 milliseconds')
Trying other mirror.
Determining fastest mirrors
 * base: mirrors.huaweicloud.com
 * extras: mirrors.huaweicloud.com
 * updates: mirrors.cn99.com
Resolving Dependencies
--> Running transaction check
---> Package rsync.x86_64 0:3.1.2-4.el7 will be installed
--> Finished Dependency Resolution

Dependencies Resolved

================================================================================
 Package         Arch             Version                  Repository      Size
================================================================================
Installing:
 rsync           x86_64           3.1.2-4.el7              base           403 k

Transaction Summary
================================================================================
Install  1 Package

Total download size: 403 k
Installed size: 815 k
Downloading packages:
Running transaction check
Running transaction test
Transaction test succeeded
Running transaction
  Installing : rsync-3.1.2-4.el7.x86_64                                     1/1
  Verifying  : rsync-3.1.2-4.el7.x86_64                                     1/1

Installed:
  rsync.x86_64 0:3.1.2-4.el7

Complete!
命令执行成功
[root@node101 ~]#

[root@node101 ~]# vi /usr/local/bin/xrsync.sh             #编写同步脚本,注意:我们在编写脚本时,就把脚本放在Linux自带的“PATH”环境变量中。
[root@node101 ~]#
[root@node101 ~]# cat /usr/local/bin/xrsync.sh
#!/bin/bash
#@author :yinzhengjie
#blog:http://www.cnblogs.com/yinzhengjie
#EMAIL:y1053419035@qq.com

#判断用户是否传参
if [ $# -lt 1 ];then
    echo "请输入参数";
    exit
fi


#获取文件路径
file=$@

#获取子路径
filename=`basename $file`

#获取父路径
dirpath=`dirname $file`

#获取完整路径
cd $dirpath
fullpath=`pwd -P`

#同步文件到DataNode
for (( i=102;i<=103;i++ ))
do
    #使终端变绿色
    tput setaf 2
    echo =========== node${i}.yinzhengjie.org.cn : $file ===========
    #使终端变回原来的颜色,即白灰色
    tput setaf 7
    #远程执行命令
    rsync -lr $filename `whoami`@node${i}.yinzhengjie.org.cn:$fullpath
    #判断命令是否执行成功
    if [ $? == 0 ];then
        echo "命令执行成功"
    fi
done
[root@node101 ~]#
[root@node101 ~]#
[root@node101 ~]# chmod +x /usr/local/bin/xrsync.sh          #别忘记添加执行权限哟!
[root@node101 ~]#
[root@node101 ~]# xcall.sh cat /etc/hosts | grep yinzhengjie                        #我们在没有同步“/etc/hosts”配置文件时,发现只有“node101.yinzhengjie.org.cn”中配置了FQDN
============= node101.yinzhengjie.org.cn : cat /etc/hosts ============
172.30.1.101 node101.yinzhengjie.org.cn
172.30.1.102 node102.yinzhengjie.org.cn
172.30.1.103 node103.yinzhengjie.org.cn
============= node102.yinzhengjie.org.cn : cat /etc/hosts ============
============= node103.yinzhengjie.org.cn : cat /etc/hosts ============
[root@node101 ~]#
[root@node101 ~]# xrsync.sh /etc/hosts                                  #我们利用咱们自定义的脚本将“/etc/hosts”配置文件下发到"node102.yinzhengjie.org.cn"和“node103.yinzhengjie.org.cn”上去。
=========== node102.yinzhengjie.org.cn : /etc/hosts ===========
命令执行成功
=========== node103.yinzhengjie.org.cn : /etc/hosts ===========
命令执行成功
[root@node101 ~]#
[root@node101 ~]#
[root@node101 ~]# xcall.sh cat /etc/hosts | grep yinzhengjie                        #我们验证一下,3台机器上陪孩子是否都相同~如果输出相同说明配置生效啦~
============= node101.yinzhengjie.org.cn : cat /etc/hosts ============
172.30.1.101 node101.yinzhengjie.org.cn
172.30.1.102 node102.yinzhengjie.org.cn
172.30.1.103 node103.yinzhengjie.org.cn
============= node102.yinzhengjie.org.cn : cat /etc/hosts ============
172.30.1.101 node101.yinzhengjie.org.cn
172.30.1.102 node102.yinzhengjie.org.cn
172.30.1.103 node103.yinzhengjie.org.cn
============= node103.yinzhengjie.org.cn : cat /etc/hosts ============
172.30.1.101 node101.yinzhengjie.org.cn
172.30.1.102 node102.yinzhengjie.org.cn
172.30.1.103 node103.yinzhengjie.org.cn
[root@node101 ~]#
4>.关闭防火墙和selinux

[root@node101 java]# xcall.sh systemctl stop firewalld
============= node101.yinzhengjie.org.cn : systemctl stop firewalld ============
命令执行成功
============= node102.yinzhengjie.org.cn : systemctl stop firewalld ============
命令执行成功
============= node103.yinzhengjie.org.cn : systemctl stop firewalld ============
命令执行成功
[root@node101 java]#

[root@node101 java]# xcall.sh systemctl disable firewalld
============= node101.yinzhengjie.org.cn : systemctl disable firewalld ============
Removed symlink /etc/systemd/system/dbus-org.fedoraproject.FirewallD1.service.
Removed symlink /etc/systemd/system/basic.target.wants/firewalld.service.
命令执行成功
============= node102.yinzhengjie.org.cn : systemctl disable firewalld ============
Removed symlink /etc/systemd/system/dbus-org.fedoraproject.FirewallD1.service.
Removed symlink /etc/systemd/system/basic.target.wants/firewalld.service.
命令执行成功
============= node103.yinzhengjie.org.cn : systemctl disable firewalld ============
Removed symlink /etc/systemd/system/dbus-org.fedoraproject.FirewallD1.service.
Removed symlink /etc/systemd/system/basic.target.wants/firewalld.service.
命令执行成功
[root@node101 java]#

[root@node101 java]# xcall.sh systemctl status firewalld
============= node101.yinzhengjie.org.cn : systemctl status firewalld ============
● firewalld.service - firewalld - dynamic firewall daemon
   Loaded: loaded (/usr/lib/systemd/system/firewalld.service; disabled; vendor preset: enabled)
   Active: inactive (dead)

Dec 05 02:28:52 node101.yinzhengjie.org.cn systemd[1]: Starting firewalld - dynamic firewall daemon...
Dec 05 02:28:52 node101.yinzhengjie.org.cn systemd[1]: Started firewalld - dynamic firewall daemon.
Dec 05 03:42:15 node101.yinzhengjie.org.cn systemd[1]: Stopping firewalld - dynamic firewall daemon...
Dec 05 03:42:16 node101.yinzhengjie.org.cn systemd[1]: Stopped firewalld - dynamic firewall daemon.
============= node102.yinzhengjie.org.cn : systemctl status firewalld ============
● firewalld.service - firewalld - dynamic firewall daemon
   Loaded: loaded (/usr/lib/systemd/system/firewalld.service; disabled; vendor preset: enabled)
   Active: inactive (dead)

Dec 05 02:27:18 nod102.yinzhengjie.org.cn systemd[1]: Starting firewalld - dynamic firewall daemon...
Dec 05 02:27:18 nod102.yinzhengjie.org.cn systemd[1]: Started firewalld - dynamic firewall daemon.
Dec 05 03:42:16 nod102.yinzhengjie.org.cn systemd[1]: Stopping firewalld - dynamic firewall daemon...
Dec 05 03:42:17 nod102.yinzhengjie.org.cn systemd[1]: Stopped firewalld - dynamic firewall daemon.
============= node103.yinzhengjie.org.cn : systemctl status firewalld ============
● firewalld.service - firewalld - dynamic firewall daemon
   Loaded: loaded (/usr/lib/systemd/system/firewalld.service; disabled; vendor preset: enabled)
   Active: inactive (dead)

Dec 05 02:25:47 node103.yinzhengjie.org.cn systemd[1]: Starting firewalld - dynamic firewall daemon...
Dec 05 02:25:47 node103.yinzhengjie.org.cn systemd[1]: Started firewalld - dynamic firewall daemon.
Dec 05 03:42:17 node103.yinzhengjie.org.cn systemd[1]: Stopping firewalld - dynamic firewall daemon...
Dec 05 03:42:18 node103.yinzhengjie.org.cn systemd[1]: Stopped firewalld - dynamic firewall daemon.
[root@node101 java]#
[root@node101 java]#
[root@node101 java]#

[root@node101 ~]# xcall.sh sed -i 's#SELINUX=enforcing#SELINUX=disabled#' /etc/selinux/config
============= node101.yinzhengjie.org.cn : sed -i s#SELINUX=enforcing#SELINUX=disabled# /etc/selinux/config ============
命令执行成功
============= node102.yinzhengjie.org.cn : sed -i s#SELINUX=enforcing#SELINUX=disabled# /etc/selinux/config ============
命令执行成功
============= node103.yinzhengjie.org.cn : sed -i s#SELINUX=enforcing#SELINUX=disabled# /etc/selinux/config ============
命令执行成功
[root@node101 ~]#
[root@node101 ~]#
[root@node101 ~]# xcall.sh  cat /etc/selinux/config | grep SELINUX= | grep -v ^#
SELINUX=disabled
SELINUX=disabled
SELINUX=disabled
[root@node101 ~]#

[root@node101 ~]# xcall.sh getenforce
============= node101.yinzhengjie.org.cn : getenforce ============
Enforcing
命令执行成功
============= node102.yinzhengjie.org.cn : getenforce ============
Enforcing
命令执行成功
============= node103.yinzhengjie.org.cn : getenforce ============
Enforcing
命令执行成功
[root@node101 ~]#
[root@node101 ~]#
[root@node101 ~]# xcall.sh setenforce 0
============= node101.yinzhengjie.org.cn : setenforce 0 ============
命令执行成功
============= node102.yinzhengjie.org.cn : setenforce 0 ============
命令执行成功
============= node103.yinzhengjie.org.cn : setenforce 0 ============
命令执行成功
[root@node101 ~]#
[root@node101 ~]# xcall.sh getenforce
============= node101.yinzhengjie.org.cn : getenforce ============
Permissive
命令执行成功
============= node102.yinzhengjie.org.cn : getenforce ============
Permissive
命令执行成功
============= node103.yinzhengjie.org.cn : getenforce ============
Permissive
命令执行成功
[root@node101 ~]#
5>.下载Mangodb数据库的软件

[root@node101 ~]# yum -y install wget
Loaded plugins: fastestmirror
Loading mirror speeds from cached hostfile
 * base: mirrors.shu.edu.cn
 * extras: mirrors.shu.edu.cn
 * updates: mirrors.shu.edu.cn
Resolving Dependencies
--> Running transaction check
---> Package wget.x86_64 0:1.14-18.el7 will be installed
--> Finished Dependency Resolution

Dependencies Resolved

=================================================================================================================================================================
 Package                             Arch                                  Version                                     Repository                           Size
=================================================================================================================================================================
Installing:
 wget                                x86_64                                1.14-18.el7                                 base                                547 k

Transaction Summary
=================================================================================================================================================================
Install  1 Package

Total download size: 547 k
Installed size: 2.0 M
Downloading packages:
wget-1.14-18.el7.x86_64.rpm                                                                                                               | 547 kB  00:00:00
Running transaction check
Running transaction test
Transaction test succeeded
Running transaction
  Installing : wget-1.14-18.el7.x86_64                                                                                                                       1/1
  Verifying  : wget-1.14-18.el7.x86_64                                                                                                                       1/1

Installed:
  wget.x86_64 0:1.14-18.el7

Complete!
[root@node101 ~]#
[root@node101 ~]# wget https://fastdl.mongodb.org/linux/mongodb-linux-x86_64-3.4.7.tgz        #下载Mongodb
--2018-12-22 04:53:32--  https://fastdl.mongodb.org/linux/mongodb-linux-x86_64-3.4.7.tgz
Resolving fastdl.mongodb.org (fastdl.mongodb.org)... 99.84.194.47, 99.84.194.86, 99.84.194.92, ...
Connecting to fastdl.mongodb.org (fastdl.mongodb.org)|99.84.194.47|:443... connected.
HTTP request sent, awaiting response... 200 OK
Length: 86747873 (83M) [application/x-gzip]
Saving to: ‘mongodb-linux-x86_64-3.4.7.tgz’

100%[=======================================================================================================================>] 86,747,873   404KB/s   in 3m 33s

2018-12-22 04:57:07 (397 KB/s) - ‘mongodb-linux-x86_64-3.4.7.tgz’ saved [86747873/86747873]

[root@node101 ~]#
三.安装部署
1>.解压mongodb软件到指定的目录
[root@node101 ~]# mkdir -pv /yinzhengjie/softwares                                  #创建你经常存放目录的位置
mkdir: created directory ‘/yinzhengjie’
mkdir: created directory ‘/yinzhengjie/softwares’
[root@node101 ~]#
[root@node101 ~]# ll
total 84716
-rw-r--r--. 1 root root 86747873 Aug  7  2017 mongodb-linux-x86_64-3.4.7.tgz
[root@node101 ~]#
[root@node101 ~]# tar -zxf mongodb-linux-x86_64-3.4.7.tgz -C /yinzhengjie/softwares/                  #加压mangodb到你指定的目录中去
[root@node101 ~]#
[root@node101 ~]# ln -s /yinzhengjie/softwares/mongodb-linux-x86_64-3.4.7/ /yinzhengjie/softwares/mongodb      #创建软连接
[root@node101 ~]#
[root@node101 ~]# ll /yinzhengjie/softwares/
total 0
lrwxrwxrwx. 1 root root 50 Dec 22 05:03 mongodb -> /yinzhengjie/softwares/mongodb-linux-x86_64-3.4.7/
drwxr-xr-x. 3 root root 91 Dec 22 05:03 mongodb-linux-x86_64-3.4.7
[root@node101 ~]#
2>.创建数据目录和日志目录
[root@node101 ~]# cd /yinzhengjie/softwares/mongodb/
[root@node101 mongodb]# ll
total 116
drwxr-xr-x. 2 root root   243 Dec 22 05:03 bin
-rw-r--r--. 1 root root 34520 Aug  7  2017 GNU-AGPL-3.0
-rw-r--r--. 1 root root 16726 Aug  7  2017 MPL-2
-rw-r--r--. 1 root root  1359 Aug  7  2017 README
-rw-r--r--. 1 root root 55625 Aug  7  2017 THIRD-PARTY-NOTICES
[root@node101 mongodb]#
[root@node101 mongodb]#
[root@node101 mongodb]# mkdir db logs  conf            #创建用于存放数据和日志的目录以及配置文件存放目录
[root@node101 mongodb]#
[root@node101 mongodb]# ll
total 116
drwxr-xr-x. 2 root root   243 Dec 22 05:03 bin            #存放启动脚本的目录
drwxr-xr-x. 2 root root     6 Dec 22 05:19 conf            #该目录用于存放配置文件
drwxr-xr-x. 2 root root     6 Dec 22 05:08 db             #该目录用于存放数据
-rw-r--r--. 1 root root 34520 Aug  7  2017 GNU-AGPL-3.0
drwxr-xr-x. 2 root root     6 Dec 22 05:08 logs            #该目录用于存放日志
-rw-r--r--. 1 root root 16726 Aug  7  2017 MPL-2
-rw-r--r--. 1 root root  1359 Aug  7  2017 README
-rw-r--r--. 1 root root 55625 Aug  7  2017 THIRD-PARTY-NOTICES
[root@node101 mongodb]#
[root@node101 mongodb]# pwd
/yinzhengjie/softwares/mongodb
[root@node101 mongodb]#
3>.编辑启动mongodb的配置文件
[root@node101 ~]# cd /yinzhengjie/softwares/mongodb/conf/
[root@node101 conf]#
[root@node101 conf]# vi mongodb.conf
[root@node101 conf]#
[root@node101 conf]# cat mongodb.conf
dbpath=/yinzhengjie/softwares/mongodb/db              #指定数据的存放目录
logpath=/yinzhengjie/softwares/mongodb/logs/mongodb.log      #指定日志的存放目录
port=5200                                  #指定mangodb服务的启动端口
fork=true                                #指定是否以守护进程启动mangodb,换句话说就是后台启动,我们这里设置为true。
nohttpinterface=true                          #是否禁止http的接口
[root@node101 conf]#
4>.将mongodb的脚本路径添加到系统环境变量并将“node101.yinzhengjie.org.cn”节点的配置同步到其它节点上去
[root@node101 ~]# vi /etc/profile
[root@node101 ~]#
[root@node101 ~]#
[root@node101 ~]# tail -3 /etc/profile                      #我们将mongodb的环境变量添加到linux系统的配置文件中
#Add by yinzhengjie
export MONGODB_HOME=/yinzhengjie/softwares/mongodb
export PATH=$PATH:$MONGODB_HOME/bin
[root@node101 ~]#
[root@node101 ~]#
[root@node101 ~]# source /etc/profile
[root@node101 ~]#
[root@node101 ~]# xrsync.sh /etc/profile                      #将数据同步到其它的2个节点上
=========== node102.yinzhengjie.org.cn : /etc/profile ===========
命令执行成功
=========== node103.yinzhengjie.org.cn : /etc/profile ===========
命令执行成功
[root@node101 ~]#
[root@node101 ~]# xcall.sh tail -3 /etc/profile                    #验证是否同步成功
============= node101.yinzhengjie.org.cn : tail -3 /etc/profile ============
#Add by yinzhengjie
export MONGODB_HOME=/yinzhengjie/softwares/mongodb
export PATH=$PATH:$MONGODB_HOME/bin
命令执行成功
============= node102.yinzhengjie.org.cn : tail -3 /etc/profile ============
#Add by yinzhengjie
export MONGODB_HOME=/yinzhengjie/softwares/mongodb
export PATH=$PATH:$MONGODB_HOME/bin
命令执行成功
============= node103.yinzhengjie.org.cn : tail -3 /etc/profile ============
#Add by yinzhengjie
export MONGODB_HOME=/yinzhengjie/softwares/mongodb
export PATH=$PATH:$MONGODB_HOME/bin
命令执行成功
[root@node101 ~]#
[root@node101 ~]#
[root@node101 ~]# xrsync.sh /yinzhengjie/                  #这一步是必须要做的,否则你在做下一步的时候可能启动不了集群
=========== node102.yinzhengjie.org.cn : /yinzhengjie/ ===========
命令执行成功
=========== node103.yinzhengjie.org.cn : /yinzhengjie/ ===========
命令执行成功
[root@node101 ~]#
5>.编写集群启动脚本

[root@node101 ~]# vi /usr/local/bin/mongodb-start.sh
[root@node101 ~]#
[root@node101 ~]# cat  /usr/local/bin/mongodb-start.sh
#!/bin/bash
#@author :yinzhengjie
#blog:http://www.cnblogs.com/yinzhengjie
#EMAIL:y1053419035@qq.com


for (( i=101;i<=103;i++ ));do
        ssh node${i}.yinzhengjie.org.cn  "source /etc/profile;/yinzhengjie/softwares/mongodb/bin/mongod --replSet repset -f /yinzhengjie/softwares/mongodb/conf/mongodb.conf"
done
[root@node101 ~]#
[root@node101 ~]#
[root@node101 ~]# chmod +x  /usr/local/bin/mongodb-start.sh
[root@node101 ~]#
[root@node101 ~]# mongodb-start.sh                   #启动mongodb集群
about to fork child process, waiting until server is ready for connections.
forked process: 9436
child process started successfully, parent exiting
about to fork child process, waiting until server is ready for connections.
forked process: 8946
child process started successfully, parent exiting
about to fork child process, waiting until server is ready for connections.
forked process: 8911
child process started successfully, parent exiting
[root@node101 ~]#
[root@node101 ~]# xcall.sh ps -ef | grep mongodb | grep -v grep      #这里是检查各个节气是否启动了mongodb服务。
root       9436      1  2 10:20 ?        00:00:00 /yinzhengjie/softwares/mongodb/bin/mongod --replSet repset -f /yinzhengjie/softwares/mongodb/conf/mongodb.conf
root       8946      1  2 10:20 ?        00:00:00 /yinzhengjie/softwares/mongodb/bin/mongod --replSet repset -f /yinzhengjie/softwares/mongodb/conf/mongodb.conf
root       8911      1  2 10:20 ?        00:00:00 /yinzhengjie/softwares/mongodb/bin/mongod --replSet repset -f /yinzhengjie/softwares/mongodb/conf/mongodb.conf
[root@node101 ~]#
6>.初始化副本集群

[root@node101 ~]# yum -y install net-tools
Loaded plugins: fastestmirror
Loading mirror speeds from cached hostfile
 * base: mirrors.shu.edu.cn
 * extras: mirrors.shu.edu.cn
 * updates: mirrors.shu.edu.cn
Resolving Dependencies
--> Running transaction check
---> Package net-tools.x86_64 0:2.0-0.24.20131004git.el7 will be installed
--> Finished Dependency Resolution

Dependencies Resolved

=================================================================================================================================================================
 Package                             Arch                             Version                                               Repository                      Size
=================================================================================================================================================================
Installing:
 net-tools                           x86_64                           2.0-0.24.20131004git.el7                              base                           306 k

Transaction Summary
=================================================================================================================================================================
Install  1 Package

Total download size: 306 k
Installed size: 918 k
Downloading packages:
net-tools-2.0-0.24.20131004git.el7.x86_64.rpm                                                                                             | 306 kB  00:00:00
Running transaction check
Running transaction test
Transaction test succeeded
Running transaction
  Installing : net-tools-2.0-0.24.20131004git.el7.x86_64                                                                                                     1/1
  Verifying  : net-tools-2.0-0.24.20131004git.el7.x86_64                                                                                                     1/1

Installed:
  net-tools.x86_64 0:2.0-0.24.20131004git.el7

Complete!
[root@node101 ~]#
[root@node101 ~]# ps -ef | grep mongodb | grep -v grep        #检查mongodb进程是否存在,发现进程的pid是9436
root       9436      1  1 10:20 ?        00:00:09 /yinzhengjie/softwares/mongodb/bin/mongod --replSet repset -f /yinzhengjie/softwares/mongodb/conf/mongodb.conf
[root@node101 ~]#
[root@node101 ~]#
[root@node101 ~]# netstat -untalp | grep 9436            #我们查看mondb的pid进程是9436,我们可以查看该进程对应的服务端口,发现是咱们设置的5200端口
tcp        0      0 0.0.0.0:5200            0.0.0.0:*               LISTEN      9436/mongod
[root@node101 ~]#
[root@node101 ~]# mongo 127.0.0.1:5200              #登录本地的mongodb数据库
MongoDB shell version v3.4.7
connecting to: 127.0.0.1:5200
MongoDB server version: 3.4.7
Welcome to the MongoDB shell.
For interactive help, type "help".
For more comprehensive documentation, see
    http://docs.mongodb.org/
Questions? Try the support group
    http://groups.google.com/group/mongodb-user
Server has startup warnings:
2018-12-22T10:20:17.974-0500 I CONTROL  [initandlisten]
2018-12-22T10:20:17.974-0500 I CONTROL  [initandlisten] ** WARNING: Access control is not enabled for the database.
2018-12-22T10:20:17.974-0500 I CONTROL  [initandlisten] **          Read and write access to data and configuration is unrestricted.
2018-12-22T10:20:17.974-0500 I CONTROL  [initandlisten] ** WARNING: You are running this process as the root user, which is not recommended.
2018-12-22T10:20:17.974-0500 I CONTROL  [initandlisten]
2018-12-22T10:20:17.974-0500 I CONTROL  [initandlisten]
2018-12-22T10:20:17.974-0500 I CONTROL  [initandlisten] ** WARNING: /sys/kernel/mm/transparent_hugepage/enabled is 'always'.
2018-12-22T10:20:17.974-0500 I CONTROL  [initandlisten] **        We suggest setting it to 'never'
2018-12-22T10:20:17.974-0500 I CONTROL  [initandlisten]
2018-12-22T10:20:17.974-0500 I CONTROL  [initandlisten] ** WARNING: /sys/kernel/mm/transparent_hugepage/defrag is 'always'.
2018-12-22T10:20:17.974-0500 I CONTROL  [initandlisten] **        We suggest setting it to 'never'
2018-12-22T10:20:17.974-0500 I CONTROL  [initandlisten]
> config = { _id:"repset", members:[{_id:0,host:"node101.yinzhengjie.org.cn:5200"},{_id:1,host:"node102.yinzhengjie.org.cn:5200"},{_id:2,host:"node103.yinzhengjie.org.cn:5200"}]}
{
    "_id" : "repset",
    "members" : [
        {
            "_id" : 0,
            "host" : "node101.yinzhengjie.org.cn:5200"
        },
        {
            "_id" : 1,
            "host" : "node102.yinzhengjie.org.cn:5200"
        },
        {
            "_id" : 2,
            "host" : "node103.yinzhengjie.org.cn:5200"
        }
    ]
}
>
> rs.initiate(config);            #初始化副本集群
{ "ok" : 1 }                 #出现改行提示说明你成功了,注意要关闭防火墙和selinux配置哟,否则你可能还有其它提示信息,比如拒绝连接之类的!
repset:OTHER>
repset:PRIMARY>
repset:PRIMARY>
repset:PRIMARY> rs.status();        #查看集群节点的状态
{
    "set" : "repset",
    "date" : ISODate("2018-12-22T15:48:53.497Z"),
    "myState" : 1,
    "term" : NumberLong(1),
    "heartbeatIntervalMillis" : NumberLong(2000),
    "optimes" : {
        "lastCommittedOpTime" : {
            "ts" : Timestamp(1545493727, 1),
            "t" : NumberLong(1)
        },
        "appliedOpTime" : {
            "ts" : Timestamp(1545493727, 1),
            "t" : NumberLong(1)
        },
        "durableOpTime" : {
            "ts" : Timestamp(1545493727, 1),
            "t" : NumberLong(1)
        }
    },
    "members" : [
        {
            "_id" : 0,
            "name" : "node101.yinzhengjie.org.cn:5200",
            "health" : 1,
            "state" : 1,
            "stateStr" : "PRIMARY",        #这里是节点的状态保存信息!
            "uptime" : 1716,
            "optime" : {
                "ts" : Timestamp(1545493727, 1),
                "t" : NumberLong(1)
            },
            "optimeDate" : ISODate("2018-12-22T15:48:47Z"),
            "infoMessage" : "could not find member to sync from",
            "electionTime" : Timestamp(1545493665, 1),
            "electionDate" : ISODate("2018-12-22T15:47:45Z"),
            "configVersion" : 1,
            "self" : true
        },
        {
            "_id" : 1,
            "name" : "node102.yinzhengjie.org.cn:5200",
            "health" : 1,
            "state" : 2,
            "stateStr" : "SECONDARY",
            "uptime" : 78,
            "optime" : {
                "ts" : Timestamp(1545493727, 1),
                "t" : NumberLong(1)
            },
            "optimeDurable" : {
                "ts" : Timestamp(1545493727, 1),
                "t" : NumberLong(1)
            },
            "optimeDate" : ISODate("2018-12-22T15:48:47Z"),
            "optimeDurableDate" : ISODate("2018-12-22T15:48:47Z"),
            "lastHeartbeat" : ISODate("2018-12-22T15:48:52.040Z"),
            "lastHeartbeatRecv" : ISODate("2018-12-22T15:48:52.175Z"),
            "pingMs" : NumberLong(0),
            "syncingTo" : "node101.yinzhengjie.org.cn:5200",
            "configVersion" : 1
        },
        {
            "_id" : 2,
            "name" : "node103.yinzhengjie.org.cn:5200",
            "health" : 1,
            "state" : 2,
            "stateStr" : "SECONDARY",
            "uptime" : 78,
            "optime" : {
                "ts" : Timestamp(1545493727, 1),
                "t" : NumberLong(1)
            },
            "optimeDurable" : {
                "ts" : Timestamp(1545493727, 1),
                "t" : NumberLong(1)
            },
            "optimeDate" : ISODate("2018-12-22T15:48:47Z"),
            "optimeDurableDate" : ISODate("2018-12-22T15:48:47Z"),
            "lastHeartbeat" : ISODate("2018-12-22T15:48:52.040Z"),
            "lastHeartbeatRecv" : ISODate("2018-12-22T15:48:52.184Z"),
            "pingMs" : NumberLong(0),
            "syncingTo" : "node102.yinzhengjie.org.cn:5200",
            "configVersion" : 1
        }
    ],
    "ok" : 1
}
repset:PRIMARY>         #注意,这里的PRIMARY表示的当前登录的节点是主节点

[root@node102 ~]# mongo 127.0.0.1:5200
MongoDB shell version v3.4.7
connecting to: 127.0.0.1:5200
MongoDB server version: 3.4.7
Welcome to the MongoDB shell.
For interactive help, type "help".
For more comprehensive documentation, see
    http://docs.mongodb.org/
Questions? Try the support group
    http://groups.google.com/group/mongodb-user
Server has startup warnings:
2018-12-22T10:20:18.797-0500 I CONTROL  [initandlisten]
2018-12-22T10:20:18.798-0500 I CONTROL  [initandlisten] ** WARNING: Access control is not enabled for the database.
2018-12-22T10:20:18.798-0500 I CONTROL  [initandlisten] **          Read and write access to data and configuration is unrestricted.
2018-12-22T10:20:18.798-0500 I CONTROL  [initandlisten] ** WARNING: You are running this process as the root user, which is not recommended.
2018-12-22T10:20:18.798-0500 I CONTROL  [initandlisten]
2018-12-22T10:20:18.798-0500 I CONTROL  [initandlisten]
2018-12-22T10:20:18.798-0500 I CONTROL  [initandlisten] ** WARNING: /sys/kernel/mm/transparent_hugepage/enabled is 'always'.
2018-12-22T10:20:18.798-0500 I CONTROL  [initandlisten] **        We suggest setting it to 'never'
2018-12-22T10:20:18.798-0500 I CONTROL  [initandlisten]
2018-12-22T10:20:18.798-0500 I CONTROL  [initandlisten] ** WARNING: /sys/kernel/mm/transparent_hugepage/defrag is 'always'.
2018-12-22T10:20:18.798-0500 I CONTROL  [initandlisten] **        We suggest setting it to 'never'
2018-12-22T10:20:18.798-0500 I CONTROL  [initandlisten]
repset:SECONDARY>
repset:SECONDARY>             #注意这里的“SECONDRY”表示的是副本节点

[root@node103 ~]# mongo 127.0.0.1:5200
MongoDB shell version v3.4.7
connecting to: 127.0.0.1:5200
MongoDB server version: 3.4.7
Welcome to the MongoDB shell.
For interactive help, type "help".
For more comprehensive documentation, see
    http://docs.mongodb.org/
Questions? Try the support group
    http://groups.google.com/group/mongodb-user
Server has startup warnings:
2018-12-22T10:20:19.632-0500 I CONTROL  [initandlisten]
2018-12-22T10:20:19.632-0500 I CONTROL  [initandlisten] ** WARNING: Access control is not enabled for the database.
2018-12-22T10:20:19.632-0500 I CONTROL  [initandlisten] **          Read and write access to data and configuration is unrestricted.
2018-12-22T10:20:19.632-0500 I CONTROL  [initandlisten] ** WARNING: You are running this process as the root user, which is not recommended.
2018-12-22T10:20:19.632-0500 I CONTROL  [initandlisten]
2018-12-22T10:20:19.633-0500 I CONTROL  [initandlisten]
2018-12-22T10:20:19.633-0500 I CONTROL  [initandlisten] ** WARNING: /sys/kernel/mm/transparent_hugepage/enabled is 'always'.
2018-12-22T10:20:19.633-0500 I CONTROL  [initandlisten] **        We suggest setting it to 'never'
2018-12-22T10:20:19.633-0500 I CONTROL  [initandlisten]
2018-12-22T10:20:19.633-0500 I CONTROL  [initandlisten] ** WARNING: /sys/kernel/mm/transparent_hugepage/defrag is 'always'.
2018-12-22T10:20:19.633-0500 I CONTROL  [initandlisten] **        We suggest setting it to 'never'
2018-12-22T10:20:19.633-0500 I CONTROL  [initandlisten]
repset:SECONDARY>
四.测试集群功能
1>.登录mongodb的主节点并创建“yinzhengjie”数据库。
repset:PRIMARY> use yinzhengjie                      #如果数据库不存在,则创建数据库,否则切换到指定数据库。
switched to db yinzhengjie
repset:PRIMARY>
repset:PRIMARY> db                          #查看当前所在的数据库
yinzhengjie
repset:PRIMARY>
repset:PRIMARY> show databases;                    #查看已经存在的数据库信息
admin  0.000GB
local  0.000GB
repset:PRIMARY>
repset:PRIMARY> show dbs                        #除了上面的查看方式,我们也可以通过改命令进行查看
admin  0.000GB
local  0.000GB
repset:PRIMARY>
repset:PRIMARY> db.runoob.insert({"job":"DBA"})              #在当前的数据库中创建的runoob表中插入一条数据
WriteResult({ "nInserted" : 1 })
repset:PRIMARY>
repset:PRIMARY> db.runoob.find().pretty();                  #能查看数据当然就能查看相关的数据信息
{ "_id" : ObjectId("5c1e61004f6544b447ca4149"), "job" : "DBA" }
repset:PRIMARY>
repset:PRIMARY>
repset:PRIMARY> show dbs
admin        0.000GB
local        0.000GB
yinzhengjie  0.000GB
repset:PRIMARY>
repset:PRIMARY>
repset:PRIMARY> show databases;
admin        0.000GB
local        0.000GB
yinzhengjie  0.000GB
repset:PRIMARY>
2>.从副本节点连接查看数据
mongodb默认是从主节点读取数据,副本节点上不允许读,因此我们在查询的时候会抛异常如下:
repset:SECONDARY> show dbs
2018-12-22T11:13:28.329-0500 E QUERY    [thread1] Error: listDatabases failed:{
    "ok" : 0,
    "errmsg" : "not master and slaveOk=false",
    "code" : 13435,
    "codeName" : "NotMasterNoSlaveOk"
} :
_getErrorWithCode@src/mongo/shell/utils.js:25:13
Mongo.prototype.getDBs@src/mongo/shell/mongo.js:62:1
shellHelper.show@src/mongo/shell/utils.js:769:19
shellHelper@src/mongo/shell/utils.js:659:15
@(shellhelp2):1:1
repset:SECONDARY>
解决方案:
默认副本节点上不允许读,那么咱们设置副本节点可读即可,在命令执行“db.getMongo().setSlaveOk();”即可,具体操作如下:
repset:SECONDARY> db.getMongo().setSlaveOk();
repset:SECONDARY> show dbs
admin        0.000GB
local        0.000GB
yinzhengjie  0.000GB
repset:SECONDARY>
repset:SECONDARY> use yinzhengjie
switched to db yinzhengjie
repset:SECONDARY> show tables;
runoob
repset:SECONDARY> db.runoob.find().pretty();
{ "_id" : ObjectId("5c1e61004f6544b447ca4149"), "job" : "DBA" }
repset:SECONDARY>
repset:SECONDARY>
3>.测试集群的恢复功能(杀死mongodb主节点存在的进程,观察其它两个节点是否有人结果主节点的角色)
[root@node101 ~]# mongo 127.0.0.1:5200        #当前节点为主节点
MongoDB shell version v3.4.7
connecting to: 127.0.0.1:5200
MongoDB server version: 3.4.7
Server has startup warnings:
2018-12-22T10:20:17.974-0500 I CONTROL  [initandlisten]
2018-12-22T10:20:17.974-0500 I CONTROL  [initandlisten] ** WARNING: Access control is not enabled for the database.
2018-12-22T10:20:17.974-0500 I CONTROL  [initandlisten] **          Read and write access to data and configuration is unrestricted.
2018-12-22T10:20:17.974-0500 I CONTROL  [initandlisten] ** WARNING: You are running this process as the root user, which is not recommended.
2018-12-22T10:20:17.974-0500 I CONTROL  [initandlisten]
2018-12-22T10:20:17.974-0500 I CONTROL  [initandlisten]
2018-12-22T10:20:17.974-0500 I CONTROL  [initandlisten] ** WARNING: /sys/kernel/mm/transparent_hugepage/enabled is 'always'.
2018-12-22T10:20:17.974-0500 I CONTROL  [initandlisten] **        We suggest setting it to 'never'
2018-12-22T10:20:17.974-0500 I CONTROL  [initandlisten]
2018-12-22T10:20:17.974-0500 I CONTROL  [initandlisten] ** WARNING: /sys/kernel/mm/transparent_hugepage/defrag is 'always'.
2018-12-22T10:20:17.974-0500 I CONTROL  [initandlisten] **        We suggest setting it to 'never'
2018-12-22T10:20:17.974-0500 I CONTROL  [initandlisten]
repset:PRIMARY> exit
bye
[root@node101 ~]#
[root@node101 ~]# ps -ef | grep mongodb | grep -v grep
root       9436      1  1 10:20 ?        00:00:45 /yinzhengjie/softwares/mongodb/bin/mongod --replSet repset -f /yinzhengjie/softwares/mongodb/conf/mongodb.conf
[root@node101 ~]#
[root@node101 ~]# kill -9 9436        #杀死主节点的进程
[root@node101 ~]#
[root@node101 ~]#
[root@node101 ~]# mongo 127.0.0.1:5200  #服务没法正常使用了
MongoDB shell version v3.4.7
connecting to: 127.0.0.1:5200
2018-12-22T11:20:15.645-0500 W NETWORK  [thread1] Failed to connect to 127.0.0.1:5200, in(checking socket for error after poll), reason: Connection refused
2018-12-22T11:20:15.645-0500 E QUERY    [thread1] Error: couldn't connect to server 127.0.0.1:5200, connection attempt failed :
connect@src/mongo/shell/mongo.js:237:13
@(connect):1:6
exception: connect failed
[root@node101 ~]#
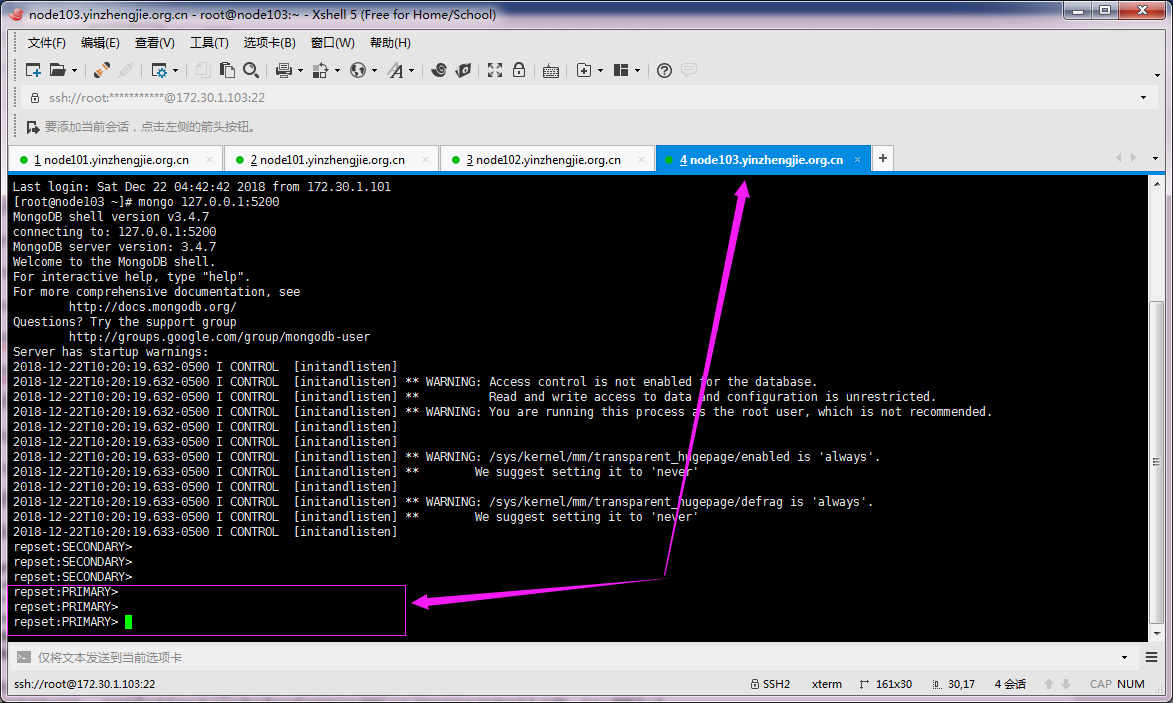
我们发现“node102.yinzhengjie.org.cn”和“node103.yinzhengjie.org.cn”有一个节点立马就接管了主节点的角色

当然也是可以在当前节点查看相应的数据的,具体操作如下:
[root@node103 ~]# mongo 127.0.0.1:5200
MongoDB shell version v3.4.7
connecting to: 127.0.0.1:5200
MongoDB server version: 3.4.7
Welcome to the MongoDB shell.
For interactive help, type "help".
For more comprehensive documentation, see
    http://docs.mongodb.org/
Questions? Try the support group
    http://groups.google.com/group/mongodb-user
Server has startup warnings:
2018-12-22T10:20:19.632-0500 I CONTROL  [initandlisten]
2018-12-22T10:20:19.632-0500 I CONTROL  [initandlisten] ** WARNING: Access control is not enabled for the database.
2018-12-22T10:20:19.632-0500 I CONTROL  [initandlisten] **          Read and write access to data and configuration is unrestricted.
2018-12-22T10:20:19.632-0500 I CONTROL  [initandlisten] ** WARNING: You are running this process as the root user, which is not recommended.
2018-12-22T10:20:19.632-0500 I CONTROL  [initandlisten]
2018-12-22T10:20:19.633-0500 I CONTROL  [initandlisten]
2018-12-22T10:20:19.633-0500 I CONTROL  [initandlisten] ** WARNING: /sys/kernel/mm/transparent_hugepage/enabled is 'always'.
2018-12-22T10:20:19.633-0500 I CONTROL  [initandlisten] **        We suggest setting it to 'never'
2018-12-22T10:20:19.633-0500 I CONTROL  [initandlisten]
2018-12-22T10:20:19.633-0500 I CONTROL  [initandlisten] ** WARNING: /sys/kernel/mm/transparent_hugepage/defrag is 'always'.
2018-12-22T10:20:19.633-0500 I CONTROL  [initandlisten] **        We suggest setting it to 'never'
2018-12-22T10:20:19.633-0500 I CONTROL  [initandlisten]
repset:SECONDARY>
repset:SECONDARY>
repset:SECONDARY>
repset:PRIMARY>
repset:PRIMARY>
repset:PRIMARY> show dbs;
admin        0.000GB
local        0.000GB
yinzhengjie  0.000GB
repset:PRIMARY>
repset:PRIMARY> show tables;
runoob
repset:PRIMARY> db.runoob.find().pretty();
{ "_id" : ObjectId("5c1e61004f6544b447ca4149"), "job" : "DBA" }
repset:PRIMARY>
repset:PRIMARY>
repset:PRIMARY> exit
bye
[root@node103 ~]#
好啦~同学们,时间也不早了,本次分析就到这里了,如果你想要学习更多关于Mongodb相关的知识,我给大家推荐一个网站,可以系统的帮你学习Mongodb数据库:http://www.runoob.com/mongodb/mongodb-tutorial.html。
本文来自博客园,作者:尹正杰,转载请注明原文链接:https://www.cnblogs.com/yinzhengjie/p/10146928.html,个人微信: "JasonYin2020"(添加时请备注来源及意图备注,有偿付费)
当你的才华还撑不起你的野心的时候,你就应该静下心来学习。当你的能力还驾驭不了你的目标的时候,你就应该沉下心来历练。问问自己,想要怎样的人生。


