手把手教你通过Ambari新建Hadoop集群图解案例
手把手教你通过Ambari新建Hadoop集群图解案例
作者:尹正杰
版权声明:原创作品,谢绝转载!否则将追究法律责任。
登陆系统之后,会看到Ambari空空如也的欢迎界面,接下来我们就需要介绍如何通过Ambari新建Hadoop集群。关于如何部署Ambari是很简单的,我这里就不啰嗦了,感兴趣的小伙伴可以参考我之前的笔记:离线方式部署Ambari2.6.0.0。
1>.登陆Ambari的界面

2>.点击“Launc Install Wizard”按钮进入新建集群向导

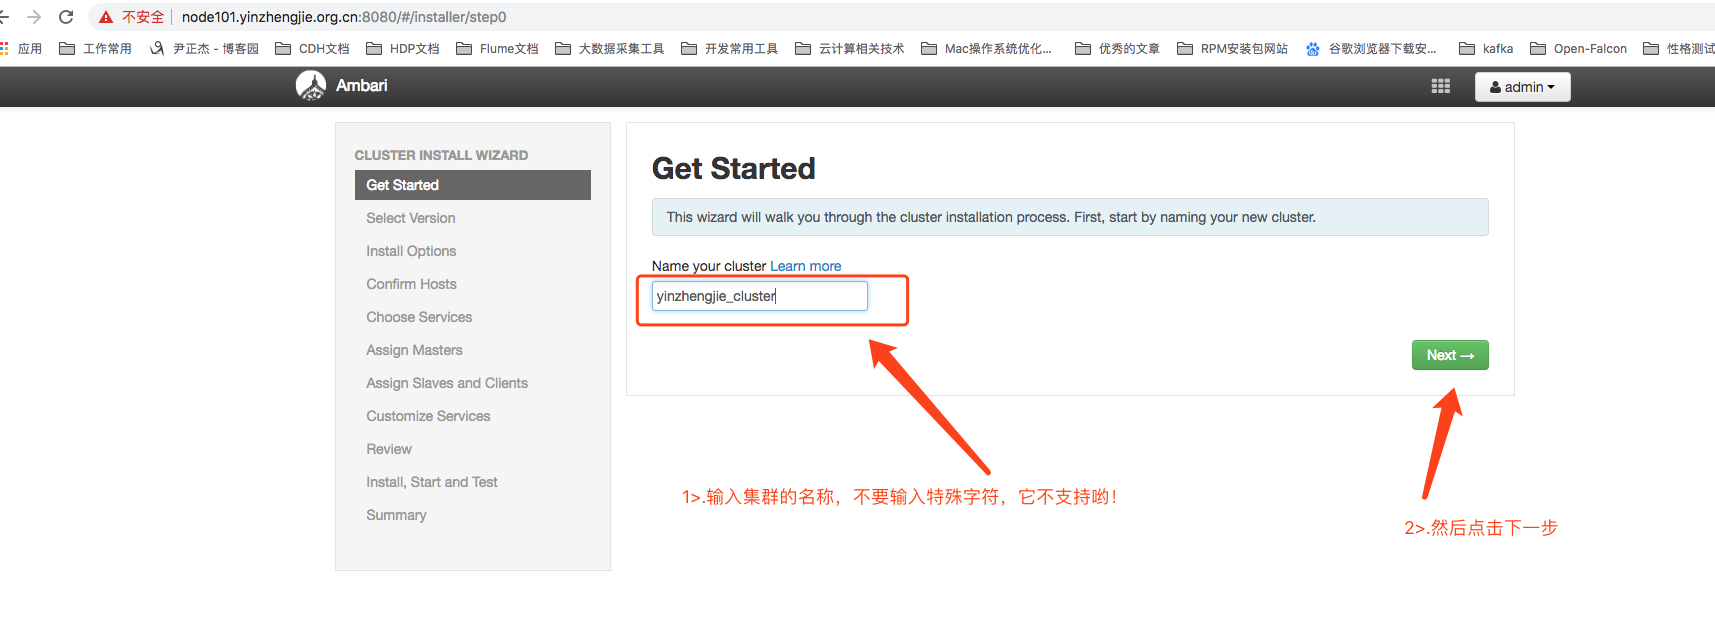
3>.自定义集群名称
4>.使用本地的yum仓库(需要选择“Use Local Repository”,我这里默认就使用的这个选项。) 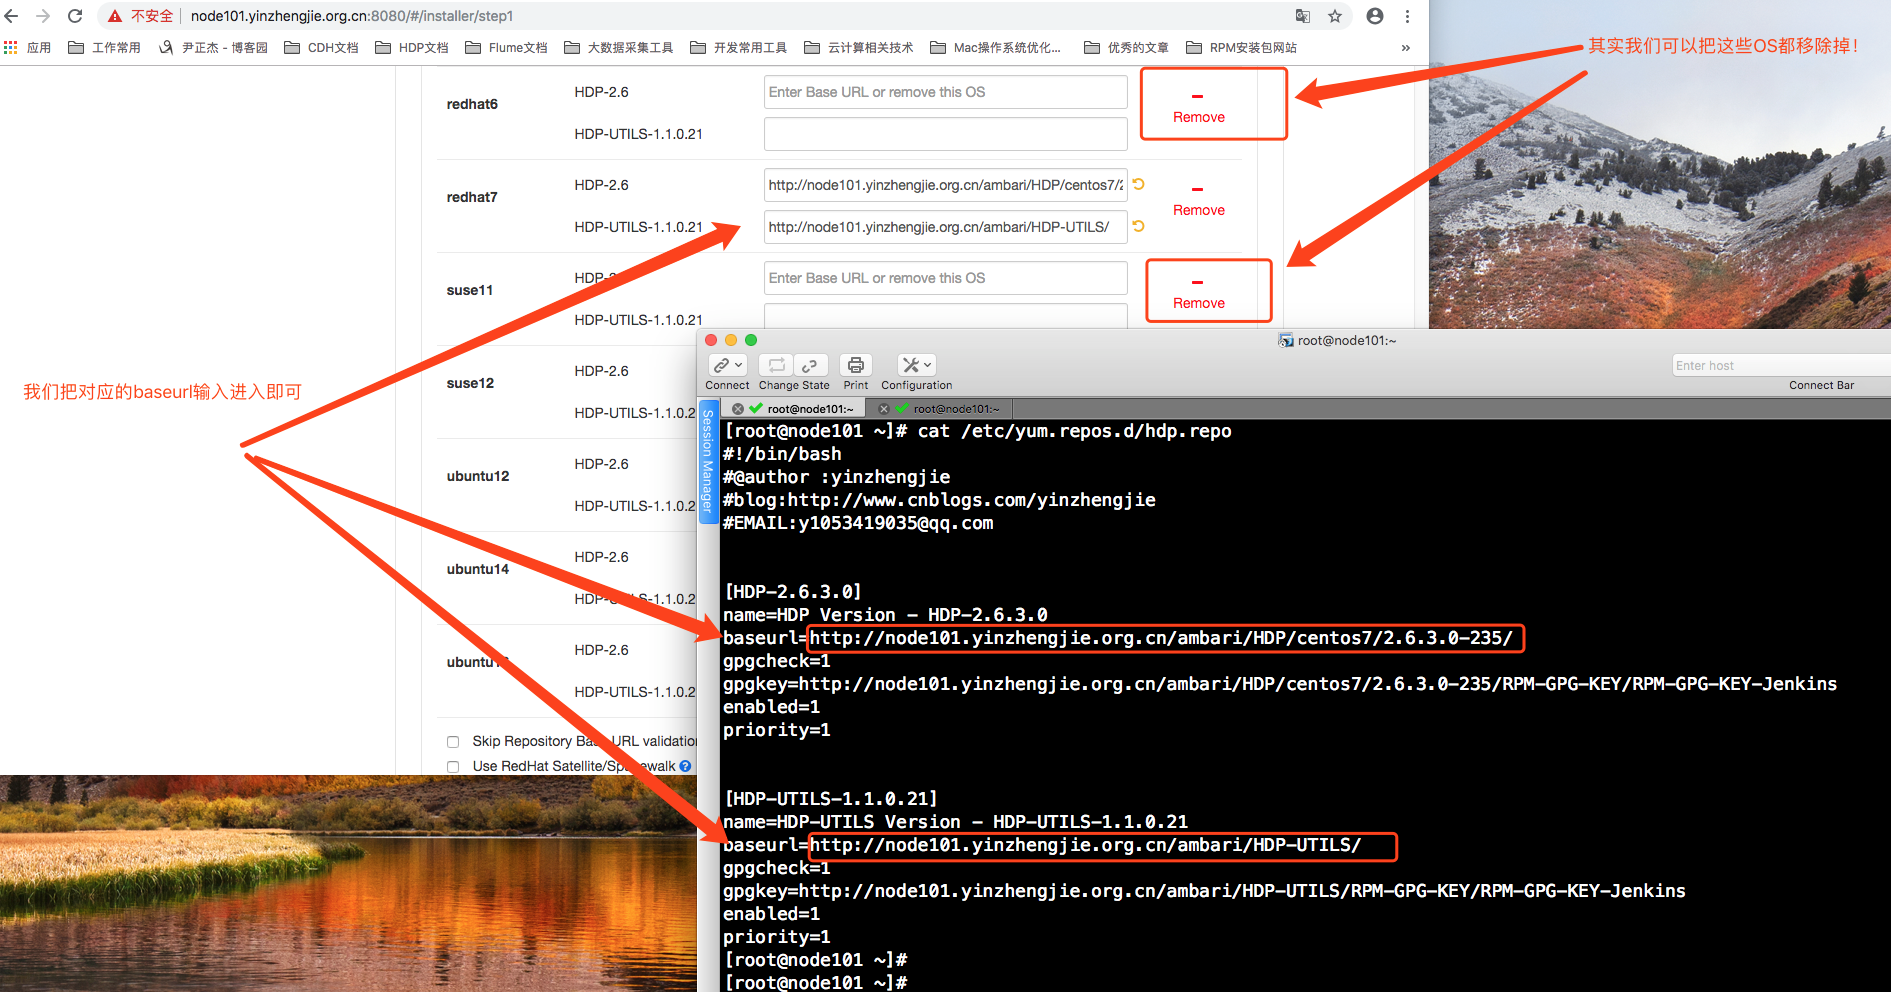
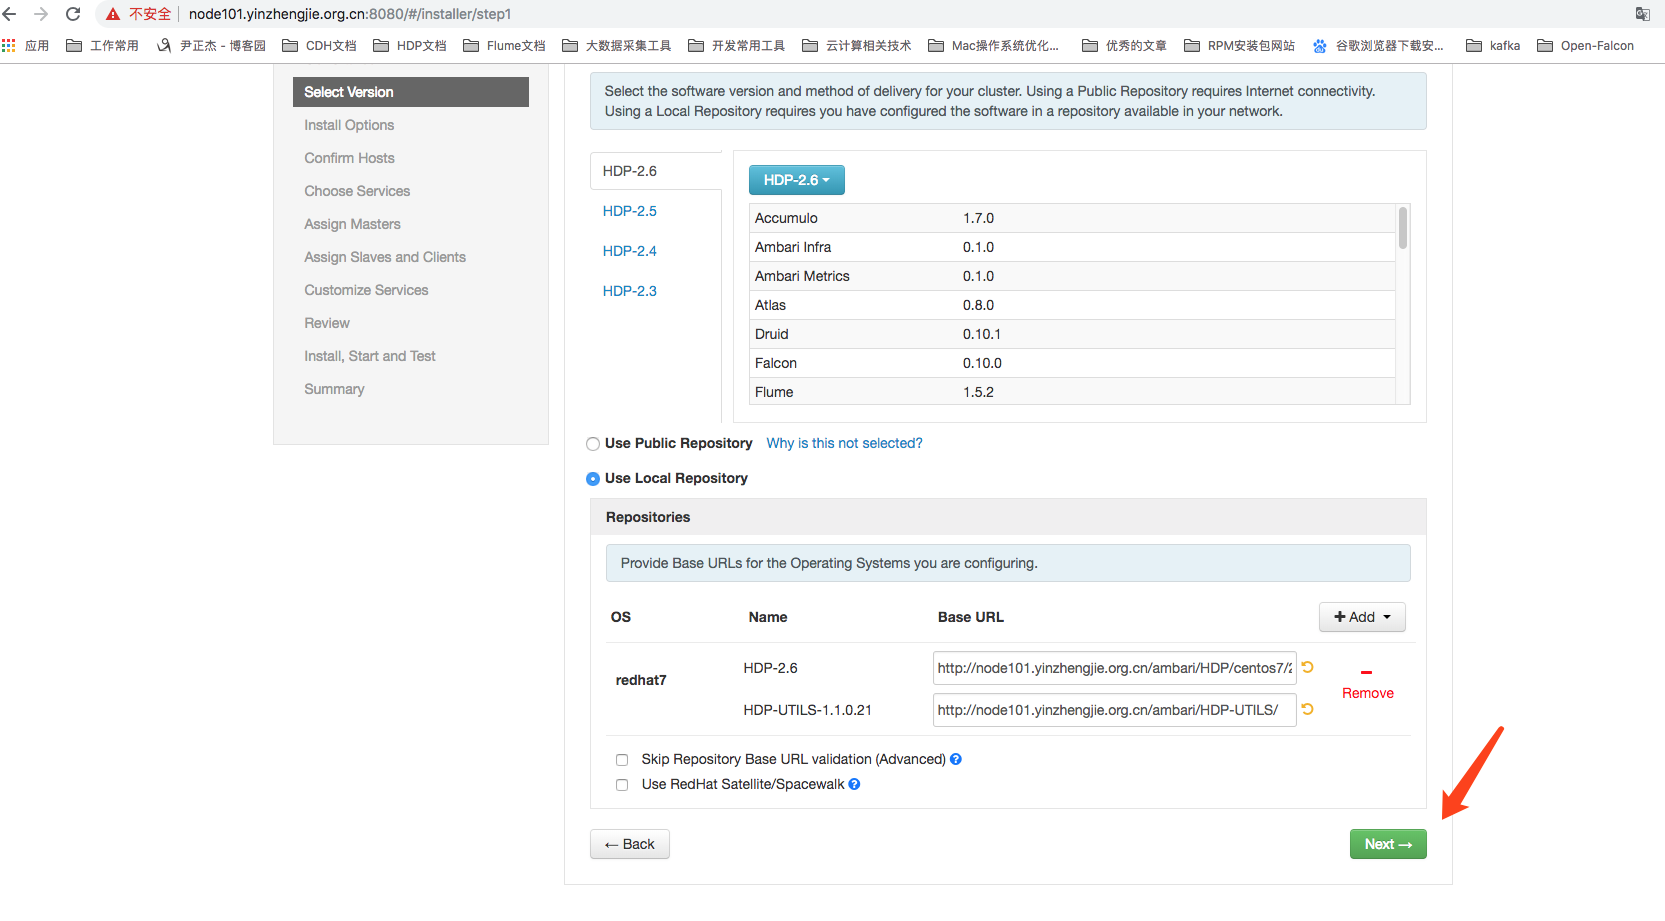
5>.在redhat7按照上图输入本地源的路径后,点击下一步
6>.将私钥上传到Ambari到管理控制台上(这个步骤应该是你在部署Ambari服务到时候就已经生成过私钥啦!)

7>.注册服务器时拍错处理(附有解决问题的详细过程)
下图正在安装软件:
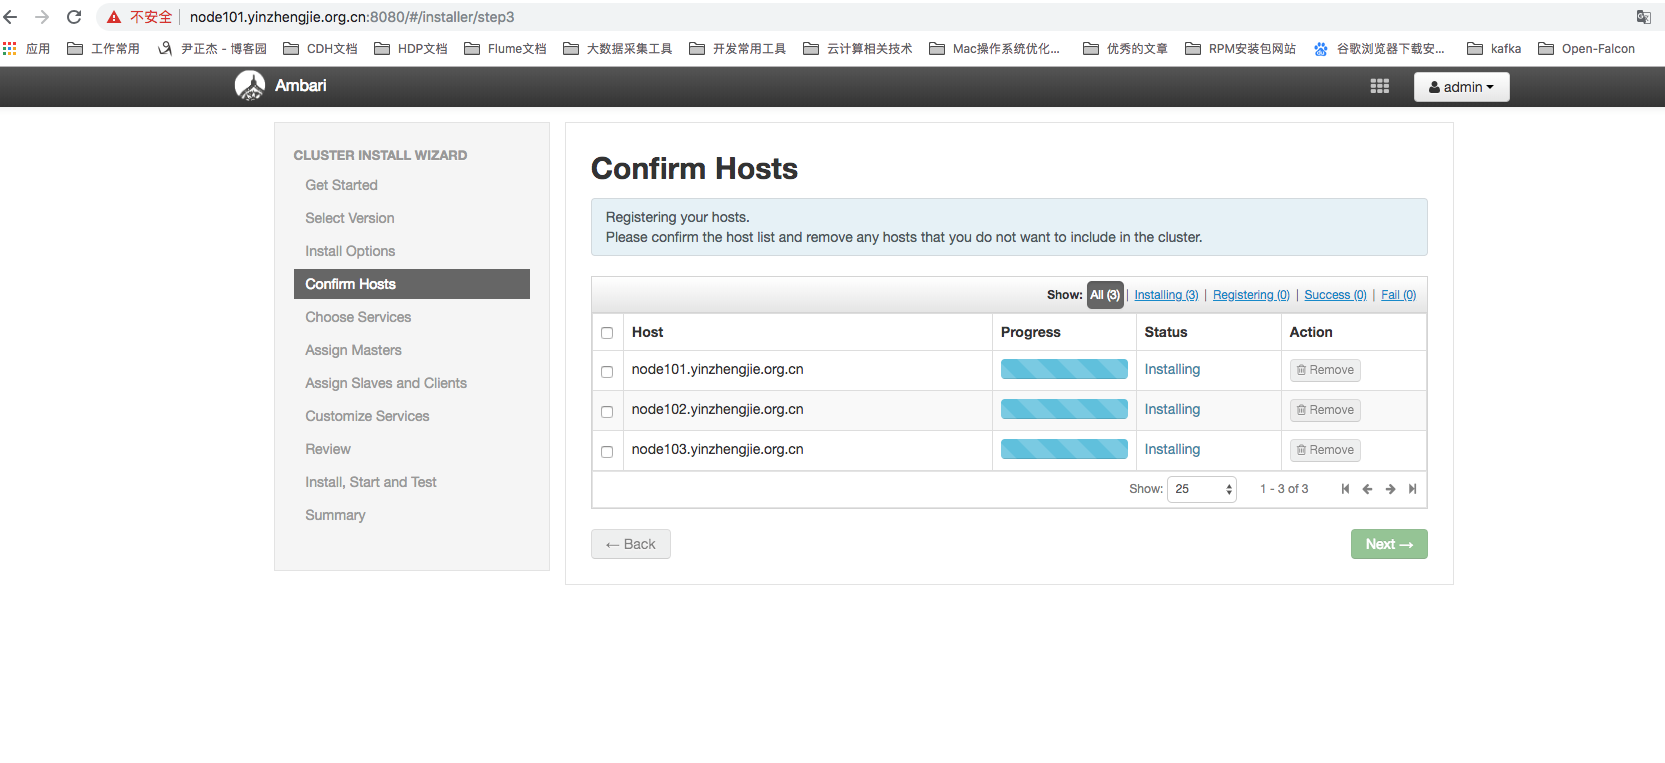
注册服务器,如下图:
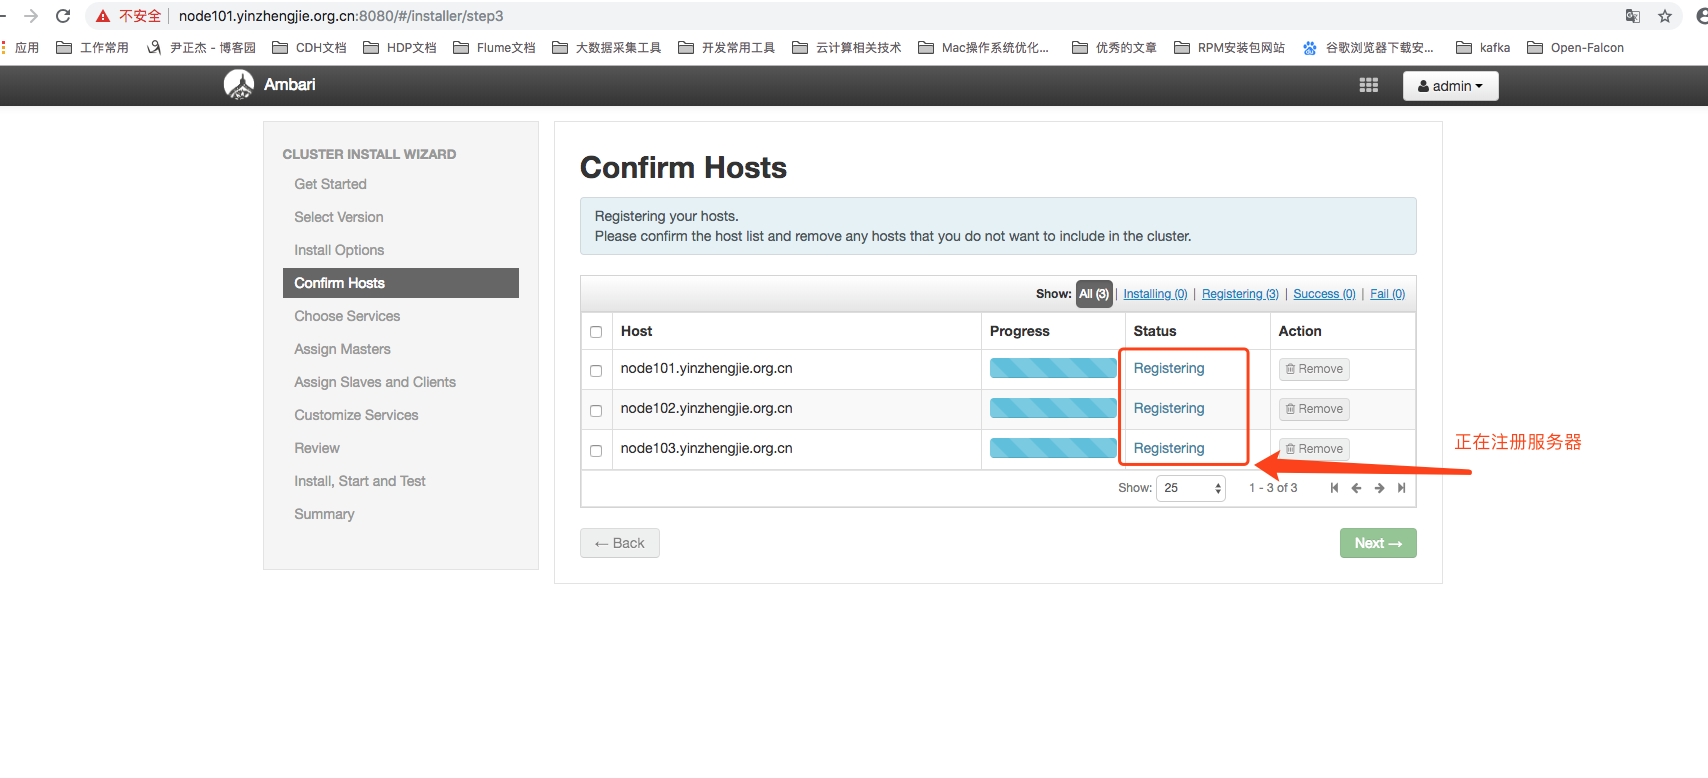
在上面的那个过程如果你卡顿的时间比较长的话,估计会失败,如下图:

查看错误日志,如下图:
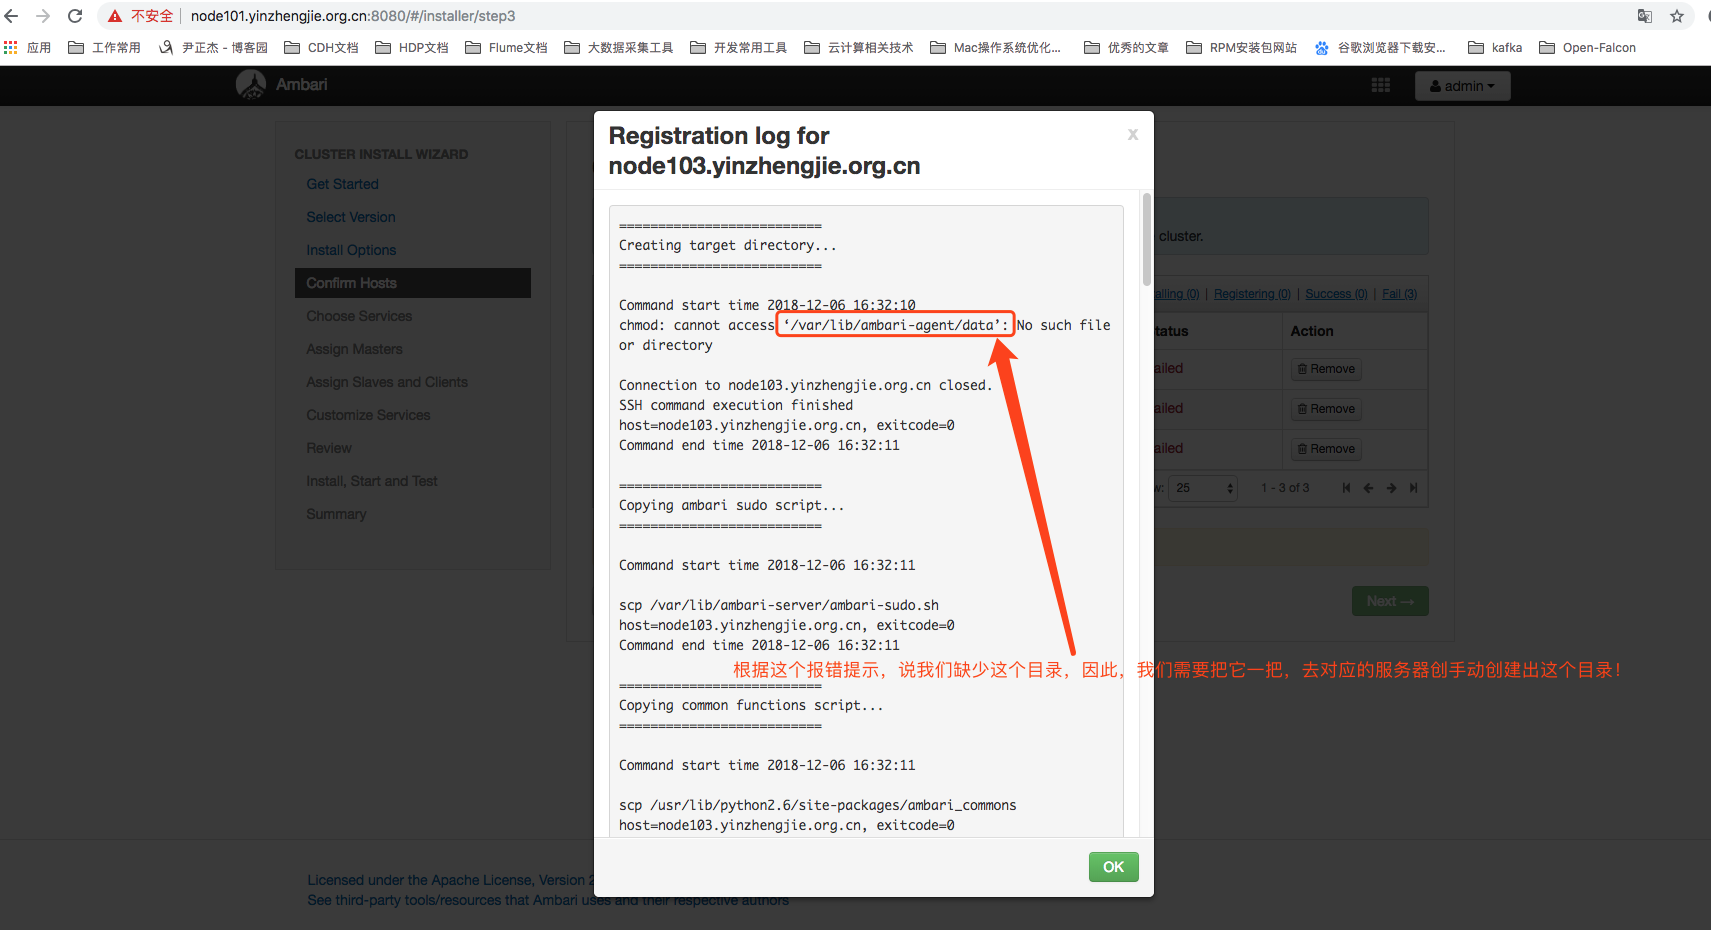
根据上面的报错信息,大家都知道是没有这个目录,才会报这个错误。可能是Ambari公司的开发人员在对这个目录进行判断时逻辑出现问题了,如果这个目录不存在他们并没有自动创建,
解决方案:
因此我们需要登陆对应的服务器手动将这个目录创建出来即可。
我们看报错一定要看全,我们需要把进度条往下拉,看是否还有其他的报错,你会发现有以下报错:

如上图所示,报错“SSLError: Failed to connect. Please check openssl library versions. ”,根据报错提示,说是我的openssl的版本有问题。百度一下原因,说有可能是openssl版本不匹配,因为python 2.7.5有的版本(或更高版本)增加了certificate verification,正是因为这个特性导致ambari-agent无法连接server。(呵呵~是不是感觉跟没说一样!)
解决步骤
既然他说我的版本有问题,那我就先看卡自己的openssl到底是啥版本
[root@node101 ~]# rpm -qa | grep openssl
openssl-libs-1.0.2k-16.el7.x86_64
openssl-1.0.2k-16.el7.x86_64
[root@node101 ~]#
好,接下里,咱们就说干就干,开始升级版本:
[root@node101 ~]# yum update openssl
Loaded plugins: fastestmirror, priorities
ambari-2.6.0.0                                                        | 2.9 kB  00:00:00
Loading mirror speeds from cached hostfile
 * base: mirrors.aliyun.com
 * extras: mirrors.tuna.tsinghua.edu.cn
 * updates: mirrors.tuna.tsinghua.edu.cn
17 packages excluded due to repository priority protections
No packages marked for update
[root@node101 ~]#
根据上面的提示,说没有可以更新的安装包对于我服务器而言,因此我得像个方法,让他可以支持更新,那就得重新更换yum源了。

[root@node101 ~]# mv /etc/yum.repos.d/CentOS-Base.repo /etc/yum.repos.d/CentOS-Base.repo.`date +%F`         #先备份一份yum源
[root@node101 ~]#
[root@node101 ~]# wget -O /etc/yum.repos.d/CentOS-Base.repo http://mirrors.aliyun.com/repo/Centos-7.repo
--2018-12-06 17:01:48--  http://mirrors.aliyun.com/repo/Centos-7.repo
Resolving mirrors.aliyun.com (mirrors.aliyun.com)... 42.81.12.221, 42.81.12.217, 42.81.12.218, ...
Connecting to mirrors.aliyun.com (mirrors.aliyun.com)|42.81.12.221|:80... connected.
HTTP request sent, awaiting response... 200 OK
Length: 2523 (2.5K) [application/octet-stream]
Saving to: ‘/etc/yum.repos.d/CentOS-Base.repo’

100%[===========================================================================>] 2,523       --.-K/s   in 0.001s

2018-12-06 17:01:48 (2.68 MB/s) - ‘/etc/yum.repos.d/CentOS-Base.repo’ saved [2523/2523]

[root@node101 ~]#

[root@node101 ~]# yum clean all
Loaded plugins: fastestmirror, priorities
Cleaning repos: HDP-2.6.3.0 HDP-UTILS-1.1.0.21 ambari-2.6.0.0 base extras updates
Cleaning up list of fastest mirrors
[root@node101 ~]#

[root@node101 ~]# yum makecache
Loaded plugins: fastestmirror, priorities
HDP-2.6.3.0                                                                                   | 2.9 kB  00:00:00
HDP-UTILS-1.1.0.21                                                                            | 2.9 kB  00:00:00
ambari-2.6.0.0                                                                                | 2.9 kB  00:00:00
base                                                                                          | 3.6 kB  00:00:00
extras                                                                                        | 3.4 kB  00:00:00
updates                                                                                       | 3.4 kB  00:00:00
(1/21): HDP-2.6.3.0/filelists_db                                                              | 418 kB  00:00:00
(2/21): HDP-2.6.3.0/primary_db                                                                | 100 kB  00:00:00
(3/21): HDP-2.6.3.0/other_db                                                                  |  14 kB  00:00:00
(4/21): HDP-UTILS-1.1.0.21/filelists_db                                                       |  95 kB  00:00:00
(5/21): HDP-UTILS-1.1.0.21/other_db                                                           |  20 kB  00:00:00
(6/21): HDP-UTILS-1.1.0.21/primary_db                                                         |  38 kB  00:00:00
(7/21): ambari-2.6.0.0/filelists_db                                                           | 167 kB  00:00:00
(8/21): ambari-2.6.0.0/other_db                                                               | 1.3 kB  00:00:00
(9/21): ambari-2.6.0.0/primary_db                                                             | 8.6 kB  00:00:00
(10/21): base/7/x86_64/group_gz                                                               | 166 kB  00:00:00
(11/21): base/7/x86_64/filelists_db                                                           | 7.1 MB  00:00:11
(12/21): extras/7/x86_64/prestodelta                                                          |  33 kB  00:00:00
(13/21): extras/7/x86_64/filelists_db                                                         | 330 kB  00:00:00
(14/21): extras/7/x86_64/other_db                                                             | 106 kB  00:00:01
(15/21): updates/7/x86_64/prestodelta                                                         | 173 kB  00:00:00
(16/21): updates/7/x86_64/filelists_db                                                        | 1.3 MB  00:00:02
(17/21): extras/7/x86_64/primary_db                                                           | 153 kB  00:00:03
(18/21): updates/7/x86_64/other_db                                                            | 182 kB  00:00:01
(19/21): updates/7/x86_64/primary_db                                                          | 1.3 MB  00:00:02
(20/21): base/7/x86_64/other_db                                                               | 2.6 MB  00:00:07
(21/21): base/7/x86_64/primary_db                                                             | 6.0 MB  00:00:21
Determining fastest mirrors
 * base: mirrors.aliyun.com
 * extras: mirrors.aliyun.com
 * updates: mirrors.aliyun.com
Metadata Cache Created
[root@node101 ~]#

[root@node101 ~]# yum -y update
......(内容太多了我就懒得复制了~)  libdrm.x86_64 0:2.4.91-3.el7
  libffi.x86_64 0:3.0.13-18.el7
  libgcc.x86_64 0:4.8.5-36.el7
  libgcrypt.x86_64 0:1.5.3-14.el7
  libgomp.x86_64 0:4.8.5-36.el7
  libgudev1.x86_64 0:219-62.el7
  libmount.x86_64 0:2.23.2-59.el7
  libndp.x86_64 0:1.2-7.el7
  libnetfilter_conntrack.x86_64 0:1.0.6-1.el7_3
  libnl3.x86_64 0:3.2.28-4.el7
  libpcap.x86_64 14:1.5.3-11.el7
  libpciaccess.x86_64 0:0.14-1.el7
  libproxy.x86_64 0:0.4.11-11.el7
  libpwquality.x86_64 0:1.2.3-5.el7
  libselinux.x86_64 0:2.5-14.1.el7
  libselinux-python.x86_64 0:2.5-14.1.el7
  libselinux-utils.x86_64 0:2.5-14.1.el7
  libsemanage.x86_64 0:2.5-14.el7
  libsepol.x86_64 0:2.5-10.el7
  libsoup.x86_64 0:2.62.2-2.el7
  libss.x86_64 0:1.42.9-13.el7
  libssh2.x86_64 0:1.4.3-12.el7
  libstdc++.x86_64 0:4.8.5-36.el7
  libtasn1.x86_64 0:4.10-1.el7
  libuser.x86_64 0:0.60-9.el7
  libuuid.x86_64 0:2.23.2-59.el7
  linux-firmware.noarch 0:20180911-69.git85c5d90.el7
  logrotate.x86_64 0:3.8.6-17.el7
  lsscsi.x86_64 0:0.27-6.el7
  lua.x86_64 0:5.1.4-15.el7
  lvm2.x86_64 7:2.02.180-10.el7_6.2
  lvm2-libs.x86_64 7:2.02.180-10.el7_6.2
  make.x86_64 1:3.82-23.el7
  man-db.x86_64 0:2.6.3-11.el7
  mariadb-libs.x86_64 1:5.5.60-1.el7_5
  microcode_ctl.x86_64 2:2.1-47.el7
  mozjs17.x86_64 0:17.0.0-20.el7
  ncurses.x86_64 0:5.9-14.20130511.el7_4
  ncurses-base.noarch 0:5.9-14.20130511.el7_4
  ncurses-libs.x86_64 0:5.9-14.20130511.el7_4
  net-tools.x86_64 0:2.0-0.24.20131004git.el7
  nettle.x86_64 0:2.7.1-8.el7
  nspr.x86_64 0:4.19.0-1.el7_5
  nss.x86_64 0:3.36.0-7.el7_5
  nss-softokn.x86_64 0:3.36.0-5.el7_5
  nss-softokn-freebl.x86_64 0:3.36.0-5.el7_5
  nss-sysinit.x86_64 0:3.36.0-7.el7_5
  nss-tools.x86_64 0:3.36.0-7.el7_5
  nss-util.x86_64 0:3.36.0-1.el7_5
  numactl-libs.x86_64 0:2.0.9-7.el7
  openldap.x86_64 0:2.4.44-20.el7
  openssh.x86_64 0:7.4p1-16.el7
  openssh-clients.x86_64 0:7.4p1-16.el7
  openssh-server.x86_64 0:7.4p1-16.el7
  os-prober.x86_64 0:1.58-9.el7
  p11-kit.x86_64 0:0.23.5-3.el7
  p11-kit-trust.x86_64 0:0.23.5-3.el7
  pam.x86_64 0:1.1.8-22.el7
  parted.x86_64 0:3.1-29.el7
  pciutils-libs.x86_64 0:3.5.1-3.el7
  pcre.x86_64 0:8.32-17.el7
  perl.x86_64 4:5.16.3-293.el7
  perl-Pod-Escapes.noarch 1:1.04-293.el7
  perl-libs.x86_64 4:5.16.3-293.el7
  perl-macros.x86_64 4:5.16.3-293.el7
  pinentry.x86_64 0:0.8.1-17.el7
  plymouth.x86_64 0:0.8.9-0.31.20140113.el7.centos
  plymouth-core-libs.x86_64 0:0.8.9-0.31.20140113.el7.centos
  plymouth-scripts.x86_64 0:0.8.9-0.31.20140113.el7.centos
  policycoreutils.x86_64 0:2.5-29.el7
  polkit.x86_64 0:0.112-18.el7
  postfix.x86_64 2:2.10.1-7.el7
  procps-ng.x86_64 0:3.3.10-23.el7
  python.x86_64 0:2.7.5-76.el7
  python-libs.x86_64 0:2.7.5-76.el7
  python-perf.x86_64 0:3.10.0-957.1.3.el7
  python-pycurl.x86_64 0:7.19.0-19.el7
  python-pyudev.noarch 0:0.15-9.el7
  python-slip.noarch 0:0.4.0-4.el7
  python-slip-dbus.noarch 0:0.4.0-4.el7
  readline.x86_64 0:6.2-10.el7
  rsyslog.x86_64 0:8.24.0-34.el7
  selinux-policy.noarch 0:3.13.1-229.el7_6.6
  selinux-policy-targeted.noarch 0:3.13.1-229.el7_6.6
  setup.noarch 0:2.8.71-10.el7
  shadow-utils.x86_64 2:4.1.5.1-25.el7
  shared-mime-info.x86_64 0:1.8-4.el7
  sudo.x86_64 0:1.8.23-3.el7
  systemd.x86_64 0:219-62.el7
  systemd-libs.x86_64 0:219-62.el7
  systemd-sysv.x86_64 0:219-62.el7
  tar.x86_64 2:1.26-35.el7
  trousers.x86_64 0:0.3.14-2.el7
  tuned.noarch 0:2.10.0-6.el7
  tzdata.noarch 0:2018g-1.el7
  util-linux.x86_64 0:2.23.2-59.el7
  vim-minimal.x86_64 2:7.4.160-5.el7
  virt-what.x86_64 0:1.18-4.el7
  wpa_supplicant.x86_64 1:2.6-12.el7
  xfsprogs.x86_64 0:4.5.0-18.el7
  xz.x86_64 0:5.2.2-1.el7
  xz-libs.x86_64 0:5.2.2-1.el7
  yum-plugin-fastestmirror.noarch 0:1.1.31-50.el7
  zlib.x86_64 0:1.2.7-18.el7

Replaced:
  NetworkManager.x86_64 1:1.0.6-27.el7                        grub2.x86_64 1:2.02-0.29.el7.centos
  grub2-tools.x86_64 1:2.02-0.29.el7.centos                   pygobject3-base.x86_64 0:3.14.0-3.el7

Complete!
[root@node101 ~]#

[root@node101 ~]# yum update openssl
Loaded plugins: fastestmirror, priorities
Loading mirror speeds from cached hostfile
 * base: mirrors.aliyun.com
 * extras: mirrors.aliyun.com
 * updates: mirrors.aliyun.com
17 packages excluded due to repository priority protections
No packages marked for update
[root@node101 ~]#
问题依旧还是僵持着,参考社区版本链接:https://community.hortonworks.com/questions/145/openssl-error-upon-host-registration.html
修改/etc/python/cert-verification.cfg配置文件
[root@node101 ~]# cat /etc/python/cert-verification.cfg
# Possible values are:
# 'enable' to ensure HTTPS certificate verification is enabled by default
# 'disable' to ensure HTTPS certificate verification is disabled by default
# 'platform_default' to delegate the decision to the redistributor providing this particular Python version

# For more info refer to https://www.python.org/dev/peps/pep-0493/
[https]
#verify=platform_default          #这是我操作系统默认的设置,我将它的值改为“disable”,建议复制一行进行修改,这样你知道上修改前的属性值是多少,便于你恢复。
verify=disable
[root@node101 ~]#
修改/etc/ambari-agent/conf/ambari-agent.ini,在[security]添加下面内容:

[root@node101 ~]# cat /etc/ambari-agent/conf/ambari-agent.ini
# Licensed to the Apache Software Foundation (ASF) under one or more
# contributor license agreements.  See the NOTICE file distributed with
# this work for additional information regarding copyright ownership.
# The ASF licenses this file to You under the Apache License, Version 2.0
# (the "License"); you may not use this file except in compliance with
# the License.  You may obtain a copy of the License at
#
#     http://www.apache.org/licenses/LICENSE-2.0
#
# Unless required by applicable law or agreed to in writing, software
# distributed under the License is distributed on an "AS IS" BASIS,
# WITHOUT WARRANTIES OR CONDITIONS OF ANY KIND, either express or implied.
# See the License for the specific

[server]
hostname=node101.yinzhengjie.org.cn
url_port=8440
secured_url_port=8441
connect_retry_delay=10
max_reconnect_retry_delay=30


[agent]
logdir=/var/log/ambari-agent
piddir=/var/run/ambari-agent
prefix=/var/lib/ambari-agent/data
;loglevel=(DEBUG/INFO)
loglevel=INFO
data_cleanup_interval=86400
data_cleanup_max_age=2592000
data_cleanup_max_size_MB = 100
ping_port=8670
cache_dir=/var/lib/ambari-agent/cache
tolerate_download_failures=true
run_as_user=root
parallel_execution=0
alert_grace_period=5
status_command_timeout=5
alert_kinit_timeout=14400000
system_resource_overrides=/etc/resource_overrides
; memory_threshold_soft_mb=400
; memory_threshold_hard_mb=1000
; ignore_mount_points=/mnt/custom1,/mnt/custom2

[security]
keysdir=/var/lib/ambari-agent/keys
server_crt=ca.crt
passphrase_env_var_name=AMBARI_PASSPHRASE
ssl_verify_cert=0
credential_lib_dir=/var/lib/ambari-agent/cred/lib
credential_conf_dir=/var/lib/ambari-agent/cred/conf
credential_shell_cmd=org.apache.hadoop.security.alias.CredentialShell

force_https_protocol=PROTOCOL_TLSv1_2               #没错,我修改的就是它!

[network]
; this option apply only for Agent communication
use_system_proxy_settings=true

[services]
pidLookupPath=/var/run/

[heartbeat]
state_interval_seconds=60
dirs=/etc/hadoop,/etc/hadoop/conf,/etc/hbase,/etc/hcatalog,/etc/hive,/etc/oozie,
  /etc/sqoop,
  /var/run/hadoop,/var/run/zookeeper,/var/run/hbase,/var/run/templeton,/var/run/oozie,
  /var/log/hadoop,/var/log/zookeeper,/var/log/hbase,/var/run/templeton,/var/log/hive
; 0 - unlimited
log_lines_count=300
idle_interval_min=1
idle_interval_max=10


[logging]
syslog_enabled=0
[root@node101 ~]#
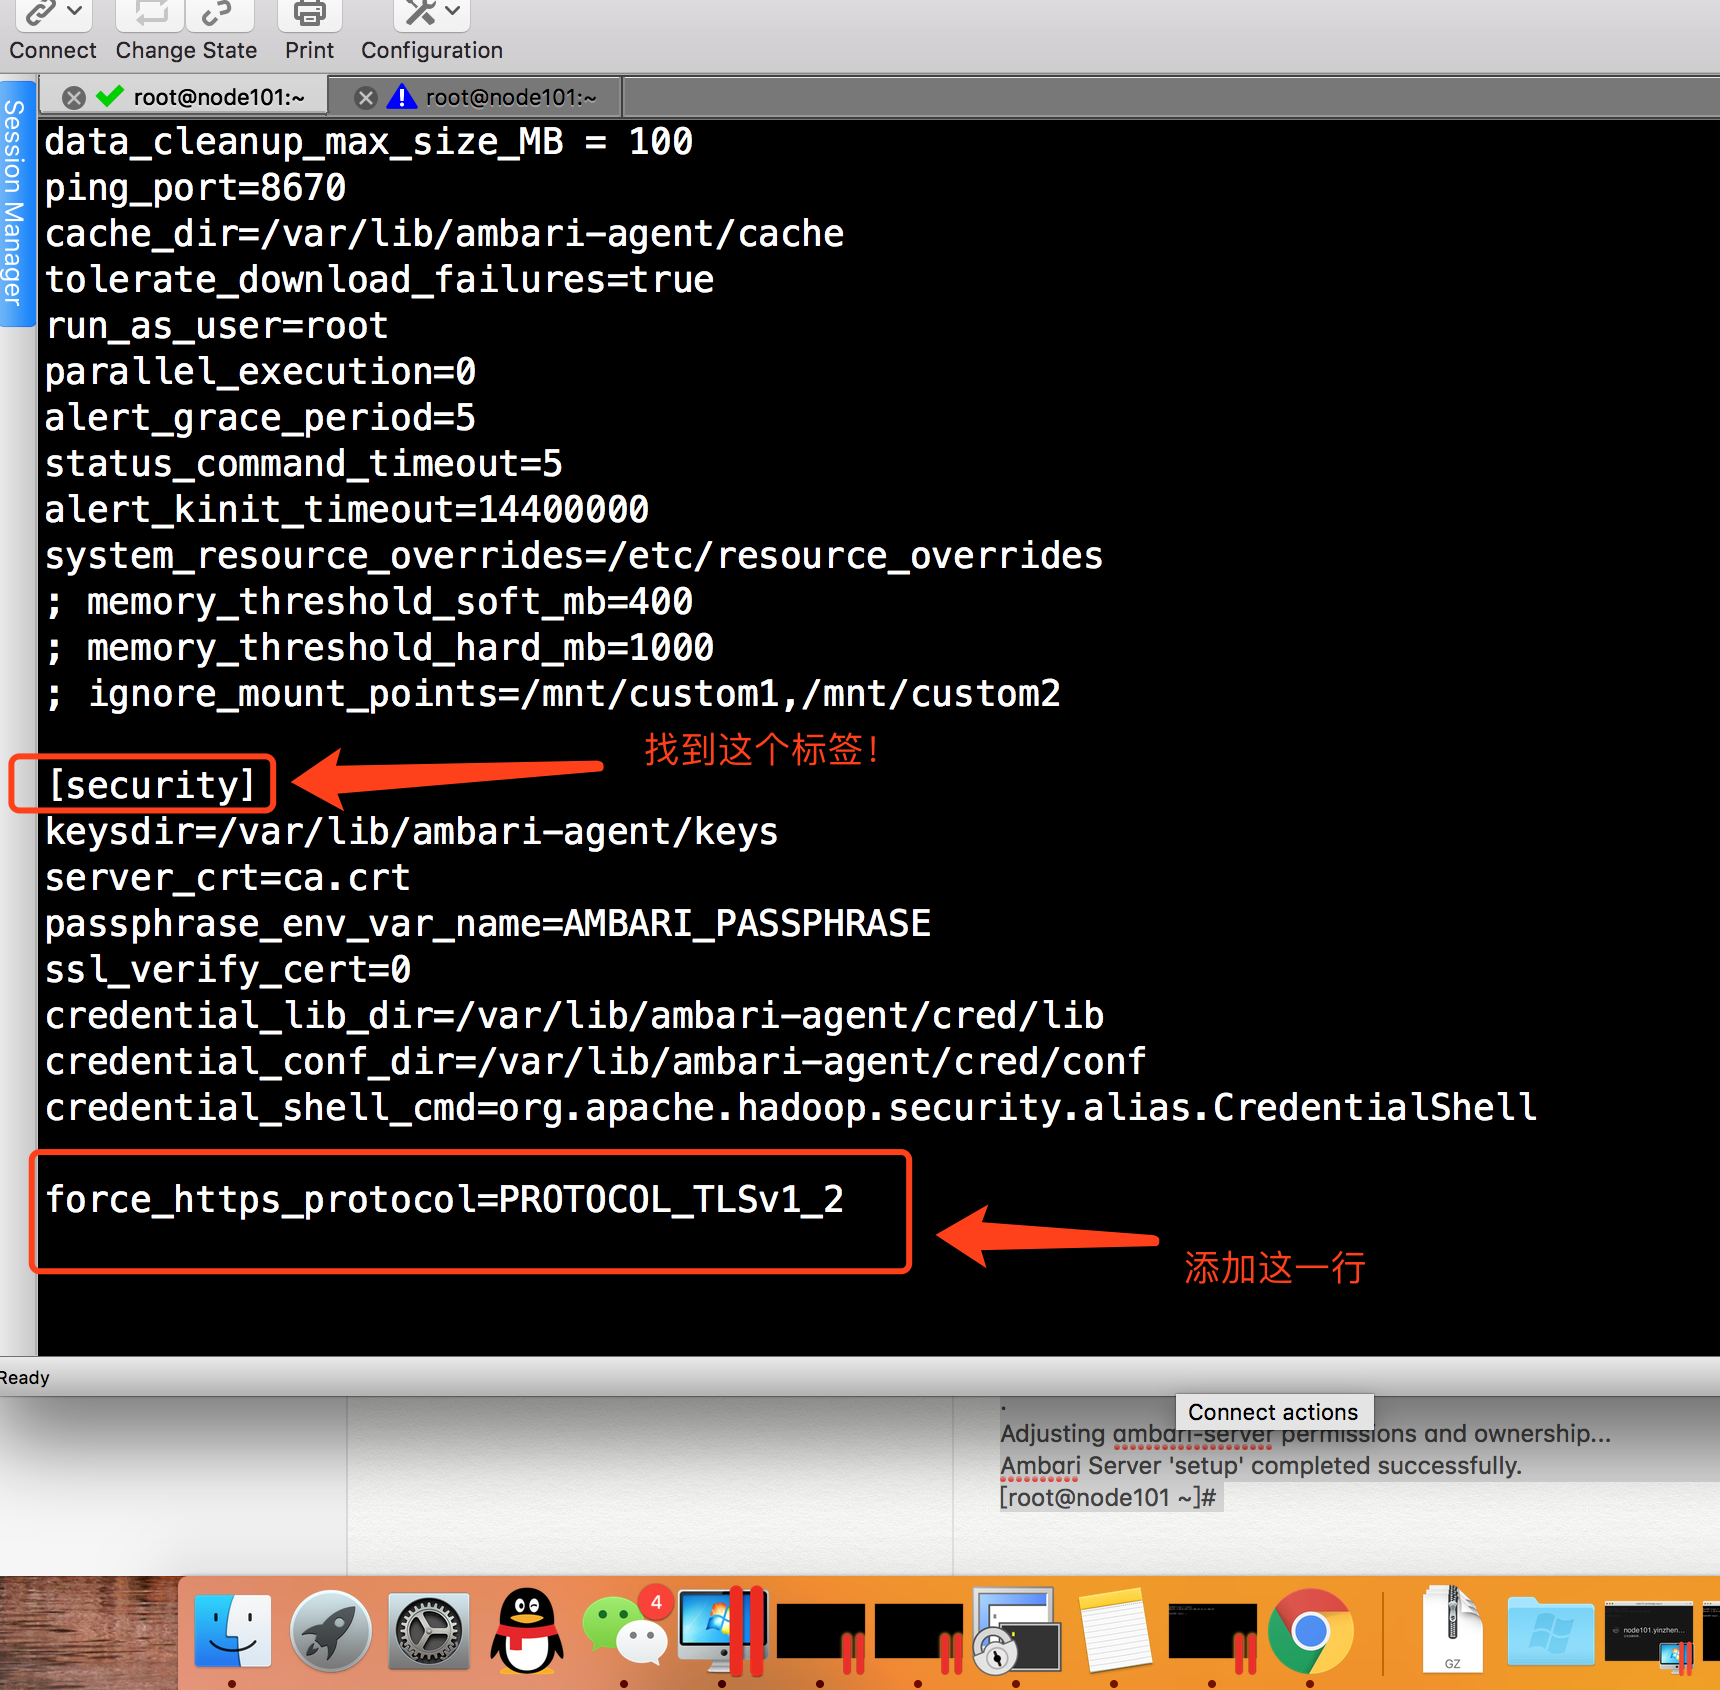
修改上述的配置文件后,我们需要重启重启ambari-agent 服务:

[root@node101 ~]# xrsync.sh /etc/ambari-agent/conf/ambari-agent.ini
=========== node102.yinzhengjie.org.cn : /etc/ambari-agent/conf/ambari-agent.ini ===========
命令执行成功
=========== node103.yinzhengjie.org.cn : /etc/ambari-agent/conf/ambari-agent.ini ===========
命令执行成功
[root@node101 ~]#

[root@node101 ~]# ambari-agent restart
Restarting ambari-agent
Verifying Python version compatibility...
Using python  /usr/bin/python
Found ambari-agent PID: 5248
Stopping ambari-agent
Removing PID file at /run/ambari-agent/ambari-agent.pid
ambari-agent successfully stopped
Verifying Python version compatibility...
Using python  /usr/bin/python
Checking for previously running Ambari Agent...
Checking ambari-common dir...
Starting ambari-agent
Verifying ambari-agent process status...
Ambari Agent successfully started
Agent PID at: /run/ambari-agent/ambari-agent.pid
Agent out at: /var/log/ambari-agent/ambari-agent.out
Agent log at: /var/log/ambari-agent/ambari-agent.log
[root@node101 ~]#
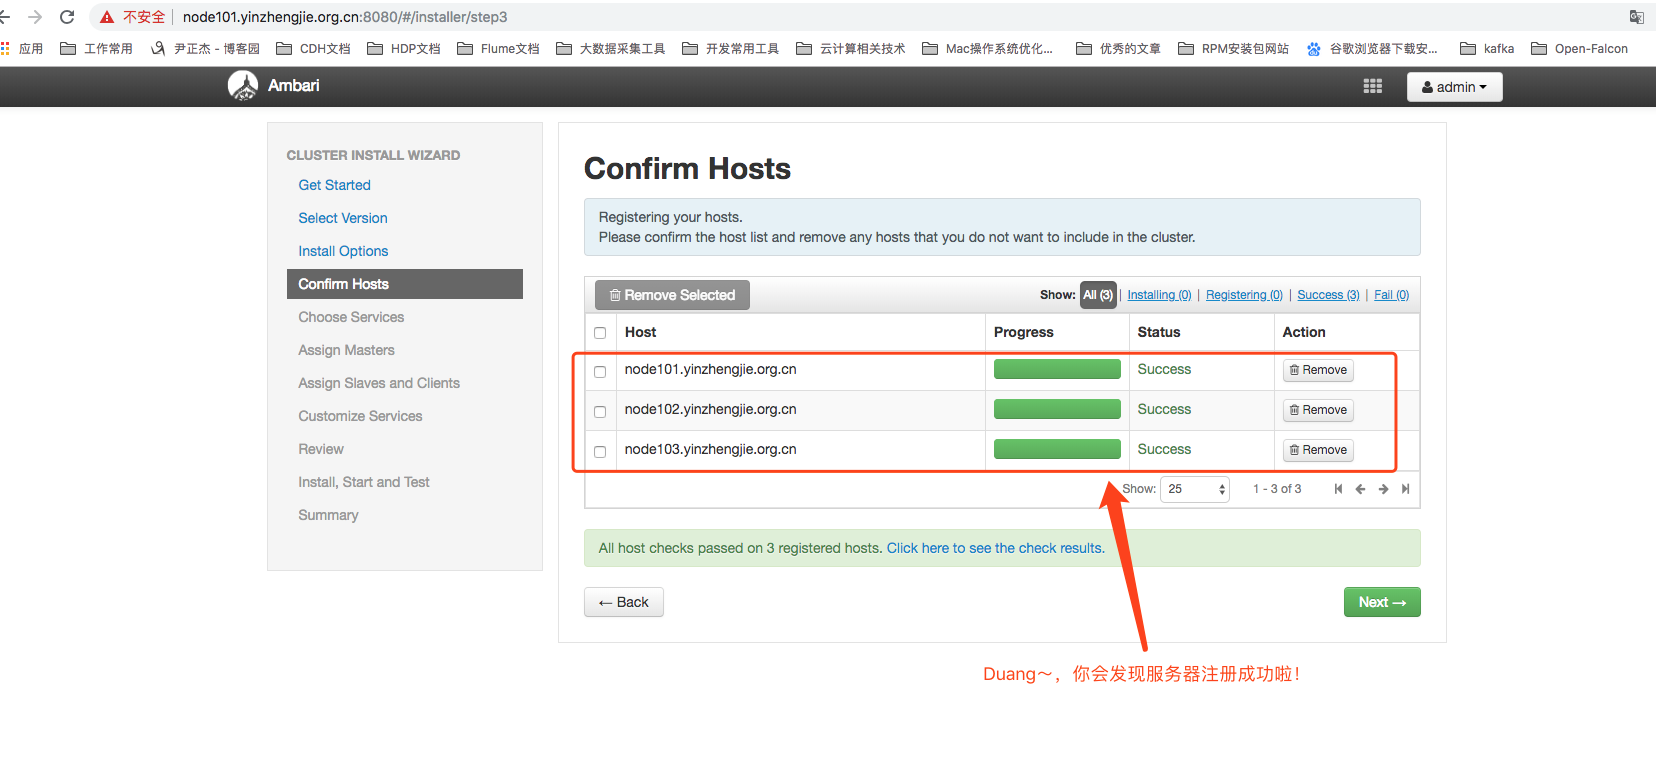
Duang~,你会发现服务器注册成功啦~问题得到解决:(看来HDP社区版的论坛的确是有不少大佬啊~哈哈哈)
8>.进入服务选择页面,自定义需要安装的服务
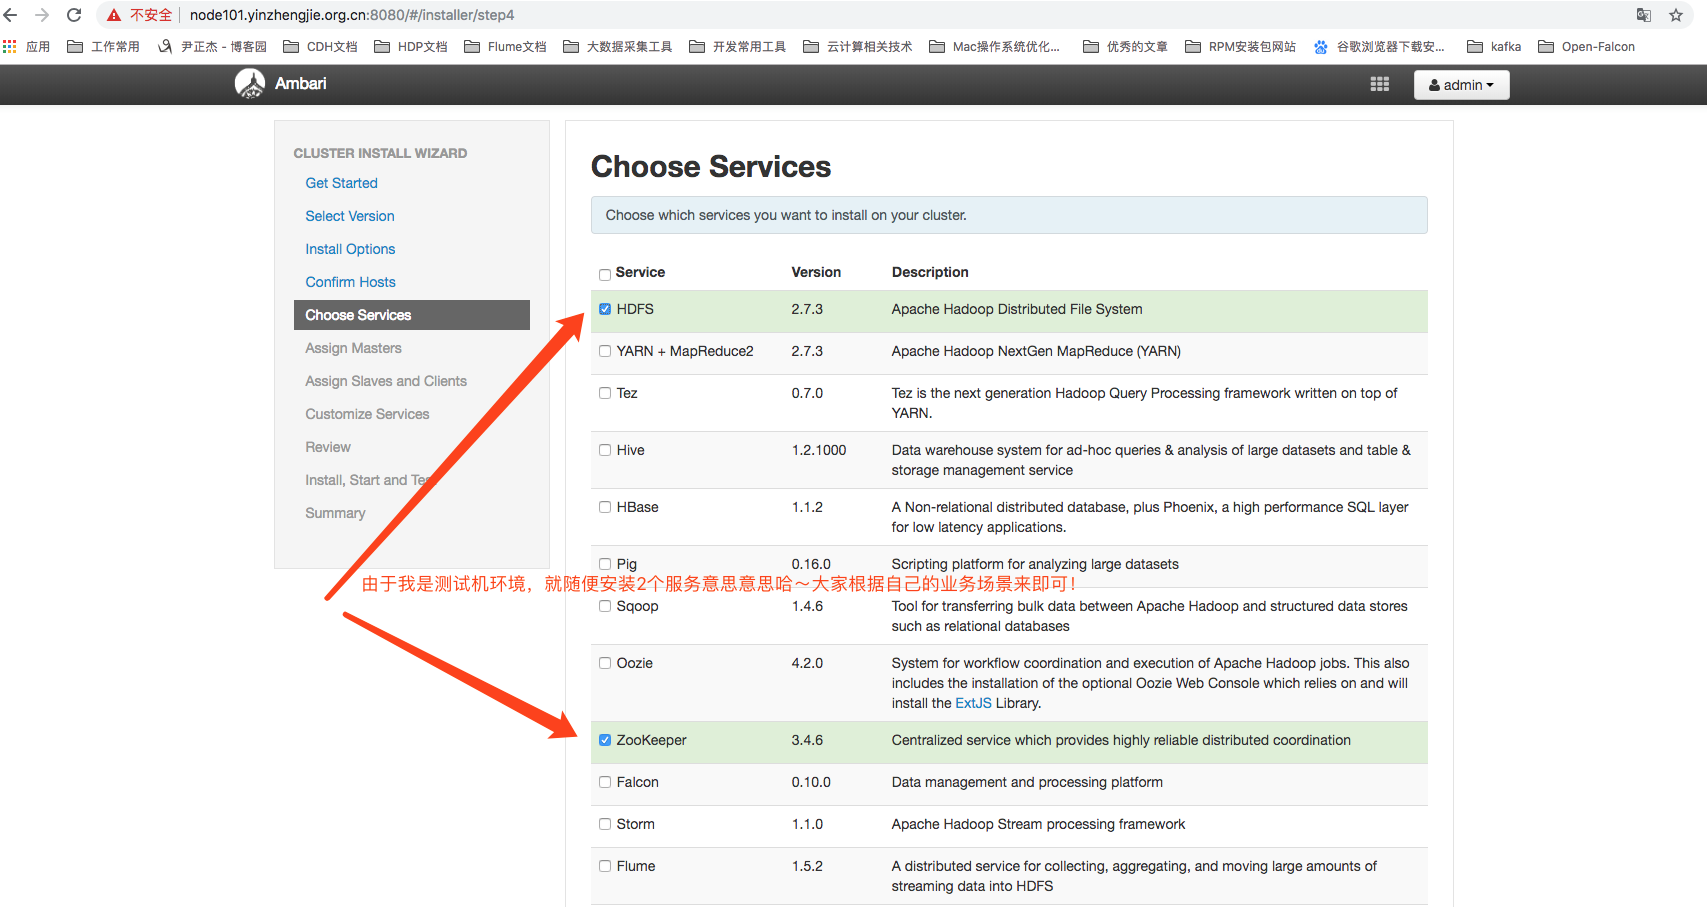
9>.自定义需要安装的服务后,点击下一步

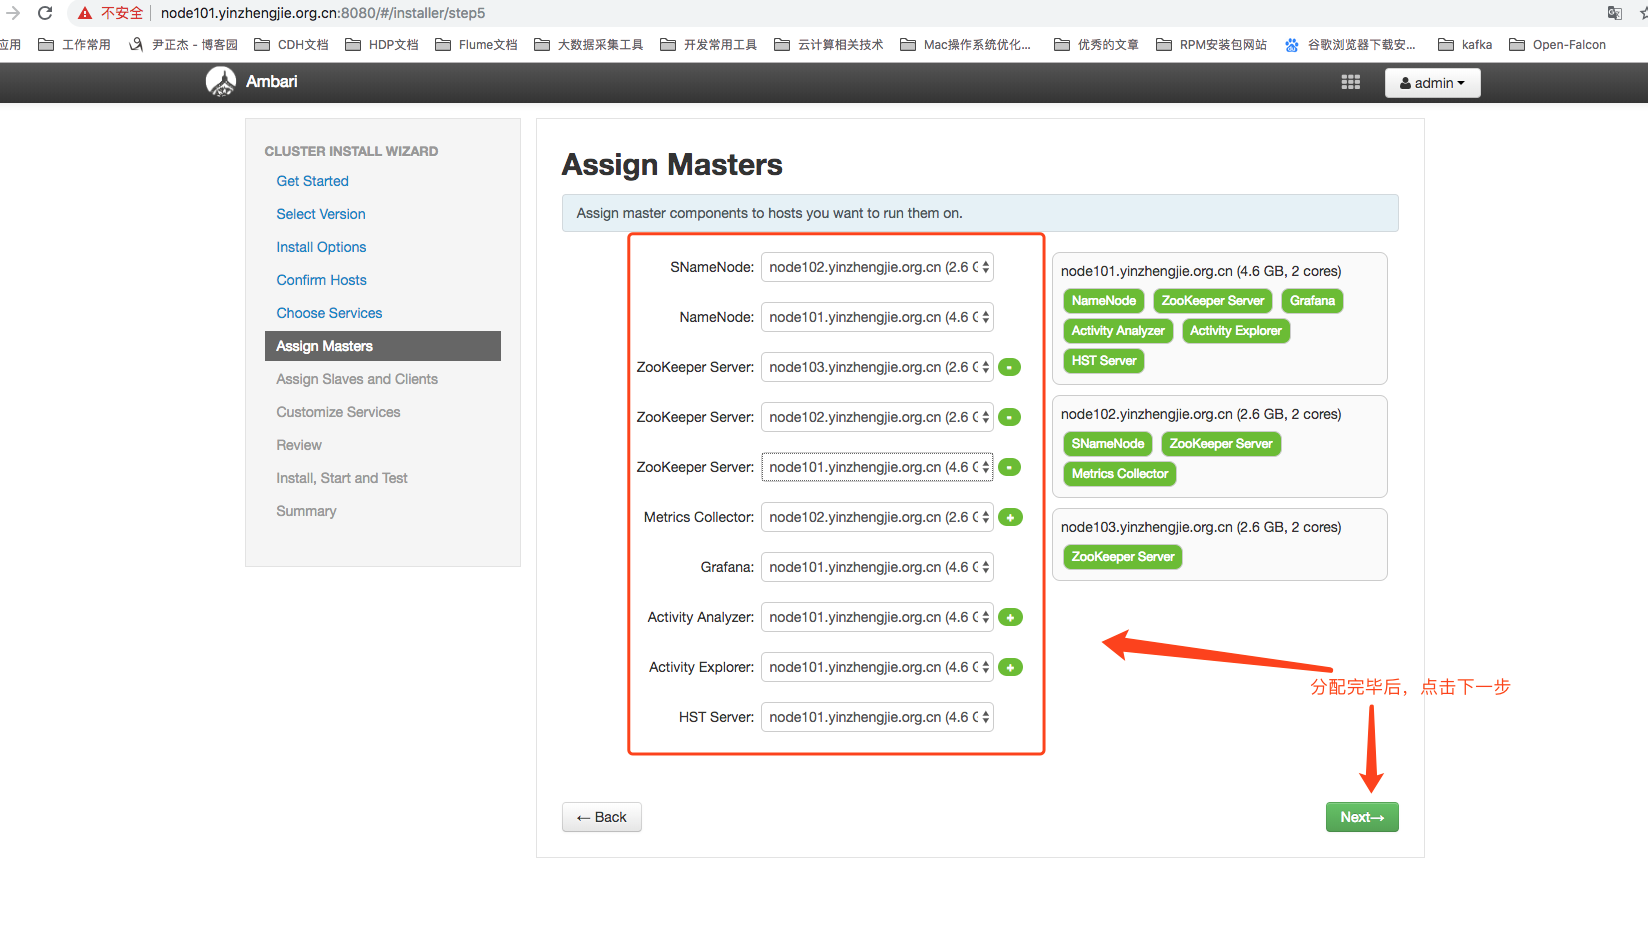
10>.分配主控服务,分配完毕后点击下一步
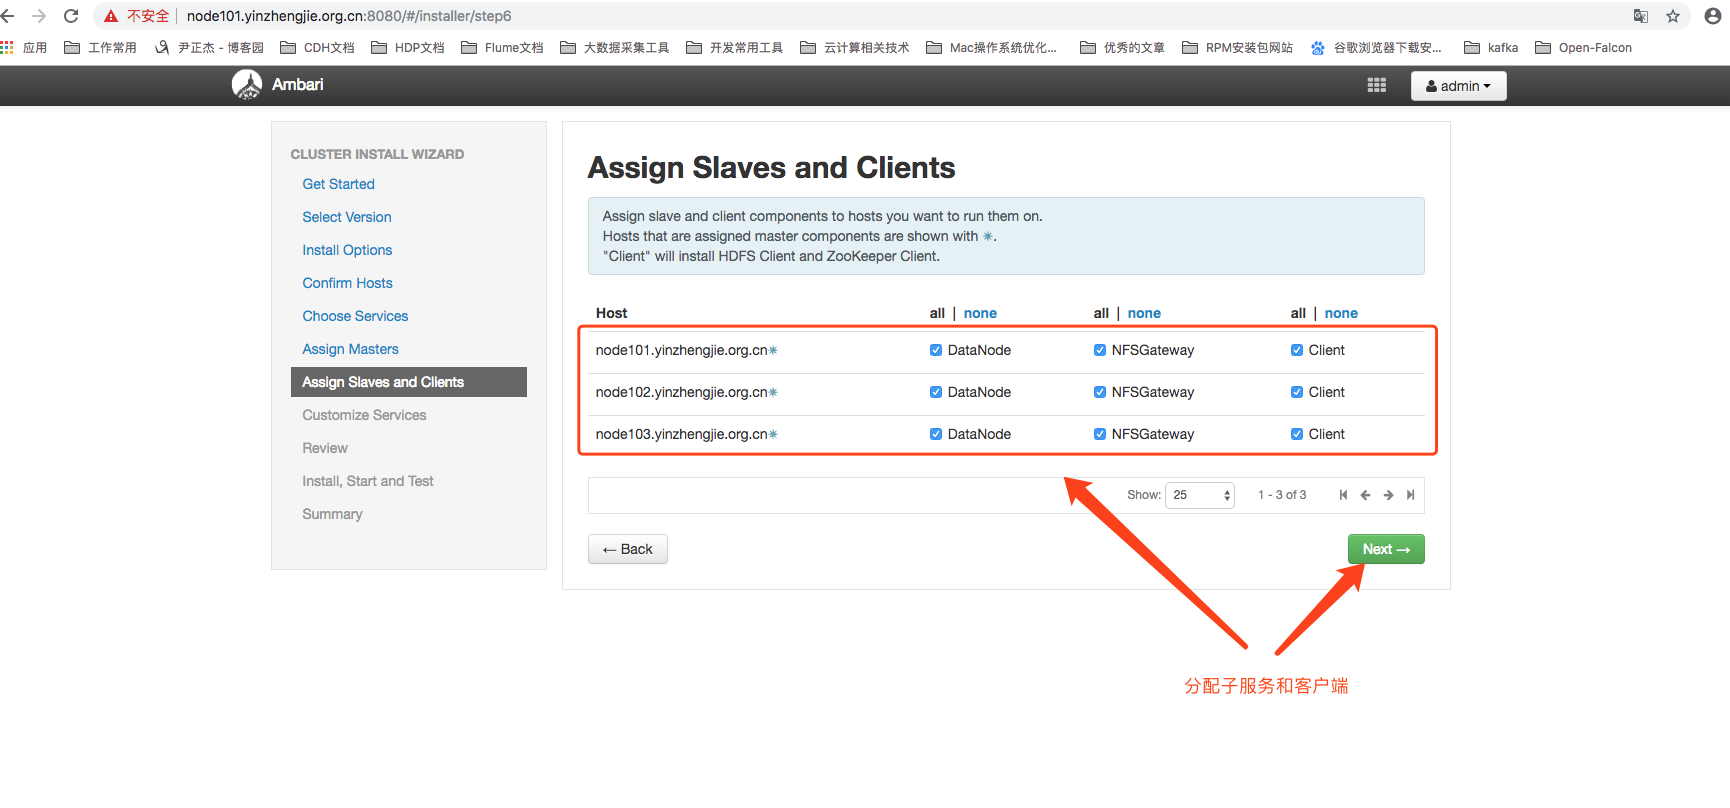
11>.分配子服务和客户端
12>.配置NameNode和DataNode在服务器上的存储路径

输入Grafana Admin的密码,如下图:
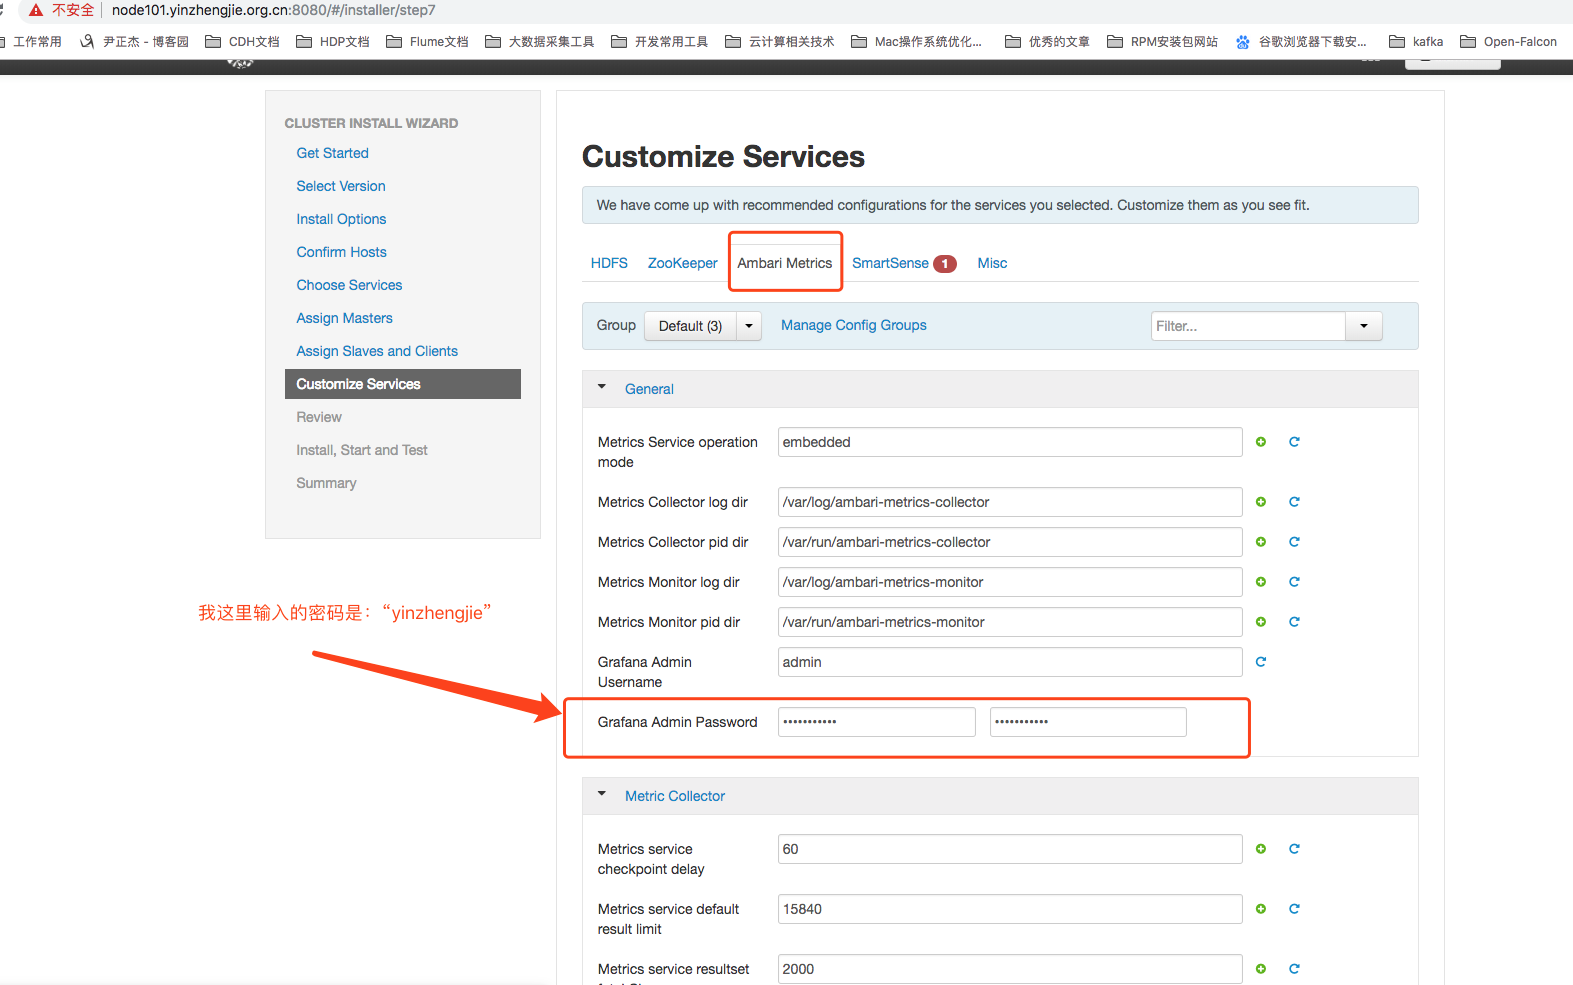
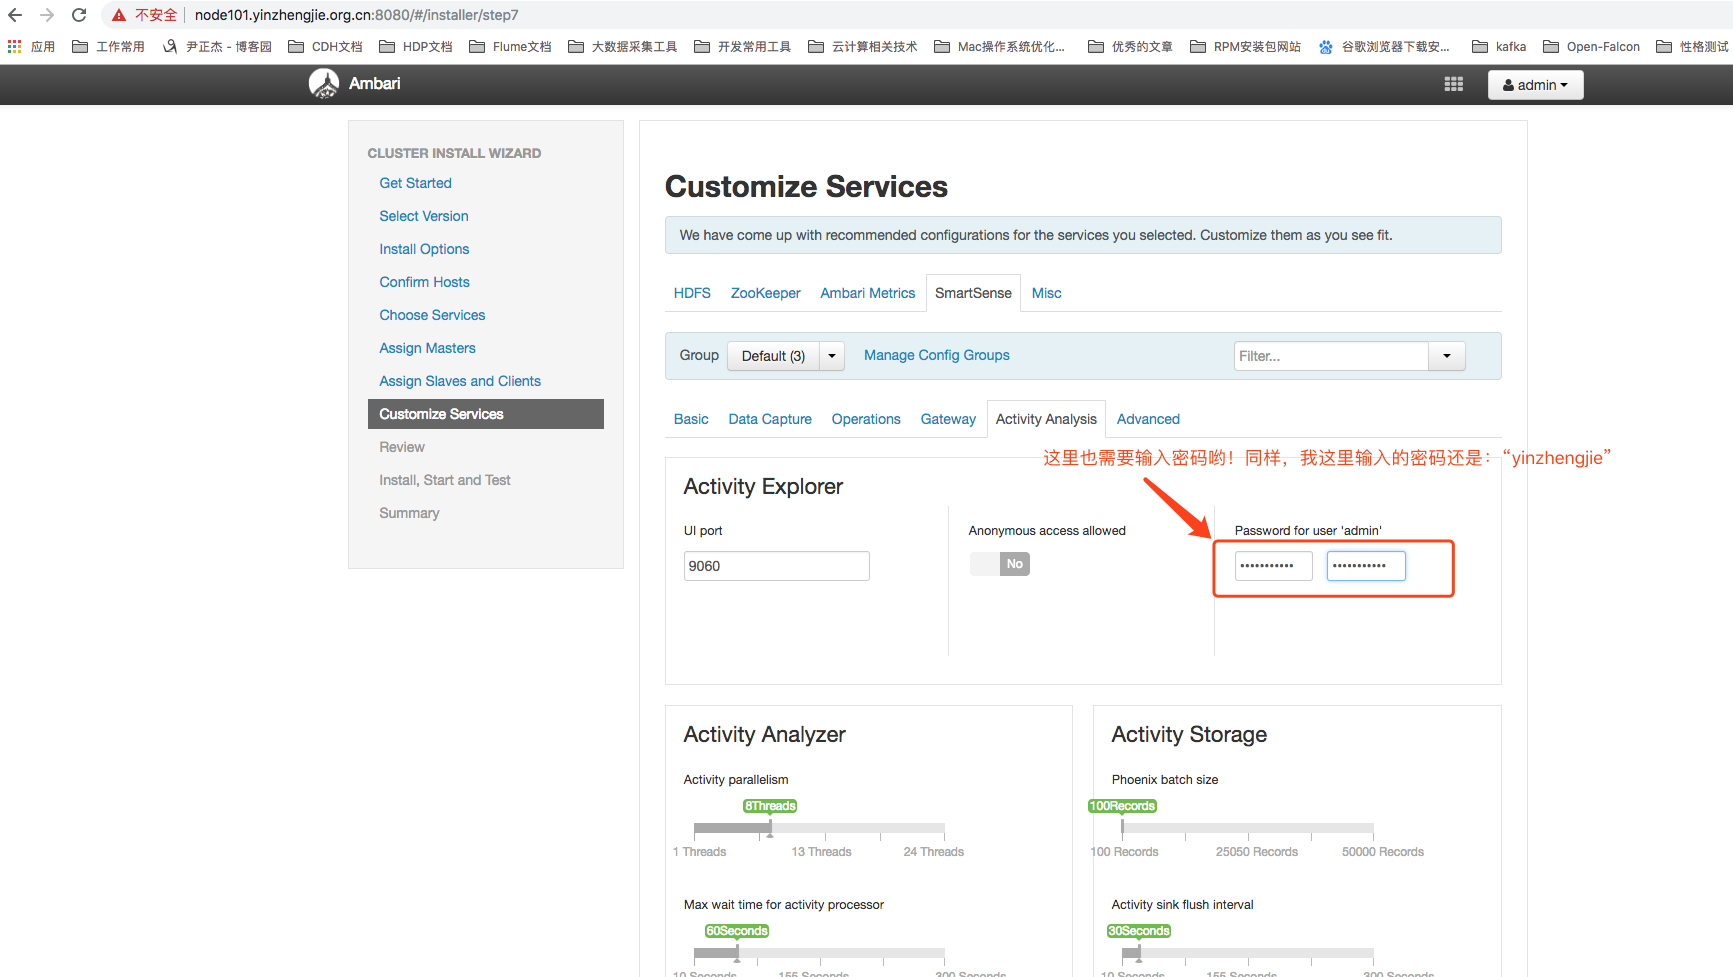
点击途中的有警告的按钮,咱们依然还需要输入一个密码,如下图:
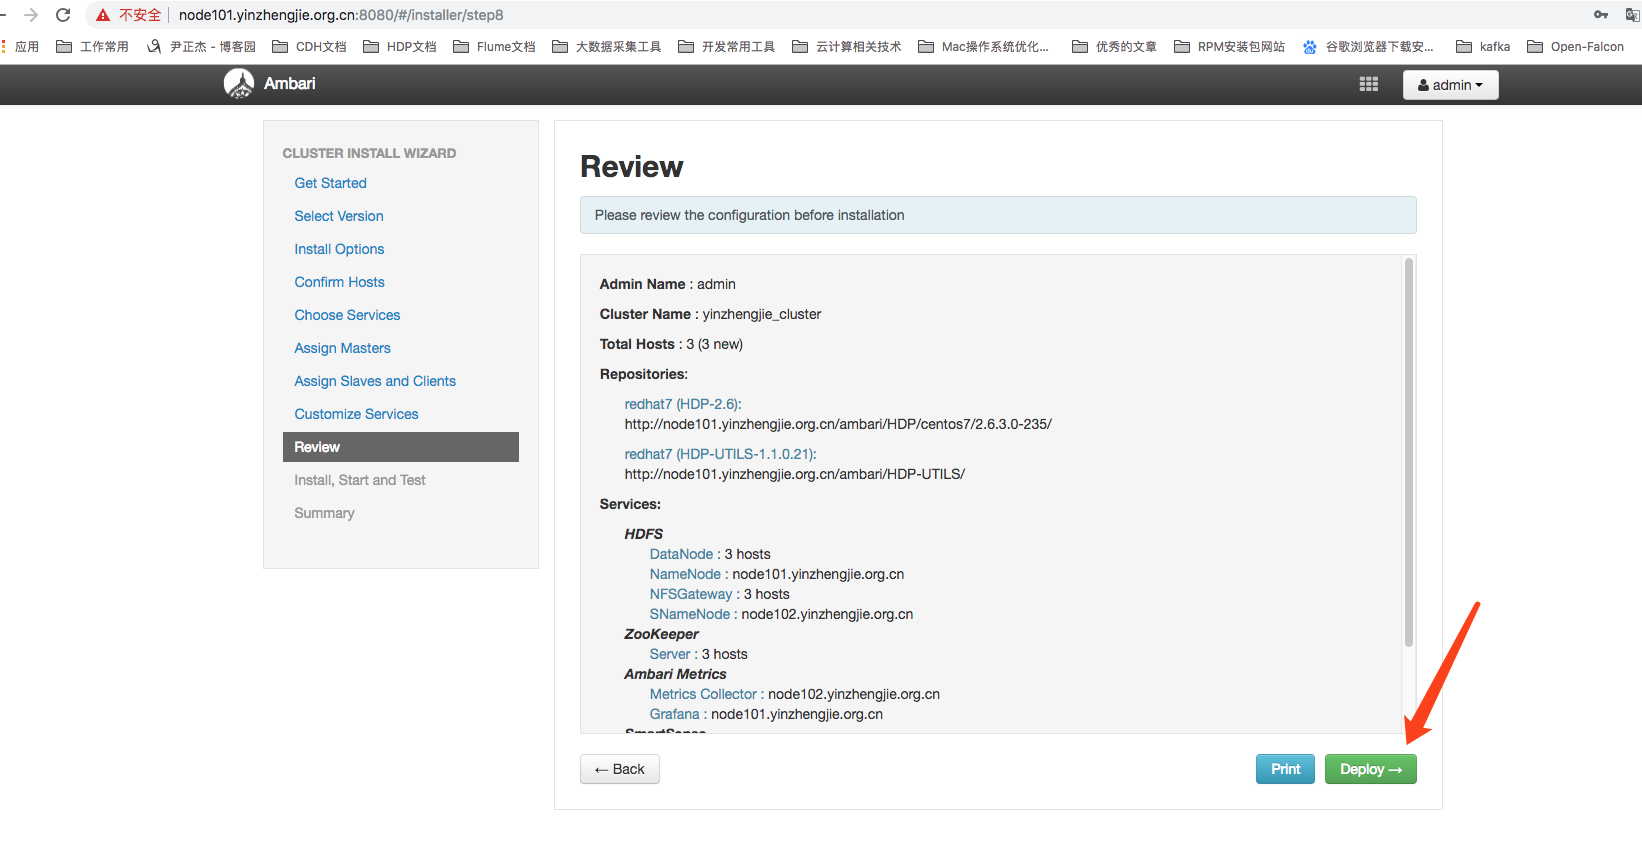
13>.查看安装预览页面,显示了安装组件的概览信息(如果你察觉到哪里配置的不合理可以点击“back”返回去修改),如无异常,点击“Deploy”
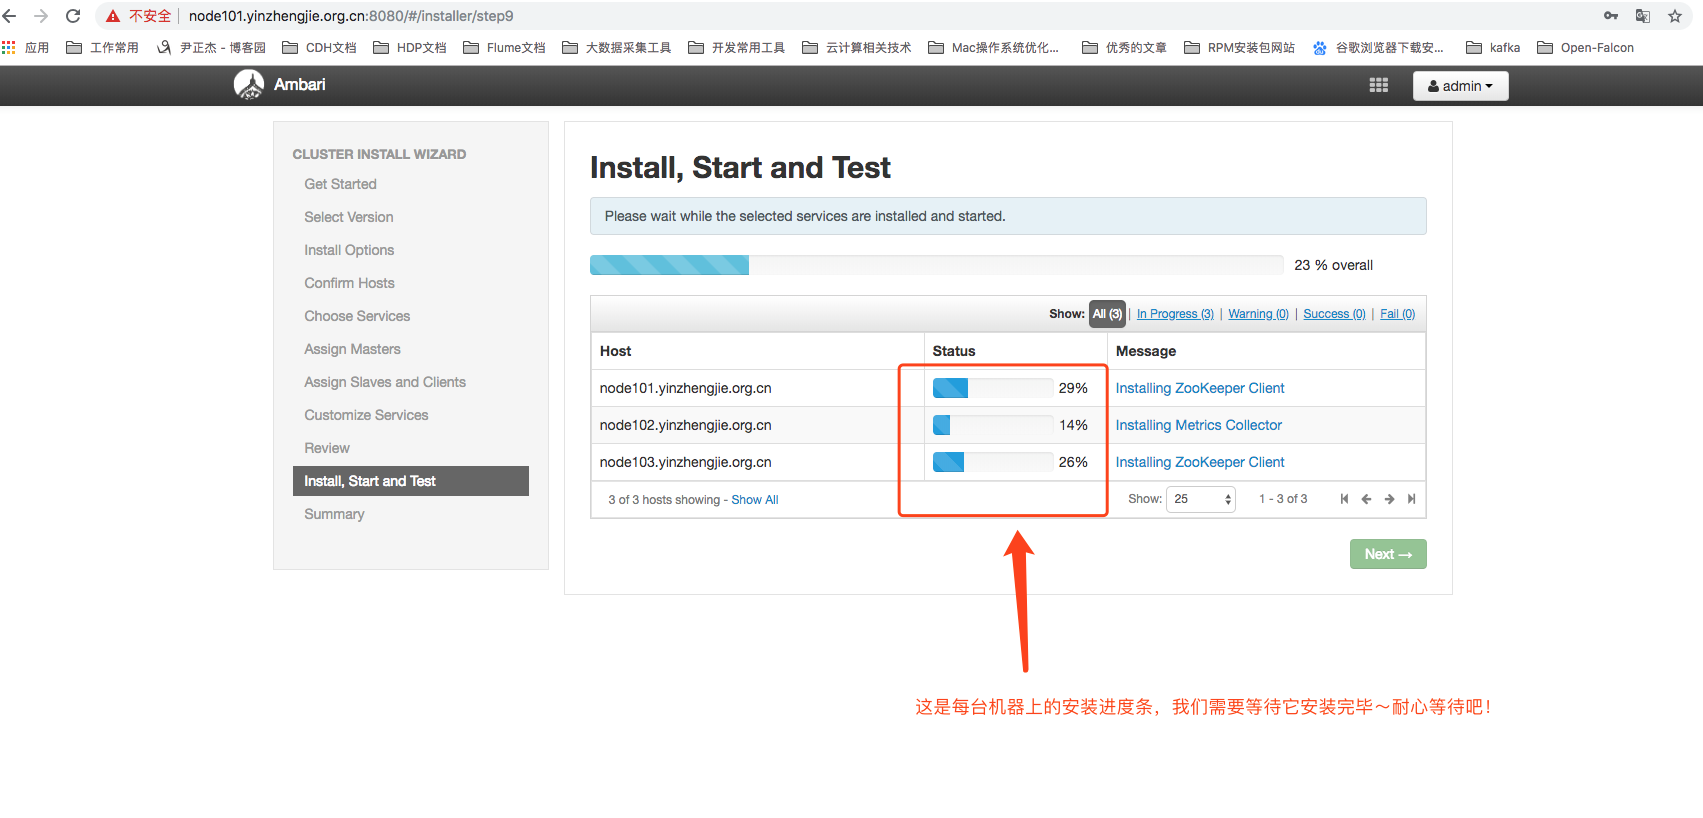
14>.等待组件安装过程
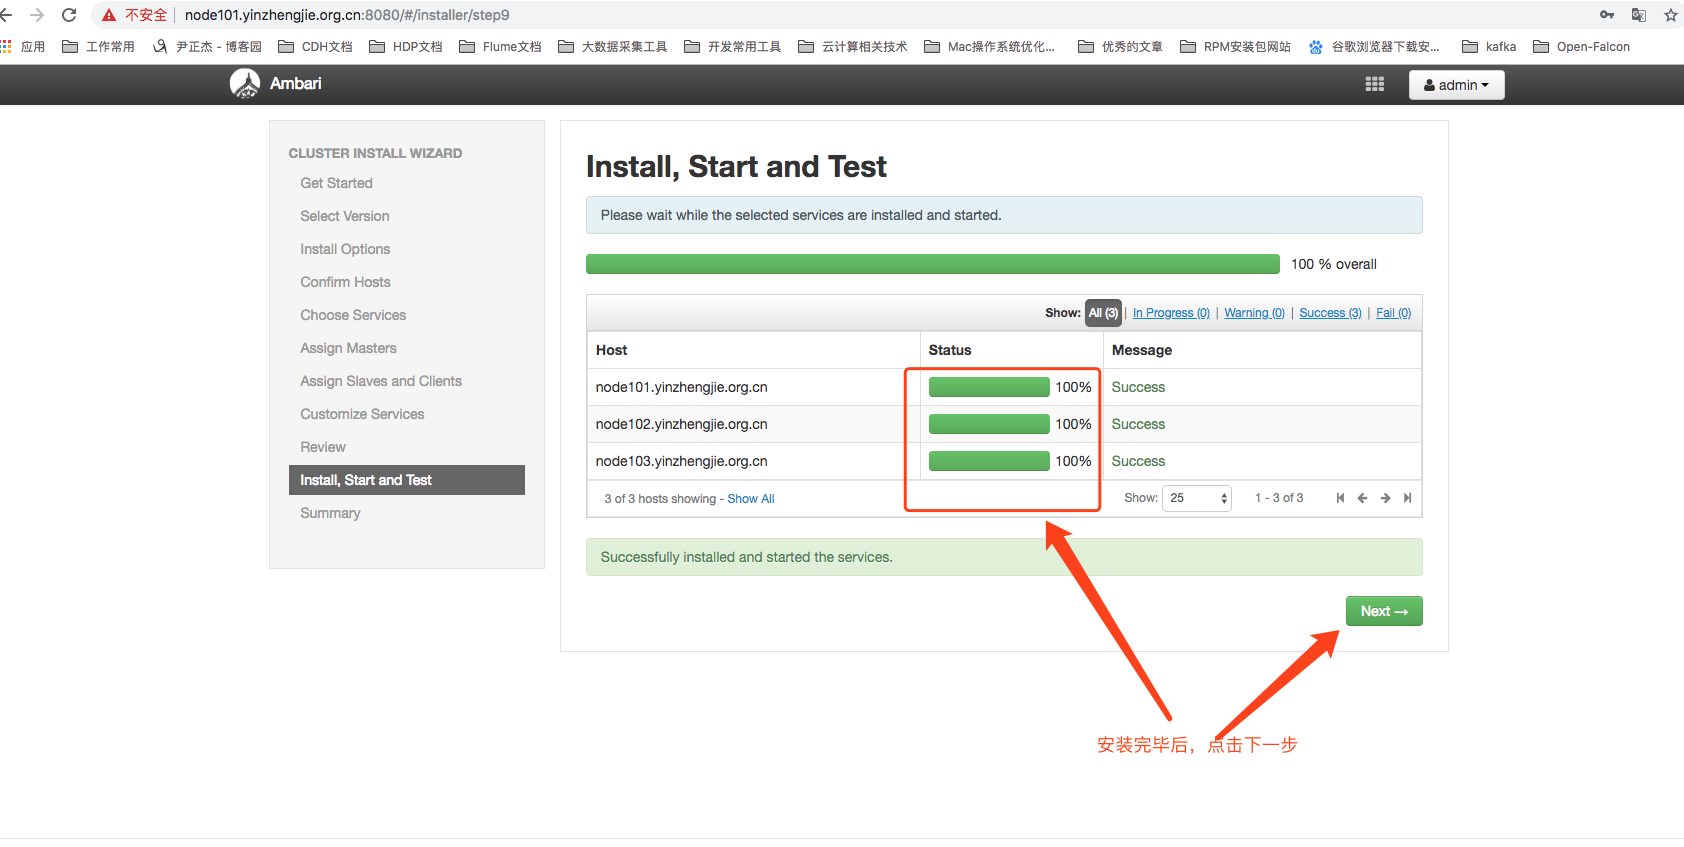
15>.安装完毕,点击下一步
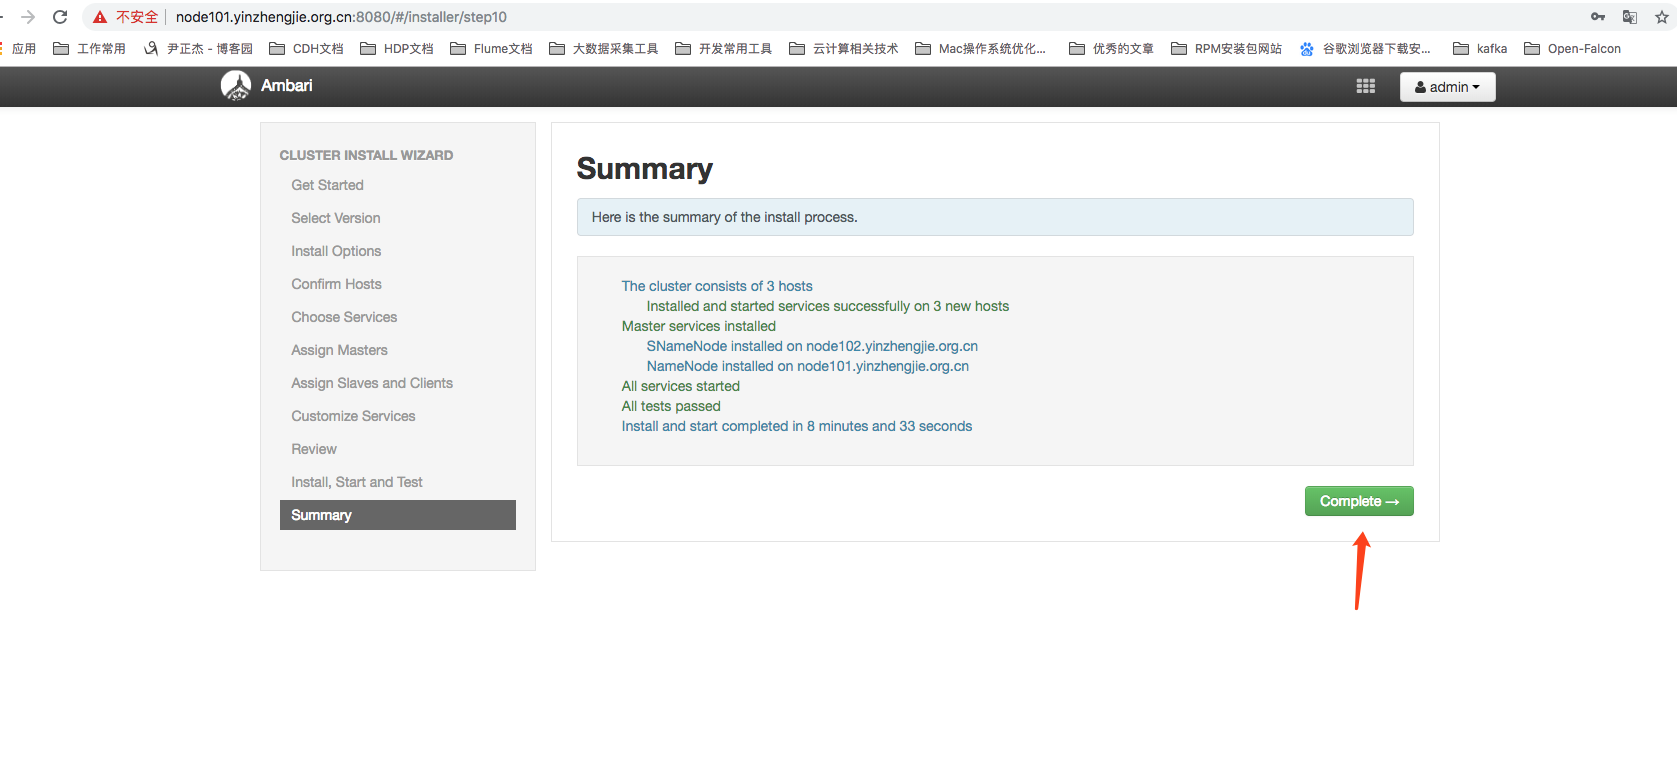
16>.安装完毕后,点击“Complete”,进入主界面
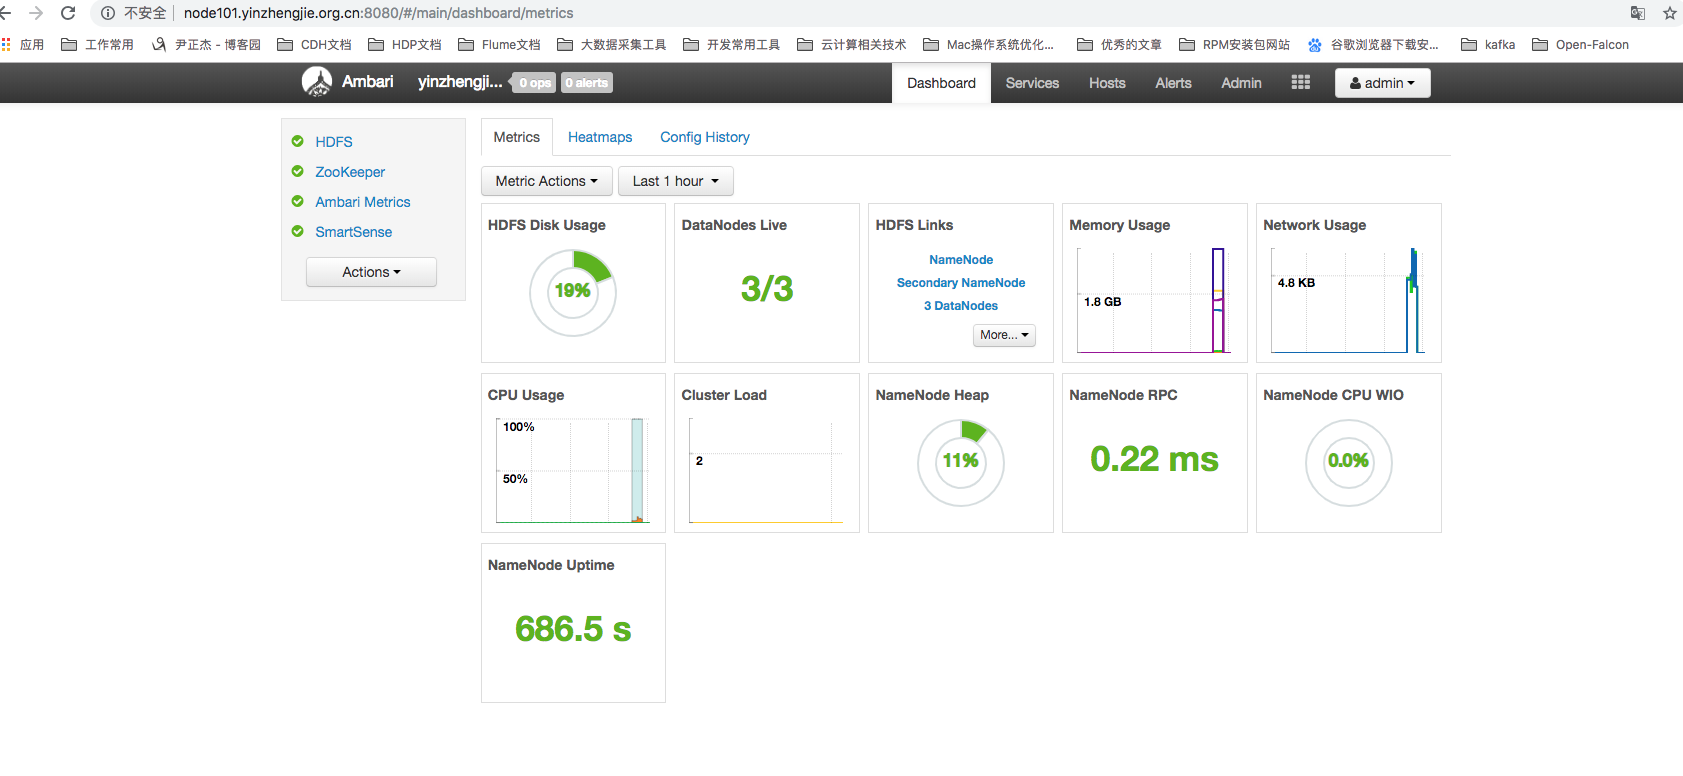
17>.进入Ambari的主界面
本文来自博客园,作者:尹正杰,转载请注明原文链接:https://www.cnblogs.com/yinzhengjie/p/10073810.html,个人微信: "JasonYin2020"(添加时请备注来源及意图备注,有偿付费)
当你的才华还撑不起你的野心的时候,你就应该静下心来学习。当你的能力还驾驭不了你的目标的时候,你就应该沉下心来历练。问问自己,想要怎样的人生。


