
Linux驱动开发十六.input系统——1.input_dev
我们在前面通过pin控制学习了LInux内核的GPIO和Pinctrl子系统。GPIO主要用作简单的引脚控制驱动,今天我们来了解一下一组新的子系统:input子系统。input子系统是Linux内核专门提出来处理按键、鼠标、键盘和触摸屏等输入设备的输入事件的。输入设备从本质上来说还是属于字符设备。input子系统就是将输入事件分隔开,用户只需要负责上报类似键值、坐标等信息,input的核心层负责处理这些事件。
input子系统
input子系统是Linux针对输入设备而创建的框架,借用正点原子教程上的图,input子系统将输入系统分解成下面的结构
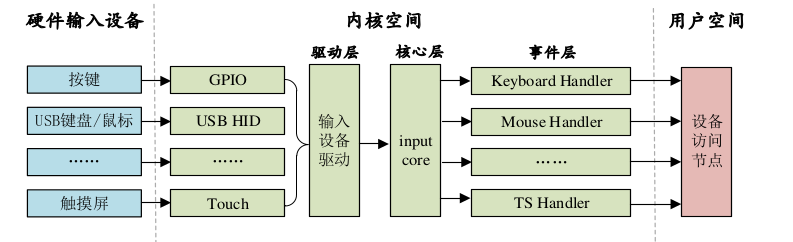
最左边的部分是最底层的具体的输入设备,中间部分属于Linux的内核空间,分为驱动层和核心层。右边的属于用户态。这种结构就符合我们前面一直强调的驱动的分层,即不同的层级干不同的事情:
- 驱动层负责输入设备的具体驱动,比如按键、鼠标或触摸屏的具体驱动程序,然后向内核报告相关内容
- 核心层类似一个中间键,起到一个承上启下的作用,一边面向驱动提供接口,另一侧向内核报告输入内容。核心层还有个很重要的功能就是帮我们注册一个字符设备
- 事件层主要用来处理输入事件,同时也和用户态做数据交互。
我们这一章主要实现input子系统的驱动框架编写。
input驱动编写
input核心层
要写input驱动,我们可以先看一下内核里是怎么使用input核心层的(drivers/input/input.cinput.c)
直接拉倒最底,可以看见类似我们加载模块的一个函数的用法,调用了设备初始化的函数

sysbsys_initcall是一个分支预测用法的宏,大致作用和我们前面的module_init是一样的。看看上面input_init函数
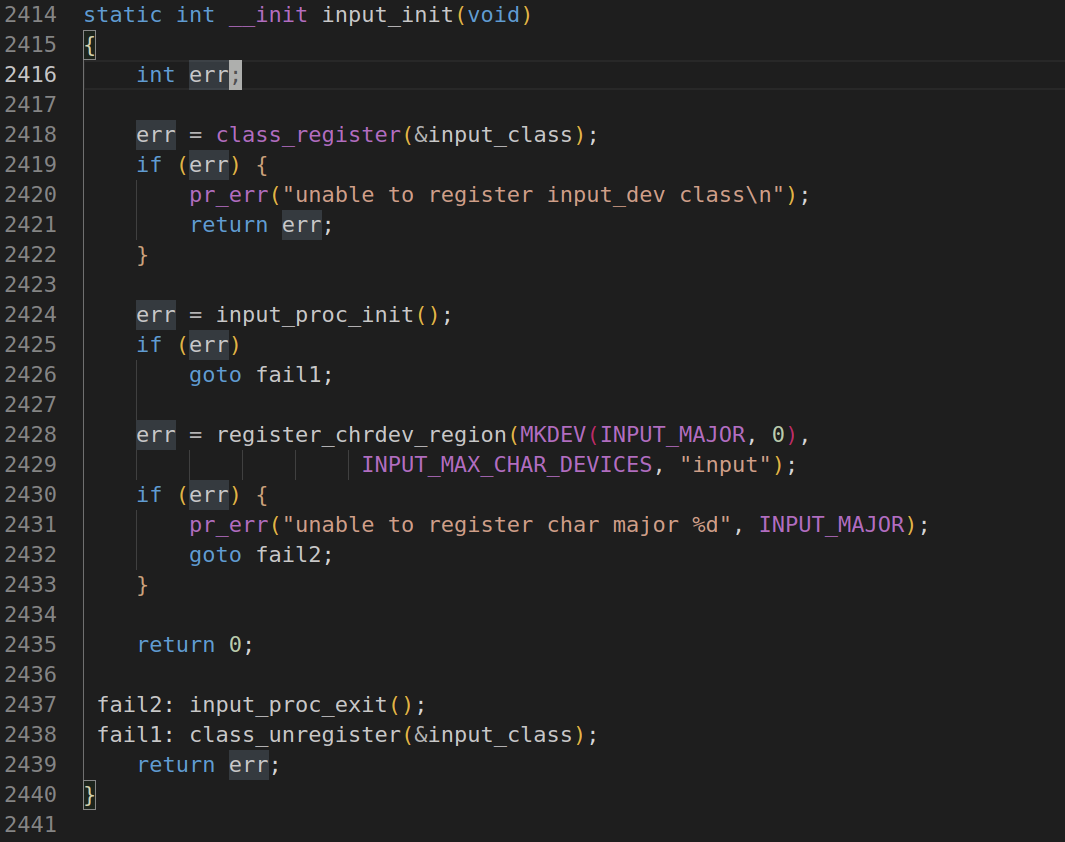
直接截图比较好看,可以看下上面的函数中有个class_register注册了类,还有个register_chrdev_region创建了字符设备,并且创建字符设备的时候还可以看到定义的主设备号(INPUT_MAJOR,宏定义,路径为include/uapi/linux/major.h可以展开看到)。
#define INPUT_MAJOR 13
也就是创建的设备节点名称叫input,主设备号是13。这个过程和我们前面写的字符设备驱动框架内容差不多。创建的类在系统启动后会在sys/class路径下出现

里面就有一些可以让我们使用的输入设备,并且这个节点在系统启动以后会自动生成这个节点,

如上图所示,生成了input节点,并且主设备号就是13。这么说来,内核已经帮我们完成了input子系统的大致框架,我们要做的就是根据input子系统的要求来编写实际设备的驱动(input_dev),然后注册到内核里就行了。
input_dev
在使用input子系统的时候我们需要注册一个input设备,内核中使用结构体input_dev来描述input设备(include/linux/input.h)


 1 struct input_dev {
 2     const char *name;
 3     const char *phys;
 4     const char *uniq;
 5     struct input_id id;
 6
 7     unsigned long propbit[BITS_TO_LONGS(INPUT_PROP_CNT)];
 8
 9     unsigned long evbit[BITS_TO_LONGS(EV_CNT)];
10     unsigned long keybit[BITS_TO_LONGS(KEY_CNT)];
11     unsigned long relbit[BITS_TO_LONGS(REL_CNT)];
12     unsigned long absbit[BITS_TO_LONGS(ABS_CNT)];
13     unsigned long mscbit[BITS_TO_LONGS(MSC_CNT)];
14     unsigned long ledbit[BITS_TO_LONGS(LED_CNT)];
15     unsigned long sndbit[BITS_TO_LONGS(SND_CNT)];
16     unsigned long ffbit[BITS_TO_LONGS(FF_CNT)];
17     unsigned long swbit[BITS_TO_LONGS(SW_CNT)];
18
19     unsigned int hint_events_per_packet;
20
21     unsigned int keycodemax;
22     unsigned int keycodesize;
23     void *keycode;
24
25     int (*setkeycode)(struct input_dev *dev,
26               const struct input_keymap_entry *ke,
27               unsigned int *old_keycode);
28     int (*getkeycode)(struct input_dev *dev,
29               struct input_keymap_entry *ke);
30
31     struct ff_device *ff;
32
33     unsigned int repeat_key;
34     struct timer_list timer;
35
36     int rep[REP_CNT];
37
38     struct input_mt *mt;
39
40     struct input_absinfo *absinfo;
41
42     unsigned long key[BITS_TO_LONGS(KEY_CNT)];
43     unsigned long led[BITS_TO_LONGS(LED_CNT)];
44     unsigned long snd[BITS_TO_LONGS(SND_CNT)];
45     unsigned long sw[BITS_TO_LONGS(SW_CNT)];
46
47     int (*open)(struct input_dev *dev);
48     void (*close)(struct input_dev *dev);
49     int (*flush)(struct input_dev *dev, struct file *file);
50     int (*event)(struct input_dev *dev, unsigned int type, unsigned int code, int value);
51
52     struct input_handle __rcu *grab;
53
54     spinlock_t event_lock;
55     struct mutex mutex;
56
57     unsigned int users;
58     bool going_away;
59
60     struct device dev;
61
62     struct list_head    h_list;
63     struct list_head    node;
64
65     unsigned int num_vals;
66     unsigned int max_vals;
67     struct input_value *vals;
68
69     bool devres_managed;
70 };
这个input_dev的结构体比较大,不过还好的是内核源码给出了大部分成员的作用(就在结构体上面)
 1 /**
 2  * struct input_dev - represents an input device
 3  * @name: name of the device
 4  * @phys: physical path to the device in the system hierarchy
 5  * @uniq: unique identification code for the device (if device has it)
 6  * @id: id of the device (struct input_id)
 7  * @propbit: bitmap of device properties and quirks
 8  * @evbit: bitmap of types of events supported by the device (EV_KEY,
 9  *    EV_REL, etc.)
10  * @keybit: bitmap of keys/buttons this device has
11  * @relbit: bitmap of relative axes for the device
12  * @absbit: bitmap of absolute axes for the device
13  * @mscbit: bitmap of miscellaneous events supported by the device
14  * @ledbit: bitmap of leds present on the device
15  * @sndbit: bitmap of sound effects supported by the device
16  * @ffbit: bitmap of force feedback effects supported by the device
17  * @swbit: bitmap of switches present on the device
18  * @hint_events_per_packet: average number of events generated by the
19  *    device in a packet (between EV_SYN/SYN_REPORT events). Used by
20  *    event handlers to estimate size of the buffer needed to hold
21  *    events.
22  * @keycodemax: size of keycode table
23  * @keycodesize: size of elements in keycode table
24  * @keycode: map of scancodes to keycodes for this device
25  * @getkeycode: optional legacy method to retrieve current keymap.
26  * @setkeycode: optional method to alter current keymap, used to implement
27  *    sparse keymaps. If not supplied default mechanism will be used.
28  *    The method is being called while holding event_lock and thus must
29  *    not sleep
30  * @ff: force feedback structure associated with the device if device
31  *    supports force feedback effects
32  * @repeat_key: stores key code of the last key pressed; used to implement
33  *    software autorepeat
34  * @timer: timer for software autorepeat
35  * @rep: current values for autorepeat parameters (delay, rate)
36  * @mt: pointer to multitouch state
37  * @absinfo: array of &struct input_absinfo elements holding information
38  *    about absolute axes (current value, min, max, flat, fuzz,
39  *    resolution)
40  * @key: reflects current state of device's keys/buttons
41  * @led: reflects current state of device's LEDs
42  * @snd: reflects current state of sound effects
43  * @sw: reflects current state of device's switches
44  * @open: this method is called when the very first user calls
45  *    input_open_device(). The driver must prepare the device
46  *    to start generating events (start polling thread,
47  *    request an IRQ, submit URB, etc.)
48  * @close: this method is called when the very last user calls
49  *    input_close_device().
50  * @flush: purges the device. Most commonly used to get rid of force
51  *    feedback effects loaded into the device when disconnecting
52  *    from it
53  * @event: event handler for events sent _to_ the device, like EV_LED
54  *    or EV_SND. The device is expected to carry out the requested
55  *    action (turn on a LED, play sound, etc.) The call is protected
56  *    by @event_lock and must not sleep
57  * @grab: input handle that currently has the device grabbed (via
58  *    EVIOCGRAB ioctl). When a handle grabs a device it becomes sole
59  *    recipient for all input events coming from the device
60  * @event_lock: this spinlock is is taken when input core receives
61  *    and processes a new event for the device (in input_event()).
62  *    Code that accesses and/or modifies parameters of a device
63  *    (such as keymap or absmin, absmax, absfuzz, etc.) after device
64  *    has been registered with input core must take this lock.
65  * @mutex: serializes calls to open(), close() and flush() methods
66  * @users: stores number of users (input handlers) that opened this
67  *    device. It is used by input_open_device() and input_close_device()
68  *    to make sure that dev->open() is only called when the first
69  *    user opens device and dev->close() is called when the very
70  *    last user closes the device
71  * @going_away: marks devices that are in a middle of unregistering and
72  *    causes input_open_device*() fail with -ENODEV.
73  * @dev: driver model's view of this device
74  * @h_list: list of input handles associated with the device. When
75  *    accessing the list dev->mutex must be held
76  * @node: used to place the device onto input_dev_list
77  * @num_vals: number of values queued in the current frame
78  * @max_vals: maximum number of values queued in a frame
79  * @vals: array of values queued in the current frame
80  * @devres_managed: indicates that devices is managed with devres framework
81  *    and needs not be explicitly unregistered or freed.
82  */
input_dev在使用以前必须先申请!申请过程是下面的函数
 1 struct input_dev *input_allocate_device(void)
 2 {
 3     static atomic_t input_no = ATOMIC_INIT(-1);
 4     struct input_dev *dev;
 5
 6     dev = kzalloc(sizeof(struct input_dev), GFP_KERNEL);
 7     if (dev) {
 8         dev->dev.type = &input_dev_type;
 9         dev->dev.class = &input_class;
10         device_initialize(&dev->dev);
11         mutex_init(&dev->mutex);
12         spin_lock_init(&dev->event_lock);
13         init_timer(&dev->timer);
14         INIT_LIST_HEAD(&dev->h_list);
15         INIT_LIST_HEAD(&dev->node);
16
17         dev_set_name(&dev->dev, "input%lu",
18                  (unsigned long)atomic_inc_return(&input_no));
19
20         __module_get(THIS_MODULE);
21     }
22
23     return dev;
24 }
申请好的input子设备在卸载时需要释放
void input_free_device(struct input_dev *dev)
有时间可以把这个input.c流程过一下,真的跟我们写的驱动流程差不多!
input_dev结构体
因为input_dev太大了,我们摘几个重要的部分讲一下,首先是下面这一段成员
unsigned long evbit[BITS_TO_LONGS(EV_CNT)];
unsigned long keybit[BITS_TO_LONGS(KEY_CNT)];
unsigned long relbit[BITS_TO_LONGS(REL_CNT)];
unsigned long absbit[BITS_TO_LONGS(ABS_CNT)];
unsigned long mscbit[BITS_TO_LONGS(MSC_CNT)];
unsigned long ledbit[BITS_TO_LONGS(LED_CNT)];
unsigned long sndbit[BITS_TO_LONGS(SND_CNT)];
unsigned long ffbit[BITS_TO_LONGS(FF_CNT)];
unsigned long swbit[BITS_TO_LONGS(SW_CNT)];
这几个内容我们要拆开看看
事件类型evbit
事件类型是个长整型,内核给我们指定了宏供我们使用
 1 /*
 2  * Event types
 3  */
 4 #define EV_SYN            0x00                //同步
 5 #define EV_KEY            0x01                //按键
 6 #define EV_REL            0x02                //相对坐标,类似鼠标移动坐标
 7 #define EV_ABS            0x03                //绝对坐标,类似触摸屏触摸坐标
 8 #define EV_MSC            0x04                //杂项事
 9 #define EV_SW             0x05                //开关
10 #define EV_LED            0x11                //LED
11 #define EV_SND            0x12                //声音
12 #define EV_REP            0x14                //重复,类似按键按下未释放
13 #define EV_FF             0x15                //压力
14 #define EV_PWR            0x16                //电源
15 #define EV_FF_STATUS      0x17                //压力状态
16 #define EV_MAX            0x1f                //Todo
17 #define EV_CNT            (EV_MAX+1)          //计数器
从宏的定义名称可以看出来,EV就是event事件,后面大多数名称都可以根据实际名称推断出实际作用。我们下面要用按键作为input子系统的底层硬件,所以要将evbit的值设置为EV_KEY。
键值keybit
事件下面的几个成员是根据实际事件的类型使用的,如果我们使用了按键类型以后可以使用key_bit来指定按键对应的键值(include/uapi/linux/input.h)
/*
 * Keys and buttons
 *
 * Most of the keys/buttons are modeled after USB HUT 1.12
 * (see http://www.usb.org/developers/hidpage).
 * Abbreviations in the comments:
 * AC - Application Control
 * AL - Application Launch Button
 * SC - System Control
 */

#define KEY_RESERVED        0
#define KEY_ESC            1
#define KEY_1            2
#define KEY_2            3
#define KEY_3            4
#define KEY_4            5
#define KEY_5            6
#define KEY_6            7
#define KEY_7            8
.........
#define BTN_TRIGGER_HAPPY34        0x2e1
#define BTN_TRIGGER_HAPPY35        0x2e2
#define BTN_TRIGGER_HAPPY36        0x2e3
#define BTN_TRIGGER_HAPPY37        0x2e4
#define BTN_TRIGGER_HAPPY38        0x2e5
#define BTN_TRIGGER_HAPPY39        0x2e6
#define BTN_TRIGGER_HAPPY40        0x2e7
有了上面的宏定义,我们可以把开发板上的按键模拟成键盘上随便一个按键,除了按键,还可以定义成不同的button效果。
我们这一章主要是将按键作为input的实际输入设备,所以后面那些type对应的事件就不再展开说了。在初始化input_dev的时候,主要就是要定义好evbit和keybit,如果需要连续按下效果还要在evbit里定义EV_REP。input_dev在初始化完成以后,要使用下面函数的向内核注册(最后要卸妆)
int __must_check input_register_device(struct input_dev *);
void input_unregister_device(struct input_dev *);
input_dev初始化
input_dev是我们申请得到的,在申请以后需要按事件对其进行初始化,初始化有三种方法
 1 static int __init xxx_init(void)
 2 {
 3     inputdev = input_allocate_device();     //申请input设备
 4
 5     inputdev->name = "keytest";             //设置input的name为keytest
 6
 7     /*初始化方法一*/
 8     __set_bit(EV_KEY,inputdev->evbit);      //设置input事件类型为按键
 9     __set_bit(EV_REP,inputdev->evbit);      //允许input设备重复
10     __set_bit(KEY_0,inputdev->keybit);      //设置按键为KEY_0
11
12     /*初始化方法二*/
13     inputdev->evbit[0] = BIT_MASK(EV_KEY) |
14                          BIT_MASK(EV_REP);
15     inputdev->keybit[BIT_WORD(KEY_0)] |=
16                       BIT_MASK(KEY_0);
17
18     /*初始化方法三*/
19     inputdev->evbit[0] = BIT_MASK(EV_KEY) |
20                                     BIT_MASK(EV_REP);
21     input_set_capability(inputdev, EV_KEY, KEY_0);
22
23     input_register_device(inputdev);        //注册
24 }
上面就是初始化inputdev的三种方法,特别是第三种方法还用到一个新的函数input_set_capability,但是三种方法的效果是一样的。
事件上报
在向Linux内核注册完input_dev以后,我们还需要将输入事件上报给Linux内核,比如我们前面一直使用的按键,在按下按键后触发了中断,然后再中断中调用了定时器用来消抖,定时器溢出时进行按键实际的功能行为,在这里的行为就是向内核上报一个事件,告诉内核按键是否被按下,是哪个按键被按下等等。这个上报事件是input_event函数去处理的。
 1 /**
 2  * input_event() - report new input event
 3  * @dev: device that generated the event
 4  * @type: type of the event
 5  * @code: event code
 6  * @value: value of the event
 7  *
 8  * This function should be used by drivers implementing various input
 9  * devices to report input events. See also input_inject_event().
10  *
11  * NOTE: input_event() may be safely used right after input device was
12  * allocated with input_allocate_device(), even before it is registered
13  * with input_register_device(), but the event will not reach any of the
14  * input handlers. Such early invocation of input_event() may be used
15  * to 'seed' initial state of a switch or initial position of absolute
16  * axis, etc.
17  */
18 void input_event(struct input_dev *dev,
19          unsigned int type, unsigned int code, int value)
20 {
21     unsigned long flags;
22
23     if (is_event_supported(type, dev->evbit, EV_MAX)) {
24
25         spin_lock_irqsave(&dev->event_lock, flags);
26         input_handle_event(dev, type, code, value);
27         spin_unlock_irqrestore(&dev->event_lock, flags);
28     }
29 }
函数的参数具体作用我们下面使用的时候会讲到
针对按键而言,还有一个函数是通过调用input_event来实现按键的事件上报。
static inline void input_report_key(struct input_dev *dev, unsigned int code, int value)
{
    input_event(dev, EV_KEY, code, !!value);
}
重要点:在输入事件上报完成后,一定要用input_sync函数同步!!!
input模板编写
这次这个input驱动框架的编写我们使用前面那个带抖动消除的按键驱动的整体框架来实现。先把整个代码放出来吧
  1 #include <linux/module.h>
  2 #include <linux/kernel.h>
  3 #include <linux/init.h>
  4 #include <linux/fs.h>
  5 #include <linux/uaccess.h>
  6 #include <linux/io.h>
  7 #include <linux/types.h>
  8 #include <linux/cdev.h>
  9 #include <linux/device.h>
 10 #include <linux/of.h>
 11 #include <linux/of_address.h>
 12 #include <linux/of_irq.h>
 13 #include <linux/gpio.h>
 14 #include <linux/of_gpio.h>
 15 #include <linux/irq.h>
 16 #include <linux/interrupt.h>
 17 #include <linux/input.h>
 18
 19 #define DEVICE_CNT      1
 20 #define DEVICE_NAME    "imx6ukey"
 21
 22 #define KEY_NUM         1
 23 #define KEY0VALUE       0x01
 24 #define INVALKEYS       0xFF
 25
 26 /**
 27  * @brief 按键中断结构体
 28  *
 29  */
 30 struct irq_keydesc {
 31     int gpio;                           //io编号
 32     int irqnum;                         //中断号
 33     unsigned char value;                //键值
 34     char name[10];                      //按键名字
 35     irqreturn_t (*handler)(int,void*);  //中断处理函数
 36 };
 37
 38 /**
 39  * @brief 设备结构体
 40  *
 41  */
 42 struct new_dev
 43 {
 44
 45     struct device_node *dev_nd;
 46     int dev_gpio;
 47
 48     struct irq_keydesc irqkey[KEY_NUM];         //按键描述数组
 49
 50     struct timer_list timer;    //定时器
 51     int timer_per;
 52
 53     struct input_dev *inputdev; //输入设备
 54
 55 };
 56
 57 struct new_dev new_dev;
 58
 59 /**
 60  * @brief 中断处理函数
 61  *
 62  */
 63 static irqreturn_t key0_handle_irq(int irq, void *dev_id)
 64 {
 65     int value = 0;
 66     struct new_dev *dev = dev_id;
 67     dev->timer.data = dev_id;
 68     mod_timer(&dev->timer,jiffies + msecs_to_jiffies(10));
 69     return IRQ_HANDLED;
 70 }
 71
 72 /**
 73  * @brief 消抖定时处理函数
 74  *
 75  * @param arg
 76  */
 77 timer_func(unsigned long arg){
 78
 79     int value = 0;
 80     struct new_dev *dev =(struct new_dev*)arg;
 81
 82     value = gpio_get_value(dev->irqkey[0].gpio);
 83
 84     /*上报按键值*/
 85     if(value == 0){             //按下
 86         input_event(dev->inputdev,EV_KEY,KEY_0,1);
 87         input_sync(dev->inputdev);
 88     }
 89     else if(value == 1){        //释放
 90         input_event(dev->inputdev,EV_KEY,KEY_0,0);
 91         input_sync(dev->inputdev);
 92     }
 93 }
 94
 95 static int dev_gpio_init(struct new_dev *dev)
 96 {
 97     int ret = 0;
 98     int i = 0;
 99
100     //搜索设备树节点
101     dev->dev_nd = of_find_node_by_path("/key");
102     if(dev->dev_nd == NULL){
103         printk("can't find device key\r\n");
104         ret = -EINVAL;
105         goto fail_nd;
106     }
107
108     for(i=0;i<KEY_NUM;i++)
109     {
110         dev->irqkey[i].gpio = of_get_named_gpio(dev->dev_nd,"key-gpios",i); //多个按键获取
111         if(dev->irqkey[i].gpio<0){
112             ret = -EINVAL;
113             goto fail_gpio_num;
114         }
115         ret = gpio_request(dev->irqkey[i].gpio,dev->irqkey[i].name);
116         if(ret){
117             ret = -EBUSY;
118             goto fail_gpio_request;
119         }
120         gpio_direction_input(dev->irqkey[i].gpio);
121         dev->irqkey[i].irqnum = gpio_to_irq(dev->irqkey[i].gpio);           //获取中断号
122     }
123
124     dev->irqkey[0].handler = key0_handle_irq;
125     dev->irqkey[0].value = KEY0VALUE;
126
127     for(i=0;i<KEY_NUM;i++){
128         memset(dev->irqkey[i].name,0,sizeof(dev->irqkey[i].name));
129         sprintf(dev->irqkey[i].name,"KEY%d",i);  //将格式化数据写入字符串中
130         ret = request_irq(dev->irqkey[i].irqnum,                            //中断号
131                             key0_handle_irq,                                //中断处理函数
132                             IRQ_TYPE_EDGE_RISING|IRQ_TYPE_EDGE_FALLING,     //中断处理函数
133                             dev->irqkey[i].name,                            //中断名称
134                             dev                                             //设备结构体
135                             );
136         if(ret){
137             printk("irq %d request err\r\n",dev->irqkey[i].irqnum);
138             goto fail_irq;
139         }
140     }
141     //此处不设置定时值,防止定时器add后直接运行
142     init_timer(&dev->timer);
143     dev->timer.function = timer_func;
144
145     return 0;
146     fail_gpio_request:
147     fail_irq:
148         for(i=0; i<KEY_NUM;i++){
149             gpio_free(dev->irqkey[i].gpio);
150         }
151     fail_gpio_num:
152     fail_nd:
153         return ret;
154 }
155
156 static int __init key_init(void)
157 {
158     int ret = 0;
159
160     /*GPIO初始化*/
161     ret = dev_gpio_init(&new_dev);
162     if(ret<0){
163         goto fail_gpio_init;
164     }
165
166     /*input_dev处理*/
167     //申请input_dev
168     new_dev.inputdev = input_allocate_device();
169     if(new_dev.inputdev == NULL){
170         ret = -EINVAL;
171         goto fail_gpio_init;        //申请失败,误操作
172     }
173
174     //input_dev初始化
175     new_dev.inputdev->name = DEVICE_NAME;
176     __set_bit(EV_KEY,new_dev.inputdev->evbit);         //按键事件
177     __set_bit(EV_REP,new_dev.inputdev->evbit);         //允许重复
178     __set_bit(KEY_0,new_dev.inputdev->keybit);         //设置键值
179
180     //input_dev注册
181     ret = input_register_device(new_dev.inputdev);
182     if(ret){
183         goto fail_input_register;
184     }
185     return ret;
186
187 fail_input_register:
188     input_free_device(new_dev.inputdev);
189 fail_gpio_init:
190
191     return ret;
192 }
193
194 static void __exit key_exit(void){
195     int i = 0;
196     //释放中断
197     for(i=0;i<KEY_NUM;i++){
198         free_irq(new_dev.irqkey[i].irqnum,&new_dev);
199     }
200
201     //释放GPIO
202     for(i=0;i<KEY_NUM;i++){
203         gpio_free(new_dev.irqkey[i].gpio);
204     }
205     //释放定时器
206     del_timer_sync(&new_dev.timer);
207
208     //注销input_dev
209     input_unregister_device(new_dev.inputdev);
210     input_free_device(new_dev.inputdev);
211
212 }
213
214 module_init(key_init);
215 module_exit(key_exit);
216 MODULE_LICENSE("GPL");
217 MODULE_AUTHOR("ZeqiZ");
首先我们可以看到,这个new_dev结构体和原先的比起来简化了好多,起码主从设备号、类、设备、cdev、按键状态的原子变量等成员都被删掉了,因为input子系统会帮我们自动创建设备节点。
在设备初始化函数key_init函数中,我们先对GPIO进行初始化,这个过程前面用过了很多次了,就不再说了。
174~178行是我们这一章节所讲的input_dev申请以及初始化
181~184行是将初始化的input_dev注册给内核。
整个驱动把文件操作集合也都删除了,因为这个input子系统是通过事件上报来处理具体信息的,这里在定时中断函数里调用了上报事件的函数,函数一共4个参数
input_event(dev->inputdev,EV_KEY,KEY_0,1);     //按键按下
input_event(dev->inputdev,EV_KEY,KEY_0,0);     //按键释放
可以看出来按键在按下和释放时调用函数所传递的参数只有最后一个不同,所以input_event函数的参数第一个就是input_dev对象,第二个就是input事件,在这里就是在初始化input_dev时候定义的EV_KEY,第三个参数是根据事件类型来定的,如果是按键事件就是键值,最后一个value就是当前按键是否被按下。
驱动测试
整个模板完成以后,就可以make生成ko文件,加载模块以后可以测试一下
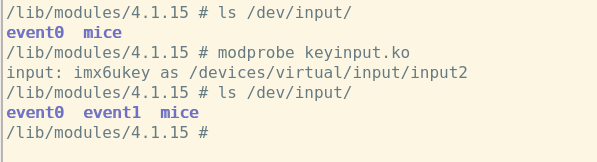
可以看到,在没有加载模块前,/dev/input路径下只有2个文件,在加载完模块以后会有个新的文件event1(加载后生成的input2文件在卸载后重新加载会变成input3,不知道是不是哪个资源没释放),这个event1就是对应我们的按键。那么怎么测试这个按键呢?要用到一个新的命令:hexdump

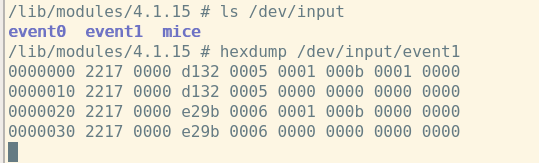
看看,打印出来了一堆信息,这个信息就是对应了input_event结构体。这个结构体在我们后面的章节会再分析。这个event1文件就是我们用户态程序要获取按键信息时所操作的对象。


【推荐】国内首个AI IDE,深度理解中文开发场景,立即下载体验Trae
【推荐】编程新体验,更懂你的AI,立即体验豆包MarsCode编程助手
【推荐】抖音旗下AI助手豆包,你的智能百科全书,全免费不限次数
【推荐】轻量又高性能的 SSH 工具 IShell:AI 加持,快人一步
· 震惊!C++程序真的从main开始吗?99%的程序员都答错了
· 别再用vector<bool>了!Google高级工程师:这可能是STL最大的设计失误
· 单元测试从入门到精通
· 【硬核科普】Trae如何「偷看」你的代码?零基础破解AI编程运行原理
· 上周热点回顾(3.3-3.9)
2020-08-27 Xadmin控件的实现:〇八查询视图六——list视图filter功能