
Linux驱动开发十.中断——1.中断功能的实现
在Linux驱动开发过程中,最常用到的就是定时和中断了。在前面章节我们大致了解了如何在Linux内核中实现定时功能,在下面的部分我们来学习一下中断的使用。
先回顾一下在裸机开发过程中我们怎么做的中断(忘记的可以看一下前面的章节:点击跳转):
- 首先使能中断,并初始化相应的寄存器
- 注册中的服务函数,向中断向量表里指定标号出写入中欧冠那段服务函数
- 终端发生以后进入IRQ中断服务函数,在IRQ中断服务函数数组中通过标号执行相应的中断处理函数
整个中断的生命周期是由一个叫做GIC(Generic Interrupt Controller,通用中断控制器),而ARM的CPU对外设连接的中断只有IRQ(一般中断处理模式)和FIQ(快速中断处理模式)两种模式,我们这里主要考虑IRQ。在Linux的内核中已经为提供了完善的中断框架让我们使用,我们只需了解常用的API接口函数,就不需要配置相关寄存器,只需要和定时器一样,申请中断然后注册中断处理函数就行了。
Linux 内核提供了完善的中断框架,我们只需要申请中断,然后注 册中断处理函数即可,使用非常方便,不需要一系列复杂的寄存器配置。本章我们就来学习一 下如何在 Linux 下使用中断。
常用API函数
中断常用的函数在include/linux/interrupt.h文件下,主要涉及到中断的申请、释放以及使能、禁止等一系列操作。
中断申请和释放
在裸机开发的过程中,我们了解到了中断号的概念,每个中断都有个编号用来区分不同的中断源(有时候也叫中断线)。在Linux内核中中断号是通过一个int类型的数据来表示的。要对中断进行操作,首先要获取到中断号。有了中断号才能申、释放中断资源。先看下中断资源的申请
request_irq(unsigned int irq, irq_handler_t handler, unsigned long flags,
        const char *name, void *dev)
{
    return request_threaded_irq(irq, handler, NULL, flags, name, dev);
}
函数request_irq用来申请中断资源,其中参数的定义如下:
irq——中断号,
handler——中断处理函数,函数的声明是通过关键字irqreturn_t定义。
格式是这样的
irqreturn_t (*irq_handler_t) (int, void *){
    return IRQ_HANDLED
}
第一个整形参数是中断号,第二个参数是指向void的指针,一般要和request_irq的dev参数保持一致,用来区分共享中断的不同设备。dev也可以指向设备数据结构。这个函数的使用在后面案例的时候会用到,很简单!
flags——中断标志,在include/linux/interrupt.h文件下定义了触发方式的宏定义(只截取部分)
 1 /*
 2  * These correspond to the IORESOURCE_IRQ_* defines in
 3  * linux/ioport.h to select the interrupt line behaviour.  When
 4  * requesting an interrupt without specifying a IRQF_TRIGGER, the
 5  * setting should be assumed to be "as already configured", which
 6  * may be as per machine or firmware initialisation.
 7  */
 8 #define IRQF_TRIGGER_NONE    0x00000000
 9 #define IRQF_TRIGGER_RISING    0x00000001
10 #define IRQF_TRIGGER_FALLING    0x00000002
11 #define IRQF_TRIGGER_HIGH    0x00000004
12 #define IRQF_TRIGGER_LOW    0x00000008
13 #define IRQF_TRIGGER_MASK    (IRQF_TRIGGER_HIGH | IRQF_TRIGGER_LOW | \
14                  IRQF_TRIGGER_RISING | IRQF_TRIGGER_FALLING)
15 #define IRQF_TRIGGER_PROBE    0x00000010
中断标志主要用来描述快速中断或中断共享等中断处理属性。我们这里主要使用的是触发方式。注意还有另外一个头文件里(include/linux/irq.h)声明了另外一些触发模式,名称不同但是是一样的效果
/*
 * IRQ line status.
 *
 * Bits 0-7 are the same as the IRQF_* bits in linux/interrupt.h
 *
 * IRQ_TYPE_NONE        - default, unspecified type
 * IRQ_TYPE_EDGE_RISING        - rising edge triggered
 * IRQ_TYPE_EDGE_FALLING    - falling edge triggered
 * IRQ_TYPE_EDGE_BOTH        - rising and falling edge triggered
 * IRQ_TYPE_LEVEL_HIGH        - high level triggered
 * IRQ_TYPE_LEVEL_LOW        - low level triggered
 * IRQ_TYPE_LEVEL_MASK        - Mask to filter out the level bits
 * IRQ_TYPE_SENSE_MASK        - Mask for all the above bits
 * IRQ_TYPE_DEFAULT        - For use by some PICs to ask irq_set_type
 *                  to setup the HW to a sane default (used
 *                                by irqdomain map() callbacks to synchronize
 *                                the HW state and SW flags for a newly
 *                                allocated descriptor).
........
如上面的说明说的,IRQ_TYPE_EDGE_RISING和IRQF_TRIGGER_RISING的效果是一样的,我们用哪个都可以!
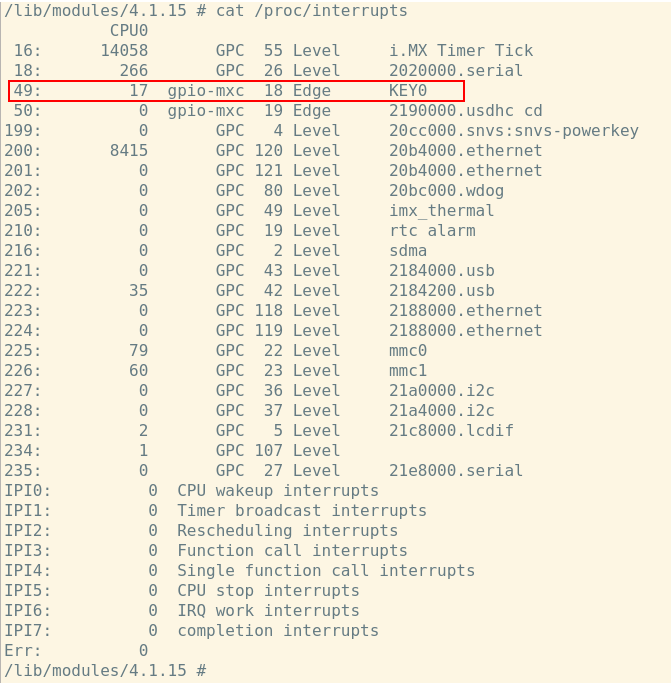
name——中断名称,在ko模块加载了申请完中断以后再/proc/interrupts文件中可以看到我们指定的中断名称。dev——如果将 flags 设置为 IRQF_SHARED 的话,dev 用来区分不同的中断,一般情况下将 dev 设置为设备结构体,dev 会传递给中断处理函数 irq_handler_t 的第二个参数。
上面就是request_irq的使用方法,在申请了irq以后,卸载驱动模块势必有与之对应的释放irq资源的函数
extern void free_irq(unsigned int, void *);
第一个参数就是中断号,第二个参数dev和request_irq的最后一个dev参数一样:如果中断设置为共享(IRQF_SHARED)的话,此参数用来区分具体的中断。共享中断只有在释放最后中断处理函数的时候才会被禁止掉。
中断使能与禁止
常用的中断使能和禁止函数如下所示:
extern void disable_irq(unsigned int irq);      //中断禁止
extern void enable_irq(unsigned int irq);       //中断使能
上面两个函数用来使能和禁止中断,只要算入参数irq(中断号) 就可以操作相应的中断。针对禁止操作来说,要等到当前执行的中断处理函数完成时才能返回。因此使用的时候要注意保证不会有新的中断产生而且已经开始执行的中断处理函数已经全部退出。针对这种情况可以使用这个中断禁止函数
extern void disable_irq_nosync(unsigned int irq);
这个函数一旦被调用会理科返回,不会等待当前中断处理程序执行完毕。上面几个函数都是针对指定中断号的中断进行操作。有时候我们需要关闭当前处理器的整个中断系统(关闭全局中断),这时候需要用到下面两个宏定义
#define local_irq_enable()    do { raw_local_irq_enable(); } while (0)
#define local_irq_disable()    do { raw_local_irq_disable(); } while (0)
这两个宏用来禁止/使能全局中断。但是有一个问题,假如任务A调用宏关闭全局终端10S,但是在2S后另外一个任务B运行,关闭全局中断3S后开启了全局中断。但是A原本需要10S才能开启全局中断的,但是任务B把全局中断开启了,这样很有可能导致严重的后果,甚至整个系统都要被A任务搞崩溃了。所以针对这种现象,B任务就不能简单粗暴的通过local_irq_enable来开启全局中断,而是恢复到中断前的状态
local_irq_save(*flags);         //保存当前禁止状态至flag标志
local_irq_restore(*flags);      //从flag标志恢复禁止状态
调用local_irq_save(flags),会禁止全局中断,并把当前的禁止状态保存在标志变量中,local_irq_restore用来恢复中断,并通过保存的flag状态字恢复原先的中断状态。
设备树中断信息
针对GIC而言,设备树的节点信息在文档中有说明(Documentation/devicetree/bindings/arm/gic.txt。主要内容如下:
 1 - interrupt-controller : Identifies the node as an interrupt controller
 2 - #interrupt-cells : Specifies the number of cells needed to encode an
 3   interrupt source.  The type shall be a <u32> and the value shall be 3.
 4
 5   The 1st cell is the interrupt type; 0 for SPI interrupts, 1 for PPI
 6   interrupts.
 7
 8   The 2nd cell contains the interrupt number for the interrupt type.
 9   SPI interrupts are in the range [0-987].  PPI interrupts are in the
10   range [0-15].
11
12   The 3rd cell is the flags, encoded as follows:
13     bits[3:0] trigger type and level flags.
14         1 = low-to-high edge triggered
15         2 = high-to-low edge triggered (invalid for SPIs)
16         4 = active high level-sensitive
17         8 = active low level-sensitive (invalid for SPIs).
18     bits[15:8] PPI interrupt cpu mask.  Each bit corresponds to each of
19     the 8 possible cpus attached to the GIC.  A bit set to '1' indicated
20     the interrupt is wired to that CPU.  Only valid for PPI interrupts.
21     Also note that the configurability of PPI interrupts is IMPLEMENTATION
22     DEFINED and as such not guaranteed to be present (most SoC available
23     in 2014 seem to ignore the setting of this flag and use the hardware
24     default value).
25
26 - reg : Specifies base physical address(s) and size of the GIC registers. The
27   first region is the GIC distributor register base and size. The 2nd region is
28   the GIC cpu interface register base and size.
针对I.MX6ULL来说,gic的节点在imx6ull.dtsi文件中
1 intc: interrupt-controller@00a01000 {
2     compatible = "arm,cortex-a7-gic";
3     #interrupt-cells = <3>;
4     interrupt-controller;
5     reg = <0x00a01000 0x1000>,
6             <0x00a02000 0x100>;
7 };
第2行的属性是compatible,在内核中搜索arm,cortex-a7-gic就能找到gic控制器驱动文件
第3行interrupt-cells和address-cells值意思是一样的,表示GIC下节点属性大小,一般就是一条信息里有几个cells。每个cells也都是一个32位的int数据,对于ARM架构的GIC来说,一共有3个CELLS,分别表示下面的信息
- cell1:中断类型,0表示SPI中断,1表示PPI中断(注意SPI中断是共享外设中断,不是SPI总线啊!)
- cell2:中断号,对于SPI中断来说是0-987,对PPI来说是0-15
- cell3:标志,包括但触发类型、PPI中断CPI掩码等。
第4行interrupt-controller表示当前节点是个中断控制器
补充一点,对于GPIO系统来说,GPIO节点也可以作为中断控制器。比如我们搜一下gpio1节点,就能发现下面的内容
 1 gpio1: gpio@0209c000 {
 2     compatible = "fsl,imx6ul-gpio", "fsl,imx35-gpio";
 3     reg = <0x0209c000 0x4000>;
 4     interrupts = <GIC_SPI 66 IRQ_TYPE_LEVEL_HIGH>,
 5                 <GIC_SPI 67 IRQ_TYPE_LEVEL_HIGH>;
 6     gpio-controller;
 7     #gpio-cells = <2>;
 8     interrupt-controller;
 9     #interrupt-cells = <2>;
10 };
整个gpio1节点里面还定义了gpio的中断信息,主要就是看下第4行的interrupt属性,有两组信息,每组里面一共有3个cell,对应上面说的3个cell,第一个GIC_SPI说明中断类型是SPI中断,第二个cell一组是66另一组是67,时中断号,对应不同的中断源

一个是GPIO1的高16位,另一个是低16位,在IMX6ULL参考手册的第三章可以查到。最后一个cell是中断标志:高电平触发。
注意最后一行将interrupt-cell重新指定为2,是因为在继承该节点的设备节点对其interrupt属性是有格式要求的,在文档中(Documentation/devicetree/bindings/gpio/gpio-mxs.txt)里有对其进行的说明
 1 * Freescale MXS GPIO controller
 2
 3 The Freescale MXS GPIO controller is part of MXS PIN controller.  The
 4 GPIOs are organized in port/bank.  Each port consists of 32 GPIOs.
 5
 6 As the GPIO controller is embedded in the PIN controller and all the
 7 GPIO ports share the same IO space with PIN controller, the GPIO node
 8 will be represented as sub-nodes of MXS pinctrl node.
 9
10 Required properties for GPIO node:
11 - compatible : Should be "fsl,<soc>-gpio".  The supported SoCs include
12   imx23 and imx28.
13 - interrupts : Should be the port interrupt shared by all 32 pins.
14 - gpio-controller : Marks the device node as a gpio controller.
15 - #gpio-cells : Should be two.  The first cell is the pin number and
16   the second cell is used to specify the gpio polarity:
17       0 = active high
18       1 = active low
19 - interrupt-controller: Marks the device node as an interrupt controller.
20 - #interrupt-cells : Should be 2.  The first cell is the GPIO number.
21   The second cell bits[3:0] is used to specify trigger type and level flags:
22       1 = low-to-high edge triggered.
23       2 = high-to-low edge triggered.
24       4 = active high level-sensitive.
25       8 = active low level-sensitive.
26
27 Note: Each GPIO port should have an alias correctly numbered in "aliases"
28 node.
可以在我们使用的设备树文件里搜索一下gpio的相关节点(除了gpio5没找到使用中断的其余GPIO组)
1 fxls8471@1e {
2     compatible = "fsl,fxls8471";
3     reg = <0x1e>;
4     position = <0>;
5     interrupt-parent = <&gpio5>;
6     interrupts = <0 8>;
7 };
其中第5行的interrupt-parent说明了这个节点的中断父节点是gpio5,要注意点是最后一行interrupt属性值,里面有2个cell,这就是上面gpio节点中最后把cell定义为2对应的地方,这两个cell参照说明里第20行介绍的,第一个cell是使用的gpio中pin的索引,第二个是触发电平或边沿状态(第22~25行)。
修改我们的设备树
这里我们延续前面的试验,使用按键作为产生中断的外设,所以就要将前面的设备树加上中断信息
/*按键0节点*/
key{
    compatible = "alientek,key";
    pinctrl-names = "default";
    pinctrl-0 = <&pinctrl_key>;
    key-gpios = <&gpio1 18 GPIO_ACTIVE_HIGH>;
    //添加中断信息
    interrupt-parent = <&gpio1>;
    interrupts =<18 IRQ_TYPE_EDGE_BOTH>;    //使用的宏在include/irq.h中有定义
    status = "okay";
};
基本上不用怎么动,其中就是指定了继承gpio1的中断信息,然后interrupt属性里的一个cell值为18指我们使用gpio1_IO18这个pin作为外部中断的产生源,第二个参数用了个宏表示使用上升和下降沿都可以触发中断。
中断号的获取
在写中断的时候我们需要用到中断号,而设备的中断号我们在设备树里的中断信息里已经写好了,要向获取中断号,可以通过下面的函数来实现(头文件路径为include/linux/of_irq.h)
static inline unsigned int irq_of_parse_and_map(struct device_node *dev,
                        int index)
{
    return 0;
}
如果设备节点中interrupt属性包含了多个,就像下面这样
mipi_csi: mipi_csi@021dc000 {
    compatible = "fsl,imx6q-mipi-csi2";
    reg = <0x021dc000 0x4000>;
    interrupts = <0 100 0x04>,
                 <0 101 0x04>;
    clocks =    <&clks 138>,
                <&clks 53>,
                <&clks 213>;
    clock-names = "dphy_clk", "pixel_clk", "cfg_clk";
    status = "disabled";
};
上面那个设备节点里的interrupts属性就有两条中断信息,这就要通过index索引值来获取我们需要对中断号了。函数的返回值就是中断号。
如果我们使用GPIO节点,有个函数可以直接获取gpio对应的中断号
static inline int gpio_to_irq(unsigned gpio)
{
    /* GPIO can never have been requested or set as input */
    WARN_ON(1);
    return -EINVAL;
}
在使用时传入要获取中断号的GPIO编号,函数就会将该GPIO的中断号返回。
驱动试验
前面说了,我们这一章通过一个按键来测试中断,思路就是当按键按下后GPIO产生中断,然后内核响应中断并在前台打印信息。
设备树的修改前面讲设备树的时候已经完成了,主要就是设置了interrupt-parent的值和GPIO_IO18对应的中断源信息。
设备结构体
一般情况按键是成一组的状态存在的,所以我们一般用一个结构体来专门形容按键中断
/**
 * @brief 按键中断结构体
 *
 */
struct irq_keydesc {
    int gpio;                           //io编号
    int irqnum;                         //中断号
    unsigned char value;                //键值
    char name[10];                      //按键名字
    irqreturn_t (*handler)(int,void*);  //中断处理函数
};

/**
 * @brief 设备结构体
 *
 */
struct new_dev
{
    dev_t dev_id;
    int major;
    int minor;
    struct class *class;
    struct device *device;
    struct cdev cdev;
    struct device_node *dev_nd;
    int dev_gpio;

    struct irq_keydesc irqkey[KEY_NUM];         //按键描述数组
};
按键中断等结构体里定义了每个按键使用的GPIO,中断号、按键的键值、按键名字(这个按键名在设备注册完成后会在/proc/interrupt文件里呈现出来)最后是中断处理函数。
设备创建/dev节点的过程就不再多说了,但是因为这里在结构体里放了个按键数组,所以GPIO初始化需要再多说两句
GPIO初始化及中断初始化
先看代码
 1 static int dev_gpio_init(struct new_dev *dev)
 2 {
 3     int ret = 0;
 4     int i = 0;
 5
 6     //搜索设备树节点
 7     dev->dev_nd = of_find_node_by_path("/key");
 8     if(dev->dev_nd == NULL){
 9         printk("can't find device key\r\n");
10         ret = -EINVAL;
11         goto fail_nd;
12     }
13
14     for(i=0;i<KEY_NUM;i++)
15     {
16         dev->irqkey[i].gpio = of_get_named_gpio(dev->dev_nd,"key-gpios",i); //多个按键获取
17         if(dev->irqkey[i].gpio<0){
18             ret = -EINVAL;
19             goto fail_gpio_num;
20         }
21         ret = gpio_request(dev->irqkey[i].gpio,dev->irqkey[i].name);
22         if(ret){
23             ret = -EBUSY;
24             goto fail_gpio_request;
25         }
26         gpio_direction_input(dev->irqkey[i].gpio);
27         dev->irqkey[i].irqnum = gpio_to_irq(dev->irqkey[i].gpio);           //获取中断号
28         // dev->irqkey[i].irqnum = irq_of_parse_and_map(dev->dev_nd,i)        //方法2获取中断号
29     }
30
31     dev->irqkey[0].handler = key0_handle_irq;
32     dev->irqkey[0].value = KEY0VALUE;
33
34     for(i=0;i<KEY_NUM;i++){
35         memset(dev->irqkey[i].name,0,sizeof(dev->irqkey[i].name));
36         sprintf(dev->irqkey[i].name,"KEY%d",i);  //将格式化数据写入字符串中
37         ret = request_irq(dev->irqkey[i].irqnum,                            //中断号
38                             key0_handle_irq,                                //中断处理函数
39                             IRQ_TYPE_EDGE_RISING|IRQ_TYPE_EDGE_FALLING,     //中断处理函数
40                             dev->irqkey[i].name,                            //中断名称
41                             dev                                             //设备结构体
42                             );
43         if(ret){
44             printk("irq %d request err\r\n",dev->irqkey[i].irqnum);
45             goto fail_irq;
46         }
47     }
48
49     return 0;
50     fail_gpio_request:
51     fail_irq:
52         for(i=0; i<KEY_NUM;i++){
53             gpio_free(dev->irqkey[i].gpio);
54         }
55     fail_gpio_num:
56     fail_nd:
57         return ret;
58 }
这个gpio初始化和以前做的初始化最大的区别就是用来个for循环来进行GPIO的初始化。因为一个外设很有可能有多个按键,所以把按键做了个数组来对其描述。当前设备上只有一个按键,所以循环条件里的KEY_NUM就定义成了1。第一个循环里(14~29行)主要用来获取每个按键的gpio,申请GPIO资源,最后根据这个获取到中断的号。在获取中断号的时候因为是gpio外设就用了gpio_to_irq函数。还有个获取中断号的方法是低28行我注释掉的那个方法。第31行绑定了中断处理函数,第32行设置一个按钮的值(KEY0VALUE是个宏,对应的是第1个按钮的预设值)。
第2个循环体主要是处理中断相关内容。第25行用memset对字符串name初始化,在用36行的sprintf函数将格式化后的字符串写入字符串name。这个字符串就是我们在模块加载后可以查询中断信息的名称(KEY0)
中断初始化过程最重要的就是 37到42行的requrest_irq。函数每个参数都加上了注释应该很好理解。
中断处理函数
前面讲过,中断处理函数是有固定格式及返回值的,所以我们必须按照要求来构造
 1 static irqreturn_t key0_handle_irq(int irq, void *dev_id)
 2 {
 3     int value = 0;
 4     struct new_dev *dev = dev_id;
 5     value = gpio_get_value(dev->irqkey[0].gpio);
 6     printk("gpio read value = %d\r\n",value);
 7     if(value == 0){     //按下
 8         printk("key0 push\r\n");
 9     }
10     else{
11         //释放
12         printk("key0 released\r\n");
13     }
14     return IRQ_HANDLED;
15 }
在中断事件被触发后,系统会调用我们指定的中断处理函数。在这个函数中没有什么需要特别将的,因为在前面的request_irq函数中我们指定了触发模式是上升、下降沿触发,所以不管按键按下或松开都会触发中断运行该函数。触发中断后读取gpio到值,为1时表示按键松开,反之按键按下,每个操作都会打印出相关信息。下面放出来最终的代码


/**
 * @file irq.c
 * @author your name (you@domain.com)
 * @brief 中断驱动测试程序
 * @version 0.1
 * @date 2022-07-22
 *
 * @copyright Copyright (c) 2022
 *
 */
#include <linux/module.h>
#include <linux/kernel.h>
#include <linux/init.h>
#include <linux/fs.h>
#include <linux/uaccess.h>
#include <linux/io.h>
#include <linux/types.h>
#include <linux/cdev.h>
#include <linux/device.h>
#include <linux/of.h>
#include <linux/of_address.h>
#include <linux/of_irq.h>
#include <linux/gpio.h>
#include <linux/of_gpio.h>
#include <linux/irq.h>
#include <linux/interrupt.h>

#define DEVICE_CNT      1
#define DEVICE_NAME    "imx6uirq"

#define KEY_NUM         1
#define KEY0VALUE       0x01
#define INVALKEYS       0xFF

/**
 * @brief 按键中断结构体
 *
 */
struct irq_keydesc {
    int gpio;                           //io编号
    int irqnum;                         //中断号
    unsigned char value;                //键值
    char name[10];                      //按键名字
    irqreturn_t (*handler)(int,void*);  //中断处理函数
};

/**
 * @brief 设备结构体
 *
 */
struct new_dev
{
    dev_t dev_id;
    int major;
    int minor;
    struct class *class;
    struct device *device;
    struct cdev cdev;
    struct device_node *dev_nd;
    int dev_gpio;

    struct irq_keydesc irqkey[KEY_NUM];         //按键描述数组
};


/**
 * @brief 文件操作集合
 *
 */
static const struct file_operations key_fops = {
    .owner = THIS_MODULE,
    // .write = new_dev_write,
    // .open =  new_dev_open,
    // .release = new_dev_release,
};


struct new_dev new_dev;

static irqreturn_t key0_handle_irq(int irq, void *dev_id)
{
    int value = 0;
    struct new_dev *dev = dev_id;
    value = gpio_get_value(dev->irqkey[0].gpio);
    printk("gpio read value = %d\r\n",value);
    if(value == 0){     //按下
        printk("key0 push\r\n");
    }
    else{
        //释放
        printk("key0 released\r\n");
    }
    return IRQ_HANDLED;
}


static int dev_gpio_init(struct new_dev *dev)
{
    int ret = 0;
    int i = 0;

    //搜索设备树节点
    dev->dev_nd = of_find_node_by_path("/key");
    if(dev->dev_nd == NULL){
        printk("can't find device key\r\n");
        ret = -EINVAL;
        goto fail_nd;
    }

    for(i=0;i<KEY_NUM;i++)
    {
        dev->irqkey[i].gpio = of_get_named_gpio(dev->dev_nd,"key-gpios",i); //多个按键获取
        if(dev->irqkey[i].gpio<0){
            ret = -EINVAL;
            goto fail_gpio_num;
        }
        ret = gpio_request(dev->irqkey[i].gpio,dev->irqkey[i].name);
        if(ret){
            ret = -EBUSY;
            goto fail_gpio_request;
        }
        gpio_direction_input(dev->irqkey[i].gpio);
        dev->irqkey[i].irqnum = gpio_to_irq(dev->irqkey[i].gpio);           //获取中断号
        // dev->irqkey[i].irqnum = irq_of_parse_and_map(dev->dev_nd,i)        //方法2获取中断号
    }

    dev->irqkey[0].handler = key0_handle_irq;
    dev->irqkey[0].value = KEY0VALUE;

    for(i=0;i<KEY_NUM;i++){
        memset(dev->irqkey[i].name,0,sizeof(dev->irqkey[i].name));
        sprintf(dev->irqkey[i].name,"KEY%d",i);  //将格式化数据写入字符串中
        ret = request_irq(dev->irqkey[i].irqnum,                            //中断号
                            key0_handle_irq,                                //中断处理函数
                            IRQ_TYPE_EDGE_RISING|IRQ_TYPE_EDGE_FALLING,     //中断处理函数
                            dev->irqkey[i].name,                            //中断名称
                            dev                                             //设备结构体
                            );
        if(ret){
            printk("irq %d request err\r\n",dev->irqkey[i].irqnum);
            goto fail_irq;
        }
    }

    return 0;
    fail_gpio_request:
    fail_irq:
        for(i=0; i<KEY_NUM;i++){
            gpio_free(dev->irqkey[i].gpio);
        }
    fail_gpio_num:
    fail_nd:
        return ret;
}

static int __init key_init(void){

    int ret = 0;
    // unsigned int val = 0;
    //申请设备号
    new_dev.major = 0;
    if(new_dev.major){
        //手动指定设备号,使用指定的设备号
        new_dev.dev_id = MKDEV(new_dev.major,0);
        ret = register_chrdev_region(new_dev.dev_id,DEVICE_CNT,DEVICE_NAME);
    }
    else{
        //设备号未指定,申请设备号
        ret = alloc_chrdev_region(&new_dev.dev_id,0,DEVICE_CNT,DEVICE_NAME);
        new_dev.major = MAJOR(new_dev.dev_id);
        new_dev.minor = MINOR(new_dev.dev_id);
    }
    printk("dev id geted!\r\n");

    if(ret<0){
        //设备号申请异常,跳转至异常处理
        goto faile_devid;
    }

    //字符设备cdev初始化
    new_dev.cdev.owner = THIS_MODULE;

    cdev_init(&new_dev.cdev,&key_fops);                 //文件操作集合映射

    ret = cdev_add(&new_dev.cdev,new_dev.dev_id,DEVICE_CNT);
    if(ret<0){
        //cdev初始化异常,跳转至异常处理
        goto fail_cdev;
    }

    printk("chr dev inited!\r\n");


    //自动创建设备节点
    new_dev.class = class_create(THIS_MODULE,DEVICE_NAME);
    if(IS_ERR(new_dev.class)){
        //class创建异常处理
        printk("class err!\r\n");
        ret = PTR_ERR(new_dev.class);
        goto fail_class;
    }
    printk("dev class created\r\n");
    new_dev.device = device_create(new_dev.class,NULL,new_dev.dev_id,NULL,DEVICE_NAME);
    if(IS_ERR(new_dev.device)){
        //设备创建异常处理
        printk("device err!\r\n");
        ret = PTR_ERR(new_dev.device);
        goto fail_device;
    }
    printk("device created!\r\n");


    ret = dev_gpio_init(&new_dev);
    if(ret<0){
        goto fail_gpio_init;
    }
    return ret;


fail_gpio_init:
fail_device:
    //device创建失败,意味着class创建成功,应该将class销毁
    printk("device create err,class destroyed\r\n");
    class_destroy(new_dev.class);
fail_class:
    //类创建失败,意味着设备应该已经创建成功,此刻应将其释放掉
    printk("class create err,cdev del\r\n");
    cdev_del(&new_dev.cdev);
fail_cdev:
    //cdev初始化异常,意味着设备号已经申请完成,应将其释放
    printk("cdev init err,chrdev register\r\n");
    unregister_chrdev_region(new_dev.dev_id,DEVICE_CNT);
faile_devid:
    //设备号申请异常,由于是第一步操作,不需要进行其他处理
    printk("dev id err\r\n");
    return ret;
}

static void __exit key_exit(void){
    int i = 0;
    //释放中断
    for(i=0;i<KEY_NUM;i++){
        free_irq(new_dev.irqkey[i].irqnum,&new_dev);
    }

    for(i=0;i<KEY_NUM;i++){
        gpio_free(new_dev.irqkey[i].gpio);
    }
    cdev_del(&new_dev.cdev);
    unregister_chrdev_region(new_dev.dev_id,DEVICE_CNT);

    device_destroy(new_dev.class,new_dev.dev_id);
    class_destroy(new_dev.class);

}

module_init(key_init);
module_exit(key_exit);
MODULE_LICENSE("GPL");
MODULE_AUTHOR("ZeqiZ");
编译好驱动模块并加载后,查看中断信息可以看到前面那个讲name字符串时候的截图。按键按下和抬起后都会打印出相应内容
注意一下上面的打印信息,会有重复的信息打印出来,是因为我们没有对按键进行消抖操作。我们下一章会结合前面章节的定时器来实现如何对按键消抖。
