
Linux驱动开发四.使用of函数获取设备树节点信息
这一章之前我们应该先大致了解一下设备树的基本信息和基础语法。这两点我就先不总结了,网上多的是。为了后续做设备树的使用,我们这一章讲一下如何在驱动中(内核态)获取设备树中对于设备的描述。
of函数
内核为我们提供了一组of函数,用来获取设备树节点中的详细信息。这个OF函数路径为在内核路径下单include/linux/of.c中。我们主要使用下面几种
- 查找节点
- 查找子/父节点
- 提取属性值
- 其他,例如查询属性是否包含指定字符的、直接获取内存映射信息的等等
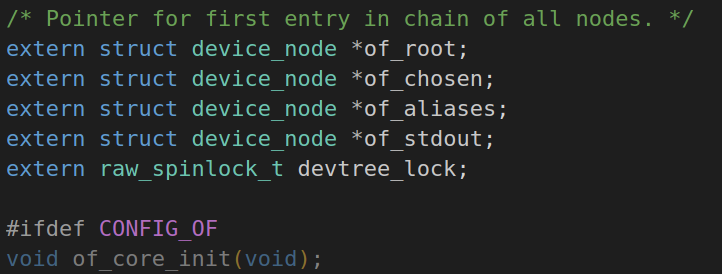
注意一点:在内核中如果想要使用of函数,要在导入的of.h内进行配置,加上下面的代码
#ifdef CONFIG_OF
如下图所示
结合下面一段设备树的信息,我们来试下如何使用这些of函数
#include <dt-bindings/input/input.h>
#include "imx6ull.dtsi"

/ {
    model = "Freescale i.MX6 ULL 14x14 EVK Board";
    compatible = "fsl,imx6ull-14x14-evk", "fsl,imx6ull";

    chosen {
        stdout-path = &uart1;
    };

    memory {
        reg = <0x80000000 0x20000000>;
    };

    reserved-memory {
        #address-cells = <1>;
        #size-cells = <1>;
        ranges;

        linux,cma {
            compatible = "shared-dma-pool";
            reusable;
            size = <0x14000000>;
            linux,cma-default;
        };
    };

    backlight {
        compatible = "pwm-backlight";
        pwms = <&pwm1 0 5000000>;
        brightness-levels = <0 4 8 16 32 64 128 255>;
        default-brightness-level = <6>;
        status = "okay";
    };
}
我们主要想要获取根节点下面back-light的信息。
通过OF函数获取节点
节点(device_node)在of.h里是按照一个结构体被定义好的
struct device_node {
    const char *name;
    const char *type;
    phandle phandle;
    const char *full_name;
    struct fwnode_handle fwnode;

    struct    property *properties;
    struct    property *deadprops;    /* removed properties */
    struct    device_node *parent;
    struct    device_node *child;
    struct    device_node *sibling;
    struct    kobject kobj;
    unsigned long _flags;
    void    *data;
#if defined(CONFIG_SPARC)
    const char *path_component_name;
    unsigned int unique_id;
    struct of_irq_controller *irq_trans;
#endif
};
驱动操作硬件,主要是获取节点内的属性。而想要获取属性,首先要索引到该节点。这个device_node结构体就是被索引出来的节点对象。
比如我们需要操作设备树中backlight这个设备,因为我们有这个设备的名称(backlight),并且这个设备树是我们自己写的,所以路径也是明确的,我们只需要直接指定路径就可以了,就要用到下面的函数
static inline struct device_node *of_find_node_by_path(const char *path)
参数path就是要操作的节点路径,由于backlight是在根节点下面,就可以直接指定,所以这个函数是我们最长用到。但是如果我们不太清楚其具体路径,还有个通过指定名称来查找的
extern struct device_node *of_find_node_by_name(struct device_node *from,
    const char *name);
指针参数from是我们需要查找的起始路径,name就是我们要找到设备树名称。
此外还有几种不太常用的,在/include/linux/of.h文件中都能找到
#define for_each_of_allnodes_from(from, dn) \
    for (dn = __of_find_all_nodes(from); dn; dn = __of_find_all_nodes(dn))
#define for_each_of_allnodes(dn) for_each_of_allnodes_from(NULL, dn)
extern struct device_node *of_find_node_by_name(struct device_node *from,
    const char *name);
extern struct device_node *of_find_node_by_type(struct device_node *from,
    const char *type);
extern struct device_node *of_find_compatible_node(struct device_node *from,
    const char *type, const char *compat);
extern struct device_node *of_find_matching_node_and_match(
    struct device_node *from,
    const struct of_device_id *matches,
    const struct of_device_id **match);

extern struct device_node *of_find_node_opts_by_path(const char *path,
    const char **opts);
不太常用,这里就不再一一列举了。
获取父子节点
这个功能暂时还用不到,把头文件中的声明列出来,以后如果需要了再做完善
extern struct device_node *of_get_parent(const struct device_node *node);
extern struct device_node *of_get_next_parent(struct device_node *node);
extern struct device_node *of_get_next_child(const struct device_node *node,
                                     struct device_node *prev);
extern struct device_node *of_get_next_available_child(const struct device_node *node,
                                  struct device_node *prev);
extern struct device_node *of_get_child_by_name(const struct device_node *node,
                                     const char *name);
不再说明具体用法。
获取节点属性
敲黑板!这段是重点!!!
我们要通过设备树来对应硬件写驱动,必须要拿到设备树里这些节点中指定键的值。根据值不同数据类型我们一步步来实现
字符串类属性获取
backlight属性中compatible(兼容性)属性的值时字符串类型
compatible = "pwm-backlight";
extern int of_property_read_string(struct device_node *np,
                   const char *propname,
                   const char **out_string);
参数np就是我们在前面拿到的节点结构体,propame就是属性,out_string就是要读取的数据,通过指针放到内存中。
#include <linux/module.h>
#include <linux/kernel.h>
#include <linux/init.h>
#include <linux/fs.h>
#include <linux/uaccess.h>
#include <linux/io.h>
#include <linux/types.h>
#include <linux/cdev.h>
#include <linux/device.h>
#include <linux/of.h>
#include <linux/of_address.h>
#include <linux/of_irq.h>


static int __init dtsof_init(void)
{
    int ret = 0;
    struct device_node *dev_nd=NULL;
    const char *str;

    //获取节点
    dev_nd = of_find_node_by_path("/backlight");
    //找到backlight的节点,其路径为/backlight
    if(dev_nd==NULL){
        ret = -EINVAL;
        return ret;
        goto fail_findnd;
    }

    //获取字符串类型属性
    ret = of_property_read_string(dev_nd,"compatible",&str);
    if(ret<0)
    {
        goto fail_readstr;
    }
    else{
        printk("read string status=%s\r\n",str);
    }

    return ret;
fail_readstr:
fail_findnd:
    return ret;
}

static void __exit dtsof_exit(void)
{

}

module_init(dtsof_init);
module_exit(dtsof_exit);

MODULE_LICENSE("GPL");
MODULE_AUTHOR("ZZQ");
整个文件是以驱动的流程呈现的,通过module_init()将初始化函数dtsof_init注册,在加载模块以后,先获取backlight对应节点(dev_nd),再通过读取字符属性的函数将compatible属性值读取到str指向的内存中,最后通过printk打印至终端。修改make文件后编译生成ko文件。
将ko文件复制到rootfs路径下lib/modules/4.1.15下,加载模块,会直接打印出来(第一次加载模块一定注意先运行depmod一下!),就会有下面的效果

of函数在读取成功时返回值应该为0,否则返回值为负数,所以在程序中我加了个判定,如果有异常通过goto语句跳转至相应功能代码处(案例中不需要做相应动作,所以是空的。)
default-brightness-level = <6>;
要注意点是,这里我们读取的数值类型数据都是32位的,要用到下面的函数
static inline int of_property_read_u32(const struct device_node *np,
                                 const char *propname,
                                  u32 *out_value)
其中参数np还是device_node,propname是我们要读取的属性,后面的指针是指向到读取数据存储的内存地址
由于前面已经有了整个函数的架构,这里只把init函数放出来看下
static int __init dtsof_init(void)
{
    int ret = 0;
    struct device_node *dev_nd=NULL;

    const char *str;

    //获取节点
    dev_nd = of_find_node_by_path("/backlight");
    //找到backlight的节点,其路径为/backlight
    if(dev_nd==NULL){
        ret = -EINVAL;
        return ret;
        goto fail_findnd;
    }

    //获取字符串类型属性
    ret = of_property_read_string(dev_nd,"compatible",&str);
    if(ret<0)
    {
        goto fail_readstr;
    }
    else{
        printk("read string status=%s\r\n",str);
    }

    //获取数字类型属性
    const u32 def_val;
    ret = of_property_read_u32(dev_nd,"default-brightness-level",&def_val);
    if(ret<0){goto fail_read32;}
    else{
        printk("default-brightness-level=%d\r\n",def_val);
    }

    return ret;
fail_read32:
fail_readstr:
fail_findnd:
    return ret;
}
make一下复制到指定目录,启动开发板后加载模块

这样可以看到我们读取到数据了,整形数据,值为6!
数组类型数据读取
最后就是读取数组类型的数据,首先要用到下面的函数获取数组的长度
static inline int of_property_count_elems_of_size(const struct device_node *np,
            const char *propname, int elem_size)
注意那个elem_size是数组中每个元素的数据长度,我们可以直接用sizeof(u32)来指定
static inline int of_property_read_u32(const struct device_node *np,
                       const char *propname,
                       u32 *out_value)
参数device_node就是设备节点,propname为属性名称,最后的out_value是读取的数组存储的地方。
先演示一个稍微复杂的方法,使用这个函数时可以先使用kmalloc函数申请一块内存(记得导入头文件(/linux/slab.h)),把读到的数据放在这块内存中
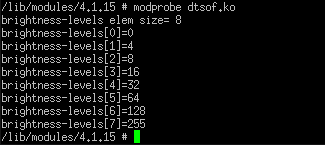
static int __init dtsof_init(void)
{
    int ret = 0;
    struct device_node *dev_nd=NULL;
    u8 i=0;
    u8 datasize;
    u32 *brival;

    //获取节点
    dev_nd = of_find_node_by_path("/backlight");
    //找到backlight的节点,其路径为/backlight
    if(dev_nd==NULL){
        ret = -EINVAL;
        return ret;
        goto fail_findnd;
    }

    // 获取数组类型属性

    datasize = of_property_count_elems_of_size(dev_nd,"brightness-levels",sizeof(u32));
    if(ret<0){
        ret = -EINVAL;
        goto fail_readele;
    }
    else{
        printk("brightness-levels elem size= %d\r\n",datasize);
    }

    brival = kmalloc(datasize * sizeof(u32),GFP_KERNEL);        //申请内存
    if(!brival){
        printk("buf err\r\n");
        ret = -EINVAL;
        goto fail_mem;
    }

    //内存获取成功,获取数组
    ret = of_property_read_u32_array(dev_nd,"brightness-levels",brival,datasize);
    if(ret<0){
        printk("read array err\r\n");
        goto fail_read32array;
    }
    else{
        for(i=0;i<datasize;i++)
        {printk("brightness-levels[%d]=%d\r\n",i,*(brival+i));}

    }
    kfree(brival);
    return ret;

fail_read32array:
    kfree(brival);   //释放内存
fail_mem:

fail_readele:
fail_findnd:
    return ret;
}
注意在使用kmalloc函数后如果成功申请了内存,在使用完成后要将该内存空间释放,有个和kmalloc成对的函数kfree,把申请的内存传递过去就可以了。make以后加载模块可以看出来读取到的值和数组。
这种方法要事先申请一段内存空间,也可以直接声明一个数组,把数组直接传给参数。但是用上面的方法有个优点就是如果我们不知道数组元素的个数,在声明变量的时候是无法定义数组大小的,那么就可以直接通过获取数组元素个数再通过这个值申请内存空间。直接定义数组的过程在下一章节会使用到!
有了上面的几个函数,后面我们就可以从最基础的点灯来演示一下了!
