WebAPI2使用Autofac实现IOC属性注入完美解决方案
一、前言
只要你是.NETer你一定IOC,IOC里面你也会一定知道Autofac,上次说了在MVC5实现属性注入,今天实现在WebApi2实现属性注入,顺便说一下autofac的程序集的注入方式,都会在后面的代码里面有提现
在WebAPI2使用Autofac注入的时候大多数人会出现如下问题:
未能加载文件或程序集“System.Web.Http, Version=5.0.0.0, Culture=neutral, PublicKeyToken=31bf3856ad364e35”或它的某一个依赖项。找到的程序集清单定义与程序集引用不匹配。 (异常来自 HRESULT:0x80131040)
截图如下:

这个是Autofac强依赖造成的,比较坑的。解决办法如下。
Nuget添加Microsoft.AspNet.WebApi
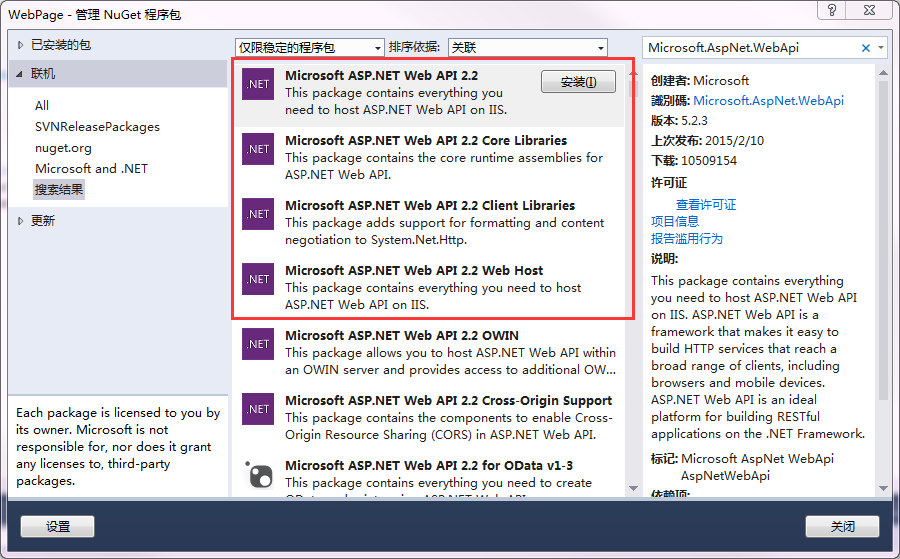
或通过NuGet 程序包管理器控制台添加:
Install-Package Microsoft.AspNet.WebApi
Update-Package Microsoft.AspNet.WebApi -reinstall(存在)
原因:我们新建的是一个空的MVC项目,缺少引用
先上个结构图,结构图只是为了说明webAPI如何简单使用Autofac实现属性注入。

属性注入存在安全隐患,官方建议使用构造函数注入。
下面说下具体实现:
二、代码实现
1、新建一个WebAPI.Entity类库,新建一个Person.cs类
    public class Person
    {
        public int Id { get; set; }
        public string Name { get; set; }
        public int Age { get; set; }
        public string Address { get; set; }
    }
2、新建WebAPI.IRepository类库,新建一个IPersonRepository类
    public interface IPersonRepository
    {
        List<Person> GetAll();
        Person Get(int id);
        Person Add(Person item);
        bool Update(Person item);
        bool Delete(int id);
    }
3、新建WebAPI.Repository类库,新建一个PersonRepository类实现IPersonRepository接口

public class PersonRepository : IPersonRepository
    {
        List<Person> person = new List<Person>();

        public PersonRepository()
        {
            Add(new Person { Id = 1, Name = "joye.net1", Age = 18, Address = "中国上海" });
            Add(new Person { Id = 2, Name = "joye.net2", Age = 18, Address = "中国上海" });
            Add(new Person { Id = 3, Name = "joye.net3", Age = 18, Address = "中国上海" });
        }
        public List<Person> GetAll()
        {
            return person;
        }
        public Person Get(int id)
        {
            return person.Find(p => p.Id == id);
        }
        public Person Add(Person item)
        {
            if (item == null)
            {
                throw new ArgumentNullException("item");
            }
            person.Add(item);
            return item;
        }
        public bool Update(Person item)
        {
            if (item == null)
            {
                throw new ArgumentNullException("item");
            }

            int index = person.FindIndex(p => p.Id == item.Id);
            if (index == -1)
            {
                return false;
            }
            person.RemoveAt(index);
            person.Add(item);
            return true;
        }
        public bool Delete(int id)
        {
            person.RemoveAll(p => p.Id == id);
            return true;
        }
    }
4、新建WebAPI.IServices类库,新建IPersonServices接口
    public interface IPersonServices
    {
        List<Person> GetAll();
    }
5、IPersonServices接口在WebAPI.Services类库里面PersonServices实现
    public class PersonServices : IPersonServices
    {
        //程序集属性注入
        public IPersonRepository iPerson;

        public List<Person> GetAll()
        {
            return iPerson.GetAll();
        }
    }
6、新建一个WebAPI项目WebAPI,新建AutoFacBootStrapper类,nuget安装autofac

public class AutoFacBootStrapper
    {
        public static void CoreAutoFacInit()
        {
            var builder = new ContainerBuilder();
            HttpConfiguration config = GlobalConfiguration.Configuration;

            SetupResolveRules(builder);

            ////注册所有的Controllers
            //builder.RegisterControllers(Assembly.GetExecutingAssembly()).PropertiesAutowired();
            //注册所有的ApiControllers
            builder.RegisterApiControllers(Assembly.GetExecutingAssembly()).PropertiesAutowired();

            var container = builder.Build();
            //注册api容器需要使用HttpConfiguration对象
            config.DependencyResolver = new AutofacWebApiDependencyResolver(container);
            DependencyResolver.SetResolver(new AutofacDependencyResolver(container));
        }

        private static void SetupResolveRules(ContainerBuilder builder)
        {
            //WebAPI只用引用services和repository的接口,不用引用实现的dll。
            //如需加载实现的程序集,将dll拷贝到bin目录下即可,不用引用dll
            var iServices = Assembly.Load("WebAPI.IServices");
            var services = Assembly.Load("WebAPI.Services");
            var iRepository = Assembly.Load("WebAPI.IRepository");
            var repository = Assembly.Load("WebAPI.Repository");

            //根据名称约定(服务层的接口和实现均以Services结尾),实现服务接口和服务实现的依赖
            builder.RegisterAssemblyTypes(iServices, services)
              .Where(t => t.Name.EndsWith("Services"))
              .AsImplementedInterfaces();

            //根据名称约定(数据访问层的接口和实现均以Repository结尾),实现数据访问接口和数据访问实现的依赖
            builder.RegisterAssemblyTypes(iRepository, repository)
              .Where(t => t.Name.EndsWith("Repository"))
              .AsImplementedInterfaces();
        }
    }
7、程序启动注入
        protected void Application_Start()
        {
            GlobalConfiguration.Configure(WebApiConfig.Register);
            AreaRegistration.RegisterAllAreas();
            RouteConfig.RegisterRoutes(RouteTable.Routes);
            FilterConfig.RegisterGlobalFilters(GlobalFilters.Filters);
            BundleConfig.RegisterBundles(BundleTable.Bundles);

            //程序启动注入
            AutoFacBootStrapper.CoreAutoFacInit();
        }
8.接口调用数据
        public IPersonServices IServices { get; set; }
        // GET api/<controller>
        public IEnumerable<string> Get()
        {
            var list = IServices.GetAll();
            return new string[] { "value1", "value2" };
        }
9.运行访问api/values/,打个断点看下搞定
三、总结
autofac确实用起来很方便,上面只是简单的实现,如果想深入学习可以下载我上一个文章提供的两个开源的项目可以学习下,也可以到autofac官网去了解下。
最近在看相关文章,很多都太专业化了没怎么看懂,这是自己现在对IoC的一些理解,记录下来,要不然时间一久,也就忘了。
自己对IoC模式理解还很浅,希望得到各位的指点。
代码下载:
https://yunpan.cn/c6QCURhYmGcP9 (提取码:e97a)


【推荐】国内首个AI IDE,深度理解中文开发场景,立即下载体验Trae
【推荐】编程新体验,更懂你的AI,立即体验豆包MarsCode编程助手
【推荐】抖音旗下AI助手豆包,你的智能百科全书,全免费不限次数
【推荐】轻量又高性能的 SSH 工具 IShell:AI 加持,快人一步
· Linux系列:如何用 C#调用 C方法造成内存泄露
· AI与.NET技术实操系列(二):开始使用ML.NET
· 记一次.NET内存居高不下排查解决与启示
· 探究高空视频全景AR技术的实现原理
· 理解Rust引用及其生命周期标识(上)
· 阿里最新开源QwQ-32B,效果媲美deepseek-r1满血版,部署成本又又又降低了!
· 单线程的Redis速度为什么快?
· SQL Server 2025 AI相关能力初探
· 展开说说关于C#中ORM框架的用法!
· AI编程工具终极对决:字节Trae VS Cursor,谁才是开发者新宠?