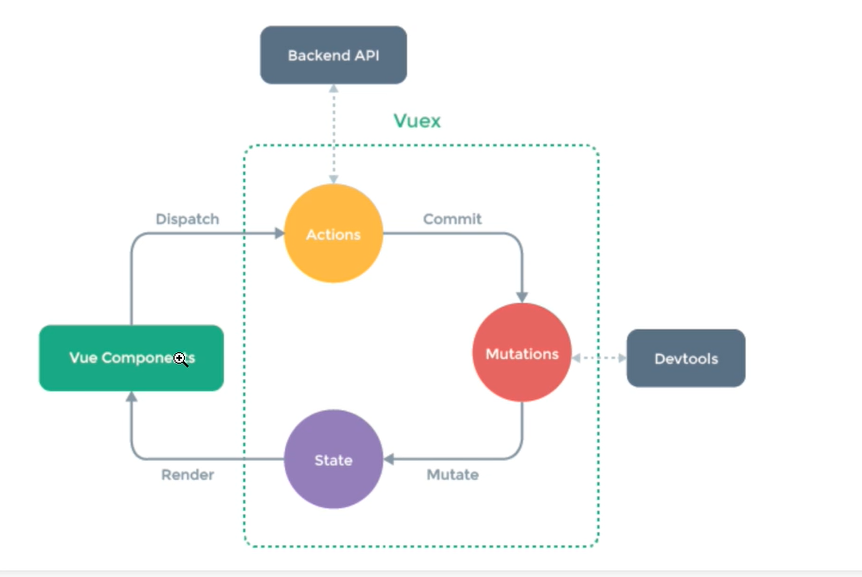
vuex使用
使用的流程
文件中的代码
前端页面
<template>
<div>
<h1>使用vuex</h1>
购物车商品数量:{{num}}
购物车的数量:{{$store.state.num}}
<br>
<button @click="yjx">加数量</button>
</div>
</template>
<script>
export default {
name: 'HomeView',
data(){
return{}
},
methods:{
yjx(){
1.直接在这个页面完成加减
this.$store.state.num += 1
2.通过dispatch触发actions这个就是一个完整的流程方法
this.$store.dispatch('add',2)
3.跳过Actions调用Mutations函数
this.$store.commit('yzx',3)
}
}
}
</script>
src下的store文件的index文件
import Vue from 'vue' 导入main文件在那边也导入了
import Vuex from 'vuex'
Vue.use(Vuex)
export default new Vuex.Store({
state: {
num:10 默认的数量
},
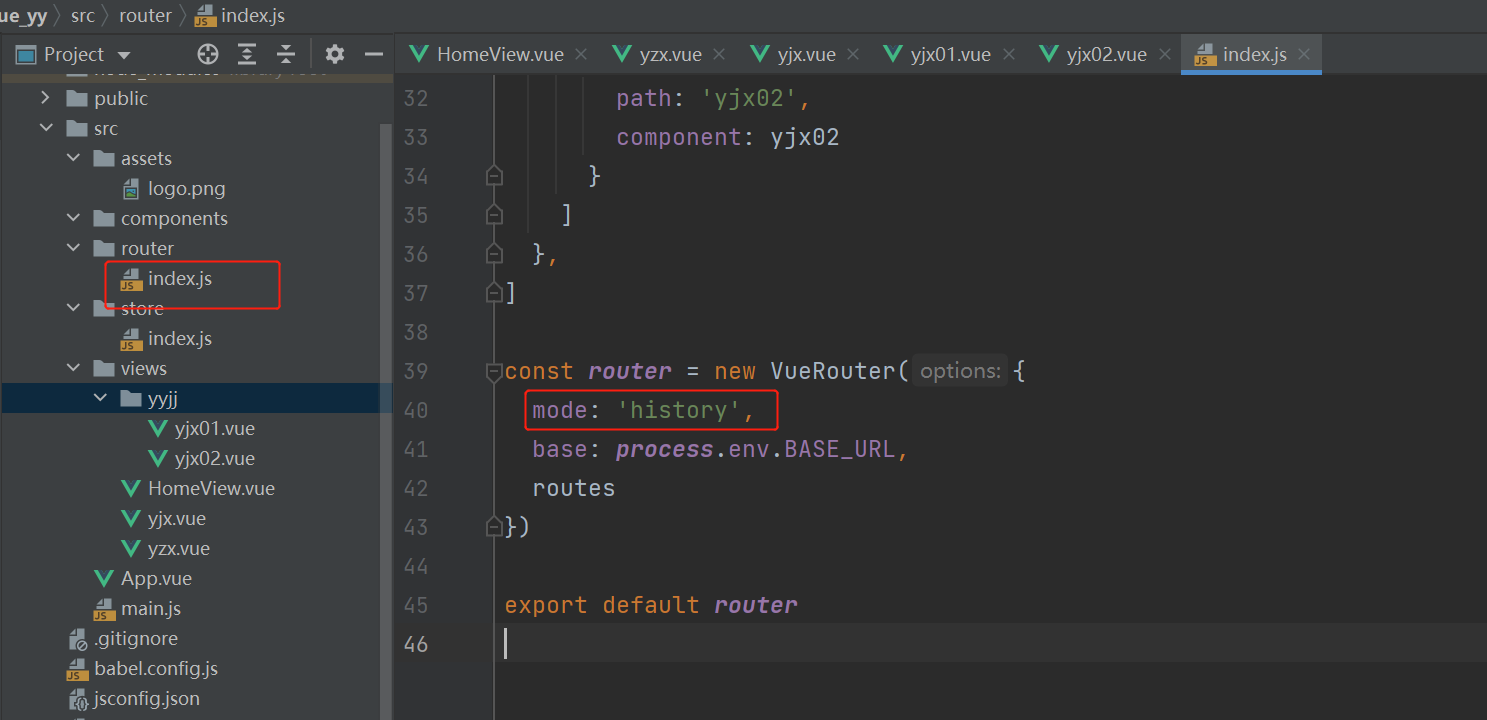
mutations: {
yzx(state, count){
// console.log(state)
// console.log(count)
state.num=state.num+count 添加数量
}
},
actions: {
// 需要一个参数和一个调用函数的数据,context上下文对象,可以触发mutations中的函数,也可以更改state中的数据都可以
add(context, count){
// 使用count来触发mutations的函数
// console.log(context)
// console.log(count)
context.commit('yzx', count) // 触发mutations函数yzx执行
}
},
})
组件之间的交互
html文件编写
父件
<template>
<div>
<HelloWorld></HelloWorld>
</div>
</template>
<script>
import HelloWorld from "@/components/HelloWorld";
export default {
name: 'HomeView',
data(){
return{}
},
methods:{
app(name){
this.$store.dispatch('yy',name)
}
},
components:{
HelloWorld
}
}
</script>
子件
<template>
<div>
购物车商品:{{$store.state.goods}}
</div>
</template>
<script>
export default {
}
</script>
<style scoped>
</style>
index文件
import Vue from 'vue'
import Vuex from 'vuex'
Vue.use(Vuex)
export default new Vuex.Store({
state: {
goods:[]
},
mutations: {
yyjj(state, name){
state.goods.push(name)
}
},
actions: {
yy(context, name){
context.commit('yyjj', name)
}
},
})
Router使用(做两个页面的跳转)
简单使用
<template>
  <div>
    <h1>久保</h1>
    <router-link to="/elmw">   路由配置
      <button>跳转到式守</button>  这里包什么都会跳转
    </router-link>
  </div>
</template>
js跳转html文件
<button @click="yy">跳就对了</button>
methods:{
    yy(){
      this.$router.push('/elmw')
    }
  },
路由跳转时,可以使用对象
通过对象跳转路由name形式: <router-link :to="{name:'about'}">
通过对象跳转路由path形式: <router-link :to="{path:'/about'}">
对象中可以有query属性,是个对象类型,会把里面的key-value拼到路径后面
<router-link :to="usr">
      <button>跳转到式守</button>
</router-link>
  data(){
    return{
      usr:{
        path:'/emlw',
        query:{
          id:1,
          age:18
        }
      }
    }
  }
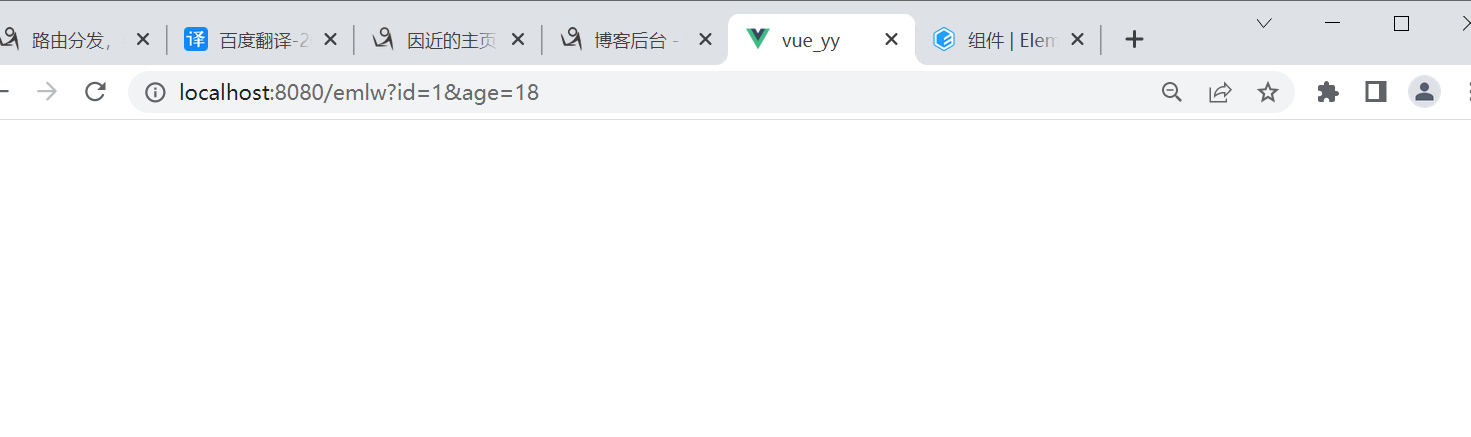
获取网址?后带的数据
this.$route:当前路由对象,当前路径,取传递数据。。。
this.$router:整个路由对象,主要做跳转用
这样就是获取?后面的数据this.$route.query注意那个页面的哦
export default {
  name: "elmw",
created() {
  console.log(this.$route.query)
}}
注册的时候加个:pk就是后面匹配数字多少都可以3
const routes = [
  {
    path: '/',
    name: 'home',
    component: HomeView
  },
    {
    path: '/yzx/:pk',
    name: 'yzx',
    component: yzx
  },
]
获取pk的数据
export default {
  name: "yzx",
  created() {
    console.log(this.$route.params)
  }
}
this.router 的一些方法
this.$router.push(path): 相当于点击路由链接(可以返回到当前路由界面)
this.$router.replace(path): 用新路由替换当前路由(不可以返回到当前路由界面)
this.$router.back(): 请求(返回)上一个记录路由
this.$router.go(-1): 请求(返回)上一个记录路由
this.$router.go(1): 请求下一个记录路由
多级路由(就是为了实现在一个页面上几个子页面跳转)
主文件编辑,创建一个文件存放在views下面
<template>
<div>
  <h1>应锦曦主页面</h1>
  <router-link to="yjx01"><button>yjx--01</button></router-link>   点击展示子页面
  <router-link to="yjx02"><button>yjx--02</button></router-link>  点击展示子页面
  <router-view>   写着吧不知道干嘛
  </router-view>
</div>
</template>
注册方法
import yjx02 from "@/views/yyjj/yjx02";    文件导入
import yjx01 from "@/views/yyjj/yjx01";     文件导入
const routes = [
  {
    path: '/',
    name: 'home',
    component: HomeView
  },
    {
    path: '/yzx/:pk',
    name: 'yzx',
    component: yzx
  },  {
    path: '/yjx',
    name: 'yjx',
    component: yjx,
    children:[   放在主页面的下面 然后就可以使用子页面了
      {
        path: 'yjx01',
        component: yjx01
      },
      {
        path: 'yjx02',
        component: yjx02
      }
    ]
  },
]
路由守卫(对路由进行权限控制)
使用的范围(全局守卫,独享守卫,组件守卫)
前置路由守卫和后置路由守卫
在router-index.js中添加以下代码
router.beforeEach((to, from, next) => {
    console.log('前置路由守卫', to, from)
    // 要是访问yjx,都不能跳转'
    // 如果没有登录,不能访问
    if (to.path == '/yjx/yjx01') {
        alert('你没有有权限')
    } else {
        next() # 继续访问
    }
路由的工作模式(切换HTTP请求)
路由器的两种工作模式
1 对于一个url来说,什么是hash值?——
2 hash值不会包含在 HTTP 请求中,即:hash值不会带给服务器。
3 hash模式:
地址中永远带着
若以后将地址通过第三方手机app分享,若app校验严格,则地址会被标记为不合法。
兼容性较好。
4 history模式:
地址干净,美观 。
兼容性和hash模式相比略差。
应用部署上线时需要后端人员支持,解决刷新页面服务端404的问题
localstorage和sessionstorage,和cookie(前端存储数据的地方)
localstorage:永久存储,除非你删除,关闭浏览器,再打开还会在
sessionstorage:只在当前会话生效,关闭浏览器,就没了
cookie:有过期时间,到了过期时间,自动删除
代码编写
<template>
<div>
<h1>操作localstorage,永久存储</h1>
<button @click="addLocalstorage">增加</button>
<button @click="getLocalstorage">查</button>
<button @click="deleteLocalstorage">删除</button>
<h1>操作sessiostorage,当前会话,关闭浏览器</h1>
<button @click="addSessiostorage">增加</button>
<button @click="getSessiostorage">查</button>
<button @click="deleteSessiostorage">删除</button>
<h1>操作cookie,有过期时间</h1>
<button @click="addCookie">增加</button>
<button @click="getCookie">查</button>
<button @click="deleteCookie">删除</button>
</div>
</template>
<script>
export default {
name: 'HomeView',
data(){
return{
}
},
methods:{
addLocalstorage() {
var userinfo = {name: '数据', age: 数据}
localStorage.setItem('userinfo', JSON.stringify(userinfo))
}, 不转换成json模式就乱码了
getLocalstorage() {
var userinfo = localStorage.getItem('userinfo')
console.log(JSON.parse(userinfo).name)
},
deleteLocalstorage() {
localStorage.clear()
localStorage.removeItem('userinfo')
},
addSessiostorage() {
var userinfo = {name: '数据', age: 数据}
sessionStorage.setItem('userinfo', JSON.stringify(userinfo))
},
getSessiostorage() {
var userinfo = sessionStorage.getItem('userinfo')
console.log(JSON.parse(userinfo).name)
},
deleteSessiostorage() {
sessionStorage.clear()
sessionStorage.removeItem('userinfo')
},
addCookie() {
this.$cookies.set('name', '数据', '数据')
},
getCookie() {
console.log(this.$cookies.get('name'))
},
deleteCookie() {
this.$cookies.remove('name')
},
},
components:{
}
}
</script>


【推荐】国内首个AI IDE,深度理解中文开发场景,立即下载体验Trae
【推荐】编程新体验,更懂你的AI,立即体验豆包MarsCode编程助手
【推荐】抖音旗下AI助手豆包,你的智能百科全书,全免费不限次数
【推荐】轻量又高性能的 SSH 工具 IShell:AI 加持,快人一步
· TypeScript + Deepseek 打造卜卦网站:技术与玄学的结合
· Manus的开源复刻OpenManus初探
· AI 智能体引爆开源社区「GitHub 热点速览」
· 从HTTP原因短语缺失研究HTTP/2和HTTP/3的设计差异
· 三行代码完成国际化适配,妙~啊~