CentOS安装MariaDB
本文总结自己的实践过程,文末有相关参考链接。
安装
前往官网选择版本
将以下内容创建到文件/etc/yum.repos.d/MariaDB.repo中(版本为10.5)
# MariaDB 10.5 [Stable] CentOS repository list - created 2020-09-09 08:33 UTC
# https://mariadb.org/download-test/
[mariadb]
name = MariaDB
baseurl = https://mirrors.tuna.tsinghua.edu.cn/mariadb/yum/10.5/centos7-amd64
gpgkey=https://mirrors.tuna.tsinghua.edu.cn/mariadb/yum/RPM-GPG-KEY-MariaDB
gpgcheck=1
用以下命令安装MariaDB
yum install MariaDB-server MariaDB-client
注:使用efcore并且当你改了实体字段名做自动迁移时,可能会出现异常,原因是低版本不支持ALTER TABLE XX RENAME COLUMN OLDXXX TO NEWXX语法,升级到高版本即可,亲测V10.5支持。
初始化
执行mysql_secure_installation命令,按步骤操作即可,如下
# mysql_secure_installation

NOTE: RUNNING ALL PARTS OF THIS SCRIPT IS RECOMMENDED FOR ALL MariaDB
      SERVERS IN PRODUCTION USE!  PLEASE READ EACH STEP CAREFULLY!

In order to log into MariaDB to secure it, we'll need the current
password for the root user.  If you've just installed MariaDB, and
you haven't set the root password yet, the password will be blank,
so you should just press enter here.

Enter current password for root (enter for none):
OK, successfully used password, moving on...

Setting the root password ensures that nobody can log into the MariaDB
root user without the proper authorisation.

Set root password? [Y/n] y
New password:
Re-enter new password:
Password updated successfully!
Reloading privilege tables..
 ... Success!


By default, a MariaDB installation has an anonymous user, allowing anyone
to log into MariaDB without having to have a user account created for
them.  This is intended only for testing, and to make the installation
go a bit smoother.  You should remove them before moving into a
production environment.

Remove anonymous users? [Y/n] y
 ... Success!

Normally, root should only be allowed to connect from 'localhost'.  This
ensures that someone cannot guess at the root password from the network.

Disallow root login remotely? [Y/n] y
 ... Success!

By default, MariaDB comes with a database named 'test' that anyone can
access.  This is also intended only for testing, and should be removed
before moving into a production environment.

Remove test database and access to it? [Y/n] y
 - Dropping test database...
 ... Success!
 - Removing privileges on test database...
 ... Success!

Reloading the privilege tables will ensure that all changes made so far
will take effect immediately.

Reload privilege tables now? [Y/n] y
 ... Success!

Cleaning up...

All done!  If you've completed all of the above steps, your MariaDB
installation should now be secure.

Thanks for using MariaDB!
配置UTF8编码
- 编辑/etc/my.cnf,在[mysqld]标签下添加如下内容
default-storage-engine = innodb
innodb_file_per_table
max_connections = 4096
collation-server = utf8_general_ci
character-set-server = utf8
- 编辑/etc/my.cnf.d/client.cnf,在[client]标签下添加如下内容
default-character-set=utf8
- 编辑/etc/my.cnf.d/mysql-clients.cnf,在[mysql]标签下添加如下内容
default-character-set=utf8
- 重启服务
systemctl restart mariadb
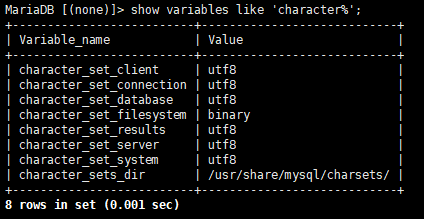
- 验证结果
show variables like 'character%';
忽略表名大小写
编辑/etc/my.cnf(不存在则新增),在[mysqld]添加如下内容
lower_case_table_names = 1
重启服务
systemctl restart mariadb
验证结果
show variables like "%lower_case_table_names";
注意:
若修改前已经存在表,修改后查询表时会出现“unknow database”错误,需要先导出后重建数据库。
开启远程访问
//方法一:不限IP(%:表示从任何主机连接到mysql服务器)
GRANT ALL PRIVILEGES ON *.* TO 'root'@'%' IDENTIFIED BY '你的root密码' WITH GRANT OPTION;
FLUSH PRIVILEGES;

//方法二:限制特定IP才可连接
GRANT ALL PRIVILEGES ON *.* TO 'root'@'100.100.100.100(此处为你的公网IP)' IDENTIFIED BY '你的root密码' WITH GRANT OPTION;
FLUSH PRIVILEGES;

 浙公网安备 33010602011771号