部署linux网络安装服务器
一、批量部署概述
什么是PXE
预启动执行环境(PXE)是由Intel公司开发的最新技术,工作于Client/Server的网络模式,支持工作站通过网络从远端服务器下载映像,并由此支持通过网络启动操作系统,在启动过程中,终端要求服务器分配IP地址,再用TFTP(trivial file transfer protocol)或MTFTP(multicast trivial file transfer protocol)协议下载一个启动软件包到本机内存中执行,由这个启动软件包完成终端(客户端)基本软件设置,从而引导预先安装在服务器中的终端操作系统。PXE可以引导多种操作系统,如:Windows95/98/2000/windows2003/windows2008/winXP/win7/win8,linux系列系统等。
PXE原理
PXE是在没有软驱、硬盘、CD-ROM的情况下引导计算机的一种方式,也就是BIOS将使用PXE协议从网络引导。整个安装的过程是这样的:
PXE网卡启动 => DHCP获得IP地址 => 从TFTP上下载 pxelinux.0、vmlinuz、initr.img 等 => 引导系统进入安装步骤 => 通过PEX linux 下载ks.cfg文件并跟据ks.cfg自动化安装系统 => 完成。
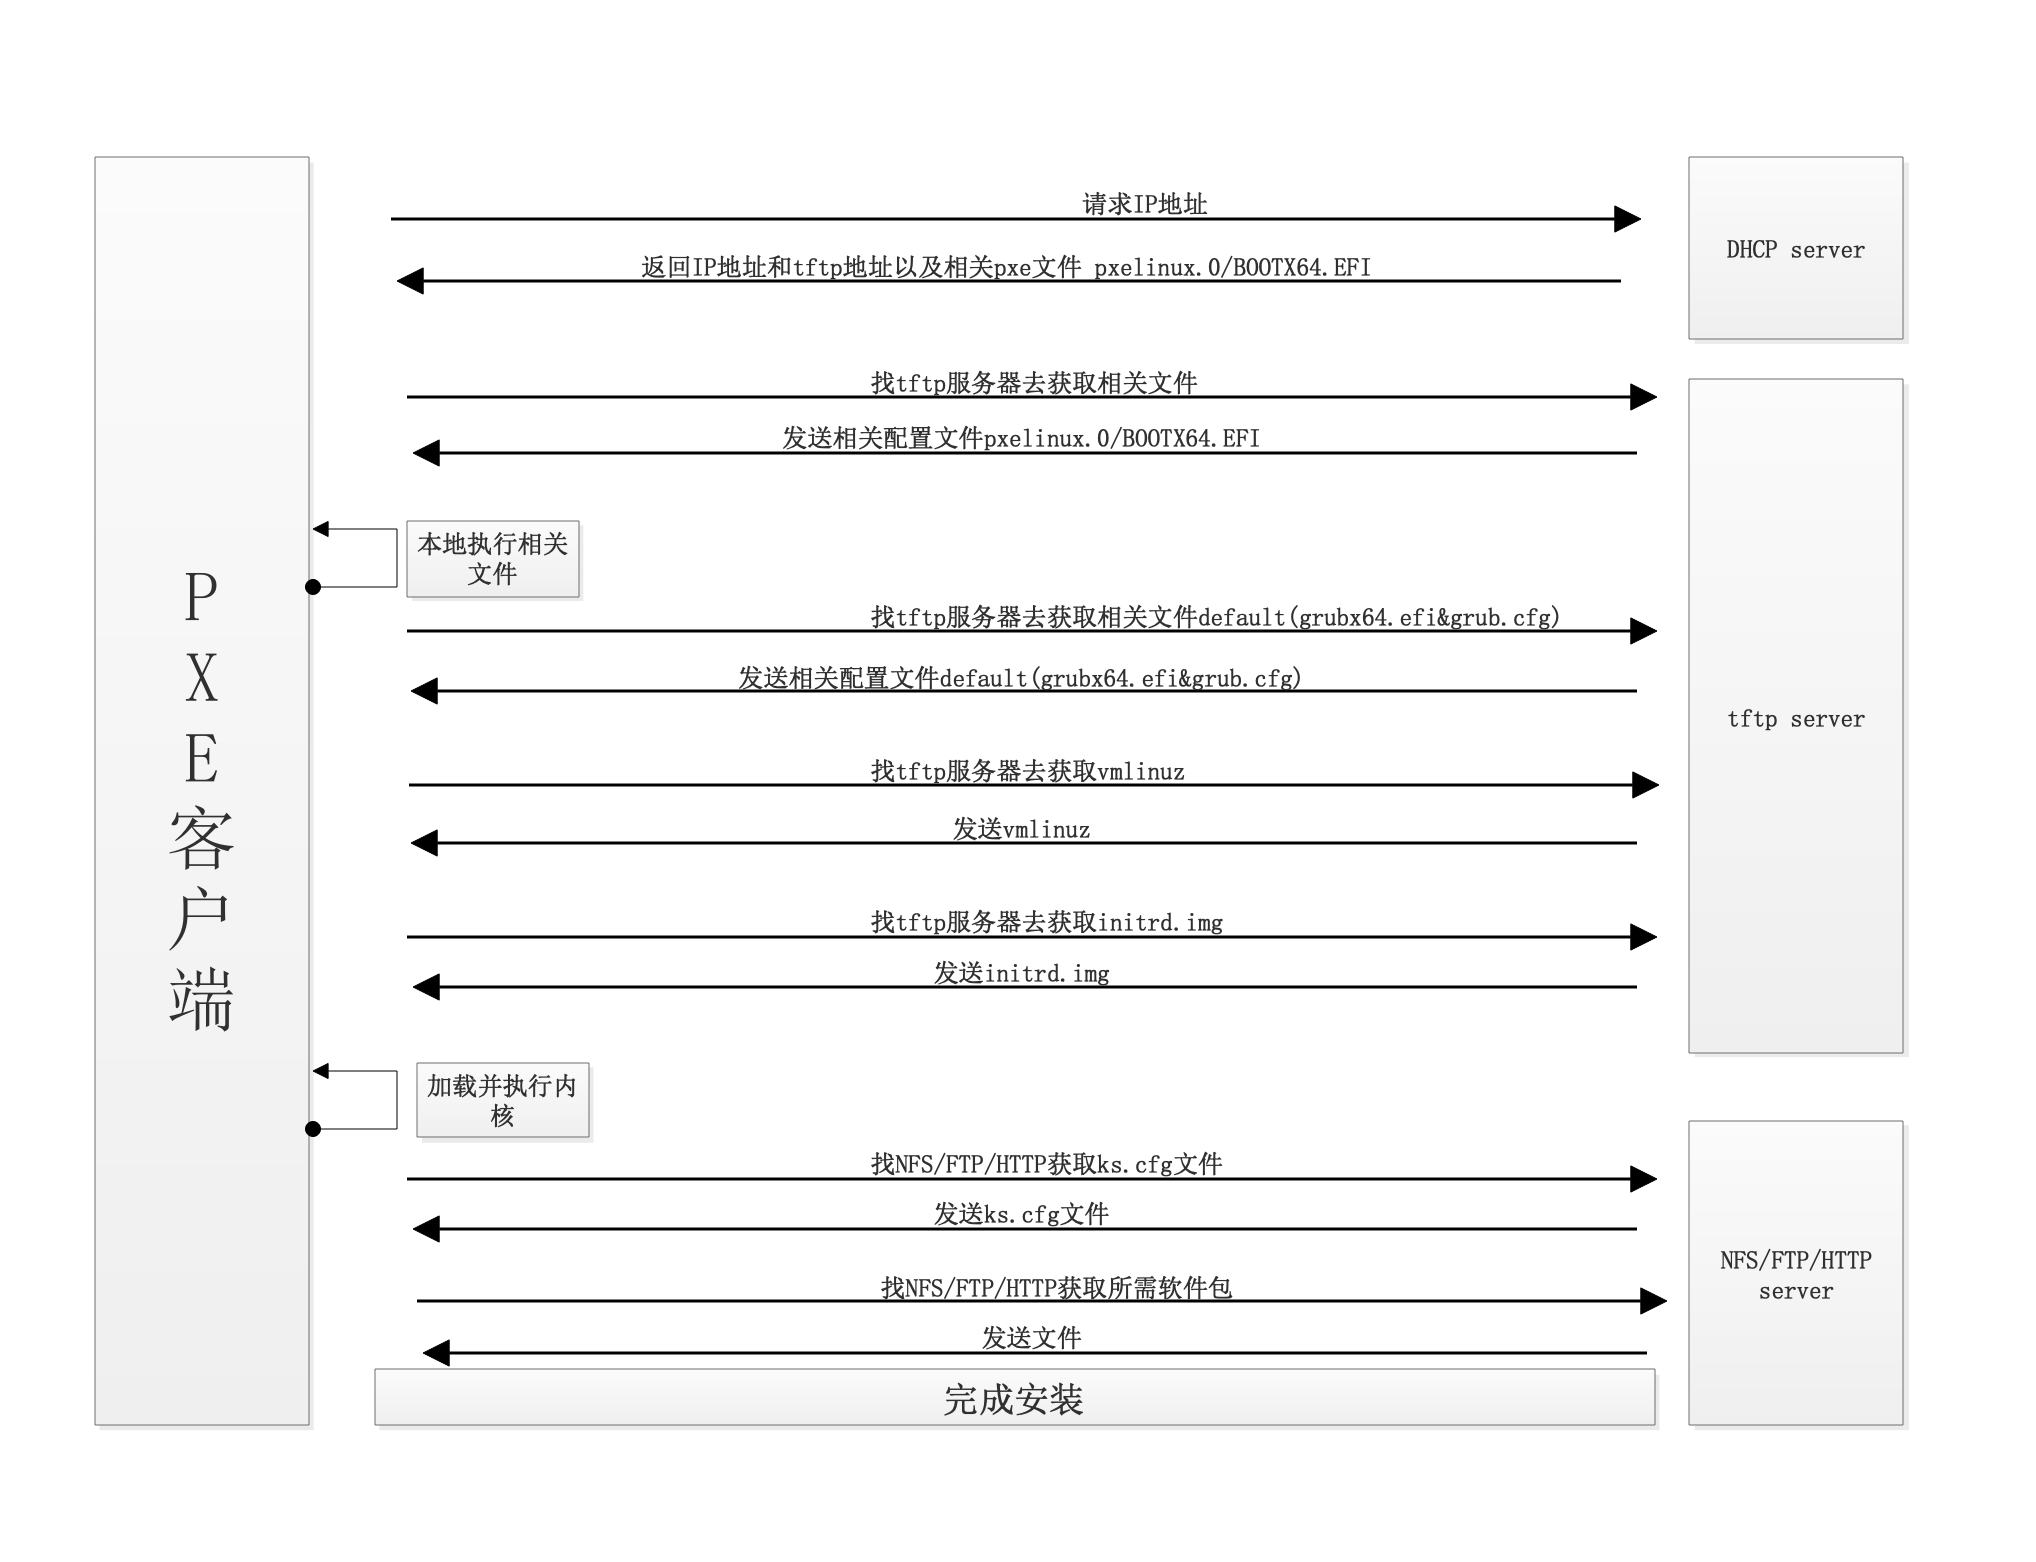
TFTP服务
TFTP是用来下载远程文件的最简单网络协议,它其于UDP协议而实现。
什么是kickstart
KickStart是一种无人职守安装方式。KickStart的工作原理是通过记录典型的安装过程中所需人工干预填写的各种参数,并生成一个名为ks.cfg的文件;在其后的安装过程中(不只局限于生成KickStart安装文件的机器)当出现要求填写参数的情况时,安装程序会首先去查找KickStart生成的文件,当找到合适的参数时,就采用找到的参数,当没有找到合适的参数时,才需要安装者手工干预。这样,如果KickStart文件涵盖了安装过程中出现的所有需要填写的参数时,安装者完全可以只告诉安装程序从何处取ks.cfg文件,然后去忙自己的事情。等安装完毕,安装程序会根据ks.cfg中设置的重启选项来重启系统,并结束安装。
二、批量部署原理
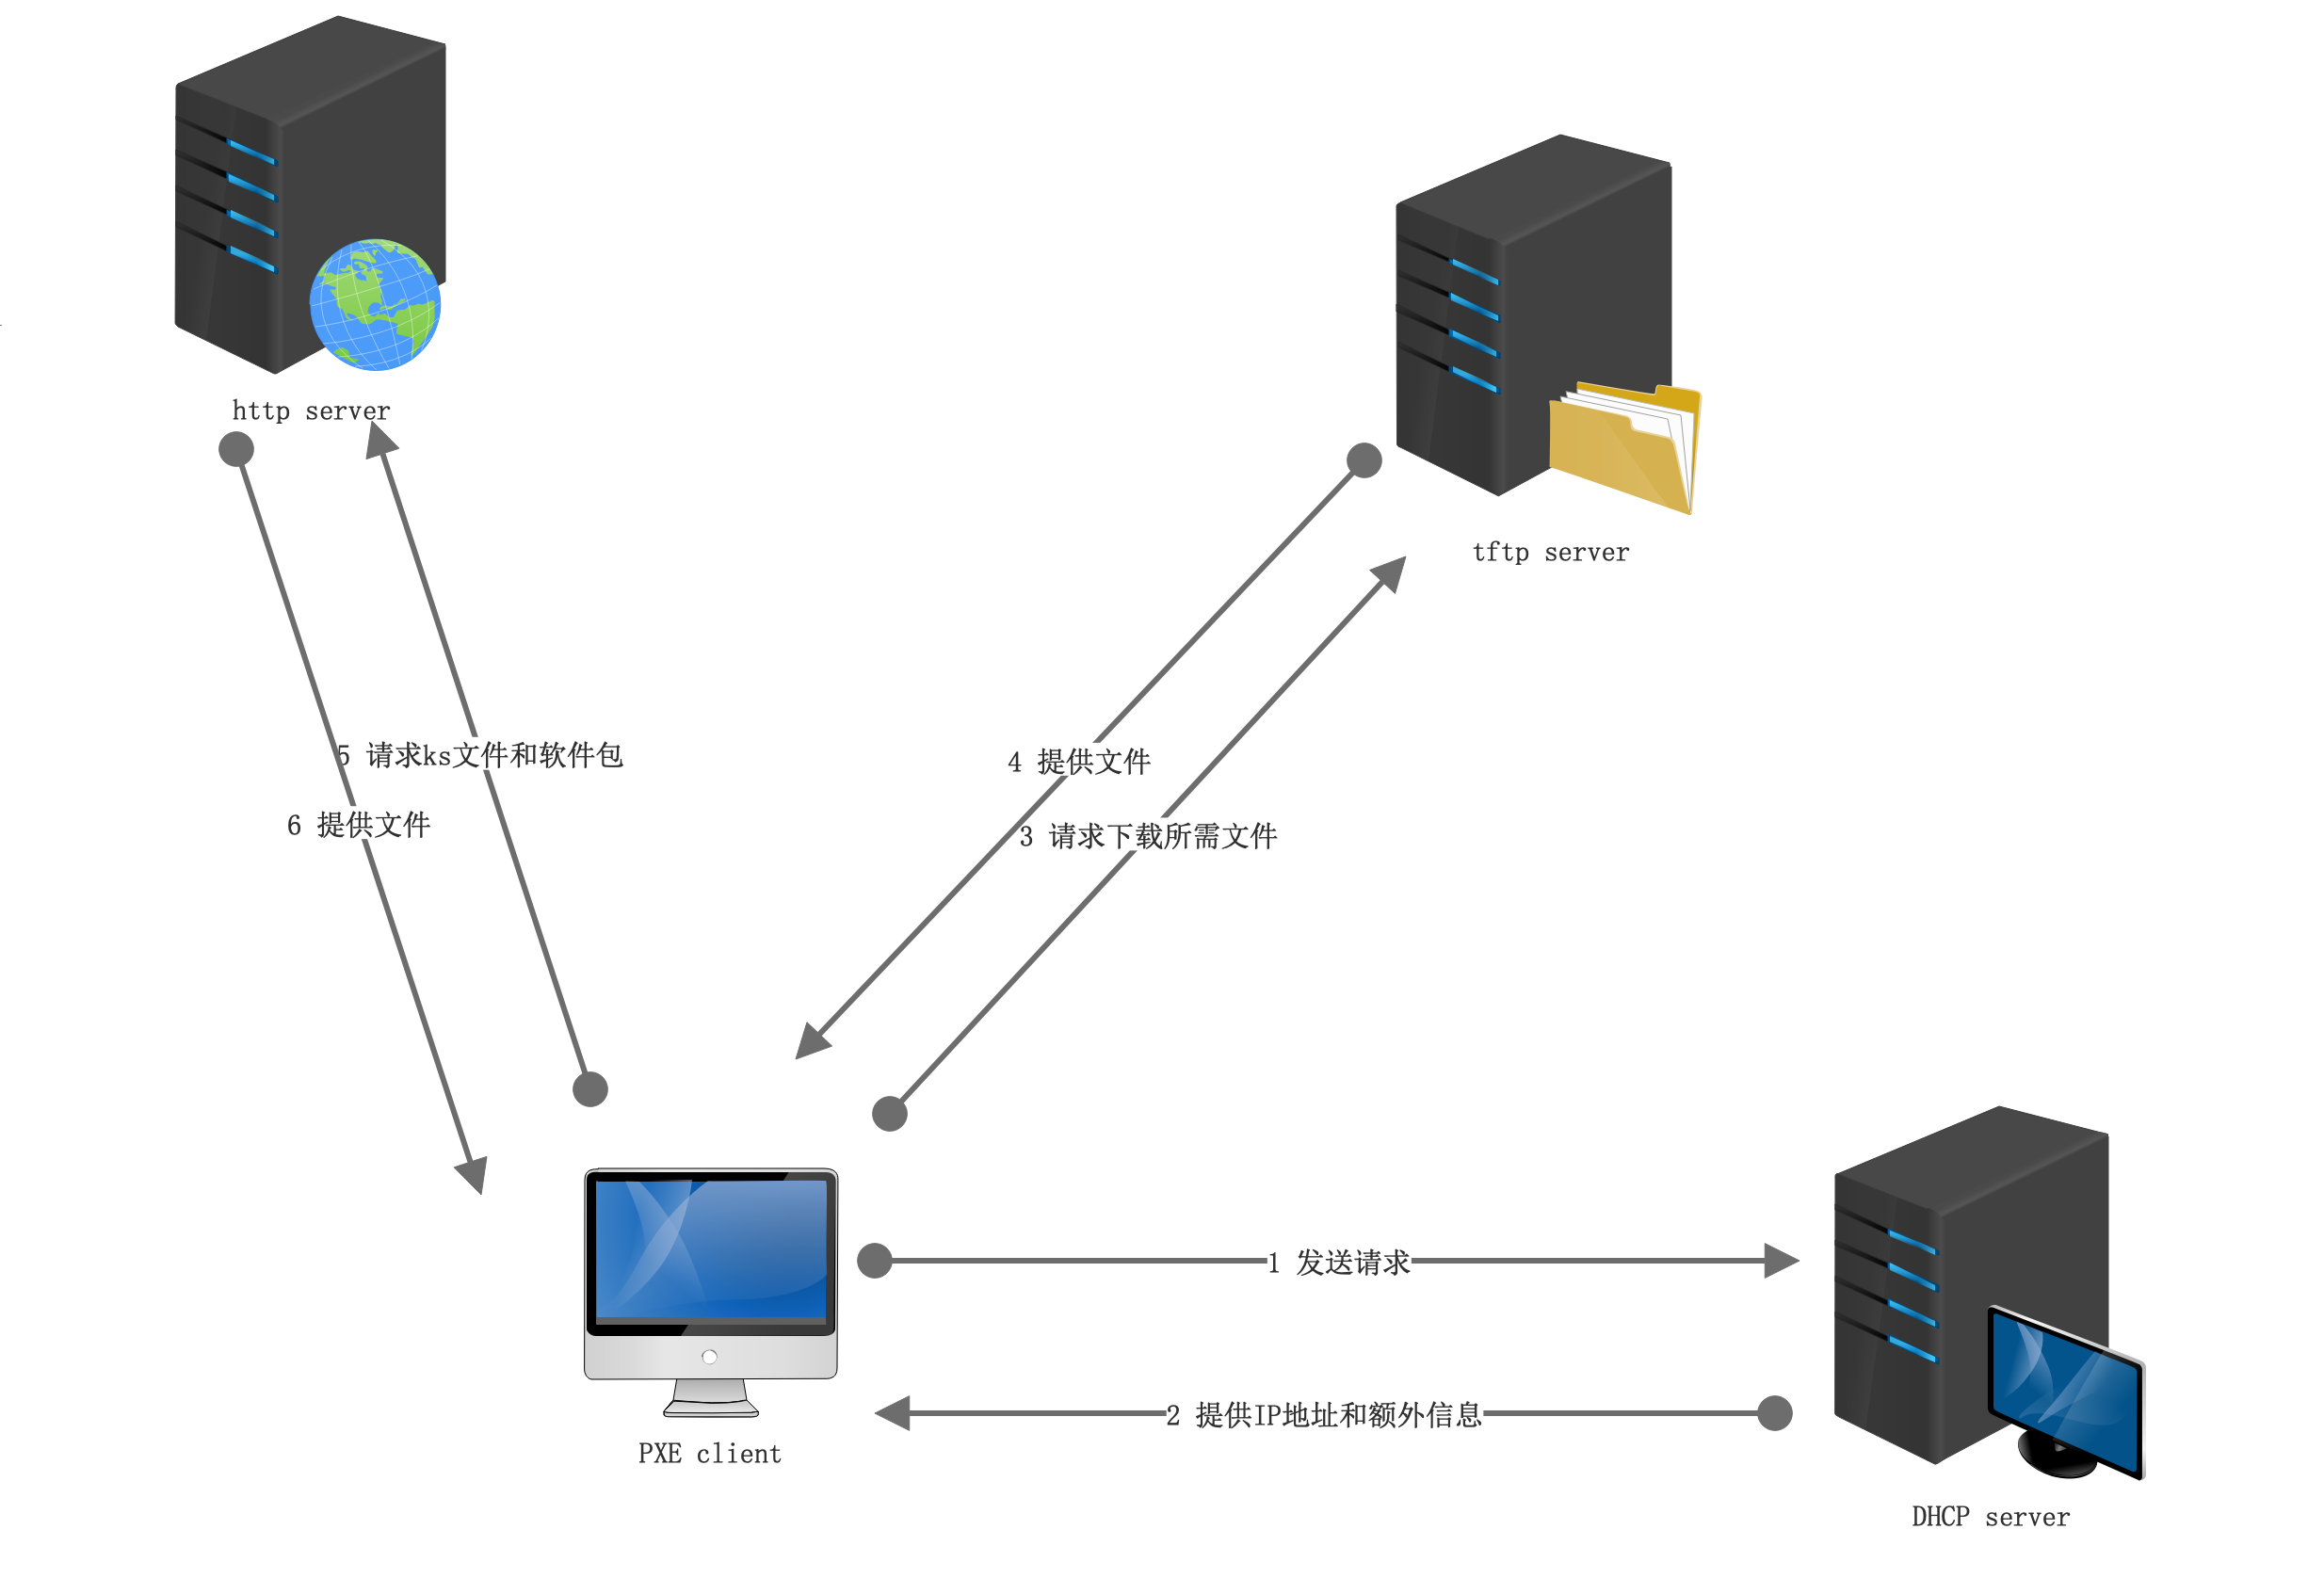
1、PXE Client向DHCP发送请求:
PXE Client从自己的PXE网卡启动,通过PXE BootROM(自启动芯片)会以UDP(简单用户数据报协议)发送一个广播请求,向本网络中的DHCP服务器索取IP。
2、DHCP服务器提供信息:
DHCP服务器收到客户端的请求,验证是否来至合法的PXE Client的请求,验证通过它将给客户端一个“提供”响应,这个“提供”响应中包含了为客户端分配的IP地址、pxelinux启动程序(TFTP)位置,以及配置文件所在位置。
3、PXE客户端请求下载启动文件:
客户端收到服务器的“回应”后,会回应一个帧,以请求传送启动所需文件。这些启动文件包括:pxelinux.0、pxelinux.cfg/default、vmlinuz、initrd.img等文件。
4、Boot Server响应客户端请求并传送文件:
当服务器收到客户端的请求后,他们之间之后将有更多的信息在客户端与服务器之间作应答, 用以决定启动参数。BootROM由TFTP通讯协议从Boot Server下载启动安装程序所必须的文件(pxelinux.0、pxelinux.cfg/default)。default文件下载完成后,会根据该文件中定义的引导顺序,启动Linux安装程序的引导内核。
5、请求下载自动应答文件:
客户端通过pxelinux.cfg/default文件成功的引导Linux安装内核后,安装程序首先必须确定你通过什么安装介质来安装linux,如果是通过网络安装(NFS, FTP, HTTP),则会在这个时候初始化网络,并定位安装源位置。接着会读取default文件中指定的自动应答文件ks.cfg所在位置,根据该位置请求下载该文件。
这里有个问题,在第2步和第5步初始化2次网络了,这是由于PXE获取的是安装用的内核以及安装程序等,而安装程序要获取的是安装系统所需的二进制包以及配置文件。因此PXE模块和安装程序是相对独立的,PXE的网络配置并不能传递给安装程序,从而进行两次获取IP地址过程,但IP地址在DHCP的租期内是一样的。
6、客户端安装操作系统:
将ks.cfg文件下载回来后,通过该文件找到OS Server,并按照该文件的配置请求下载安装过程需要的软件包。
OS Server和客户端建立连接后,将开始传输软件包,客户端将开始安装操作系统。安装完成后,将提示重新引导计算机。
三、kickstart批量部署实战
环境:
- selinux关闭,防火墙关闭
- Server:192.168.2.100
Step 1 配置dnf源
[root@zutuanxue ~]# cat server.repo
[serverApp]
name=app
enabled=1
gpgcheck=0
baseurl=file:///mnt/AppStream
[serverOS]
name=os
enabled=1
gpgcheck=0
baseurl=file:///mnt/BaseOS
Step 2 安装软件包
[root@zutuanxue ~]# dnf install dhcp-server tftp-server httpd syslinux -y
Step 3 搭建并启动DHCP
[root@zutuanxue ~]# vim /etc/dhcp/dhcpd.conf
subnet 192.168.2.0 netmask 255.255.255.0 {
        option routers          192.168.2.100;
        range                   192.168.2.10    192.168.2.20;
        next-server             192.168.2.100;
        filename                "pxelinux.0";
}

[root@zutuanxue ~]# systemctl start dhcpd
[root@zutuanxue ~]# systemctl status dhcpd
[root@zutuanxue ~]# netstat -antlup | grep :67
udp        0      0 0.0.0.0:67              0.0.0.0:*                           31465/dhcpd
udp        0      0 0.0.0.0:67              0.0.0.0:*                           1345/dnsmasq
Step 4 生成需要的文件并启动tftp服务
[root@zutuanxue ~]# cp /usr/share/syslinux/pxelinux.0		/var/lib/tftpboot/
[root@zutuanxue ~]# cp /mnt/isolinux/{vmlinuz,ldlinux.c32,initrd.img} 		/var/lib/tftpboot/
[root@zutuanxue ~]# mkdir /var/lib/tftpboot/pxelinux.cfg
[root@zutuanxue ~]# vim /var/lib/tftpboot/pxelinux.cfg/default			#生成default文件
default linux
timeout 3
label linux
  kernel vmlinuz
  append initrd=initrd.img ip=dhcp method=http://192.168.2.100/RHEL ks=http://192.168.2.100/ks.cfg
[root@zutuanxue mnt]# systemctl start tftp			#启动tftp服务
[root@zutuanxue mnt]# systemctl status tftp
[root@zutuanxue mnt]# netstat -antulp | grep :69
udp6       0      0 :::69                   :::*                                1/systemd
Step 5 搭建并启动http服务
[root@zutuanxue ~]# mkdir /var/www/html/RHEL		#建立软件包存放目录
[root@zutuanxue ~]# mount /dev/cdrom /var/www/html/RHEL		#将光盘挂载到对应目录中
Step 6 生成ks.cfg文件
由于CentOS8.0中没有system-config-kickstart包,所以无法通过工具生成ks文件,需要手动生成,例子中root用户和新建的hello用户的密码都为‘`123qwe’
如果需要自己额外指定密码,请使用其它工具进行转换,例如doveadm命令
cp /root/anaconda-ks.cfg /var/www/html/ks.cfg	#生成ks.cfg文件
[root@zutuanxue ~]# vim /var/www/html/ks.cfg
#version=RHEL8
ignoredisk --only-use=sda
autopart --type=lvm
# Partition clearing information
clearpart --all			#删除所有分区
# Use graphical install
graphical
url  --url="http://192.168.2.100/RHEL/"			#指定安装URL
# Keyboard layouts
keyboard --vckeymap=cn --xlayouts='cn'
# System language
lang zh_CN.UTF-8
# Network information
network  --bootproto=dhcp --device=ens33 --ipv6=auto --activate
network  --hostname=localhost.localdomain
##root用户的密码"111111"
rootpw --iscrypted $6$kdHt1qIdgNPlHUD1$zibMjh/AQGZQjIJe8Q4HYiin.IKaV7MHWciueiwbLD/03giuSqzU5ynSu/giDAjMLpJFj/CpNgT7TKSm5XyxV1
# X Window System configuration information
xconfig  --startxonboot
# Run the Setup Agent on first boot
#firstboot disable		#初次启动设置
firstboot --disable
# System services
services --enabled="chronyd"
# System timezone
timezone America/New_York --isUtc
#Reboot after installation	#安装完成后自动重启
reboot
# License agreement		#同意授权协议
eula --agreed
#添加一个普通用户名字为zutuanxue密码"111111" 属组为 whell
user --groups=wheel --name=zutuanxue --password=$6$kdHt1qIdgNPlHUD1$zibMjh/AQGZQjIJe8Q4HYiin.IKaV7MHWciueiwbLD/03giuSqzU5ynSu/giDAjMLpJFj/CpNgT7TKSm5XyxV1 --iscrypted --gecos="zutuanxue"
%packages
@^graphical-server-environment
%end

%addon com_redhat_kdump --disable --reserve-mb='auto'

%end

%anaconda
pwpolicy root --minlen=6 --minquality=1 --notstrict --nochanges --notempty
pwpolicy user --minlen=6 --minquality=1 --notstrict --nochanges --emptyok
pwpolicy luks --minlen=6 --minquality=1 --notstrict --nochanges --notempty
%end
Step 7 修改文件权限,启动http服务
[root@zutuanxue ~]# chmod a+r /var/www/html/ks.cfg
[root@zutuanxue ~]# systemctl start httpd
[root@zutuanxue ~]# systemctl start httpd
[root@zutuanxue ~]# systemctl status httpd
[root@zutuanxue ~]# netstat -antlp | grep :80
tcp6       0      0 :::80                   :::*                    LISTEN      33976/httpd
Step 8 测试
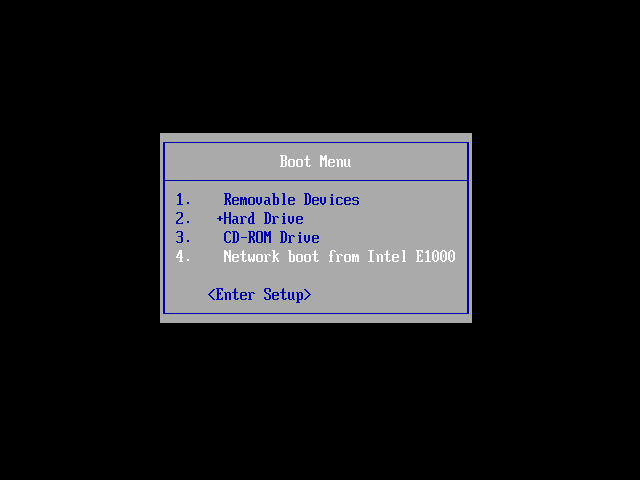
选择网络启动
获取IP和相关文件
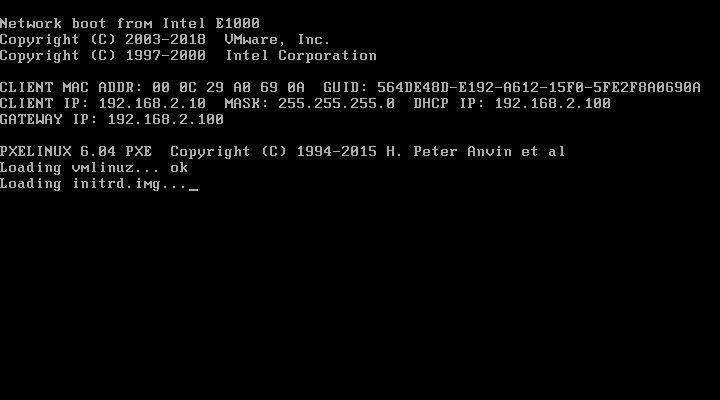
开启安装进程

安装完成后自动重启
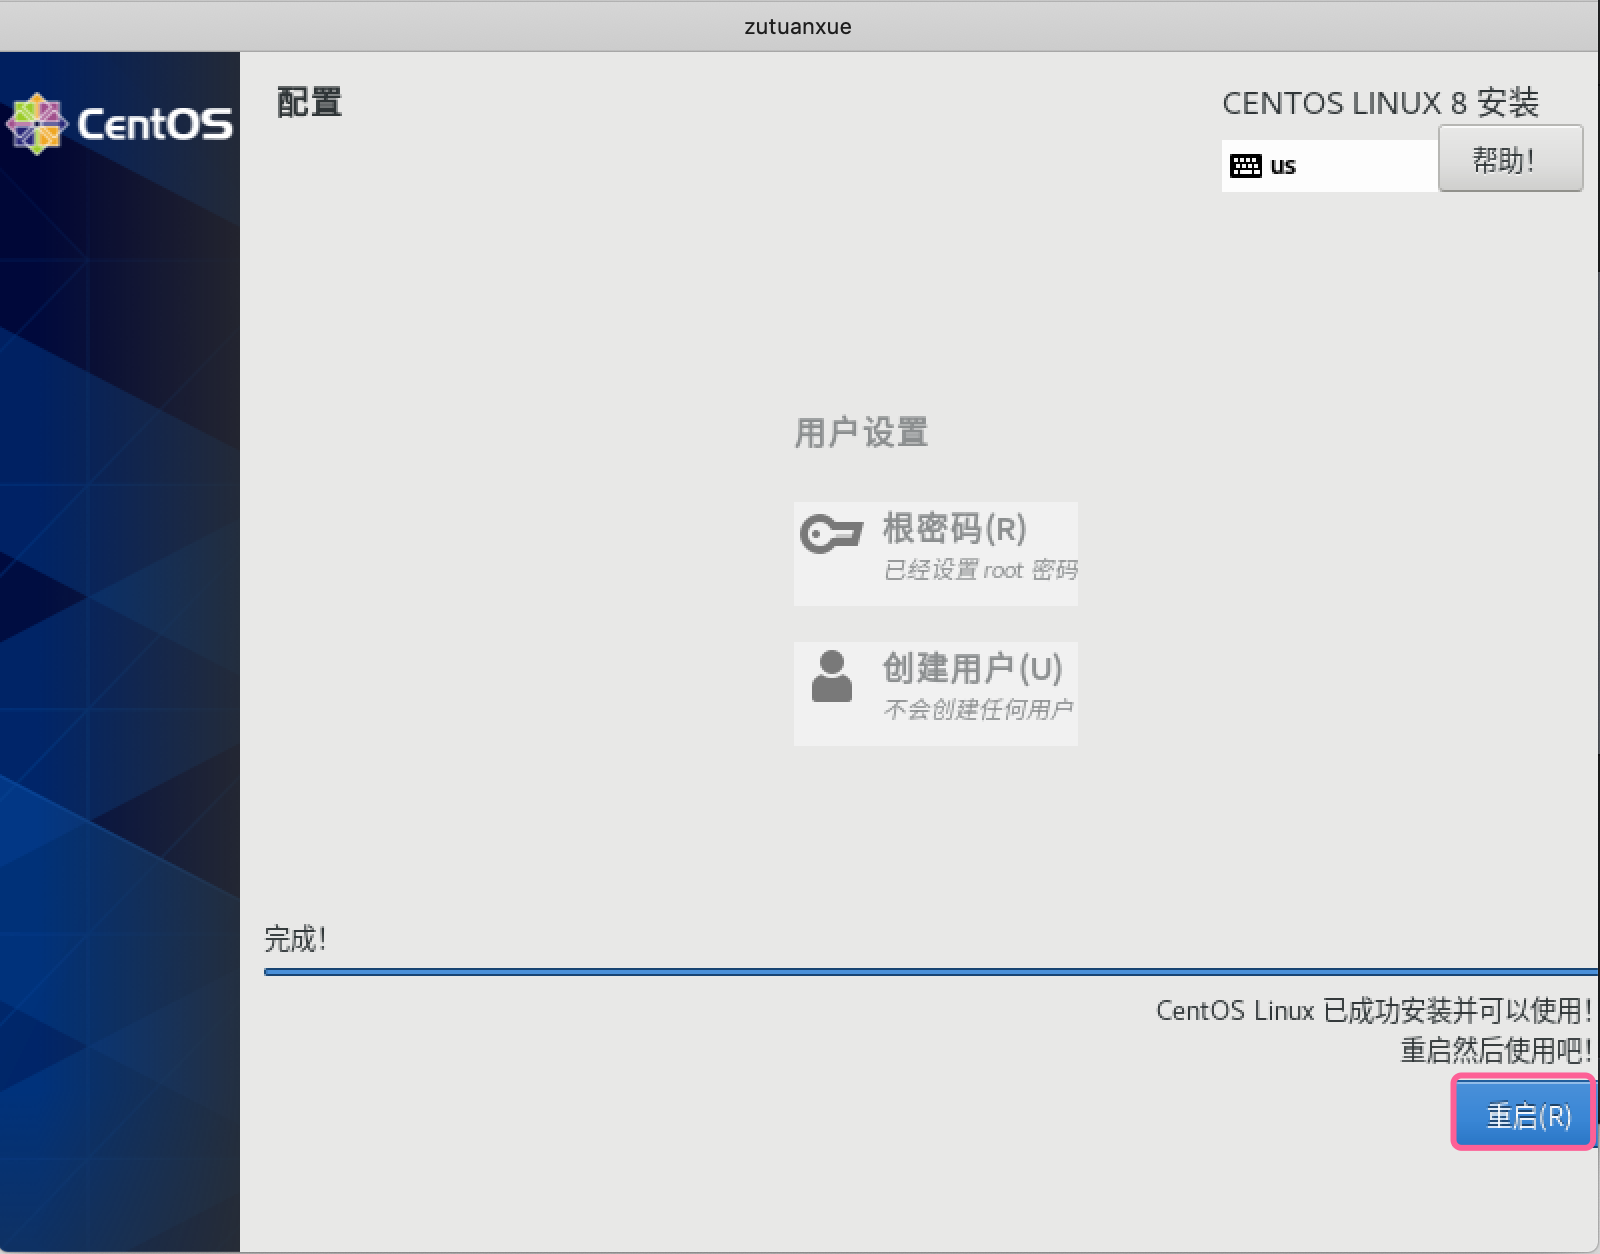
四、kickstart+uefi批量部署
环境:
- selinux关闭,防火墙关闭
- Server:192.168.2.100
Step 1 配置dnf源
[root@zutuanxue ~]# cat server.repo
[serverApp]
name=app
enabled=1
gpgcheck=0
baseurl=file:///mnt/AppStream
[serverOS]
name=os
enabled=1
gpgcheck=0
baseurl=file:///mnt/BaseOS
Step 2 安装软件包
[root@zutuanxue ~]# dnf install dhcp-server tftp-server httpd -y
Step 3 搭建并启动DHCP
[root@zutuanxue ~]# vim /etc/dhcp/dhcpd.conf
subnet 192.168.2.0 netmask 255.255.255.0 {
        option routers          192.168.2.100;
        range                   192.168.2.10    192.168.2.20;
        next-server             192.168.2.100;
        filename                "BOOTX64.EFI";#注意差异,使用的不是pxelinux.0
}

[root@zutuanxue ~]# systemctl start dhcpd
[root@zutuanxue ~]# systemctl status dhcpd
[root@zutuanxue ~]# netstat -antlup | grep :67
udp        0      0 0.0.0.0:67              0.0.0.0:*                           31465/dhcpd
udp        0      0 0.0.0.0:67              0.0.0.0:*                           1345/dnsmasq
Step 4 生成需要的文件并启动tftp服务
[root@zutuanxue ~]# cd /mnt/EFI/BOOT/
[root@zutuanxue BOOT]# cp BOOTX64.EFI grub.cfg grubx64.efi /var/lib/tftpboot/

[root@zutuanxue ~]# cp /mnt/isolinux/{vmlinuz,initrd.img} 		/var/lib/tftpboot/

[root@zutuanxue ~]# vim /var/lib/tftpboot/grub.cfg
set default="0"
set timeout=3
menuentry 'Install CentOS Linux 8.0.1905'  {
        linuxefi /vmlinuz ip=dhcp ks=http://192.168.2.100/ks.cfg
        initrdefi /initrd.img
}
[root@zutuanxue mnt]# systemctl start tftp			#启动tftp服务
[root@zutuanxue mnt]# systemctl status tftp
[root@zutuanxue mnt]# netstat -antulp | grep :69
udp6       0      0 :::69                   :::*                                1/systemd
Step 5 搭建并启动http服务
[root@zutuanxue ~]# mkdir /var/www/html/RHEL		#建立软件包存放目录
[root@zutuanxue ~]# mount /dev/cdrom /var/www/html/RHEL		#将光盘挂载到对应目录中
Step 6 生成ks.cfg文件
由于CentOS8.0中没有system-config-kickstart包,所以无法通过工具生成ks文件,需要手动生成,例子中root用户和新建的hello用户的密码都为‘`123qwe’
https://access.redhat.com/labs/kickstartconfig/
如果需要自己额外指定密码,请使用其它工具进行转换,例如doveadm命令,但是系统没有这个工具,所以推荐使用python来实现
注意:
[root@zutuanxue ~]# python3 -c 'import crypt,getpass;pw="zutuanxue";print(crypt.crypt(pw))'
生成ks.cfg文件
cp /root/anaconda-ks.cfg /var/www/html/ks.cfg	#生成ks.cfg文件
[root@zutuanxue ~]# vim /var/www/html/ks.cfg
#version=RHEL8
ignoredisk --only-use=nvme0n1    ###注意这是与BIOS方式差异的位置,注意设备类型,可在BIOS中查看到
autopart --type=lvm
# Partition clearing information
clearpart --all			#删除所有分区
# Use graphical install
graphical
url     --url="http://192.168.2.100/RHEL/"			#指定安装URL
# Keyboard layouts
keyboard --vckeymap=cn --xlayouts='cn'
# System language
lang zh_CN.UTF-8
# Network information
network  --bootproto=dhcp --device=ens33 --ipv6=auto --activate
network  --hostname=localhost.localdomain
# Root password	“`123qwe”			##root用户的密码"111111"
rootpw --iscrypted $6$kdHt1qIdgNPlHUD1$zibMjh/AQGZQjIJe8Q4HYiin.IKaV7MHWciueiwbLD/03giuSqzU5ynSu/giDAjMLpJFj/CpNgT7TKSm5XyxV1
# X Window System configuration information
xconfig  --startxonboot
# Run the Setup Agent on first boot
#firstboot disable		#初次启动设置
firstboot --disable
# System services
services --enabled="chronyd"
# System timezone
timezone America/New_York --isUtc
#Reboot after installation	#安装完成后自动重启
reboot
# License agreement		#同意授权协议
eula --agreed
#添加一个普通用户名字为zutuanxue密码"111111" 属组为 whell
user --groups=wheel --name=zutuanxue --password=$6$kdHt1qIdgNPlHUD1$zibMjh/AQGZQjIJe8Q4HYiin.IKaV7MHWciueiwbLD/03giuSqzU5ynSu/giDAjMLpJFj/CpNgT7TKSm5XyxV1 --iscrypted --gecos="zutuanxue"
%packages
@^graphical-server-environment
%end

%addon com_redhat_kdump --disable --reserve-mb='auto'

%end

%anaconda
pwpolicy root --minlen=6 --minquality=1 --notstrict --nochanges --notempty
pwpolicy user --minlen=6 --minquality=1 --notstrict --nochanges --emptyok
pwpolicy luks --minlen=6 --minquality=1 --notstrict --nochanges --notempty
%end
Step 7 修改文件权限,启动http服务
[root@zutuanxue ~]# chmod a+r /var/www/html/ks.cfg
[root@zutuanxue ~]# systemctl start httpd
[root@zutuanxue ~]# systemctl start httpd
[root@zutuanxue ~]# systemctl status httpd
[root@zutuanxue ~]# netstat -antlp | grep :80
tcp6       0      0 :::80                   :::*                    LISTEN      33976/httpd
Step 8 测试
新建虚拟机的是要选择自定义使用UEFI


【推荐】国内首个AI IDE,深度理解中文开发场景,立即下载体验Trae
【推荐】编程新体验,更懂你的AI,立即体验豆包MarsCode编程助手
【推荐】抖音旗下AI助手豆包,你的智能百科全书,全免费不限次数
【推荐】轻量又高性能的 SSH 工具 IShell:AI 加持,快人一步
· 无需6万激活码!GitHub神秘组织3小时极速复刻Manus,手把手教你使用OpenManus搭建本
· Manus爆火,是硬核还是营销?
· 终于写完轮子一部分:tcp代理 了,记录一下
· 别再用vector<bool>了!Google高级工程师:这可能是STL最大的设计失误
· 单元测试从入门到精通