pytest快速入门(1)--pytest与unittest的比较总揽
在掌握使用unittest进行接口测试的流程后,接下来我们将学习如何使用pytest进行接口测试。
首先我们回顾一下使用unittest进行接口测试的流程化:
1、编写测试用例 -- 需要继承unittest.TestCase类
2、收集测试用例 -- unittest.TestLoder().discover(case_path) 其中case_path表示待收集测试用例的路径
3、执行测试用例并生成测试报告 -- HtmlTestRunner or BeautifulReport
pytest在进行接口自动化测试时,其操作流程与unittest测试基本一致,都是通过python代码来编写测试用例、收集用例、运行用例、生成报告,但是pytest在操作上更加灵活。下面我们将对比着进行pytest的学习。
一、pytest安装
pip install pytest
二、pytest与unittest的比较
1、在编写测试用例方面
unittest:
(1)编写的测试类必须继承unittest.TestCase类
(2)类名必须为TestXXX、方法名称必须为test_xxx
pytest:
编写的测试类无需继承,但是类名也必须为TestXXX、方法名称也必须为test_xxx
2、在前置后置上
unittest:setup/teardown、setupClass/teardownClass
pytest:
【方案一】继续沿用unittest的风格 -- 了解即可
(1)用例级别:setup/teardown -- 类和类外的用例均可使用
(2)类级别:setup_class/teardown_class
(3)模块级别:setup_module/teardown_module
【方案二】使用fixture -- 掌握
fixture的使用比较灵活,将会在后面的章节进行详细介绍。
3、断言
unittest:self.assertxxx()
pytest:assert 表达式
4、收集测试用例和执行测试用例
由于测试用例一般分散在多个文件当中,因此我们在执行测试用例时,需要对测试用例进行收集
unittest:unittest.TestLoder().discover(case_path) -- 收集的测试用例存放在套件当中,需要调用方法进行执行;
pytest:
(1)无需编写任何代码去收集测试用例 -- 自动收集/发现测试用例
(2)执行测试用例时,自动收集测试用例。
(3)测试用例的执行需要在命令行调用pytest命令: pytest [参数]
4.1、pytest是如何自动收集测试用例的?
(1)目录:pytest一般是从rootdir下开始搜索用例,其中rootdir(根目录)一般是pytest在哪个目录下运行,就以哪个目录作为rootdir;
(2)文件名:py文件命名符合test_xxx.py或者xxx_test.py的文件一般用于存放测试用例;
(3)函数以及类下的方法:
函数以test_开头进行命名;
命名以Test开头的类下的test_xxx方法。
4.2、如何执行测试用例?
【方式一】命令行输入:pytest -s -v
【方式二】:使用main.py文件
pytest.main([命令行参数])
4.3、测试用例的执行顺序?
(1)py文件按ASCII的先后循序进行执行;
(2)py文件内部的函数:按测试用例的书写的先后顺序进行执行
5、生成测试报告
unittest: HtmlTestRunner、BeautifulReport
pytest:
需要使用html插件:pip install pytest-html
测试报告的页面显示需要安装allure插件
【说明】
allure的具体操作流程,可以参考官方文档以及相应的博客,地址如下:
官方文档:https://docs.pytest.org/en/stable/
pytest+allure集成:https://www.cnblogs.com/Simple-Small/p/11512337.html
pytest文章:https://www.cnblogs.com/Simple-Small/tag/pytest/
附录:
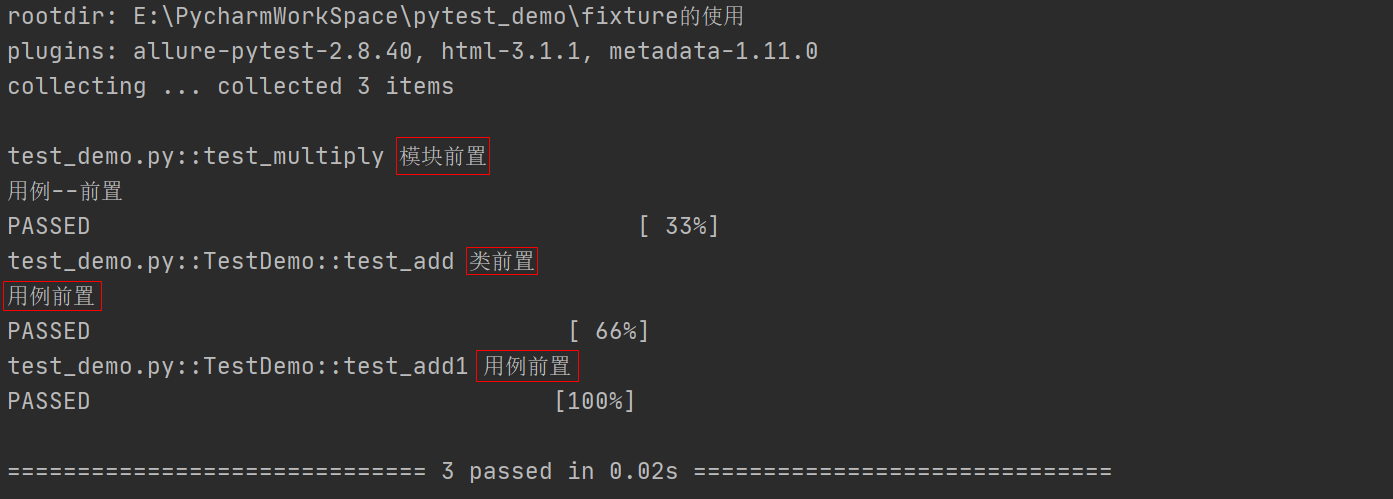
 1 """
 2 前置后置的测试
 3 """
 4 def add(*args):
 5     sum = 0
 6     for item in args:
 7         sum += item
 8     return sum
 9
10 def multiply(*args):
11     product = 1
12     for item in args:
13         product *= item
14     return product
15
16 def setup_module():
17     print("模块前置")
18
19 def setup():
20     print("用例--前置")
21
22 def test_multiply():
23     assert 10 == multiply(5,2)
24
25
26 class TestDemo:
27
28     def setup(self):
29         print("用例前置")
30
31     @classmethod
32     def setup_class(cls):
33         print("类前置")
34
35     def test_add(self):
36         assert 3 == add(1,2)
37
38     def test_add1(self):
39         assert 6 == add(1,2,3)
运行结果如下: