springmvc零xml配置原理
springmvc零xml配置原理与Servlet3.0SPI机制
这里引用另一位博主的文章,比较图文并茂一点,但是他的写法会导致一点问题,在文章结尾会说明。地址:https://blog.csdn.net/weixin_44051223/article/details/106127211
传统springmvc项目,如果要采用xml文件的方式配置,则需要web.xml、spring-mvc.xml文件。
web.xml文件用来引入springmvc的配置文件contextConfigLocation,以及spring环境org.springframework.web.context.ContextLoaderListener
web.xml:
  <!--  spring环境的初始化-->
  <listener>
    <listener-class>org.springframework.web.context.ContextLoaderListener</listener-class>
  </listener>
  <servlet>
    <servlet-name>springmvc</servlet-name>
    <servlet-class>org.springframework.web.servlet.DispatcherServlet</servlet-class>
    <init-param>
      <!--      引入springmvc的配置文件-->
      <param-name>contextConfigLocation</param-name>
      <param-value>spring-mvc.xml</param-value>
    </init-param>
    <!--    加载顺序-->
    <load-on-startup>1</load-on-startup>
  </servlet>
  <servlet-mapping>
    <servlet-name>springmvc</servlet-name>
    <url-pattern>*.do</url-pattern>
  </servlet-mapping>
spring-mvc.xml文件:
<!--启用spring的一些annotation -->
<context:annotation-config/>

<!-- 配置注解驱动 可以将request参数绑定到controller参数上 -->
<mvc:annotation-driven/>

<!-- 对模型视图名称的解析,即在模型视图名称添加前后缀(如果最后一个还是表示文件夹,则最后的斜杠不要漏了) 使用JSP-->
<!-- 默认的视图解析器 在上边的解析错误时使用 (默认使用html)- -->
<bean id="defaultViewResolver" class="org.springframework.web.servlet.view.InternalResourceViewResolver">
<property name="viewClass" value="org.springframework.web.servlet.view.JstlView"/>
<property name="prefix" value="/WEB-INF/view/"/><!--设置JSP文件的目录位置-->
<property name="suffix" value=".jsp"/>
<property name="exposeContextBeansAsAttributes" value="true"/>
</bean>

<!-- 自动扫描装配 -->
<context:component-scan base-package="com.XXX"/>
那么,现在提供一种方式,可以不用配置任何的xml文件,也同样能搭建起springmvc项目。
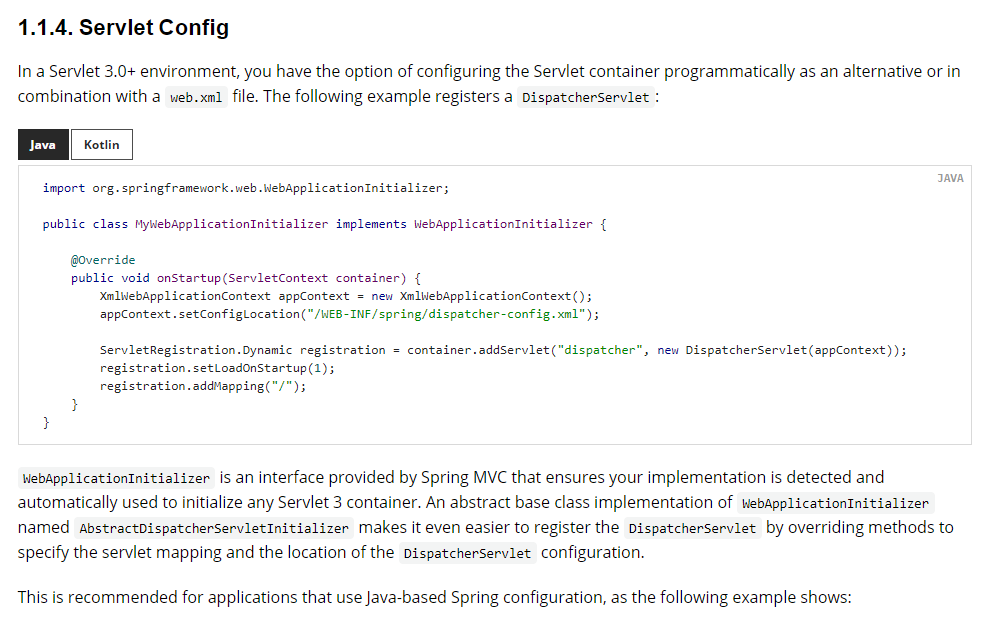
现在一起来看一下spring官网提供的文档描述:
https://docs.spring.io/spring-framework/docs/current/reference/html/web.html#mvc-servlet-config

这里可以看到需要实现一个接口的onStartup方法
public class MyWebApplicationInitializer implements WebApplicationInitializer {

    //实现0XML
    //类实现WebApplicationInitializer【spring官方提供的方法。用于加载spring容器】
    //tomcat启动时会调用onStartup方法?

    @Override
    public void onStartup(ServletContext servletContext) {
        //传入一个ServletContext:web上下文对象。web.xml能做的事她都能做

        // Load Spring web application configuration
        AnnotationConfigWebApplicationContext context = new AnnotationConfigWebApplicationContext();
        context.register(AppConfig.class);

        // Create and register the DispatcherServlet
        DispatcherServlet servlet = new DispatcherServlet(context);
        ServletRegistration.Dynamic registration = servletContext.addServlet("app", servlet);
        registration.setLoadOnStartup(1);
        registration.addMapping("*.do");
    }
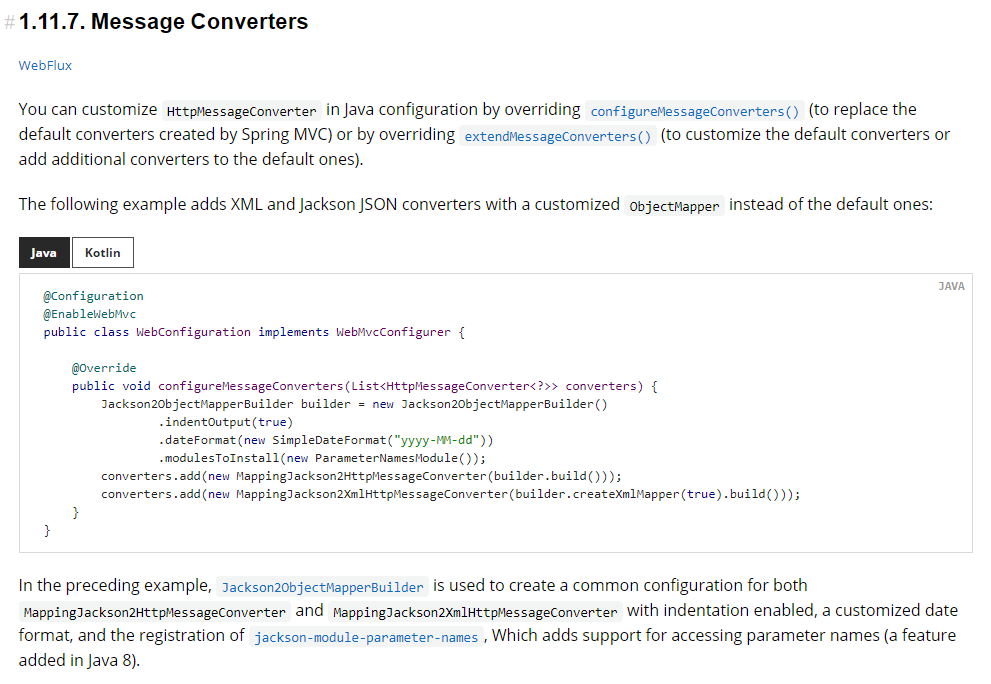
这里只是配置了一个DispatcherServlet,那试图解析器在哪里配置呢?再回到官方文档

其实这里就是用来配置视图解析器的地方
写一个AppConfig类,作为Springmvc的配置类,实现
WebMvcConfigurer
@Configuration
@ComponentScan("com")
@EnableWebMvc
public class AppConfig implements WebMvcConfigurer {
 /***
     * 配置视图解析
     * @param registry
     */
    @Override
    public void configureViewResolvers(ViewResolverRegistry registry) {
        registry.jsp("/page/", ".html");
    }
/**
     * 配置一个消息转换器[对象的转换]
     * @param converters
     */
    @Override
    public void configureMessageConverters(List<HttpMessageConverter<?>> converters) {
        for (HttpMessageConverter<?> converter : converters) {
            System.out.println(converter);
        }
        FastJsonHttpMessageConverter converter
                = new FastJsonHttpMessageConverter();
        converters.add(converter);
    }

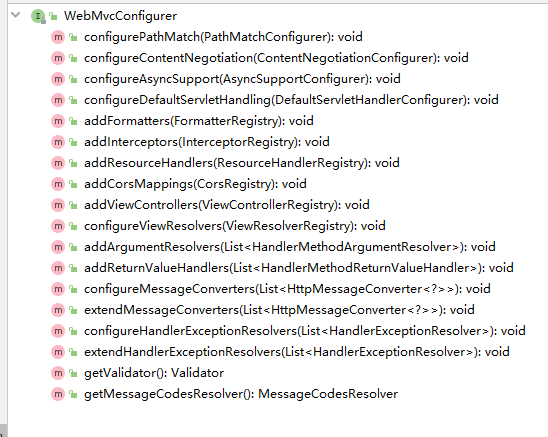
WebMvcConfigurer接口一共定义了若干方法,可以对照着官网学习配置。
此时就可以编写controller类来测试零xml配置的springmvc了
@Controller
public class TestController {


    /**
     * 访问普通的字符串,试图解析器会解析成对应的页面
     * @return
     */
    @RequestMapping("/str.do")
    public Object Test(){
        return "index";
    }

    /**
     * 因为返回值是一个对象,所以如果不做特殊处理,则试图解析器无法解析
     * 对象嵌套是一个难点
     * @param name
     * @param request
     * @param response
     * @return
     */
    @RequestMapping("/model.do")
    @ResponseBody
    public Object modeltest(String name, HttpServletRequest request, HttpServletResponse response){
        System.out.println("调用了modeltest");
        String req_name = request.getParameter("name");
        Map hashMap = new HashMap<>();
        hashMap.put("key", "value");
        return hashMap;
    }
}
启动Tomcat需要一个启动类:
public class Application {
    public static void main(String[] args) throws ClassNotFoundException, IllegalAccessException, InstantiationException, LifecycleException, ServletException {
//        Tomcat tomcat = new Tomcat();
//        tomcat.setPort(80);
//        //初始化一个context资源目录,并不会加载web的生命周期
//        //Context context = tomcat.addContext("/", System.getProperty("java.io.tmpdir"));
//        Context context = tomcat.addContext("/", Application.class.getResource("/").getPath().replaceAll("%20"," "));
//        //添加web生命周期监听器
//        context.addLifecycleListener((LifecycleListener)Class.forName(tomcat.getHost().getConfigClass()).newInstance());
//        tomcat.start();
//        tomcat.getServer().await();

        Tomcat tomcat = new Tomcat();
        tomcat.setPort(80);
        //Context context = tomcat.addContext("/", System.getProperty("java.io.tmpdir"));
        tomcat.addWebapp("/",Application.class.getResource("/").getPath().replaceAll("%20"," "));
        //context.addLifecycleListener((LifecycleListener) Class.forName(tomcat.getHost().getConfigClass()).newInstance());
        //tomcat.addWebapp("/", System.getProperty("java.io.tmpdir"));
        tomcat.start();
        tomcat.getServer().await();


    }
}
这里有一点需要注意:
如果使用引用文章的写法,即
Context context = tomcat.addContext("/", System.getProperty("java.io.tmpdir"));
context.addLifecycleListener((LifecycleListener) Class.forName(tomcat.getHost().getConfigClass()).newInstance());
会导致webapp目录下的页面与静态资源都无法访问。controller返回一个index,按道理是可以通过localhost/page/index.html访问到index.html页面。但是由于加载的是一个临时目录,所以访问不到项目的静态资源
//TODO Servlet3.0 SPI


【推荐】国内首个AI IDE,深度理解中文开发场景,立即下载体验Trae
【推荐】编程新体验,更懂你的AI,立即体验豆包MarsCode编程助手
【推荐】抖音旗下AI助手豆包,你的智能百科全书,全免费不限次数
【推荐】轻量又高性能的 SSH 工具 IShell:AI 加持,快人一步
· 基于Microsoft.Extensions.AI核心库实现RAG应用
· Linux系列:如何用heaptrack跟踪.NET程序的非托管内存泄露
· 开发者必知的日志记录最佳实践
· SQL Server 2025 AI相关能力初探
· Linux系列:如何用 C#调用 C方法造成内存泄露
· Manus爆火,是硬核还是营销?
· 终于写完轮子一部分:tcp代理 了,记录一下
· 别再用vector<bool>了!Google高级工程师:这可能是STL最大的设计失误
· 单元测试从入门到精通
· 震惊!C++程序真的从main开始吗?99%的程序员都答错了