1.props和方法
一、父组件向子组件传值
父组件通过属性的方式传递参数,子组件通过props来接收父组件传递过来的参数
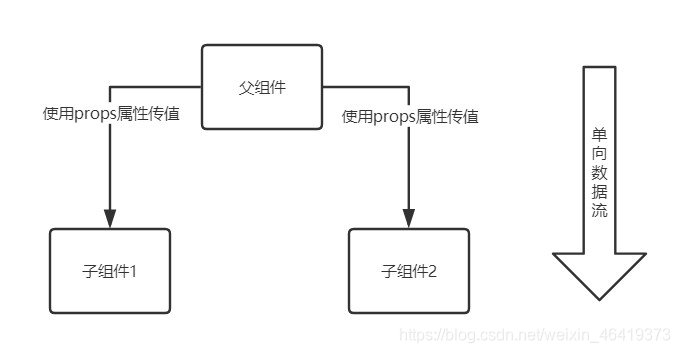
React中是单向数据流,数据只能从父组件通过属性的方式传给其子组件,如下图:
在引用子组件的时候传递,相当于一个属性,例如:在子组件内通过porps.param获取到这个param的值。
父组件向子组件传值,通过props,将父组件的state传递给了子组件。
父组件(直接定义一个属性传值即可):
1 2 3 4 5 6 7 8 9 10 11 12 13 14 | import React, { Component } from 'react'import NavigationBar from './NavigationBar'export class App extends Component { render() { return ( <div> <NavigationBar title="我是父组件向子组件传的值" /> </div> ) }}export default App |
子组件(通过this.props.父组件定义的属性 来接收父组件传递过来的参数):
1 2 3 4 5 6 7 8 9 10 11 12 13 14 15 16 17 18 19 20 21 22 23 24 25 | import React from "react";class NavigationBar extends React.Component{ constructor(props){ super(props); this.state = { title:'' } } render(){ return( <div> {this.state.title} </div> ) } componentDidMount(){ this.setState({ title:this.props.title }) }}export default NavigationBar; |
效果:
二、子组件向父组件传值
子组件通过调用父组件传递到子组件的方法向父组件传递消息的

子组件(通过this.props.事件名(参数)的方式向父组件传递参数):
1 2 3 4 5 6 7 8 9 10 11 12 13 14 15 16 17 18 19 20 21 22 23 24 25 26 27 28 | import React from "react";class NavigationBar extends React.Component{ constructor(props){ super(props); this.state = { title:'' } } render(){ return( <div> {this.state.title} <button onClick={()=>{ this.props.titleMessage("我是子组件向父组件传的值") }}>点击</button> </div> ) } componentDidMount(){ this.setState({ title:this.props.title }) }}export default NavigationBar; |
父组件:
1 2 3 4 5 6 7 8 9 10 11 12 13 14 15 16 17 18 19 20 21 22 23 24 25 26 27 | import React, { Component } from 'react'import NavigationBar from './NavigationBar'export class App extends Component { constructor(props){ super(props); this.state={ titleMassage:'' } } message=(titleMessage)=>{ console.log(titleMessage); this.setState({ titleMassage:titleMessage }) } render() { return ( <div> {this.state.titleMassage} <NavigationBar title="我是父组件向子组件传的值" titleMessage={this.message} /> </div> ) }}export default App |
效果:
点击后的效果:
2.Evnentbus
1 2 3 4 5 6 7 8 9 10 11 12 13 14 15 16 17 18 19 20 21 22 23 24 25 26 27 28 29 30 | class EventBus { constructor() { this.events = this.events || new Object(); }}//首先构造函数需要存储event事件,使用键值对存储//然后我们需要发布事件,参数是事件的type和需要传递的参数EventBus.prototype.emit = function(type, ...args) { let e; e = this.events[type]; // 查看这个type的event有多少个回调函数,如果有多个需要依次调用。 if (Array.isArray(e)) { for (let i = 0; i < e.length; i++) { e[i].apply(this, args); } } else { e[0].apply(this, args); } }; //然后我们需要写监听函数,参数是事件type和触发时需要执行的回调函数 EventBus.prototype.addListener = function(type, fun) { const e = this.events[type]; if (!e) { //如果从未注册过监听函数,则将函数放入数组存入对应的键名下 this.events[type]= [fun]; } else { //如果注册过,则直接放入 e.push(fun); } };<br>// 移除监听 const eventBus = new EventBus(); export default eventBus; |
EventBus.prototype.removeListener = function (type, fn) {
const handler = this._events.get(type); // 获取对应事件名称的函数清单
// 如果是函数,说明只被监听了一次
if (handler && typeof handler === 'function') {
this._events.delete(type, fn);
} else {
let postion;
// 如果handler是数组,说明被监听多次要找到对应的函数
for (let i = 0; i < handler.length; i++) {
if (handler[i] === fn) {
postion = i;
} else {
postion = -1;
}
}
// 如果找到匹配的函数,从数组中清除
if (postion !== -1) {
// 找到数组对应的位置,直接清除此回调
handler.splice(postion, 1);
// 如果清除后只有一个函数,那么取消数组,以函数形式保存
if (handler.length === 1) {
this._events.set(type, handler[0]);
}
} else {
return this;
}
}
};
然后,我们在login组件中加入
1 | EventBus.emit('login',values.userName) |
在需要监听的组件加入
1 2 3 | EventBus.addListener('login',(name)=>{ this.setState({user:name}) }) |
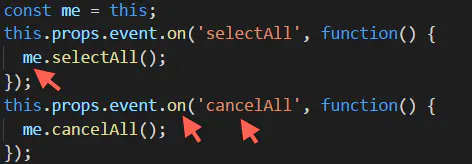
1 2 3 4 5 6 7 8 9 10 11 12 13 14 15 16 17 18 19 20 21 22 23 24 25 26 27 28 29 30 31 32 33 | 也可以利用node自己的EventEmitter。解决步骤1、直接引入并新建实例,不用额外npm install events --save直接引入并新建实例2、把第一步实例化的event传入子组件传入子组件3、发送事件发送事件注意:event.emit方法中可以传第二个参数用来传值,如下:event.emit('selectAll', 1);4、在子组件中监听下面截图中监听事件中this所指对象已经改变,render方法中的this指组件实例,但this.props.event.on方法的回调函数中的this指EventEmitter实例。子组件注意:回调函数的参数用来接收父组件发送过来的值,如下:this.props.event.on('selectAll', function(value) { // 参数value即是父组件传过来的值,即value = 1});另:第4步截图中监听事件中的回调函数是匿名形式的写法,也可以传入实名参数,如下:this.props.event.on('selectAll', this.selectAll);this.props.event.on('cancelAll', this.cancelAll);需要注意的是,监听事件可以传入匿名函数也可以传入实名函数,但是移除事件的时候,必须传入实名函数,传入匿名函数会有错误5、移除事件的监听器componentWillUnmount() { this.props.event.removeAllListeners('selectAll', this.selectAll); this.props.event.removeAllListeners('cancelAll', this.cancelAll);}这里没有用removeListener,而是用了removeAllListeners,这样更保险,因为在多次切换组件时,我发现removeListener并不能很好的移除事件的监听器。另外触发事件是点击等事件时,监听事件最好用once,而不是on。 |


3.redux&&react-redux
4.context
旧版本context——适用于React版本为16.x之前
祖先组件
 1 import PropTypes from 'prop-types'
 2
 3 class Child extends Component {
 4     static contextTypes = {
 5       text: PropTypes.string
 6     }
 7     render() {
 8       return <div>{this.context.text}</div>
 9     }
10 }
后代组件
 1 import PropTypes from 'prop-types'
 2 class Ancestor extends Component {
 3     static childContextTypes = {
 4       text: PropTypes.string
 5     }
 6
 7     getChildContext() {
 8         return {
 9             text: 'aaa'
10         }
11     }
12 }
新版本context
创建一个全局context
1 import React from 'react'
2
3 const GlobalContext = React.createContext();
4
5 export default GlobalContext;
子组件
 1 import React, {Component} from 'react'
 2 import GlobalContext from './globalContext' // 导入全局context
 3
 4 export default class Child extends Component {
 5     render() {
 6         return (
 7             <GlobalContext.Consumer>
 8                 {context => {
 9                     console.log(context)
10                     return (
11                         <div>
12                             <h4>{context.name}</h4>
13                         </div>
14                     )
15                 }}
16             </GlobalContext.Consumer>
17         )
18     }
19 }
App.js
import Child from './Component/Child'
import GlobalContext from './globalContext'

render() {
    return (
        <div className="App">
          <GlobalContext.Provider
              value = {{
                name: 'aaa',
              }}>
                <Child /> // 被传递的子组件,可多个
          </GlobalContext.Provider>
    )
}


【推荐】国内首个AI IDE,深度理解中文开发场景,立即下载体验Trae
【推荐】编程新体验,更懂你的AI,立即体验豆包MarsCode编程助手
【推荐】抖音旗下AI助手豆包,你的智能百科全书,全免费不限次数
【推荐】轻量又高性能的 SSH 工具 IShell:AI 加持,快人一步
· AI与.NET技术实操系列:基于图像分类模型对图像进行分类
· go语言实现终端里的倒计时
· 如何编写易于单元测试的代码
· 10年+ .NET Coder 心语,封装的思维:从隐藏、稳定开始理解其本质意义
· .NET Core 中如何实现缓存的预热?
· 25岁的心里话
· 闲置电脑爆改个人服务器(超详细) #公网映射 #Vmware虚拟网络编辑器
· 零经验选手,Compose 一天开发一款小游戏!
· 通过 API 将Deepseek响应流式内容输出到前端
· AI Agent开发,如何调用三方的API Function,是通过提示词来发起调用的吗