SpringBoot
一、简介
Spring Boot是Spring公司的一个顶级项目,和Spring Framework是一个级别的。
不需要编写xml配置文件,通过利用pring Framework 4 自动配置特性完成配置。
启动器
就是引入相关的依赖,通过java配置的方式完成自动配置。
1. 特征
-
-
在Spring Boot中直接嵌入了Tomcat、Jetty、Undertow等Web 容器,所以在使用SpringBoot做Web开发时不需要部署WAR文件。
-
通过提供自己的启动器(Starter)依赖,简化项目构建配置。
-
尽量的自动配置Spring和第三方库。
-
-
SNAPSHOT:快照版,即开发版。
-
CURRENT:最新版,但是不一定是稳定版。
-
GA:General Availability,正式发布的版本。
3. 核心
自动配置
@SpringBootApplication
public class Springboot01Application {
    public static void main(String[] args) {
        SpringApplication.run(Springboot01Application.class, args);
    }
}
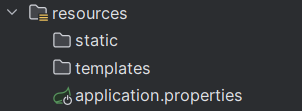
static:存放静态资源(css、js、图片、静态html等)
templates:存放模板引擎 (thymeleaf,FreeMarker等视图模板)
application.properties:SpringBoot配置文件。也可以自定义config文件夹存放配置文件。
#配置端口号
server.port=8888
#配置项目名:必须以'/'开头,不能以'/'结尾
server.servlet.context-path=/test
2. yml格式
YML格式配置文件的扩展名可以是yaml或者yml,非常适合用来做以数据为中心的配置文件。
2.1 格式要求
-
大小写敏感
-
使用缩进代表层级关系
-
缩进不允许使用tab,只允许空格
-
相同的部分只出现一次
-
'#'表示注释
2.2 书写格式
-
-
对象:键值对。map、hash、javabean
-
server:
   port: 8888
②对象
user1: {"id":10, "name":"admin"}
  user2:
    id: 20
    name: guest
  users2:
    - id: 1000
      name: users1000
    - id: 2000
      name: users2000
  map:
    k1:
      id: 19
      name: map1
    k2:
      id: 29
      name: map2
③数组
myparam:
  list1: v1,v2,v3
  list2:
    - v11
    - v12
    - v13
  array1: a1,a2,a3
  array2:
    - a11
    - a12
    - a13
3. 配置文件存放位置
-
-
当前项目根目录下的一个/config子目录中
-
项目的resources即classpath类路径中
-
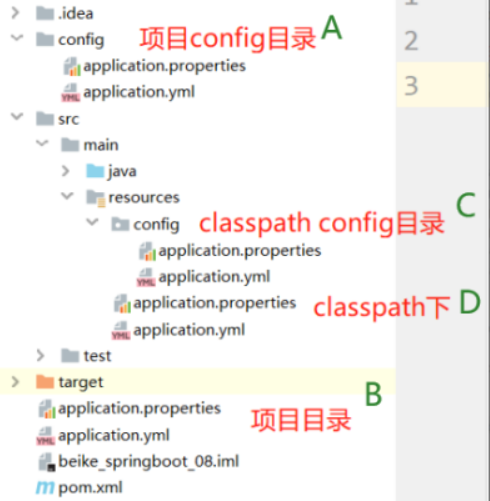
4. 配置文件加载顺序
可以有多个配置文件
4.2 不同位置的加载顺序
-
config/application.properties
-
config/application.yml
-
application.properties
-
application.yml
-
resources/config/application.properties
-
resources/config/application.yml
-
resources/application.properties
-
resources/application.yml
4.3 不同格式加载顺序
在同一个目录中的配置文件先加载properties格式 后加载yml格式的。
对于多个配置文件配置了同一个属性,最先配置的生效。
五、整合MyBatis
1. 依赖启动器
<dependency>
    <groupId>org.mybatis.spring.boot</groupId>
    <artifactId>mybatis-spring-boot-starter</artifactId>
    <version>2.2.2</version>
</dependency>
<dependency>
    <groupId>com.mysql</groupId>
    <artifactId>mysql-connector-j</artifactId>
</dependency>
2. 配置文件
application.yml
# 数据源(数据库连接池) 配置
spring:
  datasource:
    url: jdbc:mysql://127.0.0.1:3306/test?characterEncoding=utf8&useSSL=false&serverTimezone=Asia/Shanghai
    username: root
    password: root
    driver-class-name: com.mysql.cj.jdbc.Driver
mybatis:
  # 加载mybatis配置文件(mybatis有特殊配置时使用)
  # config-location: classpath:mybatis/mybatis-config.xml

  # 加载MyBatis的mapper.xml映射文件(映射接口和映射文件路径不一致时使用)
  # mapper-locations: classpath:mybatis/*.xml

  type-aliases-package: com.xxx.pojo        # 实体类定义别名
3. 启动类
在启动类上使用@MapperScan注解表示扫描指定包中的mapper接口
不写@MapperScan时要在每个Mapper接口上加@Mapper注解
六、整合Druid
1. 启动器
<dependency>
    <groupId>com.alibaba</groupId>
    <artifactId>druid-spring-boot-starter</artifactId>
    <version>1.2.11</version>
</dependency>
2. 配置文件


spring:
  datasource:
    driver-class-name: com.mysql.cj.jdbc.Driver
    url: jdbc:mysql://localhost:3306/test?serverTimezone=Asia/Shanghai&useSSL=false&characterEncoding=utf8
    username: root
    password: root
    # 使用的连接池
    type: com.alibaba.druid.pool.DruidDataSource
     # 连接池的配置信息
    druid:
      # 初始化大小,最小,最大
      initial-size: 5
      max-active: 30
      min-idle: 5
      # 配置获取连接等待超时的时间
      max-wait: 60000
      validation-query: SELECT 1 FROM DUAL
      #配置一个连接在池中最小生存的时间,单位是毫秒
      min-evictable-idle-time-millis: 300000
      test-while-idle: true
      # 配置监控统计拦截的filters,去掉后监控界面sql无法统计,'wall'用于防火墙
      filters: stat,wall,slf4j
      # 配置DruidStatViewServlet
      stat-view-servlet:
        # 登录名
        login-username: admin
        # 登录密码
        login-password: admin
        url-pattern: /druid/*
        # IP白名单(没有配置或者为空,则允许所有访问)
        allow: 192.167.10.1,127.0.0.1
        reset-enable: false
        # 必须启用,要不会404
        enabled: true
mybatis:
  # 起别名
  type-aliases-package: com.xxx.pojo
  # 扫描映射文件
  # mapper-locations: classpath:mybatis/*.xml
七、整合Junit
1. 添加依赖
<dependency>
    <groupId>org.springframework.boot</groupId>
    <artifactId>spring-boot-starter-test</artifactId>
</dependency>
2. 新建测试类
测试类需要有启动类的支持,
在test中与启动器相同的包路径或子包中新建测试类,或者添加 @SpringBootTest (classes={启动器类名.class})
-
测试类不能叫做Test
-
测试方法返回值必须是void
-
@SpringBootTest
public class MyTest {
    @Autowired
    UserMapper userMapper;
    @Test
    public void test(){
        User user = userMapper.selectById(1L);
    }
}
在springBoot2.4之前使用整合单元测试需要写 @SpringBootTest (classes={启动器类名.class})和RunWith(SpringRunner.class)
八、
<dependency>
    <groupId>com.github.pagehelper</groupId>
    <artifactId>pagehelper-spring-boot-starter</artifactId>
    <version>1.4.2</version>
</dependency>
2. 直接使用
@Service
@Transactional
public class UserServiceImpl implements UserService{
    @Autowired
    private UserMapper userMapper;
    public PageInfo<User> queryByPage(int pageNumber, int pageSize){
        // pageNumber当前页码   pageSize每页显示的条数
        PageHelper.startPage(pageNumber,pageSize);

        // 查询全部,查询方法必须是查询多行结果,且没有分页语法。否则无法在sql后面拼接limit子句。
        List<User> users = userMapper.selectAll();

        // PageInfo是分页查询所有查询结果封装的类,所有的结果都从这个类取
        PageInfo<User> pageInfo = new PageInfo<>(users);
        return pageInfo;
    }
}
PageHelper.startPage()要写在查询数据库代码之上。
底层拦截MyBatis的执行器根据传入的pageNum和pageSize进行sql的改造:查询总条数、动态拼接limit进行分页查询
九、整合logback
Logback是由log4j创始人设计的一个开源日志组件。
Spring Boot默认使用Logback组件作为日志管理。
在Spring Boot项目中我们不需要额外的添加Logback的依赖,因为在spring-boot-starter或者spring-boot-starter-web中已经包含了Logback的依赖。
1.
2. 使用默认的logback.xml
logging:
  level:
    # 根日志级别
    root: warn
    # 具体包日志级别
    com.xxx.mapper: debug
  file:
    name: mylogs/my.log
3. 自定义logback
<?xml version="1.0" encoding="UTF-8" ?>
 <configuration>
    <!--定义日志文件的存储地址-->
    <property name="LOG_HOME" value="logs/" />

    <!-- 控制台输出 -->
    <appender name="Stdout" class="ch.qos.logback.core.ConsoleAppender">
       <!-- 日志输出编码 -->
        <layout class="ch.qos.logback.classic.PatternLayout">
             <!--格式化输出:%d表示日期,%thread表示线程名,%-5level:级别从左显示5个字符宽度%msg:日志消息,%n是换行符-->
            <pattern>%d{yyyy-MM-dd HH:mm:ss.SSS} [%thread] %-5level %logger{50} - %msg%n</pattern>
        </layout>
    </appender>

    <!-- 按照每天生成日志文件 -->
    <appender name="RollingFile"  class="ch.qos.logback.core.rolling.RollingFileAppender">
        <rollingPolicy class="ch.qos.logback.core.rolling.TimeBasedRollingPolicy">
            <!--日志文件输出的文件名-->
            <FileNamePattern>${LOG_HOME}/server.%d{yyyy-MM-dd}.log</FileNamePattern>
            <MaxHistory>30</MaxHistory>
        </rollingPolicy>
        <layout class="ch.qos.logback.classic.PatternLayout">
            <!--格式化输出:%d表示日期,%thread表示线程名,%-5level:级别从左显示5个字符宽度%msg:日志消息,%n是换行符-->
            <pattern>%d{yyyy-MM-dd HH:mm:ss.SSS} [%thread] %-5level %logger{50} - %msg%n</pattern>
       </layout>
        <!--日志文件最大的大小-->
       <triggeringPolicy class="ch.qos.logback.core.rolling.SizeBasedTriggeringPolicy">
         <MaxFileSize>10MB</MaxFileSize>
       </triggeringPolicy>
    </appender>

    <!-- 日志输出级别 -->
    <root level="info">
        <appender-ref ref="Stdout" />
        <appender-ref ref="RollingFile" />
    </root>

    <logger name="com.xxx.mapper" level="Trace"></logger>
</configuration>
十、整合Thymeleaf
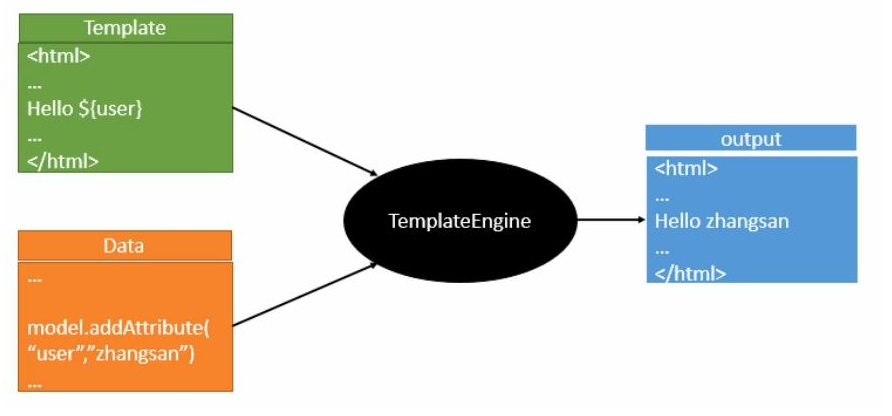
1. Thymeleaf介绍
Thymeleaf的主要目标是将优雅的自然模板带到开发工作流程中,并将HTML在浏览器中正确显示,并且可以作为静态原型,让开发团队能更容易地协作。
Thymeleaf能够处理HTML,XML,JavaScript,CSS,纯文本。
Thymeleaf是原生的,不依赖于标签库,它能够在接受原始HTML的地方进行编辑和渲染。
2. 使用
2.1 引入依赖
<dependency>
    <groupId>org.springframework.boot</groupId>
    <artifactId>spring-boot-starter-thymeleaf</artifactId>
</dependency>
2.2 新建html
在resources的templates目录中新建index.html
2.3 Thymeleaf视图解析器
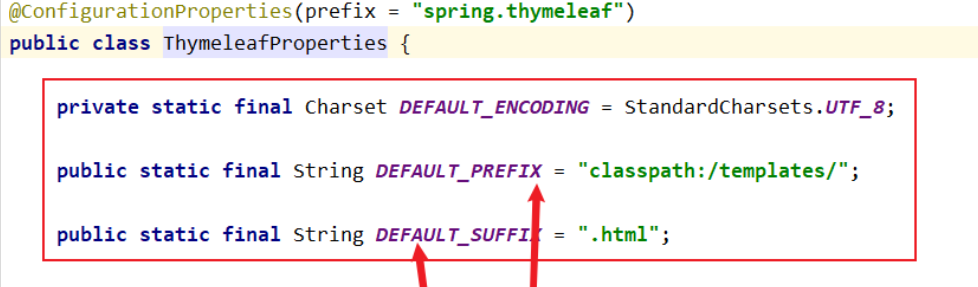
所以控制单元直接响应名字即可。
3. 语法
使用thymeleaf语法要添加命名空间
<html xmlns:th="http://www.thymeleaf.org" >
3.1 th:text
将th:text中的值添加到标签文本节点中,标签中有内容会覆盖
<h2 th:text="hello"></h2>
3.2 获取域对象中的数据
3.2.1 HttpServletRequest
<span th:text="${#httpServletRequest.getAttribute('req')}"></span>
<span th:text="${#httpServletRequest.getAttribute('mod')}"></span>
<span th:text="${#httpServletRequest.getAttribute('user')}"></span>
<span th:text="${#httpServletRequest.getAttribute('user').uid}"></span>
<hr>
<span th:text="${#request.getAttribute('req')}"></span>
<span th:text="${#request.getAttribute('mod')}"></span>
<span th:text="${#request.getAttribute('user')}"></span>
<span th:text="${#request.getAttribute('user').uname}"></span>
<hr>
<span th:text="${req}"></span>
<span th:text="${mod}"></span>
<span th:text="${user}"></span>
<span th:text="${user.password}"></span>
3.2.2 HttpSession
 <!-- 将th:text中的值添加到标签文本节点中,标签中有内容会覆盖 -->
<span th:text="${#httpSession.getAttribute('ses')}"></span>
<span th:text="${#httpSession.getAttribute('mod')}"></span>
<span th:text="${#httpSession.getAttribute('user')}"></span>
<span th:text="${#httpSession.getAttribute('user').uid}"></span>
<hr>
<span th:text="${#session.getAttribute('ses')}"></span>
<span th:text="${#session.getAttribute('mod')}"></span>
<span th:text="${#session.getAttribute('user')}"></span>
<span th:text="${#session.getAttribute('user').uname}"></span>
<hr>
<span th:text="${session.ses}"></span>
<span th:text="${session.mod}"></span>
<span th:text="${session.user}"></span>
<span th:text="${session.user.password}"></span>
3.2.3 ServletContext
<!-- 将th:text中的值添加到标签文本节点中,标签中有内容会覆盖 -->
<span th:text="${#servletContext.getAttribute('app')}"></span>
<span th:text="${#servletContext.getAttribute('mod')}"></span>
<span th:text="${#servletContext.getAttribute('user')}"></span>
<span th:text="${#servletContext.getAttribute('user').uname}"></span>
<hr>
<span th:text="${application.app}"></span>
<span th:text="${application.mod}"></span>
<span th:text="${application.user}"></span>
<span th:text="${application.user.password}"></span>
3.3 th:value
<input type="text" th:value="${name}"/>
3.4 th:if
<span th:if="${name}!='张三'">会显示</span>
3.5 th:each
-
循环遍历。
-
th:each=”u,i :${list}” 其中i表示迭代状态。
-
index:当前迭代器的索引 从0开始
-
count:当前迭代对象的计数 从1开始
-
size:被迭代对象的长度
-
even/odd:布尔值,当前循环是否是偶数/奇数 从0开始
-
first:布尔值,当前循环的是否是第一条,如果是返回true否则返回false
-
last:布尔值,当前循环的是否是最后一条,如果是则返回true否则返回false
<tr th:each="u : ${list}">
        <td th:text="${u.uid}" ></td>
        <td th:text="${u.uname}"></td>
    </tr>
3.6 th:href
<a th:href="@{/del(uid=1,uname='zs')}">跳转一</a>
<!-- 获取作用域值-->
<a th:href="@{/del(uid=${uid})}">跳转二</a>
在前端的效果就是 : /del?uid=1
3.7 th:onclick
<a href="javascript:void(0)"  th:onclick="'del('+${user.uid}+')'">删除</a>
<script>
    function del(id) {
        console.log("接收的数据:" , id);
    }
</script>
3.8 字符串操作
-
引用内置对象需要使用#
-
| 方法 | 解释 |
|---|---|
| ${#strings.isEmpty(key)} | 判断字符串是否为空,如果为空返回true,否则返回false |
| ${#strings.contains(msg,'T')} | 判断字符串是否包含指定的子串,如果包含返回true,否则返回false |
| ${#strings.startsWith(msg,'a')} | 判断当前字符串是否以子串开头,如果是返回true,否则返回false |
| ${#strings.endsWith(msg,'a')} | 判断当前字符串是否以子串结尾,如果是返回true,否则返回false |
| ${#strings.length(msg)} | 返回字符串的长度 |
| ${#strings.indexOf(msg,'h')} | 查找子串的位置,并返回该子串的下标,如果没找到则返回-1 |
| ${#strings.substring(msg, 0, 3)} | 截取字串 |
3.9 日期处理
| 解析 | |
|---|---|
| ${#dates.format(key)} | 格式化日期,默认的以浏览器默认语言为格式化标准 |
| ${#dates.format(key,'yyyy/MM/dd')} | 按照自定义的格式做日期转换 |
| ${#dates.day(key)} | Day:取日 |
| ${#dates.month(key)} | Month:取月 |
| ${#dates.year(key)} | Year:取年 |
十一、设置异常页面
1. 设置具体的状态码页面
在resources下新建error文件夹,
在error文件夹中根据状态码设置对应的页面,例如:500状态码对应的页面就是 500.html
2. 使用x模糊匹配
例如:
通过@ExceptionHandler注解处理异常
@Controller
public class UsersController {
    @RequestMapping("showInfo")
    public String showInfo(){
        String str = null;
        str.length();
        return "ok";
    }

    @ExceptionHandler(value = {java.lang.NullPointerException.class} )
    public ModelAndView nullpointExcepitonHandler(Exception e){
        ModelAndView mv = new ModelAndView();
        mv.addObject("err",e.toString());
        mv.setViewName("error1");
        return mv;
    }
}
只有当前类出现异常才会被处理
2. 通过@ControllerAdvice与@ExceptionHandler注解处理异常
/**
 * 全局异常处理类
 */
@ControllerAdvice
public class GlobalException {
    @ExceptionHandler(value = {java.lang.NullPointerException.class} )
    public ModelAndView nullpointExcepitonHandler(Exception e){
        ModelAndView mv = new ModelAndView();
        mv.addObject("err",e.toString());
        mv.setViewName("error1");
        return mv;
    }

    @ExceptionHandler(value = {java.lang.ArithmeticException.class} )
    public ModelAndView arithmeticExceptionHandler(Exception e){
        ModelAndView mv = new ModelAndView();
        mv.addObject("err",e.toString());
        mv.setViewName("error2");
        return mv;
    }
}
3. 通过SimpleMappingExceptionResolver对象处理异常
/**
 * 全局异常
 * SimpleMappingExceptionResolver
 */
@Configuration
public class GlobalException2 {

    /**
     * 此方法返回值必须是SimpleMappingExceptionResolver对象
     * @return
     */
    @Bean
    public SimpleMappingExceptionResolver getSimpleMappingExceptionResolver(){
        SimpleMappingExceptionResolver resolver = new SimpleMappingExceptionResolver();
        Properties properties = new Properties();
        /*
         * 参数一:异常类型,并且是全名
         * 参数二:视图名称
         */
        properties.put("java.lang.NullPointerException","error3");
        properties.put("java.lang.ArithmeticException","error4");

        resolver.setExceptionMappings(properties);
        return resolver;
    }

}
4. 通过自定义HandlerExceptionResolver对象处理异常、
/**
 * 自定义HandlerExceptionResolver对象处理异常
 * 必须要实现HandlerExceptionResolver
 */
@Component
public class GlobalException3 implements HandlerExceptionResolver {
    @Override
    public ModelAndView resolveException(HttpServletRequest httpServletRequest, HttpServletResponse httpServletResponse, Object handler, Exception e) {
        ModelAndView mv = new ModelAndView();
        //判断不同异常类型,做不同视图的跳转
        if(e instanceof NullPointerException){
            mv.setViewName("error5");
        }
        if(e instanceof ArithmeticException){
            mv.setViewName("error6");
        }
        mv.addObject("error",e.toString());
        return mv;
    }
}
十三、开发者工具热部署
1. 引入依赖
<dependency>
    <groupId>org.springframework.boot</groupId>
    <artifactId>spring-boot-devtools</artifactId>
</dependency>
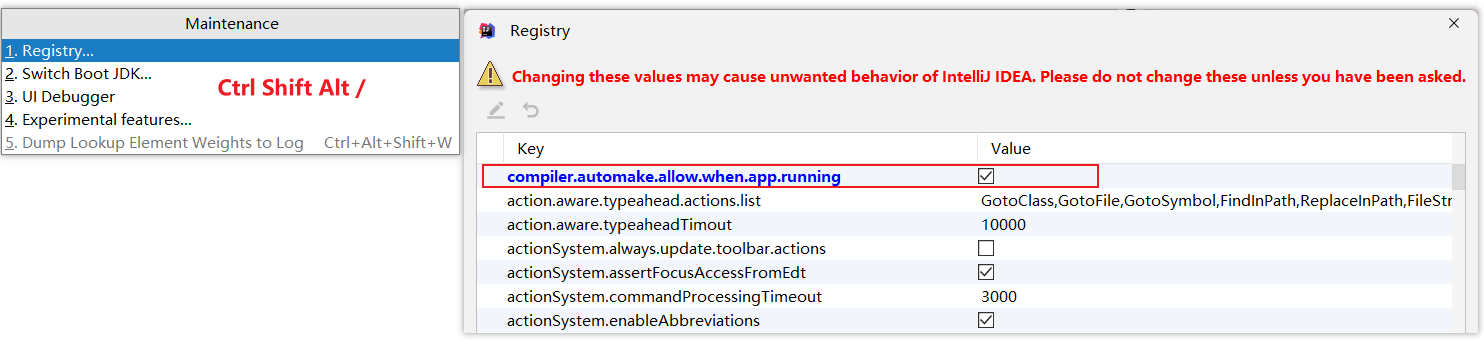
2. 相关设置
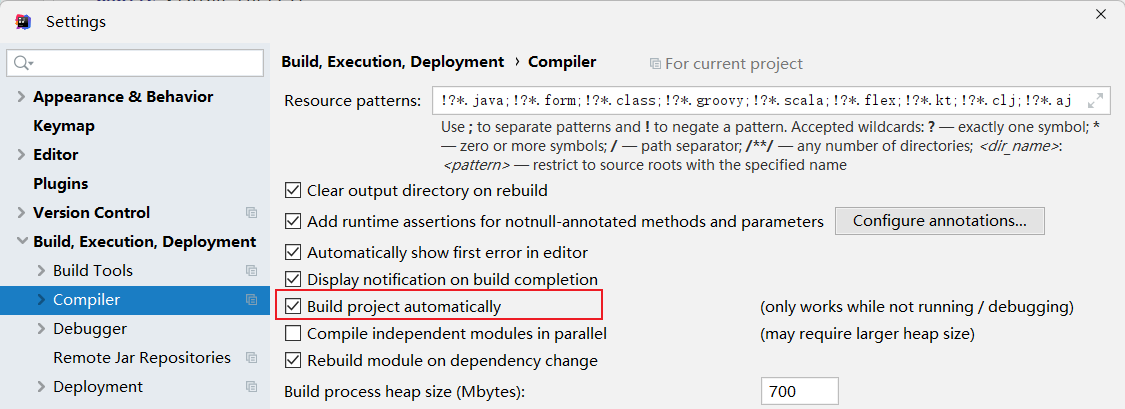
3.1 自动热部署
-
idea失去焦点后,自动热部署。
3.2 手动热部署
所以在文件上传时都会生成一个全局唯一的文件名。常见有两种方式:
(1)时间戳+随机数
/**
 * 文件上传控制单元方法实现
 * @param photo 名字必须和表单中文件域的name属性值相同
 * @return
 * @throws IOException transferTo抛出的异常,可以使用try...catch处理异常。示例中为了让代码看起来简洁直接抛出了。
 */
@RequestMapping("/upload")
@ResponseBody
public String upload(MultipartFile photo, HttpServletRequest request) throws IOException {
    // 判断上传文件流是否为空。如果不为空继续执行
    if(!photo.isEmpty()) {
        // 使用UUID生成文件名称
        // String fileName = UUID.randomUUID().toString();
        // 使用时间戳+随机数生成文件名
        long timeMillis = System.currentTimeMillis();
        Random random = new Random();
        String fileName = timeMillis + "" + random.nextInt(1000);
        // 获取上传时文件名
        String oldName = photo.getOriginalFilename();
        // 获取上传时文件的扩展名
        String suffix = oldName.substring(oldName.lastIndexOf("."));
        String suffix = oldName.substring(oldName.lastIndexOf("."));
        // 获取到当前项目images目录,发布到Tomcat后的绝对路径。
        String realPath = request.getServletContext().getRealPath("/images");
        photo.transferTo(new File(realPath,fileName + suffix));
        return "ok";
    }
    return "err";
}
2. 文件下载
如果希望所有的文件都是下载,而不是能打开则打开。可以在响应头中设置Content-Disposition参数为attachment。attachment结合filename可以设置下载文件的名称。
@RequestMapping("/download")
public void download(HttpServletRequest req, HttpServletResponse response, String filename) {
    try {
        // filename=的值就是客户端看到的下载文件名称
         String newFilename = new String(filename.getBytes("utf-8"),"iso-8859-1");
        response.setHeader("Content-Disposition", "attachment;filename=" + newFilename);
        File file = new File(req.getServletContext().getRealPath("/images"), filename);
        FileInputStream fis = new FileInputStream(file);
        ServletOutputStream os = response.getOutputStream();
        IOUtils.copy(fis, os);
    } catch (IOException e) {
        e.printStackTrace();
    }
}
十五、内容协商
根据客户端接收能力不同,返回不同媒体类型的数据。
只需引入依赖即可直接使用。
1. 导入依赖
SpringBoot 已经包含了 json的相关依赖,所以只需再引入xml的相关依赖即可
<dependency>
   <groupId>com.fasterxml.jackson.dataformat</groupId>
   <artifactId>jackson-dataformat-xml</artifactId>
</dependency>
2. 接收不同格式数据
<script>
    function getJson(){
        $.ajax({
            url:"show",
            type:"get",
            dataType:"json",
            success:function(data){
                console.log(data);
            }
        });
    }
    function getXml(){
        $.ajax({
            url:"show",
            type:"get",
            dataType:"xml",
            success:function(data){
                console.log(data);
            }
        });
    }
</script>
后端根据ajax请求所需数据的格式解析出对应格式的数据返回
十六、更换内置服务器
SpringBoot提供了3款内置的服务器:
-
tomcat(默认):apache出品,粉丝多,应⽤⾯⼴,负载了若⼲较重的组件
-
jetty:更轻量级,负载性能远不及tomcat
-
想⽤哪个,加个坐标就OK。前提是把tomcat排除掉,因为tomcat是默认加载的。
SpringBoot默认使用tomcat服务器,切换服务器只需修改依赖
<dependencies>
     <dependency>
         <groupId>org.springframework.boot</groupId>
         <artifactId>spring-boot-starter-web</artifactId>
         <exclusions>
             <exclusion>
             <groupId>org.springframework.boot</groupId>
             <artifactId>spring-boot-starter-tomcat</artifactId>
             </exclusion>
         </exclusions>
     </dependency>
     <dependency>
         <groupId>org.springframework.boot</groupId>
         <artifactId>spring-boot-starter-undertow</artifactId>
     </dependency>
</dependencies>
<exclusion>标签表示排斥、排除
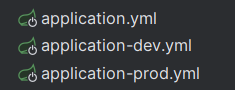
十七、多环境配置文件
Spring Boot应用支持多环境配置文件,在开发、测试、上线等不同的环境中,可以激活不同的环境配置,解决切换环境时修改配置文件的麻烦。
1. 环境配置文件定义要求
-
必须定义在application配置文件所在目录中,即只能是 classpath、classpath/config、 root、 root/config 等四个目录之一。
-
配置文件命名是application-xxx。其中xxx即环境名称,如: application-dev、application-test、application-prod等。
-
-
配置文件类型: yaml、yml、properties。
-
可以一次性激活若干环境配置,按照激活顺序依次读取环境配置,后读取的覆盖先读取的同名配置。不同名的配置使用保留|追加方式处理。
# 选择使用的环境
spring:
  profiles:
    active: prop
# 配置通用的配置
十八、整合拦截器
1. 新建拦截器
@Component
public class DemoInterceptor implements HandlerInterceptor {
    @Override
    public boolean preHandle(HttpServletRequest request, HttpServletResponse response, Object handler) throws Exception {
        System.out.println("执行拦截器");
        return false;
    }
}
注意:在类上加@Component注解
2. 配置拦截器
使用java配置类的方式进行配置
@Configuration
public class MyConfig implements WebMvcConfigurer {
    @Autowired
    private DemoInterceptor demoInterceptor;
    //配置拦截器的映射
    @Override
    public void addInterceptors(InterceptorRegistry registry) {
        registry.addInterceptor(demoInterceptor).addPathPatterns("/*").excludePathPatterns("/login");
    }
}
注意:
类上有注解@Configuration。此类相当于SpringMVC配置文件。
addPathPattern(): 拦截哪些URL。 /* 拦截全部
excludePathPatterns(): 不拦截哪些URL。当和addPathPattern()冲突时,excludePathPatterns()生效。
十九、原生组件注入
注入Servlet的过滤器,监听器。
1. 新建过滤器、监听器
在基础包下新建filter包
新建过滤器:
@WebFilter("/*")//过滤的url
public class MyFilter implements Filter {
    @Override
    public void doFilter(ServletRequest servletRequest, ServletResponse servletResponse, FilterChain filterChain) throws IOException, ServletException {
        System.out.println("执行访问资源之前 执行");
        filterChain.doFilter(servletRequest, servletResponse);
        System.out.println("执行访问资源之后 执行");
    }
}
在基础包下新建listener包
新建监听器(监听域对象的行为)
@WebListener
public class MyRequestListener extends RequestContextListener {
    @Override
    public void requestInitialized(ServletRequestEvent requestEvent) {
        System.out.println("请求对象初始化了");
    }
    @Override
    public void requestDestroyed(ServletRequestEvent requestEvent) {
        System.out.println("请求对象初销毁了");
    }
}
二十、SpringBoot项目打jar包
1. 添加插件
<build>
    <plugins>
        <plugin>
            <groupId>org.springframework.boot</groupId>
            <artifactId>spring-boot-maven-plugin</artifactId>
            <configuration>
                <fork>true</fork>
            </configuration>
        </plugin>
    </plugins>
</build>
2. 打包
在maven面板的Lifecycle中点击package
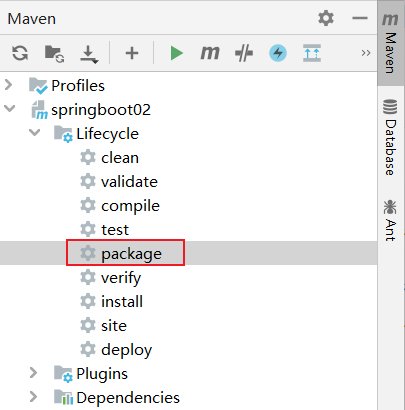
即可完成打包
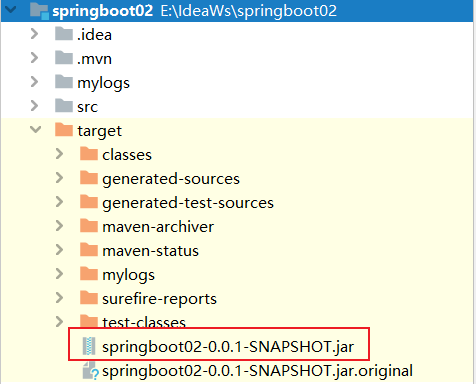
3. 运行jar包
使用命令行,在jar包所在目录执行 java -jar 文件名.jar
二十一、常用注解
-
@Configuration
-
@Bean
-
@Import
-
@Conditional
-
@ConfigurationProperties
-
@EnableConfigurationProperties
1. @Configuration
| 例如 | 解释 | |
|---|---|---|
| @ConditionalOnBean | @ConditionalOnBean(User.class) | Spring容器中存在对应的bean生效 |
| @ConditionalOnMissingBean | @ConditionalOnMissingBean(name = "user") | Spring容器中不存在对应的bean生效 |
| @ConditionalOnClass | @ConditionalOnClass(Menu.class) | 类加载器可以加载到对应的类生效 |
| @ConditionalOnMissingClass | @ConditionalOnMissingClass(Menu.class) | 类加载器加载不到对应的类生效 |
| @ConditionalOnProperty | @ConditionalOnProperty(prefix = “spring.aop”) | 应用环境中的属性满足条件生效 |
| @ConditionalOnSingleCandidate | @ConditionalOnMissingClass(Menu.class) | 表示当指定Bean在容器中只有一个,或者虽然有多个但是指定首选Bean |
| @ConditionalOnWebApplication | 当前应用是Web应用生效 | |
| @ConditionalOnNotWebApplication |
-
读取Springboot配置文件中的数据,自动注入到属性中。
- 前提是该类由spring容器管理
二十二、SpringBoot启动流程
1. 启动流程
以该启动类为例:
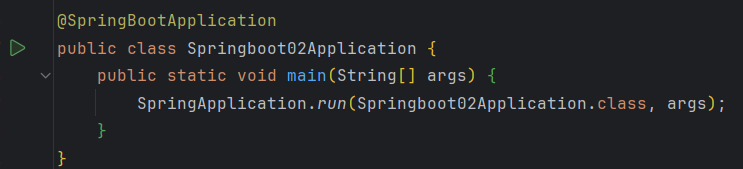
把启动类和主方法的参数传入run方法并执行:

primarySource就是传入的启动类的类对象
debug跟进去

在这里创建了一个spring的应用程序并run()
看一下它的构造方法

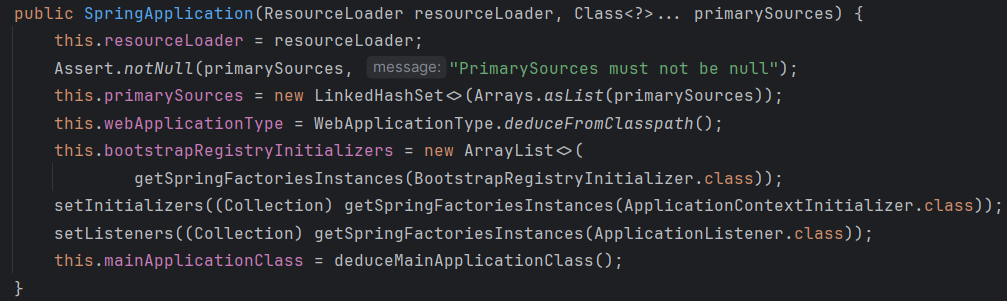
定义了一些相关的信息:
public SpringApplication(ResourceLoader resourceLoader, Class<?>... primarySources) {
    //资源加载器。默认为null
   this.resourceLoader = resourceLoader;
    //判断主类是否为null
   Assert.notNull(primarySources, "PrimarySources must not be null");
    //主类存储到set集合中
   this.primarySources = new LinkedHashSet<>(Arrays.asList(primarySources));
    //获取容器的类型SERVLET。三种取值:NONE SERVLET REACTIVE
   this.webApplicationType = WebApplicationType.deduceFromClasspath();
    //获取初始化器,默认为0
   this.bootstrapRegistryInitializers = new ArrayList<>(
         getSpringFactoriesInstances(BootstrapRegistryInitializer.class));
    //从META-INF/spring.factories中读取ApplicationContextInitializer初始化器
   setInitializers((Collection) getSpringFactoriesInstances(ApplicationContextInitializer.class));
    //从META-INF/spring.factories中读取ApplicationListener监听器
   setListeners((Collection) getSpringFactoriesInstances(ApplicationListener.class));
    //找到main方法所在的类
   this.mainApplicationClass = deduceMainApplicationClass();
}
再看run方法:
public ConfigurableApplicationContext run(String... args) {
    //创建StopWatch对象用于统计执行的耗时
    long startTime = System.nanoTime();
    //创建引导上下文对象
    DefaultBootstrapContext bootstrapContext = createBootstrapContext();
    //上下文对象
    ConfigurableApplicationContext context = null;
    //设置简单图像处理,多用于缺失显示器,键盘,鼠标等情况
    configureHeadlessProperty();
    //获取运行时的监听器
    SpringApplicationRunListeners listeners = getRunListeners(args);
    //启动监听器
    listeners.starting(bootstrapContext, this.mainApplicationClass);
    try {
        //将命令行存储到ApplicationArguments对象中
        ApplicationArguments applicationArguments = new DefaultApplicationArguments(args);
        //根据监听器,引导上下文,命令行参数获取配置环境
        ConfigurableEnvironment environment = prepareEnvironment(listeners, bootstrapContext, applicationArguments);
        //设置需要忽略的内容
        configureIgnoreBeanInfo(environment);
        //打印banner
        Banner printedBanner = printBanner(environment);
        //根据应用程序类型创建对应的上下文对象 AnnotationConfigServletWebServerApplicationContext
        context = createApplicationContext();
        //Spring5.3新添加的内容,负责记录执行步骤和时间
        context.setApplicationStartup(this.applicationStartup);
        //准备上下文对象
        prepareContext(bootstrapContext, context, environment, listeners, applicationArguments, printedBanner);
        //刷新上下文对象
        /*
            1.完成自动装配
            2.如果项目为web项目,启动内置的服务器
        */
        refreshContext(context);
        //刷新后的回调,默认为空方法。可以重写该方法完成刷新上下文后的自定义操作
        afterRefresh(context, applicationArguments);
        //计算执行时间
        Duration timeTakenToStartup = Duration.ofNanos(System.nanoTime() - startTime);
        if (this.logStartupInfo) {
            //打印启动日志信息
            new StartupInfoLogger(this.mainApplicationClass).logStarted(getApplicationLog(), timeTakenToStartup);
        }
        //启动上下文的监听器
        listeners.started(context, timeTakenToStartup);
        //启动运行器
        callRunners(context, applicationArguments);
    }
    catch (Throwable ex) {
        handleRunFailure(context, ex, listeners);
        throw new IllegalStateException(ex);
    }
    try {
        //计算执行时间
        Duration timeTakenToReady = Duration.ofNanos(System.nanoTime() - startTime);
        //完成监听器准备操作
        listeners.ready(context, timeTakenToReady);
    }
    catch (Throwable ex) {
        handleRunFailure(context, ex, null);
        throw new IllegalStateException(ex);
    }
    //返回上下文对象 AnnotationConfigServletWebServerApplicationContext
    return context;
}
注意run方法中的refreshContext(context)方法
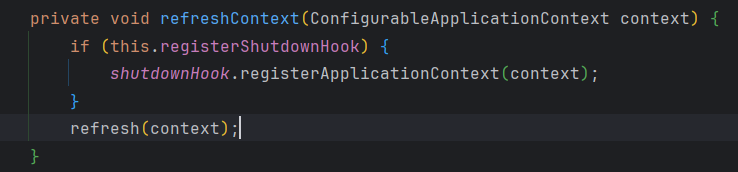

点进去
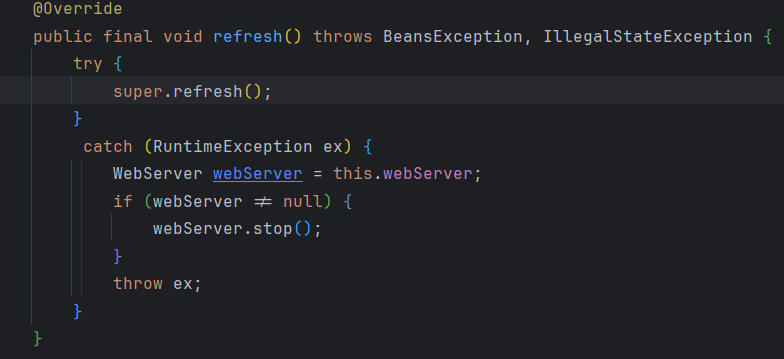
执行了父类的refresh()方法
@Override
    public void refresh() throws BeansException, IllegalStateException {
        synchronized (this.startupShutdownMonitor) {
            StartupStep contextRefresh = this.applicationStartup.start("spring.context.refresh");

            // Prepare this context for refreshing.
            prepareRefresh();

            // Tell the subclass to refresh the internal bean factory.
            ConfigurableListableBeanFactory beanFactory = obtainFreshBeanFactory();

            // Prepare the bean factory for use in this context.
            prepareBeanFactory(beanFactory);

            try {
                // Allows post-processing of the bean factory in context subclasses.
                postProcessBeanFactory(beanFactory);

                StartupStep beanPostProcess = this.applicationStartup.start("spring.context.beans.post-process");
                // Invoke factory processors registered as beans in the context.
                invokeBeanFactoryPostProcessors(beanFactory);

                // Register bean processors that intercept bean creation.
                registerBeanPostProcessors(beanFactory);
                beanPostProcess.end();

                // Initialize message source for this context.
                initMessageSource();

                // Initialize event multicaster for this context.
                initApplicationEventMulticaster();

                // Initialize other special beans in specific context subclasses.
                onRefresh();

                // Check for listener beans and register them.
                registerListeners();

                // Instantiate all remaining (non-lazy-init) singletons.
                finishBeanFactoryInitialization(beanFactory);

                // Last step: publish corresponding event.
                finishRefresh();
            }

            catch (BeansException ex) {
                if (logger.isWarnEnabled()) {
                    logger.warn("Exception encountered during context initialization - " +
                            "cancelling refresh attempt: " + ex);
                }

                // Destroy already created singletons to avoid dangling resources.
                destroyBeans();

                // Reset 'active' flag.
                cancelRefresh(ex);

                // Propagate exception to caller.
                throw ex;
            }

            finally {
                // Reset common introspection caches in Spring's core, since we
                // might not ever need metadata for singleton beans anymore...
                resetCommonCaches();
                contextRefresh.end();
            }
        }
    }
注意invokeBeanFactoryPostProcessors(beanFactory);
2. 自动装配
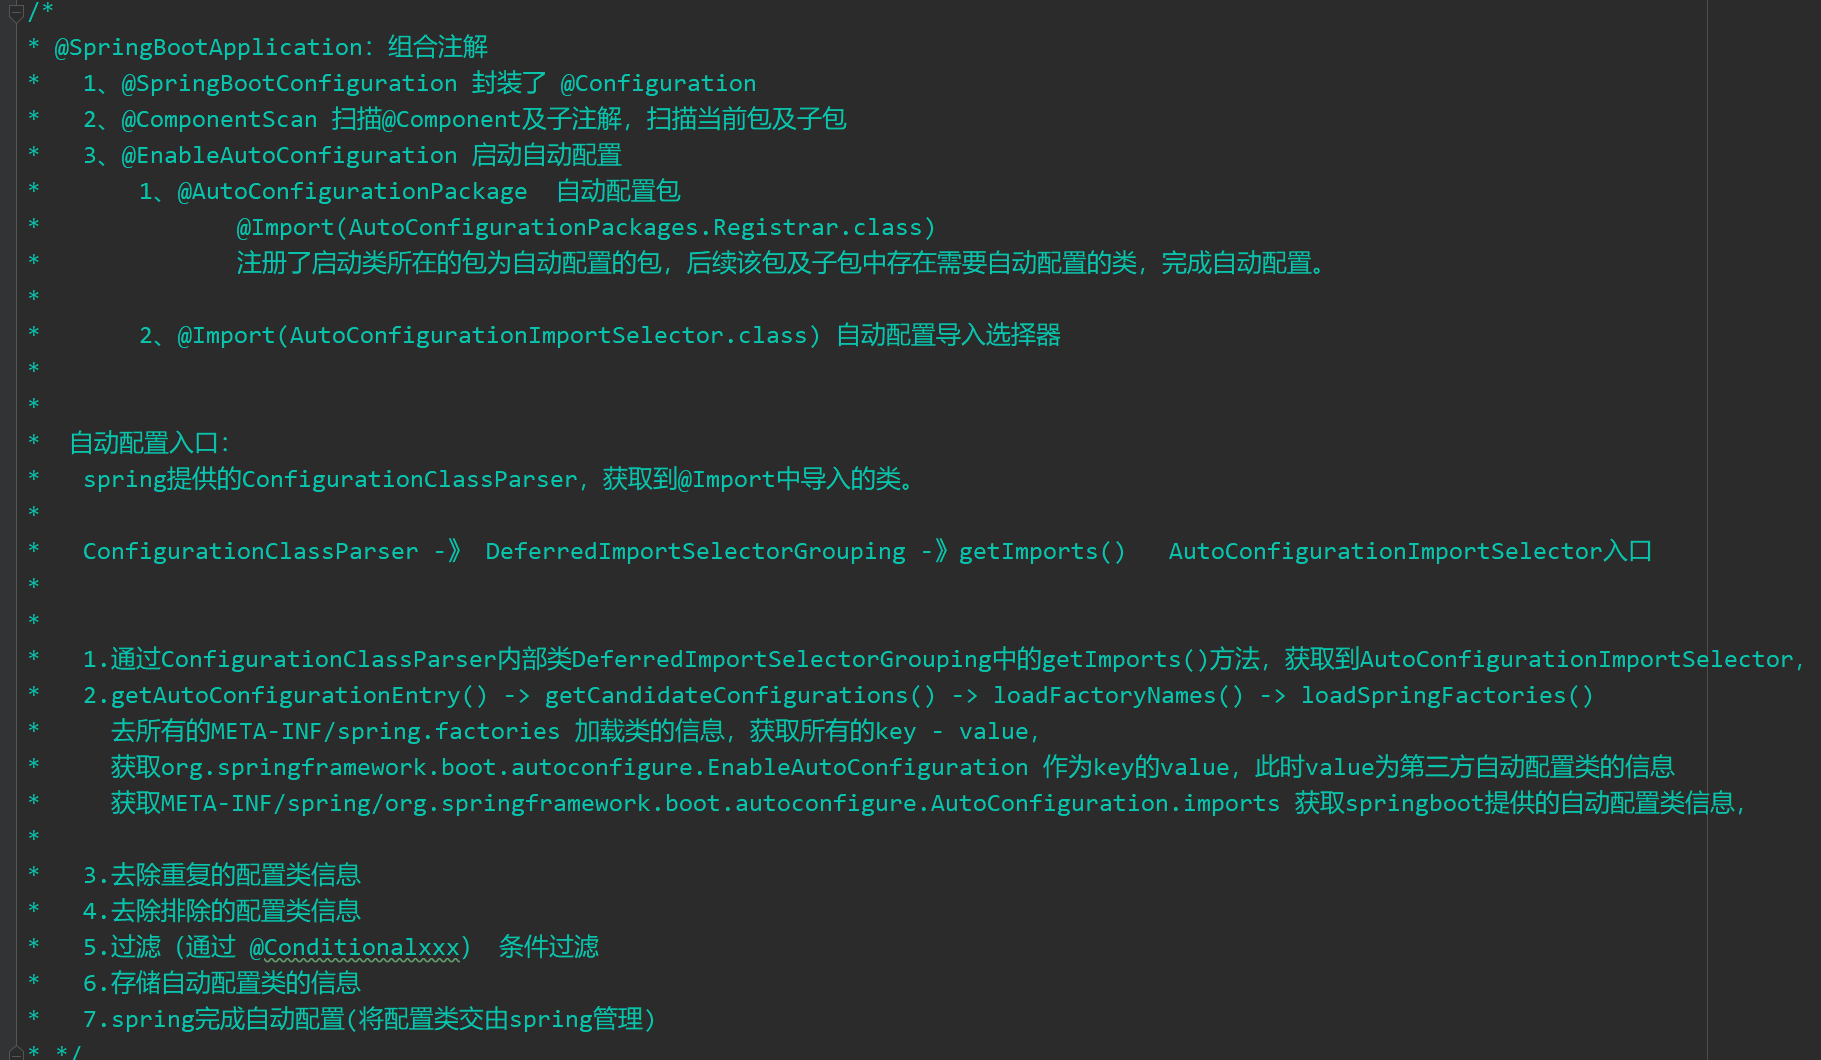
启动类上只有一个@SpringBootApplication注解
@SpringBootApplication是一个组合注解
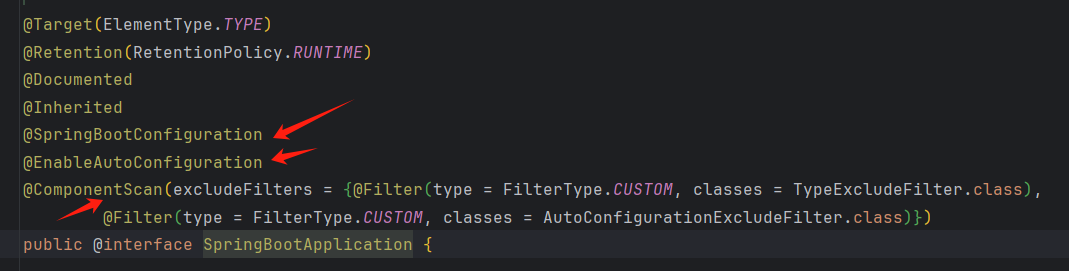
前四个都是元注解
先看@SpringBootConfiguration
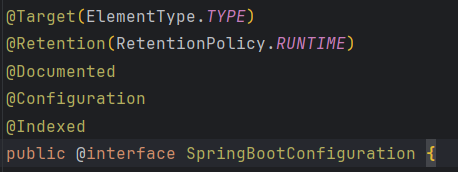
本质就是@Configuration,代表配置类(该类由spring容器管理)
@component就是扫描@Component及其子注解,扫描到类的都交给spring容器管理
重点是@EnableAutoConfiguration
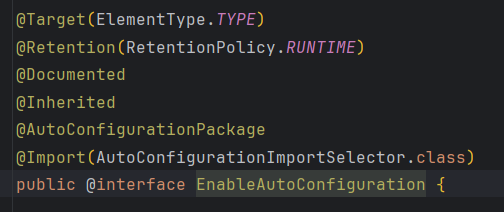
先看@AutoConfigurationPackage
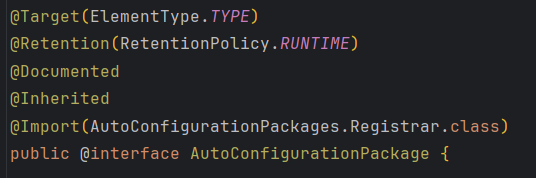
@Import(AutoConfigurationPackages.Registrar.class)
该类的内部类被导入了。
看一下这个内部类
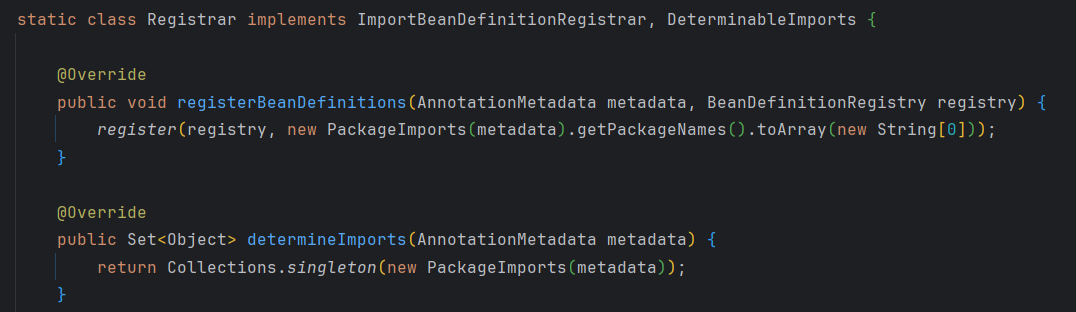
主要的作用就是注册启动类所在的包(基础包),这样可以通过@ComponentScan扫描同包和子包下的@Component及子注解
也就是先注册了启动类所在的包,后续该包及子包中存在需要自动配置的类可以进行自动装配。
再回到@EnableAutoConfiguration
还有个@Import(AutoConfigurationImportSelector.class)
@Import除了将导入的类注册到IoC中,还可以进行一些其他的操作:
spring提供了ConfigurationClassParser,可以获取@Import导入的类
该类中的一个内部类DeferredImportSelectorGrouping中的getImports()方法为AutoConfigurationImportSelector的入口(获取AutoConfigurationImportSelector并执行)。
        /**
         * Return the imports defined by the group.
         * @return each import with its associated configuration class
     *返回该组定义的导入。返回:每个导入及其关联的配置类
         */
        public Iterable<Group.Entry> getImports() {
            for (DeferredImportSelectorHolder deferredImport : this.deferredImports) {
                this.group.process(deferredImport.getConfigurationClass().getMetadata(),
                        deferredImport.getImportSelector());
            }
            return this.group.selectImports();
        }
当前 deferredImport即为启动类,调用了getImportSelector()方法返回AutoConfigurationImportSelector类对象
获取到导入的AutoConfigurationImportSelector后执行process方法
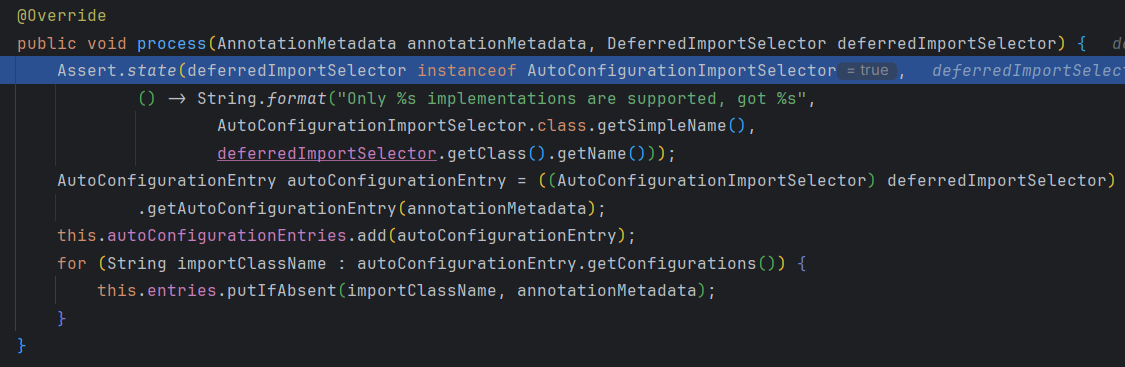
在该方法中将拿到的导入类转成AutoConfigurationEntry类型(自动配置信息的键值对)
AutoConfigurationEntry是AutoConfigurationImportSelector的一个内部类
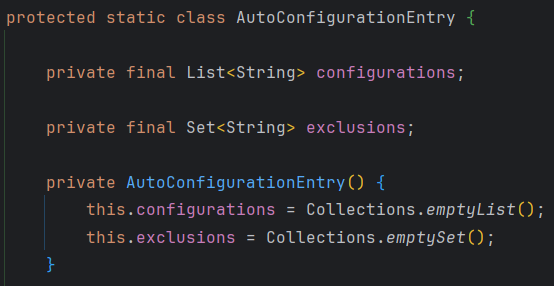
接着调用getAutoConfigurationEntry(annotationMetadata)方法
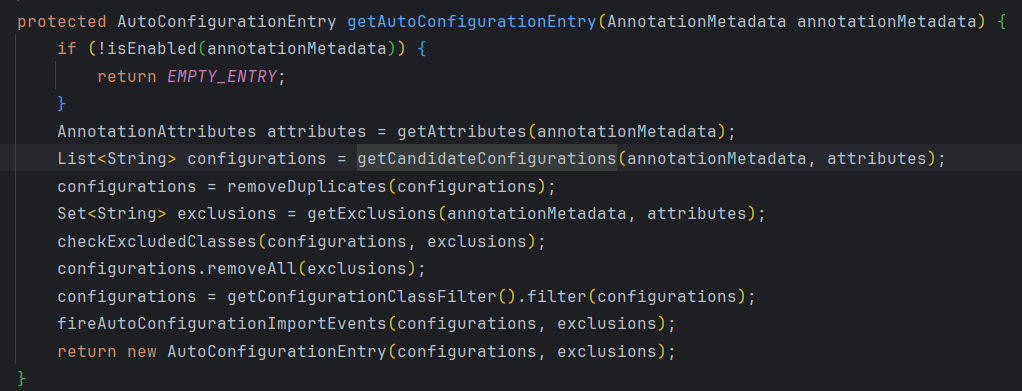
进入getCandidateConfigurations()方法

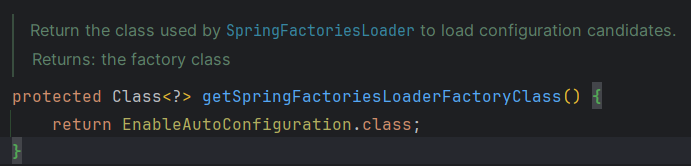
该方法中调用loadFactoryNames()方法
传入两个参数,第一个是Spring Factories Loader工厂类,第二个是bean类加载器
执行loadFactoryNames()方法
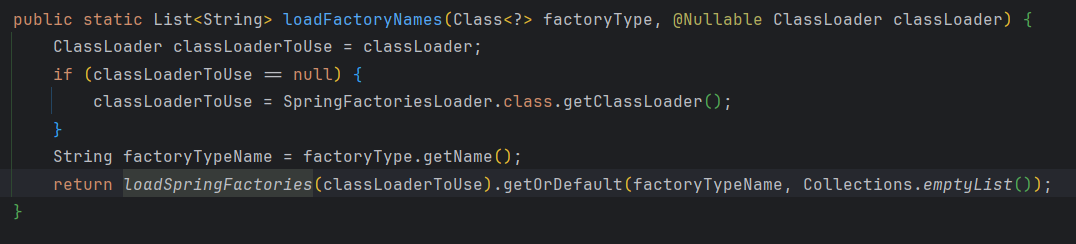
进入loadSpringFactories()方法

此时result为19 说明之前已经加载过相关配置了

根据上面的路径进行加载获取到19个配置信息,然而这些配置信息并不是都需要。
返回到loadFactoryNames()方法中调用getOrDefault()方法,参数factoryTypeName就是![]()
根据键获取对应的key最后拿到需要的配置信息。

发现都是第三方的相关配置,说明先加载的是第三方的配置
返回到getCandidateConfigurations()方法,再获取配置文件变成152个了,这次加载的是

但这些配置文件也不是全部都需要配置的
再回到getAutoConfigurationEntry(annotationMetadata)方法
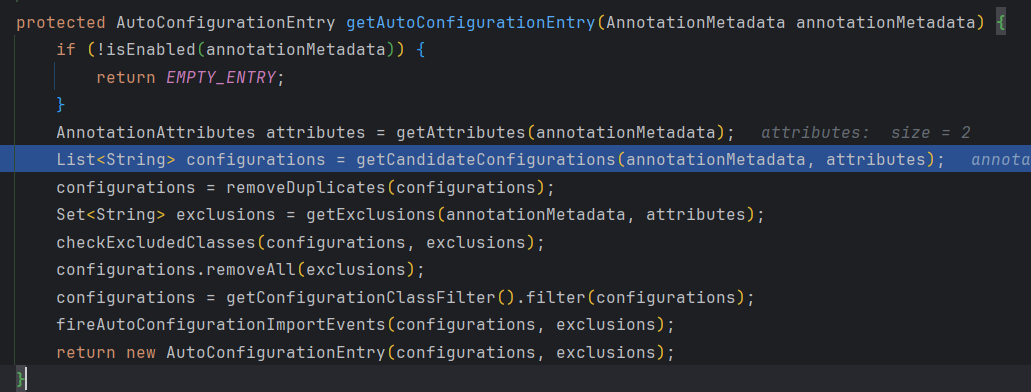
先调用removeDuplicates()方法 移除重复的配置
再通过 获取移除的类、检查移除的类、移除不需要的配置。(在启动类上@SpringBootApplication可以设置排除类的参数)

最后 filter()进行过滤
剩下的就是需要的配置信息了
就可以通过包名+类名拿到类对象及注解进行自动配置了。
3. 总结
SpringBoot启动 先执行run方法
在该方法中调用invokeBeanFactoryPostProcessors(),在此方法中完成自动装配
调用onrefresh(),如果是web项目,创建Tomcat服务器,启动Tomcat服务器
最后执行其他的操作。


 浙公网安备 33010602011771号