1、环境准备
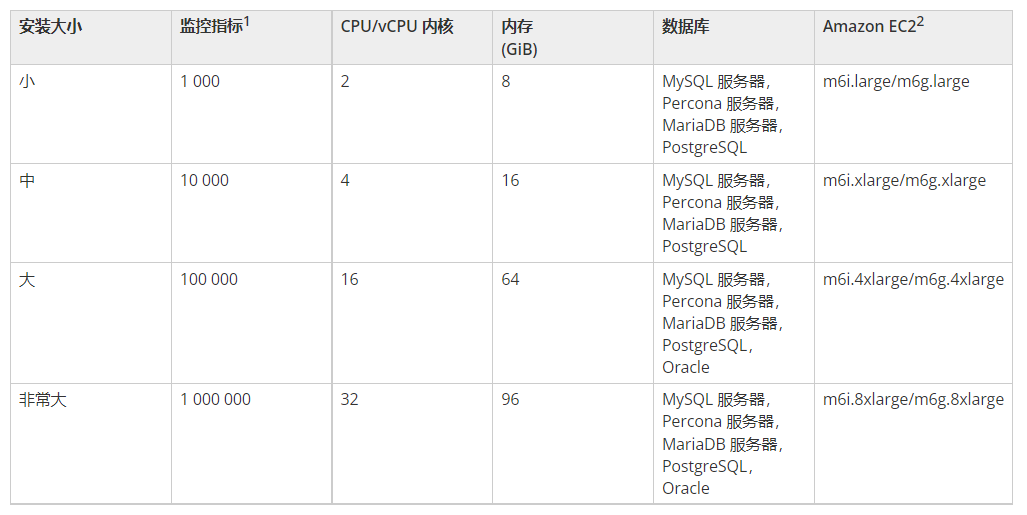
1.1、服务器配置
1.2、主机准备
# 这里主要是学习的
ubuntu    内存:4G  CPU:2核

# lsb_release -a
No LSB modules are available.
Distributor ID: Ubuntu
Description: Ubuntu 23.04
Release: 23.04
Codename: lunar
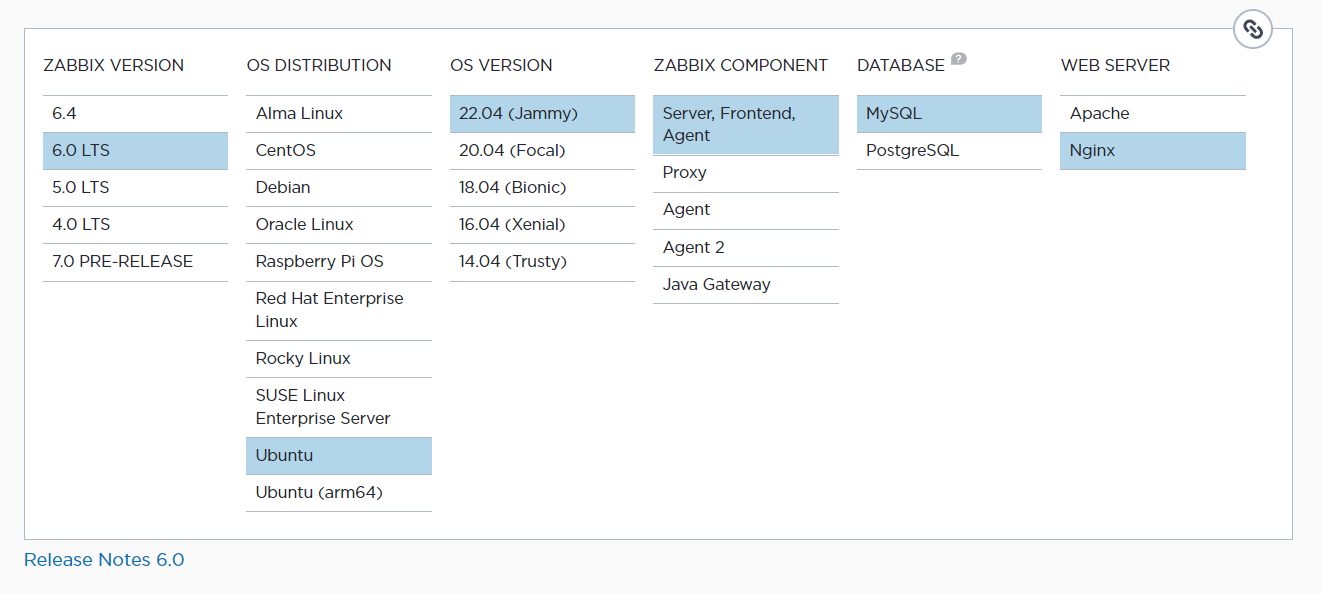
1.3、选择软件版本
1.4、配置zabbix软件仓库
1.4.1、修改ubuntu系统的仓库
# vi /etc/apt/sources.list
:1,$s/lunar/jammy/g

# 保持跟zabbix的系统版本一至

# 或都配置阿里云仓库,具体方法参考:https://developer.aliyun.com/mirror/ubuntu
1.4.2、配置zabbix仓库
# 官网仓库安装,下载速度慢,不建议,国内的
wget https://repo.zabbix.com/zabbix/6.0/ubuntu/pool/main/z/zabbix-release/zabbix-release_6.0-4+ubuntu22.04_all.deb
dpkg -i zabbix-release_6.0-4+ubuntu22.04_all.deb

# 手动配置清华源,安装快,给力
cat << 'CAT_END' > /etc/apt/sources.list.d/zabbix.list
# Zabbix main repository
deb https://mirror.tuna.tsinghua.edu.cn/zabbix/zabbix/6.4/ubuntu/ jammy main
deb-src https://mirror.tuna.tsinghua.edu.cn/zabbix/zabbix/6.4/ubuntu/ jammy main
CAT_END

cat << 'CAT_END' > /etc/apt/sources.list.d/zabbix-agent2-plugins.list
deb [arch=amd64] https://mirror.tuna.tsinghua.edu.cn/zabbix/zabbix-agent2-plugins/1/ubuntu/ jammy main
deb-src [arch=amd64] https://mirror.tuna.tsinghua.edu.cn/zabbix/zabbix-agent2-plugins/1/ubuntu/ jammy main
CAT_END

apt update
2、软件安装
2.1、安装mariadb数据库
2.1.1、安装
# 配置mariadb 仓库
cat << 'CAT_END' > /etc/apt/sources.list.d/mariadb.list
# mariadb main repository
deb https://mirror.tuna.tsinghua.edu.cn/mariadb/mariadb-11.5.1/repo/ubuntu/ jammy main
deb-src https://mirror.tuna.tsinghua.edu.cn/mariadb/mariadb-11.5.1/repo/ubuntu/ jammy  main
CAT_END

apt update
apt-get install -y mariadb-server
2.1.2、数据库配置
sed -i '/^bind-address/c bind-address=0.0.0.0' /etc/mysql/mariadb.conf.d/50-server.cnf

# grep -i 'bind' /etc/mysql/mariadb.conf.d/50-server.cnf
bind-address=0.0.0.0
2.1.3、重启mariadb和安全配置
systemctl restart mariadb.service
systemctl enable mariadb.service

# 设置root密码相关的
mysql_secure_installation
2.1.4、测试效果
mysql -uroot -p -e "show engines;"
2.2、zabbix软件安装
# libldap版本升级,否则无法apt install 安装zabbix
# 具体方法如下
wget http://archive.ubuntu.com/ubuntu/pool/main/o/openldap/libldap-2.5-0_2.5.11+dfsg-1~exp1ubuntu3_amd64.deb
dpkg -i libldap-2.5-0_2.5.11+dfsg-1~exp1ubuntu3_amd64.deb


# 更多版本参考如下
https://ubuntu.pkgs.org/22.04/ubuntu-main-amd64/libldap-2.5-0_2.5.11+dfsg-1~exp1ubuntu3_amd64.deb.html
2.2.1、安装
apt install -y zabbix-server-mysql zabbix-frontend-php zabbix-nginx-conf zabbix-sql-scripts zabbix-agent
2.2.2、安装完成后,检查软件版本
# zabbix_server -V
zabbix_server (Zabbix) 6.4.2
Revision dbfe71773cf 25 April 2023, compilation time: Apr 25 2023 08:38:57

Copyright (C) 2023 Zabbix SIA
License GPLv2+: GNU GPL version 2 or later <https://www.gnu.org/licenses/>.
This is free software: you are free to change and redistribute it according to
the license. There is NO WARRANTY, to the extent permitted by law.

This product includes software developed by the OpenSSL Project
for use in the OpenSSL Toolkit (http://www.openssl.org/).

Compiled with OpenSSL 3.0.2 15 Mar 2022
Running with OpenSSL 3.0.8 7 Feb 2023
2.3、设置zabbix数据库
2.3.1、创建数据库并配置zabbix连接权限
create database zabbix character set utf8 collate utf8_bin;
grant all privileges on zabbix.* to 'zabbix'@'localhost' identified by 'zabbix';
grant all privileges on zabbix.* to 'zabbix'@'%' identified by 'zabbix';
flush privileges;
2.3.2、导入数据表至数据库
zcat /usr/share/zabbix-sql-scripts/mysql/server.sql.gz | mysql zabbix --default-character-set=utf8mb4 -uzabbix -pzabbix
mysql -uzabbix -pzabbix -h192.168.10.21 -e 'use zabbix;show tables;'
2.3.3、为Zabbix server配置数据库
# vi /etc/zabbix/zabbix_server.conf
DBHost=192.168.10.21
DBName=zabbix
DBUser=zabbix
DBPassword=zabbix
2.4、nginx-web配置
2.4.1、查询配置文件位置
# dpkg -L zabbix-nginx-conf
/.
/etc
/etc/zabbix
/etc/zabbix/nginx.conf
/etc/zabbix/php-fpm.conf
/usr
/usr/share
/usr/share/doc
/usr/share/doc/zabbix-nginx-conf
/usr/share/doc/zabbix-nginx-conf/changelog.Debian.gz
/usr/share/doc/zabbix-nginx-conf/copyright
2.4.2、确认配置
# grep -Ev '#|^$' /etc/nginx/nginx.conf
user www-data;
worker_processes auto;
pid /run/nginx.pid;
include /etc/nginx/modules-enabled/*.conf;
events {
        worker_connections 768;
}
http {
        sendfile on;
        tcp_nopush on;
        types_hash_max_size 2048;
        include /etc/nginx/mime.types;
        default_type application/octet-stream;
        ssl_prefer_server_ciphers on;
        access_log /var/log/nginx/access.log;
        error_log /var/log/nginx/error.log;
        gzip on;
        include /etc/nginx/conf.d/*.conf;
        include /etc/nginx/sites-enabled/*;
}
2.4.3、删除默认的nginx首页配置
rm -f /etc/nginx/sites-enabled/default
2.4.4、定制zabbix的配置文件【zabbix.conf 】
# cat /etc/nginx/conf.d/zabbix.conf  | grep -v '^$'
server {
        listen          80;
        server_name     192.168.10.21;
        root    /usr/share/zabbix;
        index   index.php;
        location = /favicon.ico {
                log_not_found   off;
        }
        location / {
                try_files       $uri $uri/ =404;
        }
        location /assets {
                access_log      off;
                expires         10d;
        }
        location ~ /\.ht {
                deny            all;
        }
        location ~ /(api\/|conf[^\.]|include|locale) {
                deny            all;
                return          404;
        }
        location /vendor {
                deny            all;
                return          404;
        }
        location ~ [^/]\.php(/|$) {
                fastcgi_pass    unix:/var/run/php/zabbix.sock;
                fastcgi_split_path_info ^(.+\.php)(/.+)$;
                fastcgi_index   index.php;
                fastcgi_param   DOCUMENT_ROOT   /usr/share/zabbix;
                fastcgi_param   SCRIPT_FILENAME /usr/share/zabbix$fastcgi_script_name;
                fastcgi_param   PATH_TRANSLATED /usr/share/zabbix$fastcgi_script_name;
                include fastcgi_params;
                fastcgi_param   QUERY_STRING    $query_string;
                fastcgi_param   REQUEST_METHOD  $request_method;
                fastcgi_param   CONTENT_TYPE    $content_type;
                fastcgi_param   CONTENT_LENGTH  $content_length;
                fastcgi_intercept_errors        on;
                fastcgi_ignore_client_abort     off;
                fastcgi_connect_timeout         60;
                fastcgi_send_timeout            180;
                fastcgi_read_timeout            180;
                fastcgi_buffer_size             128k;
                fastcgi_buffers                 4 256k;
                fastcgi_busy_buffers_size       256k;
                fastcgi_temp_file_write_size    256k;
        }
}
2.4.5、修改php配置【主要修改时区】
# cat /etc/zabbix/php-fpm.conf
[zabbix]
user = www-data
group = www-data

listen = /var/run/php/zabbix.sock
listen.owner = www-data
listen.allowed_clients = 127.0.0.1

pm = dynamic
pm.max_children = 50
pm.start_servers = 5
pm.min_spare_servers = 5
pm.max_spare_servers = 35
pm.max_requests = 200

php_value[session.save_handler] = files
php_value[session.save_path]    = /var/lib/php/sessions/
php_value[date.timezone] = Asia/Shanghai

php_value[max_execution_time] = 300
php_value[memory_limit] = 128M
php_value[post_max_size] = 16M
php_value[upload_max_filesize] = 2M
php_value[max_input_time] = 300
php_value[max_input_vars] = 10000
2.5、启动服务
systemctl restart zabbix-server zabbix-agent php8.1-fpm nginx
systemctl enable zabbix-server zabbix-agent php8.1-fpm nginx
2.6、检查端口
# netstat -tunlp | grep -E 'zabbix|nginx|mari'
tcp        0      0 0.0.0.0:80              0.0.0.0:*               LISTEN      21374/nginx: master
tcp        0      0 0.0.0.0:10051           0.0.0.0:*               LISTEN      21395/zabbix_server
tcp        0      0 0.0.0.0:10050           0.0.0.0:*               LISTEN      21373/zabbix_agentd
tcp        0      0 0.0.0.0:3306            0.0.0.0:*               LISTEN      7566/mariadbd
tcp6       0      0 :::10051                :::*                    LISTEN      21395/zabbix_server
tcp6       0      0 :::10050                :::*                    LISTEN      21373/zabbix_agentd

nginx开启的是80端口
php开启的是9000端口,新版本没有此端口 php8.1
zabbix开启了多个端口10051(server)和10050(agent)
2.7、web配置
2.7.1、安装支持中文库
apt install -y language-pack-kde-zh-hans language-pack-kde-zh-hant

# locale -a | grep zh_CN
zh_CN.utf8

# 重启服务
systemctl restart nginx
systemctl restart php8.1-fpm
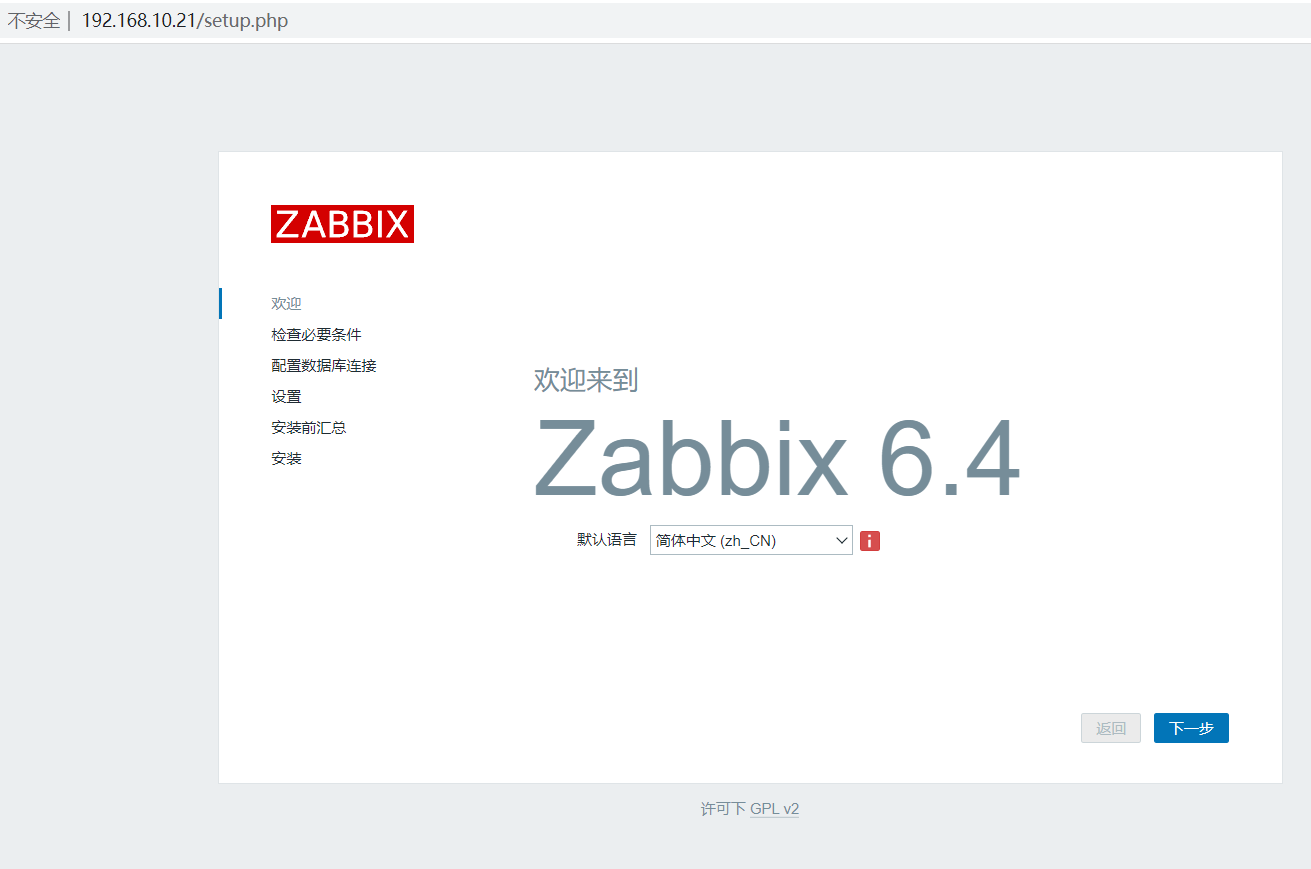
2.7.1、首次访问【设置语言为中文】
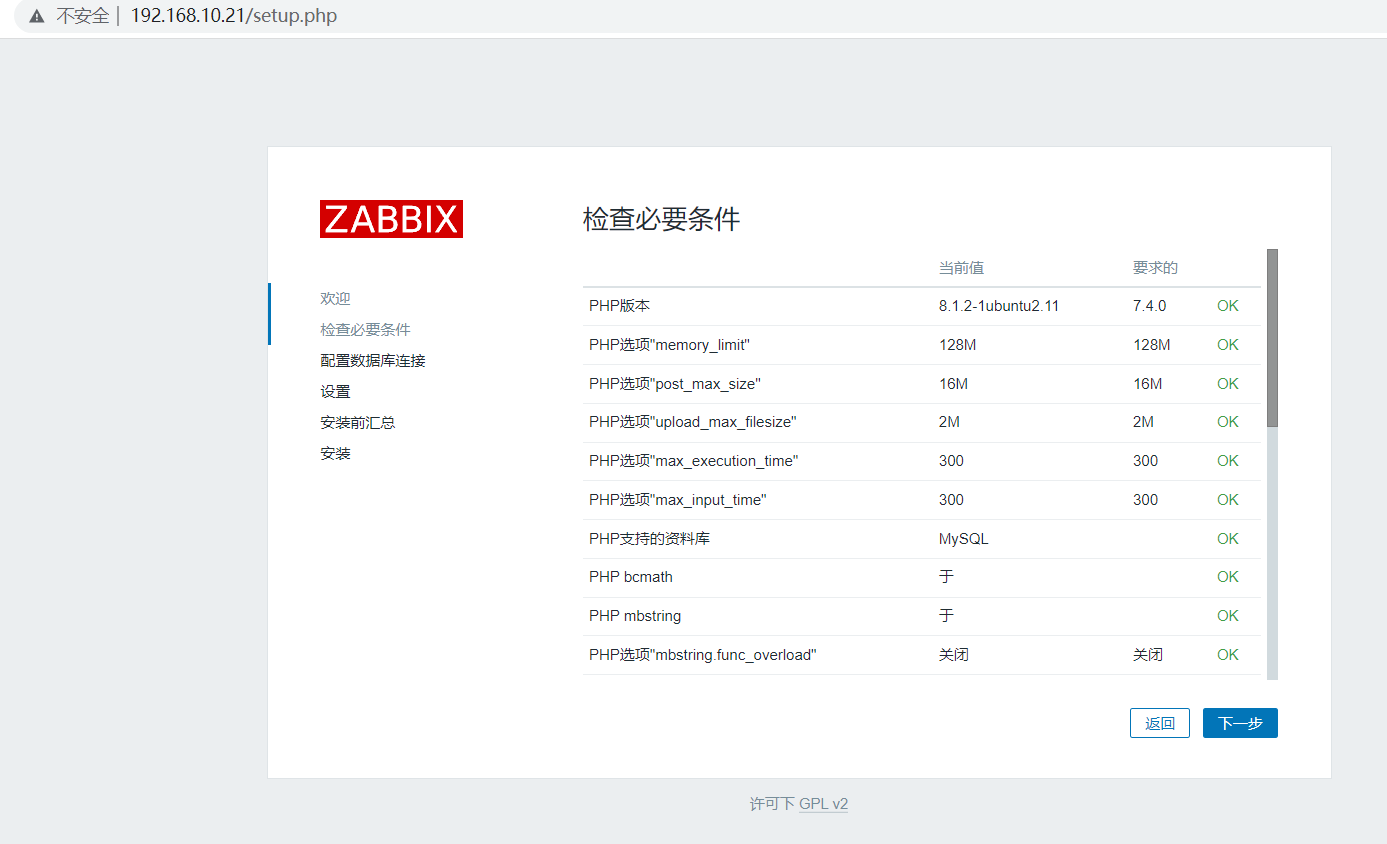
2.7.2、检查依赖库【没有的话,就补安装】
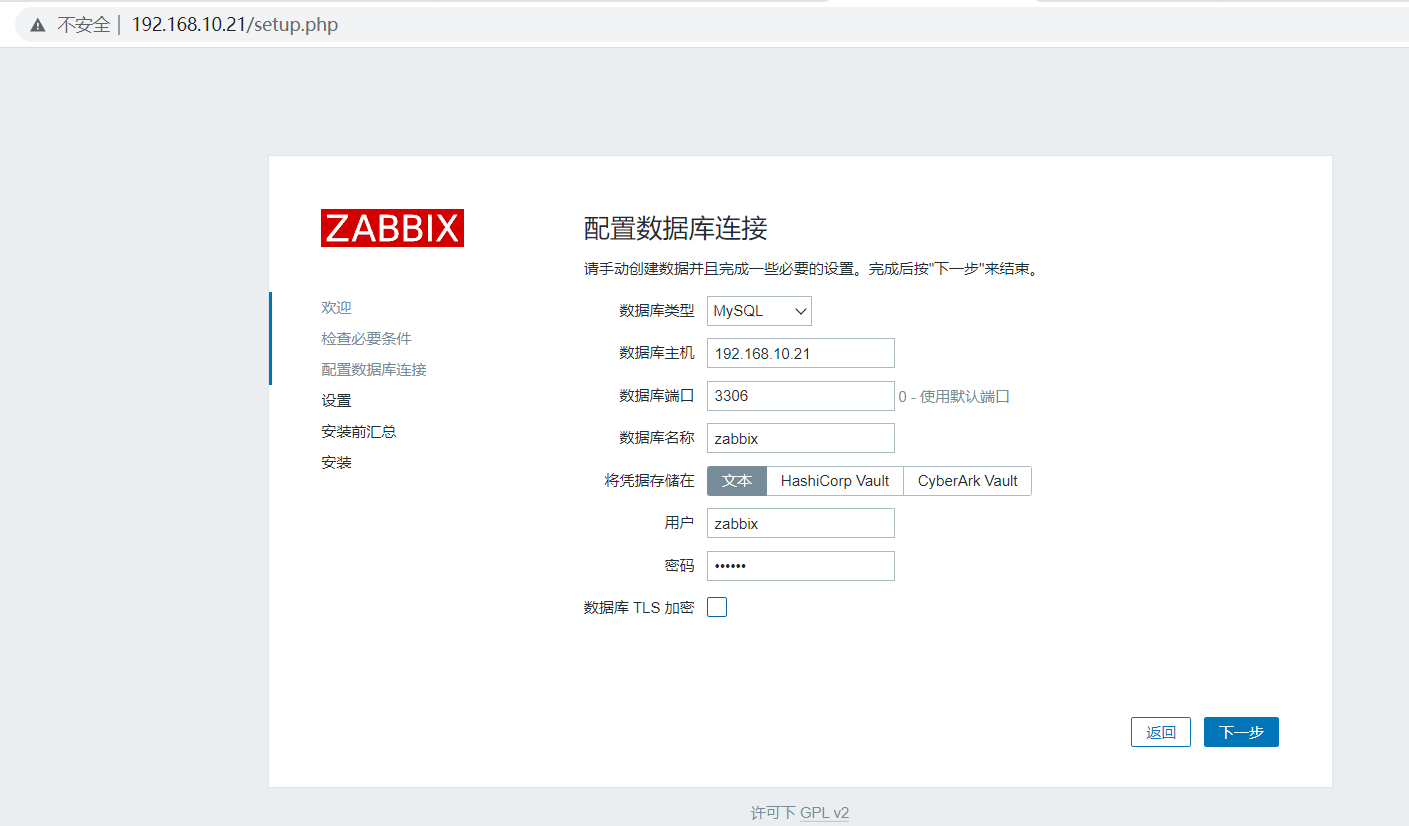
2.7.3、配置数据库连接
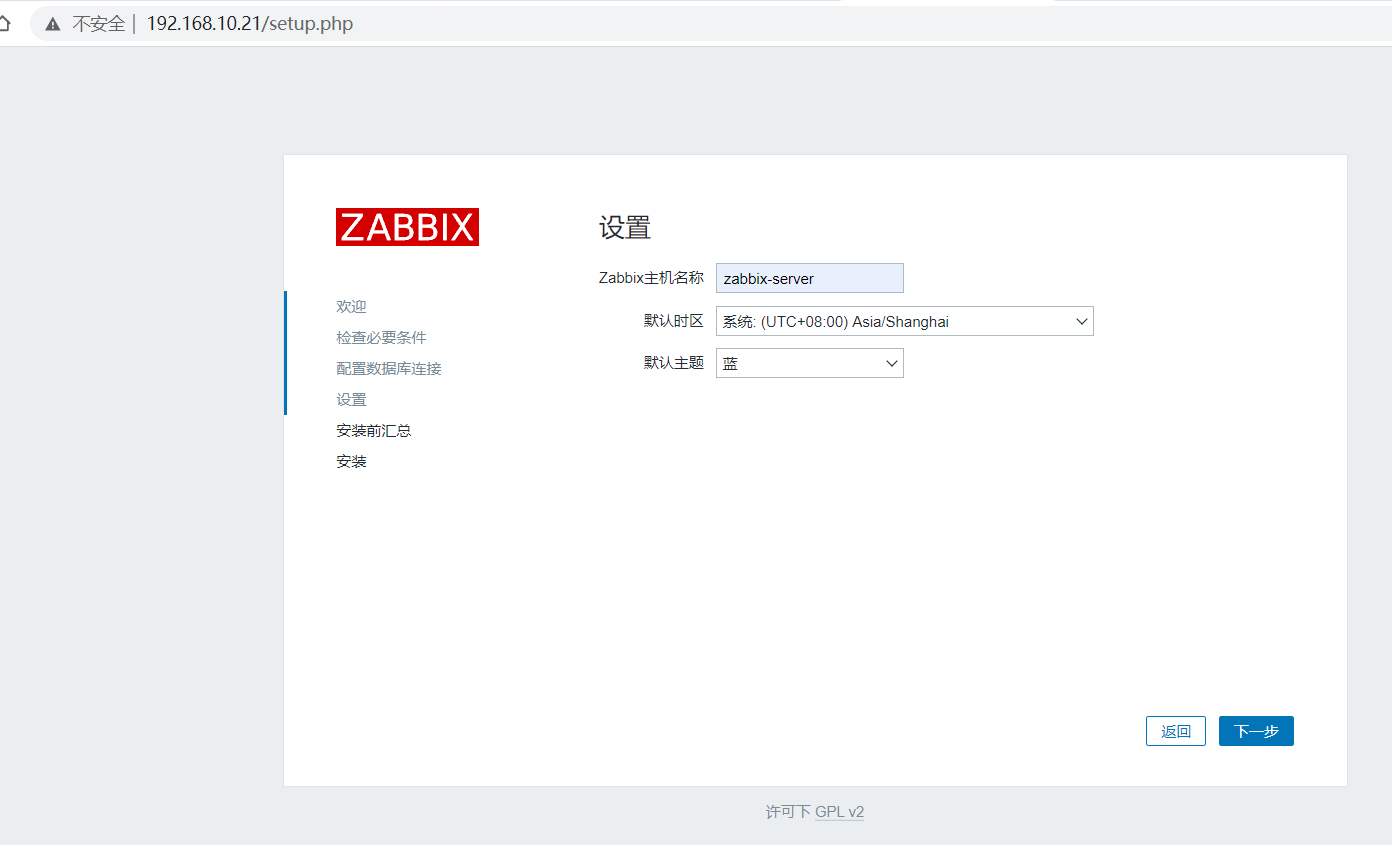
2.7.4、设置zabbix主机名和主题
2.7.5、再次确认参数配置

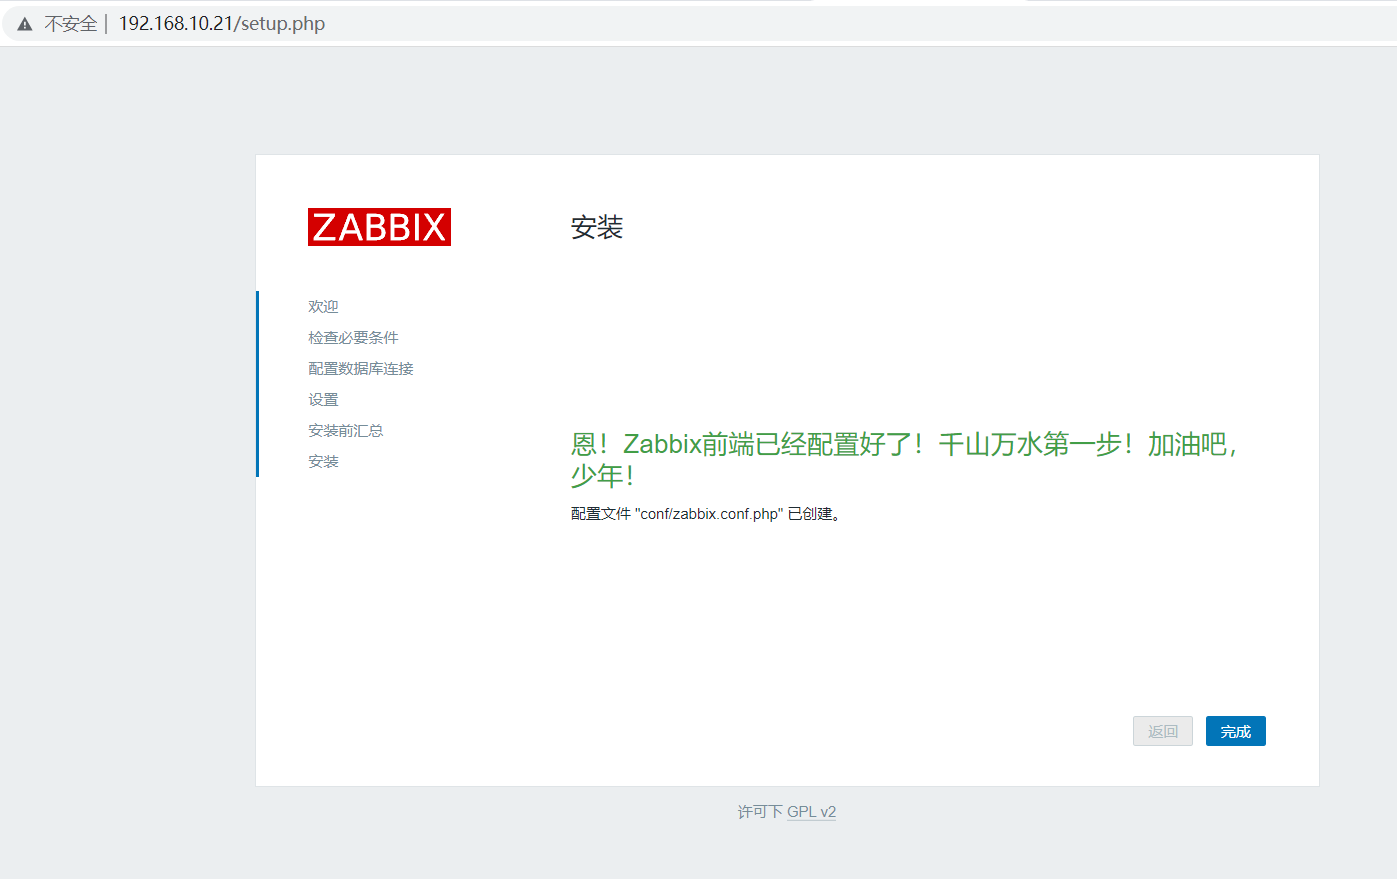
2.7.6、配置完成
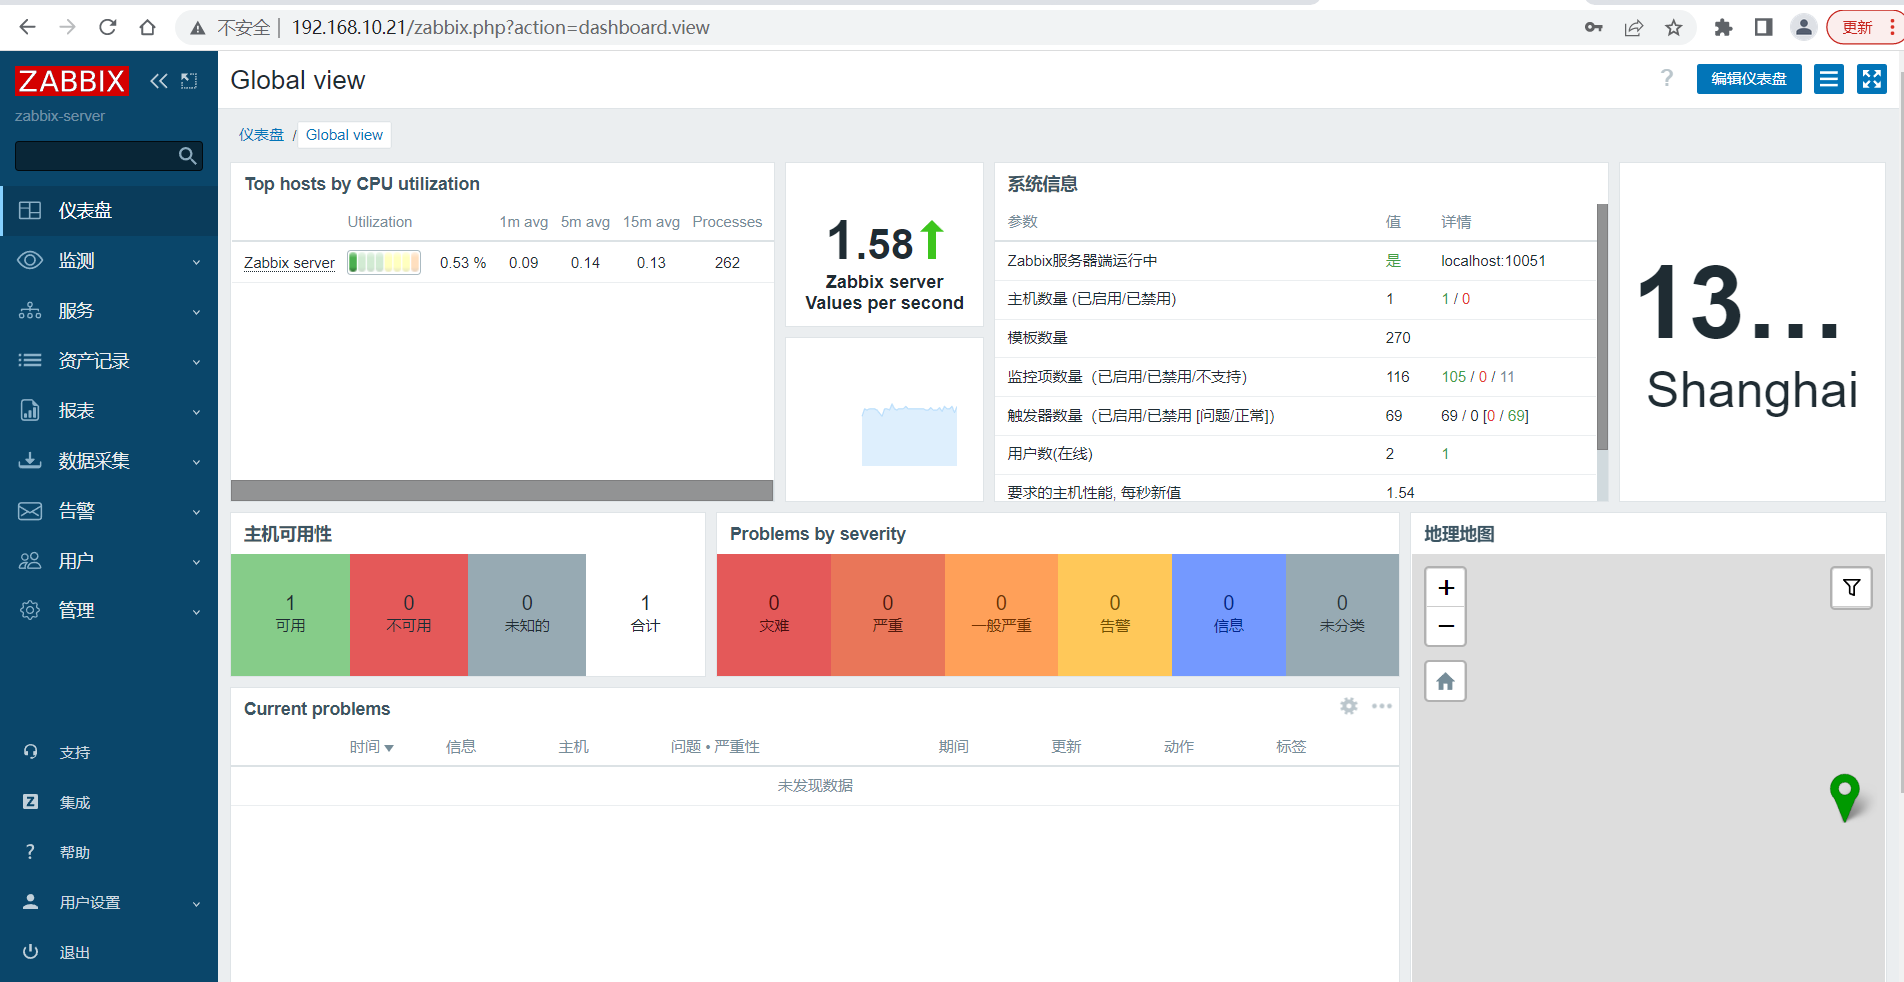
2.8、登陆zabbix web界面
在Username中输入默认的用户名"Admin",在Password中输入默认密码"zabbix",点击"Sign in",进入到zabbix的web首页
2.9、web配置生成的配置文件查看
当我们配置zabbix的web界面完毕后,会在zabbix的家目录下生成一个专用的web配置文件

# cat /etc/zabbix/web/zabbix.conf.php | grep -vE '\/\/|^$'
<?php
$DB['TYPE']                     = 'MYSQL';
$DB['SERVER']                   = '192.168.10.21';
$DB['PORT']                     = '3306';
$DB['DATABASE']                 = 'zabbix';
$DB['USER']                     = 'zabbix';
$DB['PASSWORD']                 = 'zabbix';
$DB['SCHEMA']                   = '';
$DB['ENCRYPTION']               = false;
$DB['KEY_FILE']                 = '';
$DB['CERT_FILE']                = '';
$DB['CA_FILE']                  = '';
$DB['VERIFY_HOST']              = false;
$DB['CIPHER_LIST']              = '';
$DB['VAULT']                    = '';
$DB['VAULT_URL']                = '';
$DB['VAULT_DB_PATH']            = '';
$DB['VAULT_TOKEN']              = '';
$DB['VAULT_CERT_FILE']          = '';
$DB['VAULT_KEY_FILE']           = '';
$DB['DOUBLE_IEEE754']           = true;
$ZBX_SERVER_NAME                = 'zabbix-server';
$IMAGE_FORMAT_DEFAULT   = IMAGE_FORMAT_PNG;
3、图表中文显示不出来的问题的解决
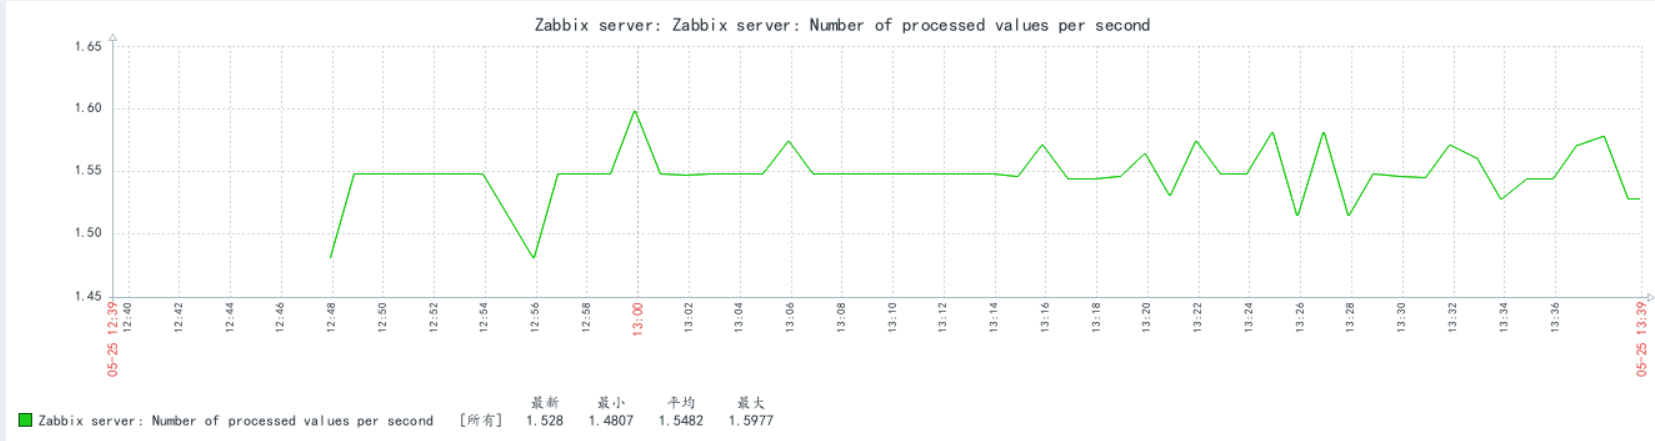
3.1、有问题的截图
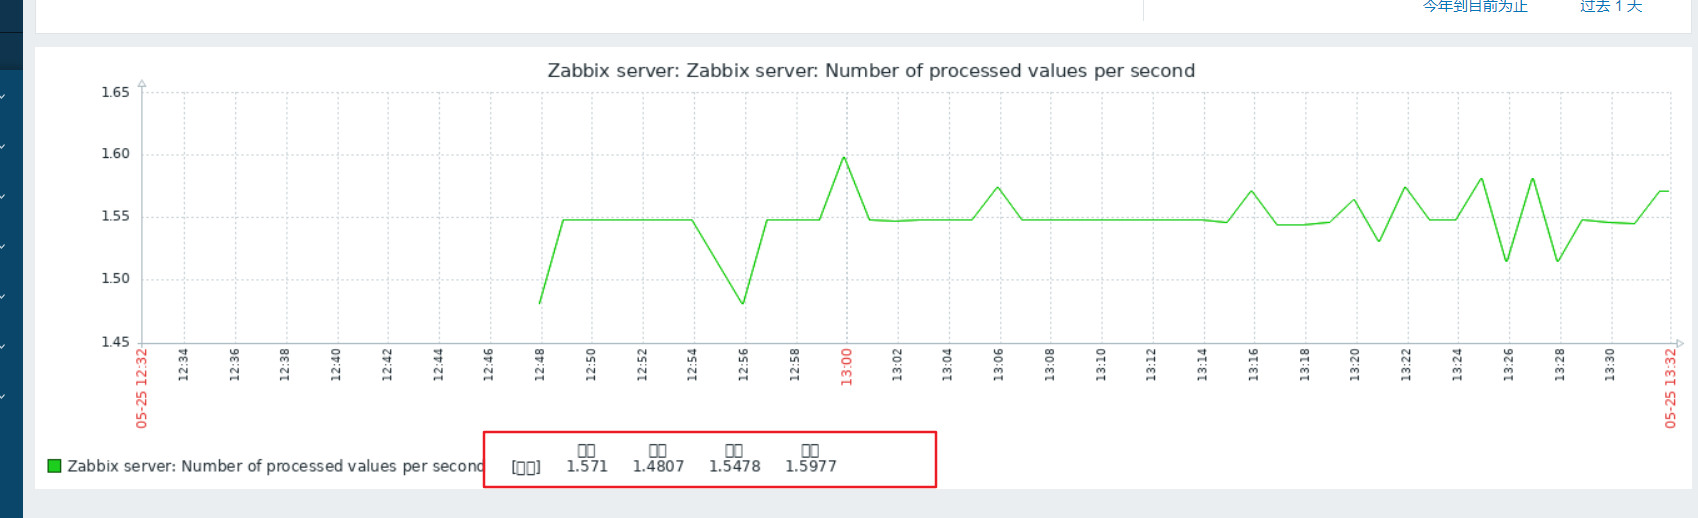
3.2、分析
说明图形中展示的信息内容不是翻译的问题,而是字体格式输出的问题,对于zabbix来说,一切的信息展示不是采用我们系统默认的字体格式,而是zabbix内部配置的字体类型,所以我们就需要对zabbix的字体进行
调整,把我们宿主机上的某些字体上传到Zabbix内部,并且让其生
3.3、解析方法
3.3.1、上传字体
C:\Windows\Fonts\simkai.ttf
# 在自己本地电脑复制字体
3.3.2、复制到zabbix front目录
# 备份
cp /usr/share/zabbix/assets/fonts/graphfont.ttf /usr/share/zabbix/assets/fonts/graphfont.ttf.bak

# 替换
mv /root/simkai.ttf /usr/share/zabbix/assets/fonts/graphfont.ttf
3.3.3、刷新页面显示正常