Python操作RabbitMQ
一、准备工作
1、安装pika模块【官方推荐的】
pip install pika
2、创建客户端登陆信息
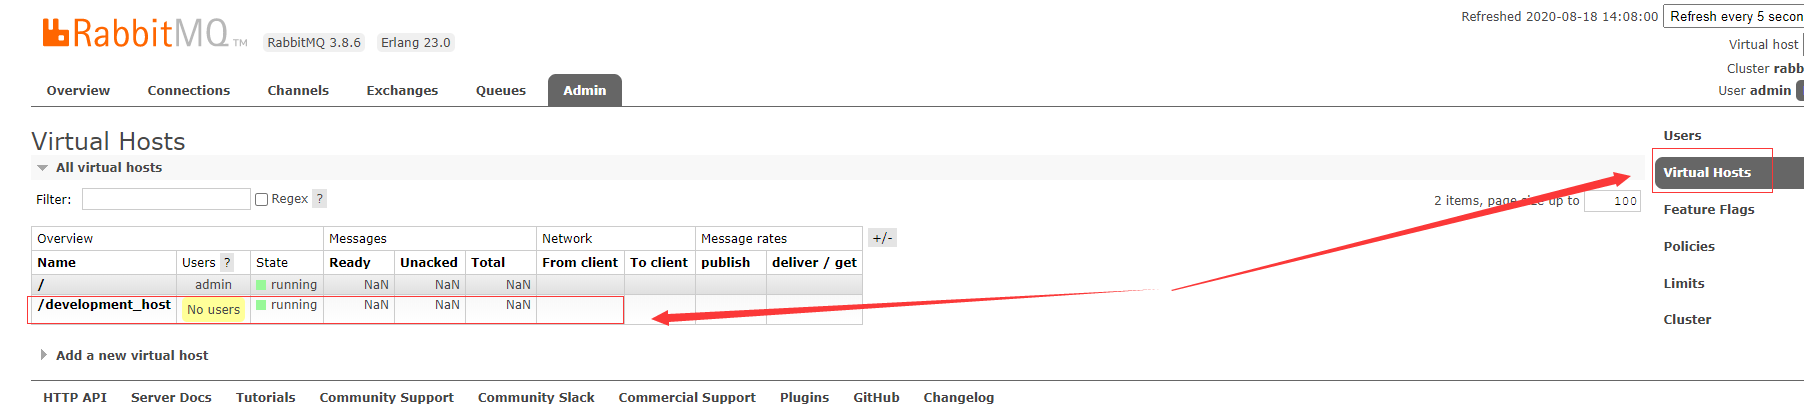
2.1、增加虚拟主机
#1、增加主机
rabbitmqctl add_vhost /development_host
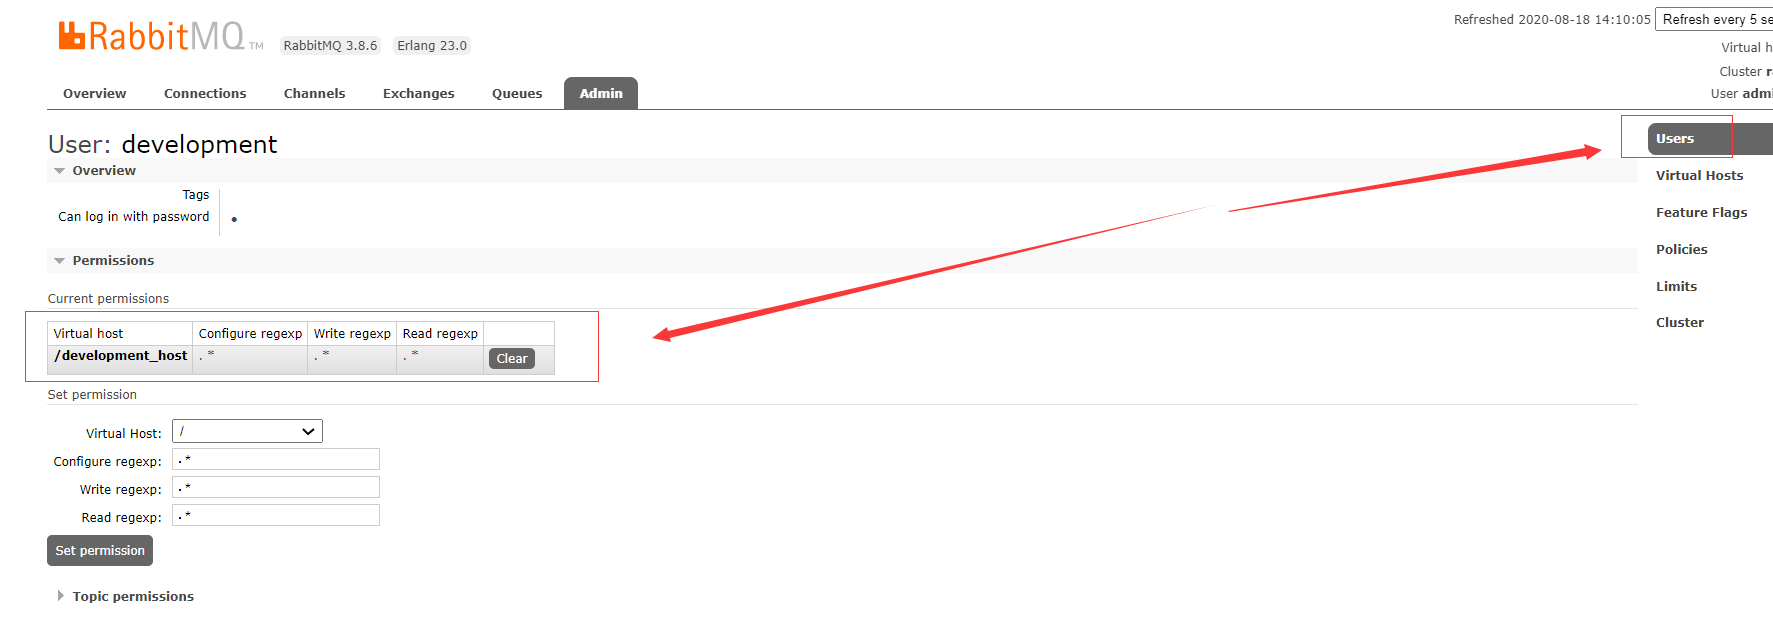
2.2、创建用户登陆信息
# 增加用户development
rabbitmqctl add_user development root

# 增加用户标签
rabbitmqctl set_user_tags development development_tag

# 设置该用户的权限并且绑虚拟主机
rabbitmqctl set_permissions -p /development_host development ".*" ".*" ".*"
2.3、其它常用操作
一、虚拟主机操作
# 增加虚拟主机
rabbitmqctl add_vhost vhoat_name

# 删除虚拟主机
rabbitmqctl delete_vhost vhoat_name

二、用户操作
# 查看用户列表
rabbitmqctl list_users

# 增加用户development
rabbitmqctl add_user Username password

# 删除用户
rabbitmqctl delete_user Username

# 增加用户标签
rabbitmqctl set_user_tags User User_tag

# 修改用户的密码
rabbitmqctl change_password Username Newpassword

三、权限操作
# 设置权限
rabbitmqctl set_permissions -p vhoat_name Username ".*" ".*" ".*"

# 删除权限
rabbitmqctl clear_permissions User -p vhoat_name

# 设置该用户的权限并且绑虚拟主机
rabbitmqctl set_permissions -p /user_vhost User ".*" ".*" ".*"

# 查看虚拟主机对应的用户权限
rabbitmqctl list_permissions -p /user_vhost

# 查看用户权限
rabbitmqctl list_user_permissions User
二、MQ操作模式
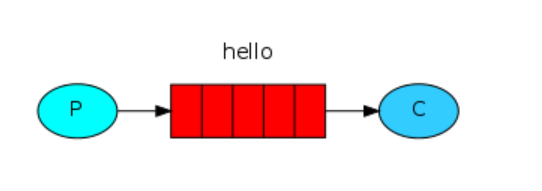
1、MQ模式一、单一队列的操作(即:一个生产者,一个消费者)
生产者代码:


import pika

# 设置凭证
credentials = pika.PlainCredentials('development', 'root')

login_info = pika.ConnectionParameters(
    host='192.168.2.129',
    port=5672,
    virtual_host='/development_host',
    credentials=credentials
)

connection = pika.BlockingConnection(login_info)

channel = connection.channel()

channel.queue_declare(queue='hello_queue')

#生产者
channel.basic_publish(exchange='', routing_key='hello_queue', body='Hello World!')
print(" [x] Sent 'Hello World!'")
connection.close()
消费者代码:
import pika

# 设置凭证
credentials = pika.PlainCredentials('development', 'root')

login_info = pika.ConnectionParameters(
    host='192.168.2.129',
    port=5672,
    virtual_host='/development_host',
    credentials=credentials
)
connection = pika.BlockingConnection(login_info)

channel = connection.channel()

channel.queue_declare(queue='hello_queue')


def callback(ch, method, properties, body):
    print(" [x] Received %r" % body)


# 消费者
channel.basic_consume(
    queue='hello_queue', on_message_callback=callback, auto_ack=True)

print(' [*] 等待消息,退出请按 CTRL+C')
channel.start_consuming()
测试结果
生产消息

消费消息

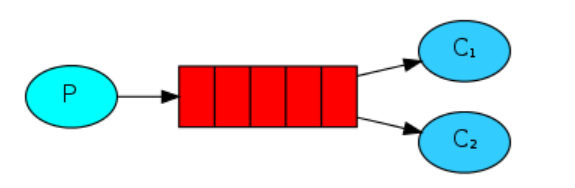
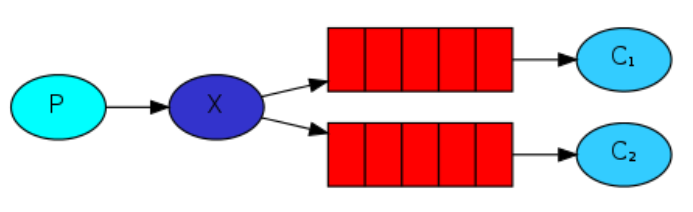
2、MQ模式二、一个生产者,多个消费者,消费者是公平轮询消费
生产者代码
import pika

# 设置凭证
credentials = pika.PlainCredentials('development', 'root')

login_info = pika.ConnectionParameters(
    host='192.168.2.129',
    port=5672,
    virtual_host='/development_host',
    credentials=credentials
)
connection = pika.BlockingConnection(login_info)

channel = connection.channel()

# durable=True,设置为持久化,重启rabbitMQ时,数据不会丢失
channel.queue_declare(queue='task_queue', durable=True)

message = "Hello World!"

#生产者
channel.basic_publish(
    exchange='',
    routing_key='task_queue',
    body=message,
    properties=pika.BasicProperties(
        delivery_mode=2,  # 设置数据持久化
    ))
print(" [x] Sent %r" % message)
connection.close()
消费者代码
import pika

# 设置凭证
credentials = pika.PlainCredentials('development', 'root')

login_info = pika.ConnectionParameters(
    host='192.168.2.129',
    port=5672,
    virtual_host='/development_host',
    credentials=credentials
)
connection = pika.BlockingConnection(login_info)

channel = connection.channel()

# durable=True,设置为持久化,重启rabbitMQ时,数据不会丢失
channel.queue_declare(queue='task_queue', durable=True)
print(' [*] 等待消息 退出请按 CTRL+C')


def callback(ch, method, properties, body):
    print(" [x] Received %r" % body)
    print(" [x] Done")
    ch.basic_ack(delivery_tag=method.delivery_tag)

#消费者
channel.basic_qos(prefetch_count=1)
channel.basic_consume(queue='task_queue', on_message_callback=callback)

channel.start_consuming()
测试结果
生产消息

消费消息

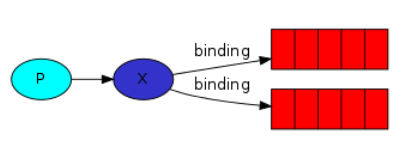
3、模式三、发布/订阅模式(一个发布者,订阅者设置key进行过滤订阅)
3.1、fanout方式:生产者给指定的exchange名字,下面的所有在线队列进行广播
生产者代码
import pika

# 设置凭证
credentials = pika.PlainCredentials('development', 'root')

login_info = pika.ConnectionParameters(
    host='192.168.2.129',
    port=5672,
    virtual_host='/development_host',
    credentials=credentials
)
connection = pika.BlockingConnection(login_info)

channel = connection.channel()

# 设置发布订阅模式:fanout方式,并且指定交换机名字
channel.exchange_declare(exchange='logs', exchange_type='fanout')

message = "info: Hello World!"
channel.basic_publish(exchange='logs', routing_key='', body=message)
print(" [x] Sent %r" % message)
connection.close()
消费者代码
import pika

# 设置凭证
credentials = pika.PlainCredentials('development', 'root')

login_info = pika.ConnectionParameters(
    host='192.168.2.129',
    port=5672,
    virtual_host='/development_host',
    credentials=credentials
)
connection = pika.BlockingConnection(login_info)

channel = connection.channel()

# 设置发布订阅模式:fanout方式,并且指定交换机名字
channel.exchange_declare(exchange='logs', exchange_type='fanout')

# 设置消费者关闭时,mq立马删除队列
result = channel.queue_declare(queue='', exclusive=True)
queue_name = result.method.queue  # mq自动生成队列名

# 将该队列绑定到logs交换机上
channel.queue_bind(exchange='logs', queue=queue_name)

print(' [*] Waiting for logs. To exit press CTRL+C')


def callback(ch, method, properties, body):
    print(" [x] %r" % body)

#消费者
channel.basic_consume(
    queue=queue_name, on_message_callback=callback, auto_ack=True)

channel.start_consuming()
测试效果

查看RbbitMQ Web绑定关系

4、模式四、精准路由模式(指定的路由key值进行路由转发到指定的队列中)
direct方式:生产者:指定交换机名字和路由键值,消费者只接收指定交换机名字和路由键值的数据【即数据路由的功能】

生产者代码
import pika
import sys

# 设置凭证
credentials = pika.PlainCredentials('development', 'root')

login_info = pika.ConnectionParameters(
    host='192.168.2.129',
    port=5672,
    virtual_host='/development_host',
    credentials=credentials
)
connection = pika.BlockingConnection(login_info)

channel = connection.channel()

# 设置发布订阅模式:direct,并且指定交换机名字
channel.exchange_declare(exchange='direct_logs', exchange_type='direct')

# 用于设置交换机的接口名字
severity = sys.argv[1] if len(sys.argv) >= 2 else 'info'

# 给交换机接口发送的内容
message = ' '.join(sys.argv[2:]) or 'Hello World!'

# 生产者
channel.basic_publish(
    exchange='direct_logs', routing_key=severity, body=message)
print(" [x] Sent %r:%r" % (severity, message))
connection.close()
消费者代码
import pika
import sys

# 设置凭证
credentials = pika.PlainCredentials('development', 'root')

login_info = pika.ConnectionParameters(
    host='192.168.2.129',
    port=5672,
    virtual_host='/development_host',
    credentials=credentials
)
connection = pika.BlockingConnection(login_info)

channel = connection.channel()

# 设置发布订阅模式:direct,并且指定交换机名字
channel.exchange_declare(exchange='direct_logs', exchange_type='direct')

# 设置队列接口一断开,则马上删除该队列
result = channel.queue_declare(queue='', exclusive=True)
queue_name = result.method.queue

# 设置交换机的一个或多个接口名字
severities = sys.argv[1:]
if not severities:
    sys.stderr.write("Usage: %s [info] [warning] [error]\n" % sys.argv[0])
    sys.exit(1)

# 编历交换机接口名字,并且与队列相互绑定
for severity in severities:
    channel.queue_bind(
        exchange='direct_logs', queue=queue_name, routing_key=severity)

print(' [*] Waiting for logs. To exit press CTRL+C')


def callback(ch, method, properties, body):
    print(" [x] %r:%r" % (method.routing_key, body))


# 消费者
channel.basic_consume(
    queue=queue_name, on_message_callback=callback, auto_ack=True)

channel.start_consuming()
测试效果

查看RbbitMQ Web绑定关系

5、模式五、模糊匹配路由模式

正则表达式词法
* : 任意字符
# : 0个或多个字符
生产者代码
import pika
import sys

# 设置凭证
credentials = pika.PlainCredentials('development', 'root')

login_info = pika.ConnectionParameters(
    host='192.168.2.129',
    port=5672,
    virtual_host='/development_host',
    credentials=credentials
)
connection = pika.BlockingConnection(login_info)

channel = connection.channel()

# 设置路由模式:topic,并且设置交换机名字
channel.exchange_declare(exchange='topic_logs', exchange_type='topic')

routing_key = sys.argv[1] if len(sys.argv) >= 2 else 'anonymous.info'
message = 'Hello World!'

# 生产者,指定产生数据,扔到交换机topic_logs和路由键值为routing_key
channel.basic_publish(
    exchange='topic_logs', routing_key=routing_key, body=message)
print(" [x] Sent %r:%r" % (routing_key, message))
connection.close()
消费者代码
import pika
import sys

# 设置凭证
credentials = pika.PlainCredentials('development', 'root')

login_info = pika.ConnectionParameters(
    host='192.168.2.129',
    port=5672,
    virtual_host='/development_host',
    credentials=credentials
)
connection = pika.BlockingConnection(login_info)

channel = connection.channel()

# 路由模式:topic,交且设置交换机名字
channel.exchange_declare(exchange='topic_logs', exchange_type='topic')

# 设置队列断开,则删除绑定关系
result = channel.queue_declare(queue='', exclusive=True)
queue_name = result.method.queue

# 设置消费的模糊的路由键值
binding_keys = sys.argv[1:]
if not binding_keys:
    sys.stderr.write("Usage: %s [binding_key]...\n" % sys.argv[0])
    sys.exit(1)

# 将路由键值和队列绑定到指定的交换机
for binding_key in binding_keys:
    channel.queue_bind(
        exchange='topic_logs', queue=queue_name, routing_key=binding_key)

print(' [*] Waiting for logs. To exit press CTRL+C')


def callback(ch, method, properties, body):
    print(" [x] %r:%r" % (method.routing_key, body))


# 消费者
channel.basic_consume(
    queue=queue_name, on_message_callback=callback, auto_ack=True)

channel.start_consuming()
测试效果

查看RbbitMQ Web绑定关系

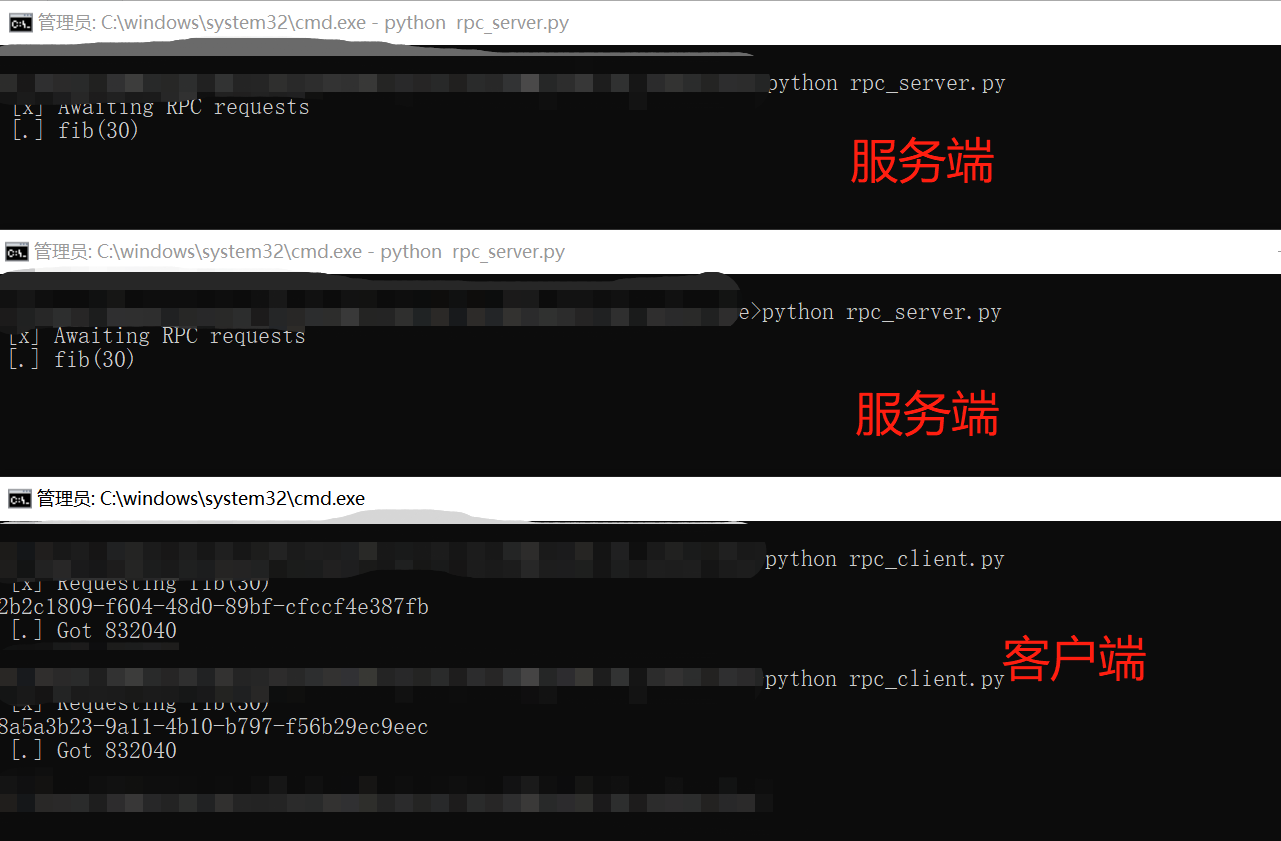
6、远程过程调用(RPC)一般用于分布式运算居多

服务端代码
import pika

# 设置凭证
credentials = pika.PlainCredentials('development', 'root')

login_info = pika.ConnectionParameters(
    host='192.168.2.129',
    port=5672,
    virtual_host='/development_host',
    credentials=credentials
)

connection = pika.BlockingConnection(login_info)

channel = connection.channel()

channel.queue_declare(queue='rpc_queue')


# 处理的函数
def fib(n):
    if n == 0:
        return 0
    elif n == 1:
        return 1
    else:
        return fib(n - 1) + fib(n - 2)


#
def on_request(ch, method, props, body):
    n = int(body)

    print(" [.] fib(%s)" % n)
    response = fib(n)  # 给处理结果附值

    # props.correlation_id : 生产者产生的唯一标识
    # props.reply_to : 生产者的路由键
    # 把处理的结果返回给生产者
    ch.basic_publish(exchange='',
                     routing_key=props.reply_to,
                     properties=pika.BasicProperties(correlation_id=props.correlation_id),
                     body=str(response))
    ch.basic_ack(delivery_tag=method.delivery_tag)


# 消费者,并且设置轮询
channel.basic_qos(prefetch_count=1)
channel.basic_consume(queue='rpc_queue', on_message_callback=on_request)

print(" [x] Awaiting RPC requests")
channel.start_consuming()
客户端代码
import pika
import uuid


class FibonacciRpcClient(object):

    def __init__(self):

        # 设置凭证
        credentials = pika.PlainCredentials('development', 'root')

        login_info = pika.ConnectionParameters(
            host='192.168.2.129',
            port=5672,
            virtual_host='/development_host',
            credentials=credentials
        )
        self.connection = pika.BlockingConnection(login_info)

        self.channel = self.connection.channel()

        result = self.channel.queue_declare(queue='', exclusive=True)
        self.callback_queue = result.method.queue

        self.channel.basic_consume(
            queue=self.callback_queue,
            on_message_callback=self.on_response,
            auto_ack=True)

    def on_response(self, ch, method, props, body):
        if self.corr_id == props.correlation_id:
            self.response = body

    def call(self, n):
        self.response = None
        self.corr_id = str(uuid.uuid4())
        print(self.corr_id)
        self.channel.basic_publish(
            exchange='',
            routing_key='rpc_queue',
            properties=pika.BasicProperties(
                reply_to=self.callback_queue,
                correlation_id=self.corr_id,
            ),
            body=str(n))
        while self.response is None:
            self.connection.process_data_events()
        return int(self.response)


fibonacci_rpc = FibonacciRpcClient()

print(" [x] Requesting fib(30)")
response = fibonacci_rpc.call(30)
print(" [.] Got %r" % response)
运行效果
查看RbbitMQ Web绑定关系
服务端产生两个链接
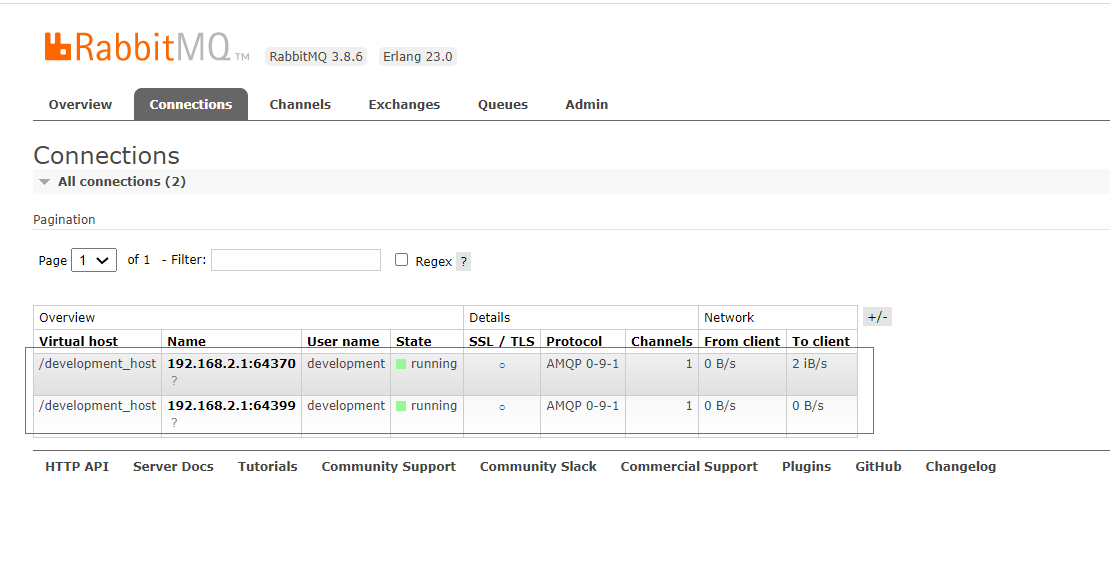
两个链接对应两个通道
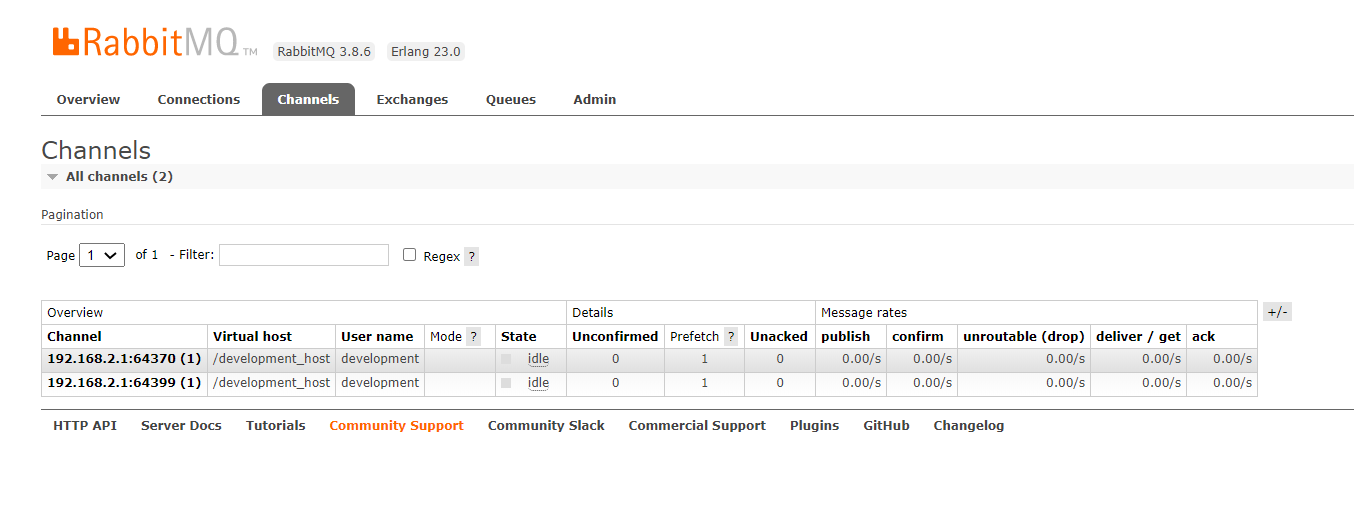
每条通道产生一个消费者的标签
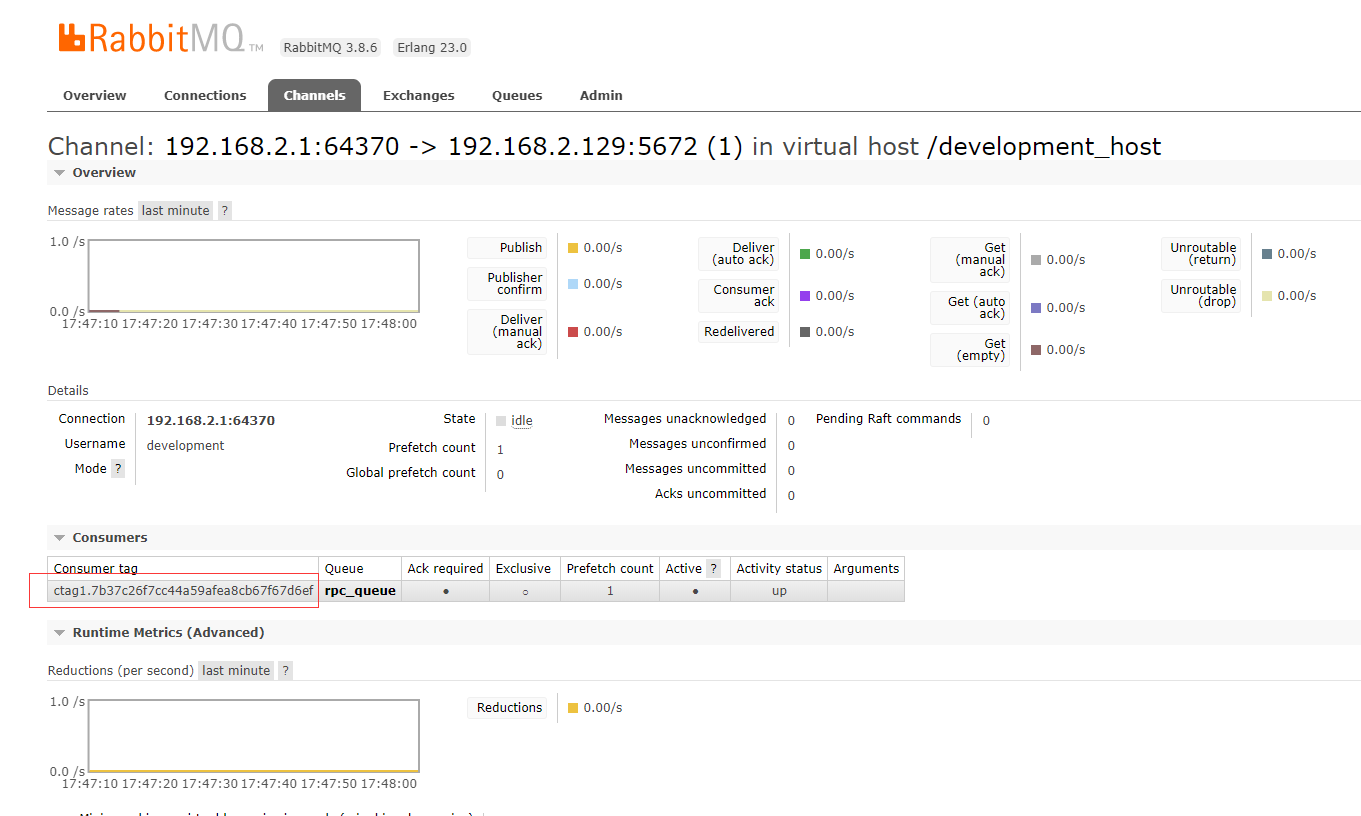
一条队列绑定两个服务端


