JavaWeb学习笔记(二十一)—— 监听器Listener
一、监听器概述
JavaWeb中的监听器是Servlet规范中定义的一种特殊类,它用于监听web应用程序中的ServletContext, HttpSession和 ServletRequest等域对象的创建与销毁事件,以及监听这些域对象中的属性发生修改的事件。
二、事件源(被监听的对象)
2.1 ServletContext
【生命周期监听】——ServletContextListener
ServletContextListener接口用于监听ServletContext对象的创建和销毁事件。实现了ServletContextListener接口的类都可以对ServletContext对象的创建和销毁进行监听。
当ServletContext对象被创建时,激发void contextInitialized (ServletContextEvent sce)方法。
当ServletContext对象被销毁时,激发void contextDestroyed(ServletContextEvent sce)方法。
ServletContext域对象创建和销毁时机:
创建:服务器启动针对每一个Web应用创建ServletContext
销毁:服务器关闭前先关闭代表每一个web应用的ServletContext
ServletContextListener监听器的主要作用:
- 初始化的工作:初始化对象、初始化数据——加载数据库驱动,连接池的初始化
- 加载一些初始化的配置文件——spring的配置文件
- 任务调度——定时器——Timer/TimerTask
/**
     * 任务调度
     */
    public void taskSchedule() {
        SimpleDateFormat format = new SimpleDateFormat("yyyy-MM-dd hh:mm:ss");
        Date parse = null;
        try {
            parse = format.parse("2018-03-25 24:00:00");
        } catch (ParseException e) {
            e.printStackTrace();
        }

        // web应用一启动,就开启任务调度
        Timer timer = new Timer();
        timer.schedule(new TimerTask() {
            @Override
            public void run() {
                // 定时执行的任务代码
                System.out.println("runner...");
            }
        }, parse,3000); //24*60*60*1000
    }
范例:编写一个MyServletContextListener类,实现ServletContextListener接口,监听ServletContext对象的创建和销毁
1、编写监听器
/**
* MyServletContextListener类实现了ServletContextListener接口,
* 因此可以对ServletContext对象的创建和销毁这两个动作进行监听。
*
*/
public class MyServletContextListener implements ServletContextListener {

    @Override
    public void contextInitialized(ServletContextEvent sce) {
        System.out.println("ServletContext对象创建");
    }

    @Override
    public void contextDestroyed(ServletContextEvent sce) {
        System.out.println("ServletContext对象销毁");
    }
}
2、在web.xml文件中注册监听器
  <!-- 注册针对ServletContext对象进行监听的监听器 -->
  <listener>
      <!--实现了ServletContextListener接口的监听器类 -->
      <listener-class>cn.itcast.listener.MyServletContextListener</listener-class>
  </listener>
【属性监听】——ServletContextAttributeListener
ServletContextAttributeListener接口的方法有:
-
void attributeAdded(ServletContextAttributeEvent event):添加属性时调用
-
void attributeReplaced(ServletContextAttributeEvent event):替换属性时调用
-
void attributeRemoved(ServletContextAttributeEvent event):移除属性时调用
public class MyServletContextAttributeListener implements ServletContextAttributeListener {
    @Override
    public void attributeAdded(ServletContextAttributeEvent servletContextAttributeEvent) {
        // 放在域中的属性
        System.out.println(servletContextAttributeEvent.getName());//放到域中的name
        System.out.println(servletContextAttributeEvent.getValue());//放到域中的value
    }

    @Override
    public void attributeRemoved(ServletContextAttributeEvent servletContextAttributeEvent) {
        System.out.println(servletContextAttributeEvent.getName());//删除的域中的name
        System.out.println(servletContextAttributeEvent.getValue());//删除的域中的value
    }

    @Override
    public void attributeReplaced(ServletContextAttributeEvent servletContextAttributeEvent) {
        System.out.println(servletContextAttributeEvent.getName());//获得修改前的name
        System.out.println(servletContextAttributeEvent.getValue());//获得修改前的value
    }
}
2.2 HttpSession
【生命周期监听】——HttpSessionListener
HttpSessionListener 接口用于监听HttpSession对象的创建和销毁
创建一个Session时,激发sessionCreated (HttpSessionEvent se) 方法
销毁一个Session时,激发sessionDestroyed (HttpSessionEvent se) 方法。
范例:编写一个MyHttpSessionListener类,实现HttpSessionListener接口,监听HttpSession对象的创建和销毁
1.编写监听器
/**
* MyHttpSessionListener类实现了HttpSessionListener接口,
* 因此可以对HttpSession对象的创建和销毁这两个动作进行监听。*/
public class MyHttpSessionListener implements HttpSessionListener {

    @Override
    public void sessionCreated(HttpSessionEvent se) {
        System.out.println( se.getSession() + "创建了!!");
    }

    /* HttpSession的销毁时机需要在web.xml中进行配置,如下:
     * <session-config>
              <session-timeout>1</session-timeout>
          </session-config>
          这样配置就表示session在1分钟之后就被销毁
     */
    @Override
    public void sessionDestroyed(HttpSessionEvent se) {
        System.out.println("session销毁了!!");
    }
}
2、在web.xml文件中注册监听器
<!--注册针对HttpSession对象进行监听的监听器-->
   <listener>
      <listener-class>cn.itcast.listener.MyHttpSessionListener</listener-class>
  </listener>
  <!-- 配置HttpSession对象的销毁时机 -->
  <session-config>
      <!--配置HttpSession对象的1分钟之后销毁 -->
      <session-timeout>1</session-timeout>
  </session-config>
【属性监听】——HttpSessionAttributeListener
- void attributeAdded(HttpSessionBindingEvent event):添加属性时调用
- void attributeReplaced(HttpSessionBindingEvent event):替换属性时调用
- void attributeRemoved(HttpSessionBindingEvent event):移除属性时调用
2.3 ServletRequest
【生命周期监听】——ServletRequestListener
ServletRequestListener接口用于监听ServletRequest 对象的创建和销毁
Request对象被创建时,监听器的requestInitialized(ServletRequestEvent sre)方法将会被调用
Request对象被销毁时,监听器的requestDestroyed(ServletRequestEvent sre)方法将会被调用
ServletRequest域对象创建和销毁时机:
创建:用户每一次访问都会创建request对象
销毁:当前访问结束,request对象就会销毁
范例:编写一个MyServletRequestListener类,实现ServletRequestListener接口,监听ServletRequest对象的创建和销毁
1.编写监听器:
/**
* MyServletRequestListener类实现了ServletRequestListener接口,
* 因此可以对ServletRequest对象的创建和销毁这两个动作进行监听。
*
*/
public class MyServletRequestListener implements ServletRequestListener {

    @Override
    public void requestDestroyed(ServletRequestEvent sre) {
        System.out.println(sre.getServletRequest() + "销毁了!!");

    }

    @Override
    public void requestInitialized(ServletRequestEvent sre) {
        System.out.println(sre.getServletRequest() + "创建了!!");
    }
}
2.在web.xml文件中注册监听器
<!--注册针对ServletRequest对象进行监听的监听器--><listener><listener-class>cn.itcast.listener.MyServletRequestListener</listener-class></listener>
【属性监听】——ServletRequestAttributeListener
- void attributeAdded(ServletRequestAttributeEvent srae):添加属性时调用
- void attributeReplaced(ServletRequestAttributeEvent srae):替换属性时调用
- void attributeRemoved(ServletRequestAttributeEvent srae):移除属性时调用
三、感知Session绑定的事件监听器
保存在Session域中的对象可以有多种状态:绑定(session.setAttribute("bean",Object))到Session中;从 Session域中解除(session.removeAttribute("bean"))绑定;随Session对象持久化到一个存储设备中;随Session对象从一个存储设备中恢复
Servlet 规范中定义了两个特殊的监听器接口"HttpSessionBindingListener和HttpSessionActivationListener"来帮助JavaBean 对象(不是三大域)了解自己在Session域中的这些状态;实现这两个接口的类不需要 web.xml 文件中进行注册。
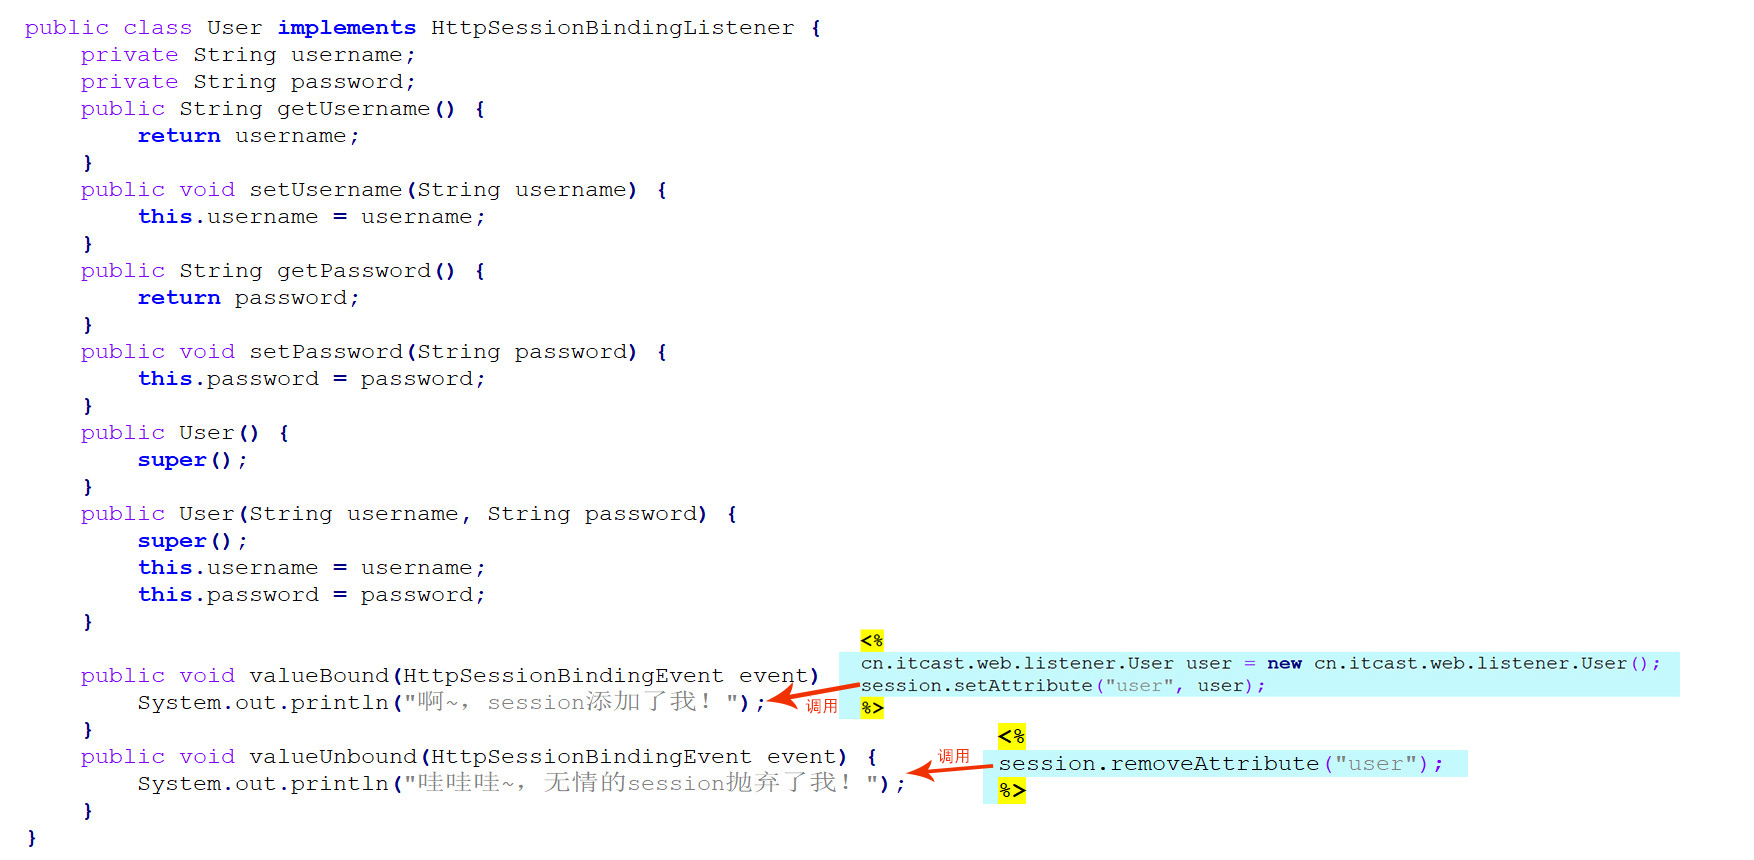
3.1 HttpSessionBindingListener接口
实现了HttpSessionBindingListener接口的JavaBean对象可以感知自己被绑定到Session中和 Session中删除的事件
当对象被绑定到HttpSession对象中时,web服务器调用该对象的void valueBound(HttpSessionBindingEvent event)方法
当对象从HttpSession对象中解除绑定时,web服务器调用该对象的void valueUnbound(HttpSessionBindingEvent event)方法

3.2 HttpSessionActivationListener接口
实现了HttpSessionActivationListener接口的JavaBean对象可以感知自己被活化(反序列化)和钝化(序列化)的事件
当绑定到HttpSession对象中的javabean对象将要随HttpSession对象被钝化(序列化)之前,web服务器调用该javabean对象的void sessionWillPassivate(HttpSessionEvent event) 方法。这样javabean对象就可以知道自己将要和HttpSession对象一起被序列化(钝化)到硬盘中. 【Session的序列化和反序列化 && Session的活化和钝化详解】
当绑定到HttpSession对象中的javabean对象将要随HttpSession对象被活化(反序列化)之后,web服务器调用该javabean对象的void sessionDidActive(HttpSessionEvent event)方法。这样javabean对象就可以知道自己将要和 HttpSession对象一起被反序列化(活化)回到内存中
范例:
/**
*
    实现了HttpSessionActivationListener接口的 JavaBean 对象可以感知自己被活化和钝化的事件
    活化:javabean对象和Session一起被反序列化(活化)到内存中。
    钝化:javabean对象存在Session中,当服务器把session序列化到硬盘上时,如果Session中的javabean对象实现了Serializable接口
    那么服务器会把session中的javabean对象一起序列化到硬盘上,javabean对象和Session一起被序列化到硬盘中的这个操作称之为钝化
    如果Session中的javabean对象没有实现Serializable接口,那么服务器会先把Session中没有实现Serializable接口的javabean对象移除
    然后再把Session序列化(钝化)到硬盘中
    当绑定到 HttpSession对象中的javabean对象将要随 HttpSession对象被钝化之前,
    web服务器调用该javabean对象对象的 void sessionWillPassivate(HttpSessionEvent event)方法
    这样javabean对象就可以知道自己将要和 HttpSession对象一起被序列化(钝化)到硬盘中
    当绑定到HttpSession对象中的javabean对象将要随 HttpSession对象被活化之后,
    web服务器调用该javabean对象的 void sessionDidActive(HttpSessionEvent event)方法
    这样javabean对象就可以知道自己将要和 HttpSession对象一起被反序列化(活化)回到内存中
*
*/
public class JavaBeanDemo2 implements HttpSessionActivationListener,
        Serializable {


    private static final long serialVersionUID = 7589841135210272124L;
    private String name;

    @Override
    public void sessionWillPassivate(HttpSessionEvent se) {

        System.out.println(name+"和session一起被序列化(钝化)到硬盘了,session的id是:"+se.getSession().getId());
    }

    @Override
    public void sessionDidActivate(HttpSessionEvent se) {
        System.out.println(name+"和session一起从硬盘反序列化(活化)回到内存了,session的id是:"+se.getSession().getId());
    }

    public String getName() {
        return name;
    }

    public void setName(String name) {
        this.name = name;
    }

    public JavaBeanDemo2(String name) {
        this.name = name;
    }
}
为了观察绑定到HttpSession对象中的javabean对象随HttpSession对象一起被钝化到硬盘上和从硬盘上重新活化回到内存中的的过程,我们需要借助tomcat服务器帮助我们完成HttpSession对象的钝化和活化过程,具体做法如下:
在WebRoot\META-INF文件夹下创建一个context.xml文件,如下所示:
context.xml文件的内容如下:
<Context><Manager className="org.apache.catalina.session.PersistentManager" maxIdleSwap="1"><Store className="org.apache.catalina.session.FileStore" directory="gacl"/></Manager></Context>
在context.xml文件文件中配置了1分钟之后就将HttpSession对象钝化到本地硬盘的一个gacl文件夹中
jsp测试代码如下:
<%@ page language="java" pageEncoding="UTF-8"%>
<%@page import="me.gacl.domain.JavaBeanDemo2"%>
<!DOCTYPE HTML>
<html>
  <head>
    <title></title>
  </head>

  <body>
      一访问JSP页面,HttpSession就创建了,创建好的Session的Id是:${pageContext.session.id}
       <hr/>
   <%
        session.setAttribute("bean",new JavaBeanDemo2("孤傲苍狼"));
    %>
  </body>
</html>
访问这个jsp页面,服务器就会马上创建一个HttpSession对象,然后将实现了HttpSessionActivationListener接口的JavaBean对象绑定到session对象中,这个jsp页面在等待1分钟之后没有人再次访问,那么服务器就会自动将这个HttpSession对象钝化(序列化)到硬盘上,
我们可以在tomcat服务器的work\Catalina\localhost\JavaWeb_Listener_20140908\gacl文件夹下找到序列化到本地存储的session,如下图所示:
当再次访问这个Jsp页面时,服务器又会自动将已经钝化(序列化)到硬盘上HttpSession对象重新活化(反序列化)回到内存中。运行结果如下:

JavaWeb开发技术中的监听器技术的内容就这么多了,在平时的工作中,监听器技术在JavaWeb项目开发中用得是比较多,因此必须掌握这门技术。
参考:https://www.cnblogs.com/xdp-gacl/p/3969249.html


 浙公网安备 33010602011771号