SpringBoot探讨
简单探讨SpringBoot的优势
1.Spring的缺点
Spring虽然引入了IOC与AOP,大大降低了代码的耦合性,但也带来了两个问题
1.依赖繁琐 pom.xml要写大量依赖,非常的繁琐,也很容易出现依赖冲突
2.配置繁琐 Spring被称为配置地狱,就是因为一个项目需要写大量的xml文件,非常耗时耗力
2. SpringBoot
SpringBoot提供了一种快速使用Spring的方式,基于约定优于配置的思想,大大提高了开发的效率。
针对Spring的两个缺点,SpringBoot提供了解决方案,
- 起步依赖
- 自动配置
下面我们着重来看看这两个特性
2.1 Maven
没错解决导包复杂的就是使用Maven,相信使用过Spring和SpringBoot的都有直接体验。
大致使用
主要介绍以下大致使用,了解的同学可以直接跳过
先看一个简单的pom文件,seckill-parent的pom文件(仅展示基础结构,如果想看完整版请直接下滑至末尾)
<?xml version="1.0" encoding="UTF-8"?>
<project xmlns="http://maven.apache.org/POM/4.0.0"
         xmlns:xsi="http://www.w3.org/2001/XMLSchema-instance"
         xsi:schemaLocation="http://maven.apache.org/POM/4.0.0 http://maven.apache.org/xsd/maven-4.0.0.xsd">
    <modelVersion>4.0.0</modelVersion>

    <parent>
        <groupId>org.springframework.boot</groupId>
        <artifactId>spring-boot-starter-parent</artifactId>
        <version>2.1.3.RELEASE</version>
    </parent>

    <groupId>org.yfmw</groupId>
    <artifactId>seckill-parent</artifactId>
    <version>1.0-SNAPSHOT</version>
    <modules>
        <module>seckill-common</module>
        <module>seckill-service</module>
        <module>seckill-admin</module>
        <module>seckill-web</module>
    </modules>

    <properties>
        <maven.compiler.source>8</maven.compiler.source>
        <maven.compiler.target>8</maven.compiler.target>
    </properties>

    <packaging>pom</packaging>

    <dependencyManagement>
        <dependencies>
            <dependency>
                <groupId>org.yfmw</groupId>
                <artifactId>seckill-common</artifactId>
                <version>1.0-SNAPSHOT</version>
            </dependency>
            <dependency>
                <groupId>org.yfmw</groupId>
                <artifactId>seckill-service</artifactId>
                <version>1.0-SNAPSHOT</version>
            </dependency>

            ....

    </dependencyManagement>

    <dependencies>
        <dependency>
            <groupId>org.springframework.boot</groupId>
            <artifactId>spring-boot-starter-web</artifactId>
            <exclusions><!-- 去掉springboot默认配置 -->
                <exclusion>
                    <groupId>org.springframework.boot</groupId>
                    <artifactId>spring-boot-starter-logging</artifactId>
                </exclusion>
            </exclusions>
        </dependency>
    </dependencies>
</project>
先简单说一下各个标签的作用
坐标
<project xmlns="http://maven.apache.org/POM/4.0.0"
         xmlns:xsi="http://www.w3.org/2001/XMLSchema-instance"
         xsi:schemaLocation="http://maven.apache.org/POM/4.0.0 http://maven.apache.org/xsd/maven-4.0.0.xsd">
    <modelVersion>4.0.0</modelVersion>
    <groupId>org.yfmw</groupId>
    <artifactId>seckill-parent</artifactId>
    <version>1.0-SNAPSHOT</version>
这是一个坐标,代表了这个maven文件怎么被使用,每个pom.xml文件都必须存在,只有这样他才能够被别人找到
dependencies标签
  <dependencies>
       <dependency>
           <groupId>org.springframework.boot</groupId>
           <artifactId>spring-boot-starter-web</artifactId>
           <exclusions>
      <!-- 去掉springboot默认配置 -->
               <exclusion>
                   <groupId>org.springframework.boot</groupId>
                   <artifactId>spring-boot-starter-logging</artifactId>
               </exclusion>
           </exclusions>
       </dependency>
     </dependencies>
-
groupId、artifactId 和 version:依赖的基本坐标,对于任何一个依赖来说,基本坐标是最重要的,Maven 根据坐标才能找到需要的依赖。
-
type:依赖的类型,对应于项目坐标定义的 packaging。大部分情况下,该元素不必声明,其默认值是 jar。
-
scope:依赖的范围。
-
optional:标记依赖是否可选。
-
exclusions:用来排除传递性依赖。
parent标签
<parent>
    <groupId>org.springframework.boot</groupId>
    <artifactId>spring-boot-starter-parent</artifactId>
    <version>2.1.3.RELEASE</version>
</parent>
当一个项目包含多个模块时,可以在该项目中再创建一个父模块,并在其 POM 中声明依赖,其他模块的 POM 可通过继承父模块的 POM 来获得对相关依赖的声明。对于父模块而言,其目的是为了消除子模块 POM 中的重复配置,其中不包含有任何实际代码,因此父模块 POM 的打包类型(packaging)必须是 pom。
dependencyManagement 标签
<dependencyManagement>
    <dependencies>
        <dependency>
            <groupId>org.yfmw</groupId>
            <artifactId>seckill-common</artifactId>
            <version>1.0-SNAPSHOT</version>
        </dependency>
        <dependency>
            <groupId>org.yfmw</groupId>
            <artifactId>seckill-service</artifactId>
            <version>1.0-SNAPSHOT</version>
        </dependency>
</dependencyManagement>
dependencyManagement 元素主要就是针对继承的,Maven 可以通过 dependencyManagement 元素对依赖进行管理,它具有以下 2 大特性:
- 在该元素下声明的依赖不会实际引入到模块中,只有在 dependencies 元素下同样声明了该依赖,才会引入到模块中。
- 该元素能够约束 dependencies 下依赖的使用,即 dependencies 声明的依赖若未指定版本,则使用 dependencyManagement 中指定的版本,否则将覆盖 dependencyManagement 中的版本。
2.2 自动配置
本文的重点来了,在开始之前,要向大家说明 自动装配与自动配置是两个东西!!
自动装配是Ioc的实现,他有个别名:依赖注入。
自动配置是SpringBoot的实现,通过它可以换种方式来写xml。
@SpringBootApplication
@MapperScan("org.yfmw.seckill.dao")
public class SeckillAdminApplication {
    public static void main(String[] args) {
        ConfigurableApplicationContext run = SpringApplication.run(SeckillAdminApplication.class, args);
    }
}
这是一个启动类,我们点开这个启动注解@SpringBootApplication
简单说一句:定义
@Target({ElementType.TYPE})  //元注解 使用域 表示能使用在类、接口(包括注解类型)或枚举声明
@Retention(RetentionPolicy.RUNTIME) //元注解 作用域 表示运行时依旧存在
@Documented	//元注解 表示他不会出现在javadoc文档
@Inherited//元注解 表示子类也会继承继承这个注解
@SpringBootConfiguration//配置类
@EnableAutoConfiguration//开启自动配置 我们的主角
@ComponentScan(//包扫描
    excludeFilters = {@Filter(
    type = FilterType.CUSTOM,
    classes = {TypeExcludeFilter.class}
), @Filter(
    type = FilterType.CUSTOM,
    classes = {AutoConfigurationExcludeFilter.class}
)}
)
public @interface SpringBootApplication {//@interface就是注解的声明方式
    @AliasFor(
        annotation = EnableAutoConfiguration.class
    )
    Class<?>[] exclude() default {};

    @AliasFor(
        annotation = EnableAutoConfiguration.class
    )
    String[] excludeName() default {};

    @AliasFor(
        annotation = ComponentScan.class,
        attribute = "basePackages"
    )
    String[] scanBasePackages() default {};

    @AliasFor(
        annotation = ComponentScan.class,
        attribute = "basePackageClasses"
    )
    Class<?>[] scanBasePackageClasses() default {};
}
@EnableAutoConfiguration翻译过来就是开启自动配置,这也就是我们的主角,点进去看一看
@Target({ElementType.TYPE})
@Retention(RetentionPolicy.RUNTIME)
@Documented
@Inherited
@AutoConfigurationPackage //自动配置包
@Import({AutoConfigurationImportSelector.class})//把该类导入IOC容器
public @interface EnableAutoConfiguration {
    String ENABLED_OVERRIDE_PROPERTY = "spring.boot.enableautoconfiguration";

    Class<?>[] exclude() default {};

    String[] excludeName() default {};
}
我们查看一下AutoConfigurationImportSelector.class(自动配置导入选择器类),然后着重看一下这三个方法
这里我提醒一下各位小伙伴,看源码不要执着于每一步都看懂,死磕源码只会带来更多的为什么,了解大致逻辑即可。
public String[] selectImports(AnnotationMetadata annotationMetadata) {
   // 判断SpringBoot是否开启自动配置
    if (!this.isEnabled(annotationMetadata)) {
        return NO_IMPORTS;
    } else {
        // 获取需要被引入的自动配置信息
        AutoConfigurationMetadata autoConfigurationMetadata = AutoConfigurationMetadataLoader.loadMetadata(this.beanClassLoader);
        AutoConfigurationImportSelector.AutoConfigurationEntry autoConfigurationEntry = this.getAutoConfigurationEntry(autoConfigurationMetadata, annotationMetadata);
        return StringUtils.toStringArray(autoConfigurationEntry.getConfigurations());
    }
}


    protected AutoConfigurationImportSelector.AutoConfigurationEntry getAutoConfigurationEntry(AutoConfigurationMetadata autoConfigurationMetadata, AnnotationMetadata annotationMetadata) {
        if (!this.isEnabled(annotationMetadata)) {
            return EMPTY_ENTRY;
        } else {
            AnnotationAttributes attributes = this.getAttributes(annotationMetadata);
            List<String> configurations = this.getCandidateConfigurations(annotationMetadata, attributes);
            configurations = this.removeDuplicates(configurations);
            Set<String> exclusions = this.getExclusions(annotationMetadata, attributes);
            this.checkExcludedClasses(configurations, exclusions);
            configurations.removeAll(exclusions);
            configurations = this.filter(configurations, autoConfigurationMetadata);
            this.fireAutoConfigurationImportEvents(configurations, exclusions);
            return new AutoConfigurationImportSelector.AutoConfigurationEntry(configurations, exclusions);
        }
    }

    protected List<String> getCandidateConfigurations(AnnotationMetadata metadata, AnnotationAttributes attributes) {
        List<String> configurations = SpringFactoriesLoader.loadFactoryNames(this.getSpringFactoriesLoaderFactoryClass(), this.getBeanClassLoader());
        Assert.notEmpty(configurations, "No auto configuration classes found in META-INF/spring.factories. If you are using a custom packaging, make sure that file is correct.");
        return configurations;
    }
相信大家已经看到了关键
 AutoConfigurationImportSelector.AutoConfigurationEntry autoConfigurationEntry = this.getAutoConfigurationEntry(autoConfigurationMetadata, annotationMetadata);


 List<String> configurations = this.getCandidateConfigurations(annotationMetadata, attributes);


SpringFactoriesLoader.loadFactoryNames(this.getSpringFactoriesLoaderFactoryClass(), this.getBeanClassLoader());
        Assert.notEmpty(configurations, "No auto configuration classes found in META-INF/spring.factories. If you are using a custom packaging, make sure that file is correct.");


那么 META-INF/spring.factories 是啥?
在导入启动依赖starter的时候,maven为我们导入一个包
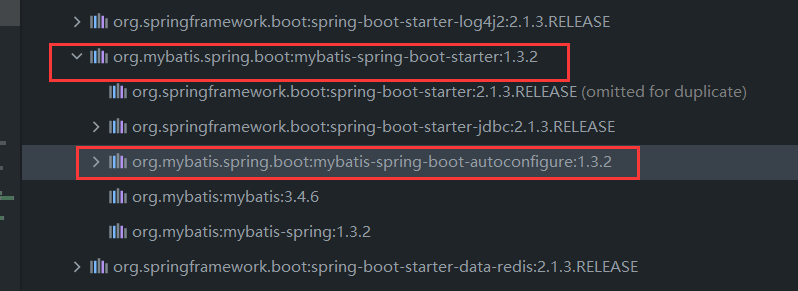
这个包就是自动配置的关键,打开我们的外部库,找到这个包
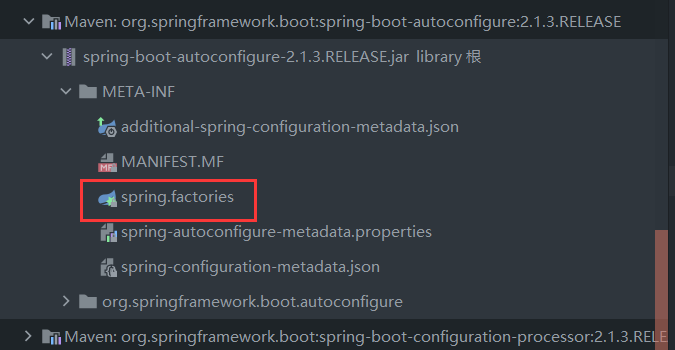
打开它
# Initializers
org.springframework.context.ApplicationContextInitializer=\
org.springframework.boot.autoconfigure.SharedMetadataReaderFactoryContextInitializer,\
org.springframework.boot.autoconfigure.logging.ConditionEvaluationReportLoggingListener

# Application Listeners
org.springframework.context.ApplicationListener=\
org.springframework.boot.autoconfigure.BackgroundPreinitializer

# Auto Configuration Import Listeners
org.springframework.boot.autoconfigure.AutoConfigurationImportListener=\
org.springframework.boot.autoconfigure.condition.ConditionEvaluationReportAutoConfigurationImportListener

# Auto Configuration Import Filters
org.springframework.boot.autoconfigure.AutoConfigurationImportFilter=\
org.springframework.boot.autoconfigure.condition.OnBeanCondition,\
org.springframework.boot.autoconfigure.condition.OnClassCondition,\
org.springframework.boot.autoconfigure.condition.OnWebApplicationCondition

# Auto Configure
org.springframework.boot.autoconfigure.EnableAutoConfiguration=\
org.springframework.boot.autoconfigure.admin.SpringApplicationAdminJmxAutoConfiguration,\
org.springframework.boot.autoconfigure.aop.AopAutoConfiguration,\
org.springframework.boot.autoconfigure.amqp.RabbitAutoConfiguration,\
org.springframework.boot.autoconfigure.batch.BatchAutoConfiguration,\
org.springframework.boot.autoconfigure.cache.CacheAutoConfiguration,\
org.springframework.boot.autoconfigure.cassandra.CassandraAutoConfiguration,\
如果我们想找jdbc

或者redis
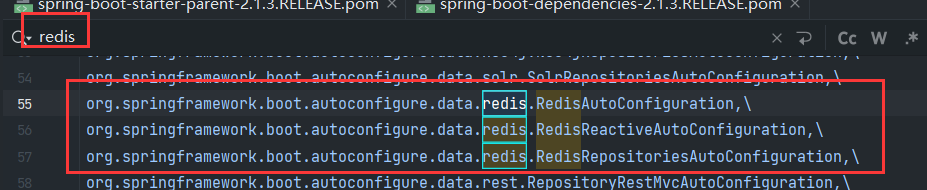
点开RedisAutoConfiguration
//@Conditional 有条件的 满足条件 这个类/方法才能生效
@Configuration
@ConditionalOnClass({RedisOperations.class})//如果有RedisOperations.class这个类,这个方法就起作用
@EnableConfigurationProperties({RedisProperties.class})
@Import({LettuceConnectionConfiguration.class, JedisConnectionConfiguration.class})
public class RedisAutoConfiguration {
    public RedisAutoConfiguration() {
    }

    @Bean
    @ConditionalOnMissingBean(
        name = {"redisTemplate"}
    )//如果没有redisTemplate这个bean,我就去创建这个bean
    public RedisTemplate<Object, Object> redisTemplate(RedisConnectionFactory redisConnectionFactory) throws UnknownHostException {
        RedisTemplate<Object, Object> template = new RedisTemplate();
        template.setConnectionFactory(redisConnectionFactory);
        return template;
    }

    @Bean
    @ConditionalOnMissingBean
    public StringRedisTemplate stringRedisTemplate(RedisConnectionFactory redisConnectionFactory) throws UnknownHostException {
        StringRedisTemplate template = new StringRedisTemplate();
        template.setConnectionFactory(redisConnectionFactory);
        return template;
    }
}
相信大家此时就明白了,在SpringBoot启动,开启自动配置的时候,这些类的条件注解会发挥作用,如果maven帮我们导入了这个包,那么对应的class文件就会存在,条件通过,再去检验IOC容器中有没有这个bean,没有我就创建一个bean,然后交给IOC容器,是不是很简单呢.
至此,自动配置就全部结束了。

 浙公网安备 33010602011771号