ASP.NET MVC - Displaying Images using Custom Html Helper Method
2012-12-22 01:18 yezhi 阅读(736) 评论(0) 编辑 收藏 举报http://www.devcurry.com/2012/10/aspnet-mvc-displaying-images-using.html
ASP.NET MVC - Displaying Images using Custom Html Helper Method
Recently in one of the trainings I conducted on ASP.NET MVC, I was asked about Image management in the View. The scenario was that images had to be fetched from the database server and then displayed in a View. It required generating the image on the fly and showing it to the user. In this article, we will go through the steps to do this.
Editor’s Note: Storing images in a Database is generally considered a bottleneck for multiple reasons. This was special case requirement that we ran into ‘in the trenches’. Ideally images should be fetched from a CDN (Content Delivery Network). The helper framework would still help, except that it need not do the ‘on-the-fly’ image generation.
As we know in ASP.NET MVC, the View can be bound to a Model and based upon the model binding, View elements (UI controls) can be scaffolded. So now the problem is that we represent an Image as “byte[]” (array) generally and we do not have any standard Html helper method for Image binding (<img src=””> html tag). So to solve this challenge, I decided to use create a Html helper method that encapsulates logic for image fetching and rendering Html Image (<img>) tag.
Html Helper method is an extension method which allows developer to create specific View element by specifying ‘McvHtmlString’ as a return string for the View. This method can now be accessible using ‘HtmlHelper’ object on the View.
For this article I have used the following SQL Server Table:

Step 1: Open VS 2010 and create a new ASP.NET MVC 3 Internet application, name it as ‘MVC3_Displaying_Image’.
Steo 2: On the Model folder, right click and add a new class file, name it as ‘ModelClasses.cs’. In this file, add the following classes for specifying ImageTable data table mapping and data access class as shown below:
namespace MVC3_Displaying_Image.Models
{
public class ImageTable
{
public int ImadeId { get; set; }
public byte[] Image { get; set; }
}
public class DataAcceess
{
public ImageTable[] GetImages()
{
ImageTable[] Images = null;
SqlConnection Conn = new
SqlConnection("Data Source=.;Initial Catalog=Company;
Integrated Security=SSPI");
Conn.Open();
SqlCommand Cmd = new SqlCommand("Select * From ImageTable", Conn);
SqlDataReader Reader = Cmd.ExecuteReader();
DataTable dt = new DataTable();
dt.Load(Reader);
Images = new ImageTable[dt.Rows.Count];
int i = 0;
foreach (DataRow Dr in dt.Rows)
{
Images[i] = new ImageTable()
{
ImadeId = Convert.ToInt32(Dr["ImageId"]),
Image = (byte[])Dr["Image"]
};
i = i + 1;
}
Conn.Close();
return Images;
}
}
}
The DataAccess class contains method ‘GetImages()’ which returns an array of ImageTable class by connecting to Sql Server.
Step 3: In the Project, right click and add a new folder, name this folder as ‘HtmlHelperRepository’ and add a new folder of name ‘Images’. In this folder, add a new class file, name it as ‘ImageHelper.cs’. This file contains a Static class ‘ImageHelper’ which has the ‘ImageData’ static method which has first parameter as a reference of the ‘HtmlHelper’ class and the second as the ImageId. This method has the following functionality:
namespace MVC3_Displaying_Image.HtmlHelperRepository
{
/// <summary>
/// Class Contains the Html Helper method for Rendering Image
/// </summary>
public static class ImageHelper
{
/// <summary>
/// The Extension method which makes call to Database and
/// Get the Data from the table by querying to it. e
/// It will read the byte array from table and convert into
/// Bitmap
/// </summary>
/// <param name="html"></param>
/// <param name="ImageId"></param>
/// <returns></returns>
public static MvcHtmlString ImageData(this HtmlHelper helper,
int imageId)
{
TagBuilder imageData = null; //To Build the Image Tag
var imgUrl = new UrlHelper(helper.ViewContext.RequestContext);
SqlConnection Conn = new SqlConnection("Data Source=.;
Initial Catalog=Company;Integrated Security=SSPI");
Conn.Open();
SqlCommand Cmd = new SqlCommand();
Cmd.Connection = Conn;
Cmd.CommandText = "Select [Image] From ImageTable where ImageId=@ImageId";
Cmd.Parameters.AddWithValue("@ImageId", imageId);
SqlDataReader Reader = Cmd.ExecuteReader();
if (Reader.HasRows)
{
while (Reader.Read())
{
long imgData = Reader.GetBytes(0, 0, null, 0, int.MaxValue);
byte[] imageArray = new byte[imgData];
Reader.GetBytes(0, 0, imageArray, 0, Convert.ToInt32(imgData));
//Convert to Image
TypeConverter bmpConverter = TypeDescriptor.GetConverter(typeof(Bitmap));
Bitmap imageReceived = (Bitmap)bmpConverter.ConvertFrom(imageArray);
//Now Generate the Image Tag for Mvc Html String
imageReceived.Save(HostingEnvironment.MapPath("~/Images")+@"\I"
+ imageId.ToString() + ".jpg");
imageData = new TagBuilder("img");
//Set the Image Url for <img> tag as <img src="">
imageData.MergeAttribute("src", imgUrl.Content("~/Images") + @"/I"
+ imageId.ToString() + ".jpg");
imageData.Attributes.Add("height", "50");
imageData.Attributes.Add("width", "50");
}
}
Reader.Close();
Conn.Close();
Cmd.Dispose();
Conn.Dispose();
//The <img> tag will have auto closing as <img src="<Image Path>"
// height="50" width="50" />
return MvcHtmlString.Create(imageData.ToString(TagRenderMode.SelfClosing));
}
}
}
Step 4: You need to register the Html helper method for the current application. To do this, open Web.config file in ‘View’ folder and add the namespace of the ImageHelper class in <pages> tag as below:
<pages pageBaseType="System.Web.Mvc.WebViewPage">
<namespaces>
<add namespace="System.Web.Helpers" />
<add namespace="System.Web.Mvc" />
<add namespace="System.Web.Mvc.Ajax" />
<add namespace="System.Web.Mvc.Html" />
<add namespace="System.Web.Routing" />
<add namespace="MVC3_Displaying_Image.HtmlHelperRepository"/>
</namespaces>
</pages>
Step 5: Add a new ImageDataController in the controller folder and implement it as shown below:
public class ImageDataController : Controller
{
DataAcceess objContext;
public ImageDataController()
{
objContext = new DataAcceess();
}
//
// GET: /ImageData/
public ActionResult Index()
{
var Images = objContext.GetImages();
return View(Images);
}
}
Step 6: Generate the Index View with List scaffold template; from the above method you will get the ImageData folder under View folder. Now delete the default generated Html code from it. We will modify it later.
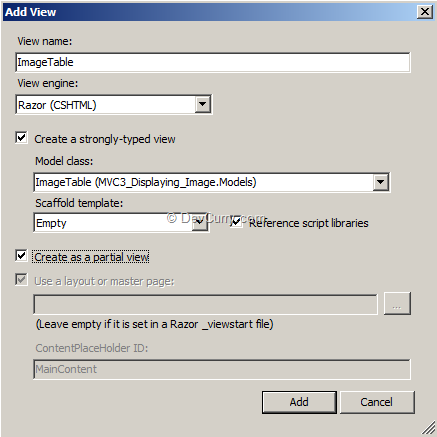
Step 7: To repeatedly display the Image, I have created a Partial View from where I am calling the Html helper method added above. Right-click on the ‘ImageData’ folder and add a Partial View of name ‘ImageTable.cshtml’ with model as ‘ImageTable’ as below:

Step 8: In the Partial View add the below code:
@using MVC3_Displaying_Image.HtmlHelperRepository
<table>
<tr>
<td>
@Html.DisplayFor(m=>Model.ImadeId)
</td>
<td>
@Html.ImageData(Model.ImadeId)
</td>
</tr>
</table>
The above code shows that the namespace ‘HtmlHelperRepository’ is referred in the view to make call to ‘ImageData’ html helper method.
Step 9: Open Index.cshtml added in the Step 6. Add the following code in it (in italics):
@model IEnumerable<MVC3_Displaying_Image.Models.ImageTable>
@{
ViewBag.Title = “Index”;
}
<h2>Index</h2>
<p>
@Html.ActionLink(“Create New”, “Create”)
</p>
<table>
<tr>
<th>
ImadeId
</th>
<th>
Image Fetched
</th>
</tr>
@foreach (var item in Model) {
<tr>
<td>
@Html.Partial("ImageTable", item)
</td>
</tr>
}
</table>
The above code adds the partial view created in Step 8 repeatedly by passing ImageTable object (item) to it by iterating through the ImageTable collection. The ‘Partial’ html helper method accepts the first parameter as the url of the partial view.
Step 9: Open _Layout.cshtml in the shared folder and the following action link under the <div> tag having id as menu container as below:
<li>@Html.ActionLink("ImageData", "Index", "ImageData")</li>
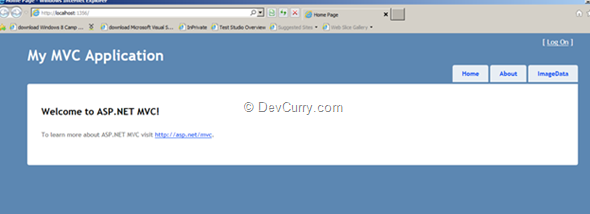
Step 10: Run the application, you will get the following result in browser:

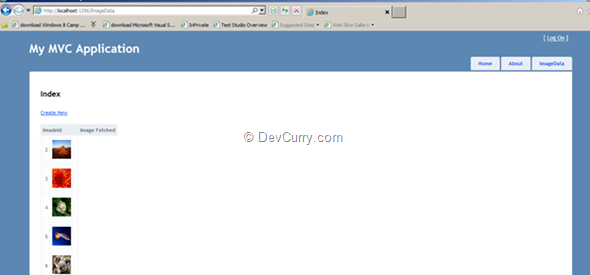
Click on the ‘ImageData’ tab, you will get the following images:

Note: Here I have used partial view to show every record separately. But as per your requirements, you can display the record inside a foreach loop of the Index view.
Editors’ Note: You will need to upload images into the database first. The uploading code is not included here.
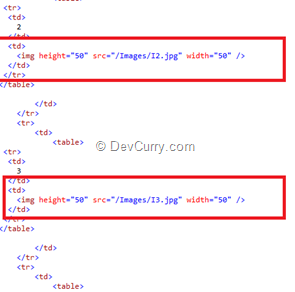
Right-click on the browser and view source, you will find <image> tag as shown below:

Download the source code here
'Like' us on our FaceBook page if you find this blog useful. Thanks!
Editor’s Note: Storing images in a Database is generally considered a bottleneck for multiple reasons. This was special case requirement that we ran into ‘in the trenches’. Ideally images should be fetched from a CDN (Content Delivery Network). The helper framework would still help, except that it need not do the ‘on-the-fly’ image generation.
As we know in ASP.NET MVC, the View can be bound to a Model and based upon the model binding, View elements (UI controls) can be scaffolded. So now the problem is that we represent an Image as “byte[]” (array) generally and we do not have any standard Html helper method for Image binding (<img src=””> html tag). So to solve this challenge, I decided to use create a Html helper method that encapsulates logic for image fetching and rendering Html Image (<img>) tag.
Html Helper method is an extension method which allows developer to create specific View element by specifying ‘McvHtmlString’ as a return string for the View. This method can now be accessible using ‘HtmlHelper’ object on the View.
For this article I have used the following SQL Server Table:

Step 1: Open VS 2010 and create a new ASP.NET MVC 3 Internet application, name it as ‘MVC3_Displaying_Image’.
Steo 2: On the Model folder, right click and add a new class file, name it as ‘ModelClasses.cs’. In this file, add the following classes for specifying ImageTable data table mapping and data access class as shown below:
namespace MVC3_Displaying_Image.Models
{
public class ImageTable
{
public int ImadeId { get; set; }
public byte[] Image { get; set; }
}
public class DataAcceess
{
public ImageTable[] GetImages()
{
ImageTable[] Images = null;
SqlConnection Conn = new
SqlConnection("Data Source=.;Initial Catalog=Company;
Integrated Security=SSPI");
Conn.Open();
SqlCommand Cmd = new SqlCommand("Select * From ImageTable", Conn);
SqlDataReader Reader = Cmd.ExecuteReader();
DataTable dt = new DataTable();
dt.Load(Reader);
Images = new ImageTable[dt.Rows.Count];
int i = 0;
foreach (DataRow Dr in dt.Rows)
{
Images[i] = new ImageTable()
{
ImadeId = Convert.ToInt32(Dr["ImageId"]),
Image = (byte[])Dr["Image"]
};
i = i + 1;
}
Conn.Close();
return Images;
}
}
}
The DataAccess class contains method ‘GetImages()’ which returns an array of ImageTable class by connecting to Sql Server.
Step 3: In the Project, right click and add a new folder, name this folder as ‘HtmlHelperRepository’ and add a new folder of name ‘Images’. In this folder, add a new class file, name it as ‘ImageHelper.cs’. This file contains a Static class ‘ImageHelper’ which has the ‘ImageData’ static method which has first parameter as a reference of the ‘HtmlHelper’ class and the second as the ImageId. This method has the following functionality:
- Connects to Database and query to the ImageTable to fetch byte array based upon ImageId and get the byte array.
- The Byte array is converted to Bitmap object.
- It defines an object of the TagBuilder class to build the html <img> tag.
- The UrlHelper object is used to build the URL within the application. This is used to build URL for the Image so that it can be set for html <img> tag.
- Using MergeAttribute method of the TagBuilder class the ‘src’ attribute for the <img> is set.
- The method returns MvcHtmlString.
namespace MVC3_Displaying_Image.HtmlHelperRepository
{
/// <summary>
/// Class Contains the Html Helper method for Rendering Image
/// </summary>
public static class ImageHelper
{
/// <summary>
/// The Extension method which makes call to Database and
/// Get the Data from the table by querying to it. e
/// It will read the byte array from table and convert into
/// Bitmap
/// </summary>
/// <param name="html"></param>
/// <param name="ImageId"></param>
/// <returns></returns>
public static MvcHtmlString ImageData(this HtmlHelper helper,
int imageId)
{
TagBuilder imageData = null; //To Build the Image Tag
var imgUrl = new UrlHelper(helper.ViewContext.RequestContext);
SqlConnection Conn = new SqlConnection("Data Source=.;
Initial Catalog=Company;Integrated Security=SSPI");
Conn.Open();
SqlCommand Cmd = new SqlCommand();
Cmd.Connection = Conn;
Cmd.CommandText = "Select [Image] From ImageTable where ImageId=@ImageId";
Cmd.Parameters.AddWithValue("@ImageId", imageId);
SqlDataReader Reader = Cmd.ExecuteReader();
if (Reader.HasRows)
{
while (Reader.Read())
{
long imgData = Reader.GetBytes(0, 0, null, 0, int.MaxValue);
byte[] imageArray = new byte[imgData];
Reader.GetBytes(0, 0, imageArray, 0, Convert.ToInt32(imgData));
//Convert to Image
TypeConverter bmpConverter = TypeDescriptor.GetConverter(typeof(Bitmap));
Bitmap imageReceived = (Bitmap)bmpConverter.ConvertFrom(imageArray);
//Now Generate the Image Tag for Mvc Html String
imageReceived.Save(HostingEnvironment.MapPath("~/Images")+@"\I"
+ imageId.ToString() + ".jpg");
imageData = new TagBuilder("img");
//Set the Image Url for <img> tag as <img src="">
imageData.MergeAttribute("src", imgUrl.Content("~/Images") + @"/I"
+ imageId.ToString() + ".jpg");
imageData.Attributes.Add("height", "50");
imageData.Attributes.Add("width", "50");
}
}
Reader.Close();
Conn.Close();
Cmd.Dispose();
Conn.Dispose();
//The <img> tag will have auto closing as <img src="<Image Path>"
// height="50" width="50" />
return MvcHtmlString.Create(imageData.ToString(TagRenderMode.SelfClosing));
}
}
}
Step 4: You need to register the Html helper method for the current application. To do this, open Web.config file in ‘View’ folder and add the namespace of the ImageHelper class in <pages> tag as below:
<pages pageBaseType="System.Web.Mvc.WebViewPage">
<namespaces>
<add namespace="System.Web.Helpers" />
<add namespace="System.Web.Mvc" />
<add namespace="System.Web.Mvc.Ajax" />
<add namespace="System.Web.Mvc.Html" />
<add namespace="System.Web.Routing" />
<add namespace="MVC3_Displaying_Image.HtmlHelperRepository"/>
</namespaces>
</pages>
Step 5: Add a new ImageDataController in the controller folder and implement it as shown below:
public class ImageDataController : Controller
{
DataAcceess objContext;
public ImageDataController()
{
objContext = new DataAcceess();
}
//
// GET: /ImageData/
public ActionResult Index()
{
var Images = objContext.GetImages();
return View(Images);
}
}
Step 6: Generate the Index View with List scaffold template; from the above method you will get the ImageData folder under View folder. Now delete the default generated Html code from it. We will modify it later.
Step 7: To repeatedly display the Image, I have created a Partial View from where I am calling the Html helper method added above. Right-click on the ‘ImageData’ folder and add a Partial View of name ‘ImageTable.cshtml’ with model as ‘ImageTable’ as below:

Step 8: In the Partial View add the below code:
@using MVC3_Displaying_Image.HtmlHelperRepository
<table>
<tr>
<td>
@Html.DisplayFor(m=>Model.ImadeId)
</td>
<td>
@Html.ImageData(Model.ImadeId)
</td>
</tr>
</table>
The above code shows that the namespace ‘HtmlHelperRepository’ is referred in the view to make call to ‘ImageData’ html helper method.
Step 9: Open Index.cshtml added in the Step 6. Add the following code in it (in italics):
@model IEnumerable<MVC3_Displaying_Image.Models.ImageTable>
@{
ViewBag.Title = “Index”;
}
<h2>Index</h2>
<p>
@Html.ActionLink(“Create New”, “Create”)
</p>
<table>
<tr>
<th>
ImadeId
</th>
<th>
Image Fetched
</th>
</tr>
@foreach (var item in Model) {
<tr>
<td>
@Html.Partial("ImageTable", item)
</td>
</tr>
}
</table>
The above code adds the partial view created in Step 8 repeatedly by passing ImageTable object (item) to it by iterating through the ImageTable collection. The ‘Partial’ html helper method accepts the first parameter as the url of the partial view.
Step 9: Open _Layout.cshtml in the shared folder and the following action link under the <div> tag having id as menu container as below:
<li>@Html.ActionLink("ImageData", "Index", "ImageData")</li>
Step 10: Run the application, you will get the following result in browser:

Click on the ‘ImageData’ tab, you will get the following images:

Note: Here I have used partial view to show every record separately. But as per your requirements, you can display the record inside a foreach loop of the Index view.
Editors’ Note: You will need to upload images into the database first. The uploading code is not included here.
Right-click on the browser and view source, you will find <image> tag as shown below:

Conclusion
It’s relatively easy to build a custom Html Helper to encapsulate repetitive HTML generation. A developer can create these reusable utilities as per their domain requirements.Download the source code here
'Like' us on our FaceBook page if you find this blog useful. Thanks!
