rabbitmq介绍与使用
一:介绍
RabbitMQ 是一个消息队列,主要是用来实现应用程序的异步和解耦,同时也能起到消息缓冲,消息分发的作用。
消息中间件在互联网公司的使用中越来越多,最主要的作用是解耦,中间件最标准的用法是生产者生产消息传送到队列,消费者从队列中拿取消息并处理,生产者不用关心是谁来消费,消费者不用关心谁在生产消息,从而达到解耦的目的。在分布式的系统中,消息队列也会被用在很多其它的方面,比如:分布式事务的支持,RPC的调用等等。
二:RabbitMQ架构介绍

-
Publisher:消息的生产者,也是一个向交换器发布消息的客户端应用程序。
-
Exchange:交换器,用来接收生产者发送的消息并将这些消息路由给服务器中的队列。
-
Queue:消息队列,用来保存消息直到发送给消费者。它是消息的容器,也是消息的终点。一个消息可投入一个或多个队列。消息一直在队列里面,等待消费者连接到这个队列将其取走。
-
Channel:信道,多路复用连接中的一条独立的双向数据流通道
-
Consumer:消息的消费者,表示一个从消息队列中取得消息的客户端应用程序
三:安装与常用命令
一:安装
地址 http://www.rabbitmq.com/install-standalone-mac.html
注意:安装rabbitmq前需要先安装erlang
二:常用命令
$ sudo chkconfig rabbitmq-server on # 添加开机启动RabbitMQ服务
$ sudo /sbin/service rabbitmq-server start # 启动服务
$ sudo /sbin/service rabbitmq-server status # 查看服务状态
$ sudo /sbin/service rabbitmq-server stop # 停止服务
# 查看当前所有用户
$ sudo rabbitmqctl list_users
# 查看默认guest用户的权限
$ sudo rabbitmqctl list_user_permissions guest
# 由于RabbitMQ默认的账号用户名和密码都是guest。为了安全起见, 先删掉默认用户
$ sudo rabbitmqctl delete_user guest
# 添加新用户
$ sudo rabbitmqctl add_user username password
# 设置用户tag
$ sudo rabbitmqctl set_user_tags username administrator
# 赋予用户默认vhost的全部操作权限
$ sudo rabbitmqctl set_permissions -p / username ".*" ".*" ".*"
# 查看用户的权限
$ sudo rabbitmqctl list_user_permissions username
四:基础Demo
一:示例
首先创建用户并授权:
sudo rabbitmqctl add_user yys123456
sudo rabbitmqctl set_permissions -p / yys ".*" ".*" ".*"
pip3 install pika
生产者:
import pika
# 连接初始化
credentials = pika.PlainCredentials('yys','123456')
connection = pika.BlockingConnection(pika.ConnectionParameters(host="localhost", credentials=credentials))
channel = connection.channel()

# 声明一个队列  durable代表持久化,防止服务器宕机,消息丢失没来得及落地
channel.queue_declare('test',durable=True)

# exchange参数:用来处理转发路由,本例子用不到
# routing_key指定放到哪个队列中
# body:数据
channel.basic_publish(exchange='',
                      routing_key='test',
                      body='hello test',
                      properties=pika.BasicProperties(
                          delivery_mode=2,  # 防止消息丢失
                      )
                      )
print('publish done')

# 关闭连接
connection.close()
消费者
import pika
# 连接初始化
credentials = pika.PlainCredentials('yys','123456')
connection = pika.BlockingConnection(pika.ConnectionParameters(host="localhost", credentials=credentials))
channel = connection.channel()

# 声明一个队列,与生产者声明的队列不会冲突
channel.queue_declare(queue='test',durable=True)

# 回调函数
def callback(ch, method, properties, body):
    print("consume done", ch, method, properties,body)

    # 代码最后告诉队列自己确实拿走了消息,防止消息丢失
    ch.basic_ack(delivery_tag=method.delivery_tag)

# 从队列中取消息,然后回调函数
channel.basic_consume(callback, queue="test")

# 开启消费者
channel.start_consuming()
二:消费者的能者多劳
服务器的性能大小不一,有的服务器处理的快,有的服务器处理的慢,因此默认的轮询方式不能够满足我们的需求,我们要的是 能者多劳,最大限度的发挥我们机器的性能. 为解决此问题,可以在各个消费者端,配置perfetch=1,意思就是告诉RabbitMQ在我这个消费者当前消息还没处理完的时候就不要再给我发新消息了。
channel.basic_qos(prefetch_count=1)

# 从队列中取消息,然后回调函数
channel.basic_consume(callback, queue="test")
五:Exchange类型
Exchange分发消息时根据类型的不同分发策略有区别,目前共四种类型:direct、fanout、topic、headers 。headers 匹配消息的 header头部字节 而不是路由键,此外 headers 交换器和 direct 交换器完全一致,但性能差很多,目前几乎用不到了,所以这里只介绍另外三种类型。
六:fanout类型
一:介绍

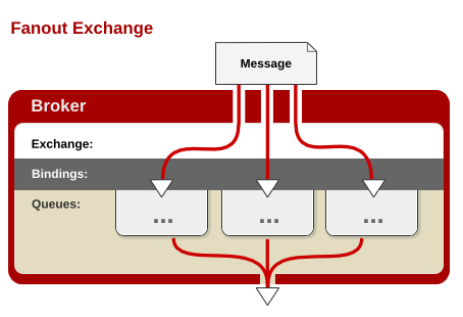
每个发到 fanout 类型交换器的消息都会分到所有绑定的队列上去。fanout 交换器不处理路由键,只是简单的将队列绑定到交换器上,每个发送到交换器的消息都会被转发到与该交换器绑定的所有队列上。很像子网广播,每台子网内的主机都获得了一份复制的消息。fanout 类型转发消息是最快的。
二:Demo示例
生产者
import pika
# 连接初始化
credentials = pika.PlainCredentials('yys', '123456')
parameters = pika.ConnectionParameters(host='localhost', credentials=credentials)
connection = pika.BlockingConnection(parameters)
channel = connection.channel()


# 开始连接exchange
channel.exchange_declare(exchange='myfanout', exchange_type='fanout')
message = "send one message"
channel.basic_publish(exchange='myfanout',
                      routing_key='',
                      body=message)

print("publish done %s" % message)
connection.close()
消费者,可以开多个消费者进行测试,生产者每发送一条消息,所有的消费者都能接收到消息
import pika
# 连接初始化
credentials = pika.PlainCredentials('yys', '123456')
parameters = pika.ConnectionParameters(host='localhost',credentials=credentials)
connection = pika.BlockingConnection(parameters)
channel = connection.channel()

# 开始连接exchange
channel.exchange_declare(exchange='myfanout', exchange_type='fanout')

# 不指定queue名字,rabbit会随机分配一个名字,exclusive=True会在使用此queue的消费者断开后,自动将queue删除
queue_obj = channel.queue_declare(exclusive=True)
# 获取自动分配的queue name
queue_name = queue_obj.method.queue
print('queue name',queue_name,queue_obj)

# 绑定队列到Exchange
channel.queue_bind(exchange='myfanout',queue=queue_name)
print(' Waiting for message. ')
def callback(ch, method, properties, body):
    print(" [x] %r" % body)
channel.basic_consume(callback,queue=queue_name, no_ack=True)
channel.start_consuming()
七:direct类型
一:介绍

如图,direct为组播的方式,指定类型为direct,可以对消息进行分组,如图可以指定routing_key为error,info ,warning,那么订阅了这个Exchange的queue就可以指定相应的routing_key接收消息,可以同时绑定多个routing_key
二:demo示例
生产者
import pika,sys
# 连接初始化
credentials = pika.PlainCredentials('yys','123456')
connection = pika.BlockingConnection(pika.ConnectionParameters(host="localhost", credentials=credentials))
channel = connection.channel()

# 开始连接exchange
channel.exchange_declare(exchange='mydirect',exchange_type='direct')
log_level = sys.argv[1] if len(sys.argv) > 1 else "info"
message = ' '.join(sys.argv[1:]) or "info:helloworld!"
channel.basic_publish(exchange='mydirect',
                      routing_key=log_level,
                      body=message)
print("publish  %s to %s" % (message,log_level))
connection.close()
消费者
import pika,sys
# 连接初始化
credentials = pika.PlainCredentials('yys','123456')
connection = pika.BlockingConnection(pika.ConnectionParameters(host="localhost", credentials=credentials))
channel = connection.channel()
channel.exchange_declare(exchange='mydirect', exchange_type='direct')

# #不指定queue名字,rabbit会随机分配一个名字,exclusive=True会在使用此queue的消费者断开后,自动将queue删除
queue_obj = channel.queue_declare(exclusive=True)
queue_name = queue_obj.method.queue
print('queue name',queue_name,queue_obj)
log_levels = sys.argv[1:]
if not log_levels:
    sys.stderr.write("Usage: %s [info] [warning] [error]\n" % sys.argv[0])
    sys.exit(1)
for level in log_levels:
    # 绑定队列到Exchange  可以同时绑定多个路由键
    channel.queue_bind(exchange='mydirect',queue=queue_name,routing_key=level)
print(' [*] Waiting for logs. To exit press CTRL+C')
def callback(ch, method, properties, body):
    print(" [x] %r" % body)
channel.basic_consume(callback,queue=queue_name, no_ack=True)
channel.start_consuming()
结果参考:
1:开启一个consumer,只接收info消息
[root@python-linux example2]# python3 consumer.py info
queue name amq.gen-hBAxVxAaRCHzrqiWz_JKHA <METHOD(['channel_number=1', 'frame_type=1', "method=<Queue.DeclareOk(['consumer_count=0', 'message_count=0', 'queue=amq.gen-hBAxVxAaRCHzrqiWz_JKHA'])>"])>
 [*] Waiting for logs. To exit press CTRL+C

2:再开一个consum,接收warning 和 error消息
[root@python-linux example2]# python3 consumer.py warning error
queue name amq.gen-2Lzvo4LauTlW6p5IiEqbJQ <METHOD(['channel_number=1', 'frame_type=1', "method=<Queue.DeclareOk(['consumer_count=0', 'message_count=0', 'queue=amq.gen-2Lzvo4LauTlW6p5IiEqbJQ'])>"])>
 [*] Waiting for logs. To exit press CTRL+C

3:启动生产者,发送一条info消息
[root@python-linux example2]# python3 producer.py info
publish  info to info

4:再发一条warning消息
[root@python-linux example2]# python3 producer.py warning
八:topic类型
一:介绍

topic 交换器通过模式匹配分配消息的路由键属性,将路由键和某个模式进行匹配,此时队列需要绑定到一个模式上。它将路由键和绑定键的字符串切分成单词,这些单词之间用点隔开
二:demo示例
生产者
import pika
import sys
# 连接初始化
credentials = pika.PlainCredentials('yys', '123456')
parameters = pika.ConnectionParameters(host='localhost',credentials=credentials)
connection = pika.BlockingConnection(parameters)
# 队列连接通道
channel = connection.channel()

channel.exchange_declare(exchange='mytopic',exchange_type='topic')
log_level =  sys.argv[1] if len(sys.argv) > 1 else 'all.info'
message = ' '.join(sys.argv[1:]) or "all.info: Hello World!"
channel.basic_publish(exchange='mytopic',
                      routing_key=log_level,
                      body=message)
print(" [x] Sent %r" % message)
connection.close()
消费者
import pika,sys
# 连接初始化
credentials = pika.PlainCredentials('yys', '123456')
parameters = pika.ConnectionParameters(host='localhost',credentials=credentials)
connection = pika.BlockingConnection(parameters)
channel = connection.channel()
channel.exchange_declare(exchange='mytopic',exchange_type='topic')

# 不指定queue名字,rabbit会随机分配一个名字,exclusive=True会在使用此queue的消费者断开后,自动将queue删除
queue_obj = channel.queue_declare(exclusive=True)
queue_name = queue_obj.method.queue

log_levels = sys.argv[1:] # info warning errr
if not log_levels:
    sys.stderr.write("Usage: %s [info] [warning] [error]\n" % sys.argv[0])
    sys.exit(1)
# 循环绑定不同的routing_key
for level in log_levels:
    channel.queue_bind(exchange='mytopic',
                       queue=queue_name,
                       routing_key=level)
print(' [*] Waiting for logs. To exit press CTRL+C')
def callback(ch, method, properties, body):
    print(" [x] %r" % body)
channel.basic_consume(callback,queue=queue_name, no_ack=True)
channel.start_consuming()
结果参考:
1:开启一个consumer,指定参数接收所有信息
[root@python-linux example3]# python3 consumer.py  '#'
 [*] Waiting for logs. To exit press CTRL+C

2:再开一个consumer,接收以error. 开头的信息
[root@python-linux example3]# python3 consumer.py 'error.*'
 [*] Waiting for logs. To exit press CTRL+C

3:开启生产者 生产一条消息 ,两个消费者都能接收到
[root@python-linux example3]# python3 producer.py error.xxxxxx
 [x] Sent 'error.xxxxxx'

4:再生产一条消息,只有第一个消费者能接收到
[root@python-linux example3]# python3 producer.py errordsad
 [x] Sent 'errordsad'


