


WinForm:抽屈面板
最近帮一个朋友做点模块,他们也是做了一个抽屈面板出来,不过每加一个面板,都要去改写代码,扩展性不是很好.特别是他们几十个模块,分不同角色加载,有点麻烦,更特别是我的模块通过他这个面板在调时,挺麻烦的,索性就自已也了一个.
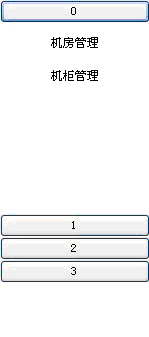
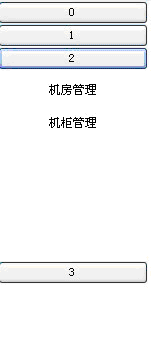
因为不同模块里面的内容各不相同,有些可能还带伸缩的,但每一个模块肯定是以一个按钮与一个面板组成
我们以接口提了出来:
public interface ISubModule
{
//当前显示的Item Index
System.Windows.Forms.Button SubBtn { get; }
System.Windows.Forms.Control SubPanel { get; }
}
而我们要实现每个按钮自动的升降,我们应该给他们一个索引值,代表着他们的Index,再通过设置Z轴来控制.
int i = 0;
foreach (ISubModule SubBtn in _ListSubModule)
{
SubBtn.SubBtn.Click += new EventHandler(SubBtnClick);
SubBtn.SubBtn.Text = i.ToString();
this.Controls.Add(SubBtn.SubBtn);
SubBtn.SubBtn.TabIndex = i++;
this.Controls.Add(SubBtn.SubPanel);
}
Button clickedButton = (Button)sender;
取索引值
int clickedButtonTabIndex = clickedButton.TabIndex;
Control selectControl = null;
Button selectBtn = null;
隐藏所有面板
foreach (ISubModule ctl in _ListSubModule)
{
ctl.SubPanel.Visible = false;
}
控制按钮升降,即比其小的升,比其大的降
foreach (ISubModule ctl in _ListSubModule)
{
if (ctl.SubBtn != null)
{
Button btn = (Button)ctl.SubBtn;
Control panel = (Control)ctl.SubPanel;
if (btn.TabIndex <clickedButtonTabIndex)
{
if (btn.Dock != DockStyle.Top)
{
btn.Dock = DockStyle.Top;
btn.BringToFront();
}
}
else if (btn.TabIndex == clickedButtonTabIndex)
{
selectBtn = btn;
panel.Visible = true;
selectControl = panel;
}
}
}
if (selectBtn != null)
{
if (selectBtn.Dock != DockStyle.Top)
{
selectBtn.Dock = DockStyle.Top;
selectBtn.BringToFront();
}
}
if (selectControl != null)
{
selectControl.BringToFront();
selectControl.Dock = DockStyle.Fill;
}
for (int i = _ListSubModule.Count - 1; i >= 0; i--)
{
ISubModule ctl = _ListSubModule[i] as ISubModule;
if (ctl.SubBtn != null)
{
Button btn = (Button)ctl.SubBtn;
Control panel = (Control)ctl.SubPanel;
if (btn.TabIndex > clickedButtonTabIndex)
{
if (btn.Dock != DockStyle.Bottom)
{
btn.Dock = DockStyle.Bottom;
btn.BringToFront();
}
}
}
代码本身没啥,也没咋整理,但一个小技七却也实现这种抽屉面板…..记录下.
基础知识:
先来段官方的
The Z order of a window indicates the window's position in a stack of overlapping windows. This window stack is oriented along an imaginary axis, the z-axis, extending outward from the screen. The window at the top of the Z order overlaps all other windows. The window at the bottom of the Z order is overlapped by all other windows.
The system maintains the Z order in a single list. It adds windows to the Z order based on whether they are topmost windows, top-level windows, or child windows. A topmost window overlaps all other non-topmost windows, regardless of whether it is the active or foreground window. A topmost window has the WS_EX_TOPMOST style. All topmost windows appear in the Z order before any non-topmost windows. A child window is grouped with its parent in Z order.
When an application creates a window, the system puts it at the top of the Z order for windows of the same type. You can use the BringWindowToTop function to bring a window to the top of the Z order for windows of the same type. You can rearrange the Z order by using the SetWindowPos and DeferWindowPos functions.
The user changes the Z order by activating a different window. The system positions the active window at the top of the Z order for windows of the same type. When a window comes to the top of Z order, so do its child windows. You can use the GetTopWindow function to search all child windows of a parent window and return a handle to the child window that is highest in Z order. The GetNextWindow function retrieves a handle to the next or previous window in Z order.
再来段中文的
Z轴: 它来源于三维空间的概念,x和y分别代表屏幕所在平面上的水平坐标和垂直坐标,而z轴则是垂直于屏幕的。z-order的作用表现在两方面:一是控件组中每个控件在同一位置时的叠加顺序;二是当几个控件停靠在父控件的同一边缘时的堆积顺序。z-order的初始值是根据你设置每个控件的parent属性值的顺序或者将一个控件加入到一个控件集合的顺序来决定的。可以查看相应的Windows 窗体设计器生成的代码,可以看到最靠近客户区中间的控件是最早被加入到控件集合中的,而停靠在边缘的控件则是最后被加入到控件集合中的。明白了以上基础原 理后,即可调用控件类提供的相关方法例如SetChildIndex或者BringToFront和SendToBack等等来修改控件的z- order,从面起到按需调整控件位置的作用。

