补充画圆画线
这是一个很简单的画图工具的例子
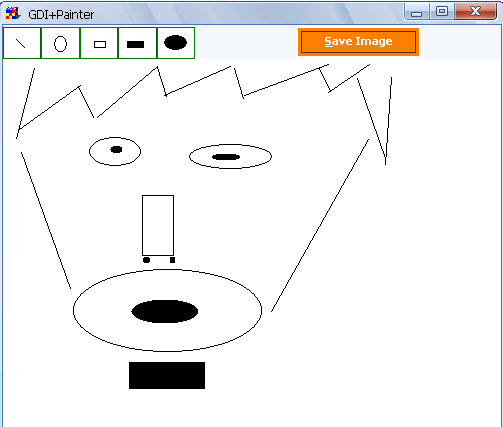
直接上图吧:
这里定义了线,矩形,椭圆等五种类型的外观,还有PEN,刷子,很简单的一个画图工具,希望能提起大家的兴趣
private void Form1_Load(object sender,
System.EventArgs e)
{
// Get the full size of the form
//取得窗口的完整大小
fullSize = SystemInformation
.PrimaryMonitorMaximizedWindowSize;
//其实也即时初始化一副BMP图
// Create a bitmap using full size
bitmap = new Bitmap(fullSize.Width,
fullSize.Height);
// Create a Graphics object from Bitmap
//并由于创建一份GRAPHICS
curGraphics = Graphics.FromImage(bitmap);
// Set background color as form's color
curGraphics.Clear(this.BackColor);
// Create a new pen and brush as
// default pen and brush
curPen = new Pen(Color.Black);
curBrush = new SolidBrush(Color.Black);
}
在DOWN的时候,即取得开始的位置
private void Form1_MouseDown(object sender,
System.Windows.Forms.MouseEventArgs e)
{
// Store the starting point of
// the rectangle and set the drag mode
// to true
curX = e.X;
curY = e.Y;
dragMode = true;
}
每次移动,都是重新画,只是肉眼所不能分得清而已
private void Form1_MouseMove(object sender,
System.Windows.Forms.MouseEventArgs e)
{
// Find out the ending point of
// the rectangle and calculate the
// difference of starting and ending
// points to find out the height and width
// of the rectangle
x = e.X;
y = e.Y;
diffX = e.X - curX;
diffY = e.Y - curY;
// If drag mode is true, call refresh
// that forces window to repaint
if (dragMode)
{
//每次刷新其实都是调用ONPAINT函数
this.Refresh();
}
}
在UP的时候,也画,并把标志量改为FALSE
private void Form1_MouseUp(object sender,
System.Windows.Forms.MouseEventArgs e)
{
diffX = x - curX;
diffY = y - curY;
//这里下一个留个问题?SWITCH是OO被人痛批的,可这里如果不采用SWITCH,有什么好的办法呢!
switch (drawIndex)
{
//不管是矩形或者是椭圆形,都是取X,Y,差值就可以了
case 1:
{
// Draw a line
curGraphics.DrawLine(curPen,
curX, curY, x, y);
break;
}
case 2:
{
// Draw an ellipse
curGraphics.DrawEllipse(curPen,
curX, curY, diffX, diffY);
break;
}
case 3:
{
// Draw rectangle
curGraphics.DrawRectangle(curPen,
curX, curY, diffX, diffY);
break;
}
case 4:
{
// Fill rectangle
curGraphics.FillRectangle(curBrush,
curX, curY, diffX, diffY);
break;
}
case 5:
{
// Fill ellipse
curGraphics.FillEllipse(curBrush,
curX, curY, diffX, diffY);
break;
}
}
// Refresh
RefreshFormBackground();
// Set drag mode to false
dragMode = false;
}
定义每次点击样式BUTTON的值,其实应该定一个枚举才对
private void LineDraw_Click(object sender,
System.EventArgs e)
{
drawIndex = 1;
}
private void RefreshFormBackground()
{
//将原来的保存起来,作为背景图像
curBitmap = bitmap.Clone(
new Rectangle(0, 0, this.Width, this.Height),
bitmap.PixelFormat);
this.BackgroundImage = curBitmap;
}
//GDI一直强调的一个模式吧
private void Form1_Closed(object sender,
System.EventArgs e)
{
// Dispose all public objects
curPen.Dispose();
curBrush.Dispose();
curGraphics.Dispose();
}
private void SaveBtn_Click(object sender,
System.EventArgs e)
{
// Save file dialog
SaveFileDialog saveFileDlg = new SaveFileDialog();
saveFileDlg.Filter =
"Image files (*.bmp)|*.bmp|All files (*.*)|*.*";
if (saveFileDlg.ShowDialog() == DialogResult.OK)
{
// Create bitmap and call Save method
// to save it
Bitmap tmpBitmap = bitmap.Clone
(new Rectangle(0, 0,
this.Width, this.Height),
bitmap.PixelFormat);
tmpBitmap.Save(saveFileDlg.FileName,
ImageFormat.Bmp);
}
}
剩下一个ONPAINT,和前面差不多,这里就略了
这是网上一个例子的代码,比较有趣贴近生活,但作者原来的代码里出现了好多重复,还有一些硬编码的,就不完全贴出了
,只当给大家一个兴趣,GDI其实能完成很多事的哦
还有一个是画饼图的,其实也是画圆啦
Graphics g = this.CreateGraphics();
g.Clear(this.BackColor);
Rectangle rect = new Rectangle(350, 150, 200, 200);
float angle = 0;
float sweep = 0;
foreach(sliceData dt in sliceList)
{
百分比值*360
sweep = 360f * dt.share / shareTotal;
画扇形部分,范围即矩形内,
if(flMode)
g.FillPie(new SolidBrush(dt.clr), rect, angle, sweep);
else
g.DrawPie(new Pen(dt.clr), rect, angle, sweep);
angle += sweep;
}
g.Dispose();
一个画线,一个填充


到具体的工程里可能还要写一些百分比,具体数目之类的,但有了前面的基础,大家应该都知道很简单的吧!就略啦!
下星期看到好玩的例子再贴!嘿嘿!加油
直接上图吧:

这里定义了线,矩形,椭圆等五种类型的外观,还有PEN,刷子,很简单的一个画图工具,希望能提起大家的兴趣
private void Form1_Load(object sender,
System.EventArgs e)
{
// Get the full size of the form
//取得窗口的完整大小
fullSize = SystemInformation
.PrimaryMonitorMaximizedWindowSize;
//其实也即时初始化一副BMP图
// Create a bitmap using full size
bitmap = new Bitmap(fullSize.Width,
fullSize.Height);
// Create a Graphics object from Bitmap
//并由于创建一份GRAPHICS
curGraphics = Graphics.FromImage(bitmap);
// Set background color as form's color
curGraphics.Clear(this.BackColor);
// Create a new pen and brush as
// default pen and brush
curPen = new Pen(Color.Black);
curBrush = new SolidBrush(Color.Black);
}
在DOWN的时候,即取得开始的位置
private void Form1_MouseDown(object sender,
System.Windows.Forms.MouseEventArgs e)
{
// Store the starting point of
// the rectangle and set the drag mode
// to true
curX = e.X;
curY = e.Y;
dragMode = true;
}
每次移动,都是重新画,只是肉眼所不能分得清而已
private void Form1_MouseMove(object sender,
System.Windows.Forms.MouseEventArgs e)
{
// Find out the ending point of
// the rectangle and calculate the
// difference of starting and ending
// points to find out the height and width
// of the rectangle
x = e.X;
y = e.Y;
diffX = e.X - curX;
diffY = e.Y - curY;
// If drag mode is true, call refresh
// that forces window to repaint
if (dragMode)
{
//每次刷新其实都是调用ONPAINT函数
this.Refresh();
}
}
在UP的时候,也画,并把标志量改为FALSE
private void Form1_MouseUp(object sender,
System.Windows.Forms.MouseEventArgs e)
{
diffX = x - curX;
diffY = y - curY;
//这里下一个留个问题?SWITCH是OO被人痛批的,可这里如果不采用SWITCH,有什么好的办法呢!
switch (drawIndex)
{
//不管是矩形或者是椭圆形,都是取X,Y,差值就可以了
case 1:
{
// Draw a line
curGraphics.DrawLine(curPen,
curX, curY, x, y);
break;
}
case 2:
{
// Draw an ellipse
curGraphics.DrawEllipse(curPen,
curX, curY, diffX, diffY);
break;
}
case 3:
{
// Draw rectangle
curGraphics.DrawRectangle(curPen,
curX, curY, diffX, diffY);
break;
}
case 4:
{
// Fill rectangle
curGraphics.FillRectangle(curBrush,
curX, curY, diffX, diffY);
break;
}
case 5:
{
// Fill ellipse
curGraphics.FillEllipse(curBrush,
curX, curY, diffX, diffY);
break;
}
}
// Refresh
RefreshFormBackground();
// Set drag mode to false
dragMode = false;
}
定义每次点击样式BUTTON的值,其实应该定一个枚举才对
private void LineDraw_Click(object sender,
System.EventArgs e)
{
drawIndex = 1;
}
private void RefreshFormBackground()
{
//将原来的保存起来,作为背景图像
curBitmap = bitmap.Clone(
new Rectangle(0, 0, this.Width, this.Height),
bitmap.PixelFormat);
this.BackgroundImage = curBitmap;
}
//GDI一直强调的一个模式吧
private void Form1_Closed(object sender,
System.EventArgs e)
{
// Dispose all public objects
curPen.Dispose();
curBrush.Dispose();
curGraphics.Dispose();
}
private void SaveBtn_Click(object sender,
System.EventArgs e)
{
// Save file dialog
SaveFileDialog saveFileDlg = new SaveFileDialog();
saveFileDlg.Filter =
"Image files (*.bmp)|*.bmp|All files (*.*)|*.*";
if (saveFileDlg.ShowDialog() == DialogResult.OK)
{
// Create bitmap and call Save method
// to save it
Bitmap tmpBitmap = bitmap.Clone
(new Rectangle(0, 0,
this.Width, this.Height),
bitmap.PixelFormat);
tmpBitmap.Save(saveFileDlg.FileName,
ImageFormat.Bmp);
}
}
剩下一个ONPAINT,和前面差不多,这里就略了
这是网上一个例子的代码,比较有趣贴近生活,但作者原来的代码里出现了好多重复,还有一些硬编码的,就不完全贴出了
,只当给大家一个兴趣,GDI其实能完成很多事的哦
还有一个是画饼图的,其实也是画圆啦
Graphics g = this.CreateGraphics();
g.Clear(this.BackColor);
Rectangle rect = new Rectangle(350, 150, 200, 200);
float angle = 0;
float sweep = 0;
foreach(sliceData dt in sliceList)
{
百分比值*360
sweep = 360f * dt.share / shareTotal;
画扇形部分,范围即矩形内,
if(flMode)
g.FillPie(new SolidBrush(dt.clr), rect, angle, sweep);
else
g.DrawPie(new Pen(dt.clr), rect, angle, sweep);
angle += sweep;
}
g.Dispose();
一个画线,一个填充


到具体的工程里可能还要写一些百分比,具体数目之类的,但有了前面的基础,大家应该都知道很简单的吧!就略啦!
下星期看到好玩的例子再贴!嘿嘿!加油


