浅析Vuex
1、Vuex是什么?
Vuex是专门为Vue服务,用于管理页面的数据状态、提供统一数据操作的生态系统,相当于数据库mongoDB,MySQL等,任何组件都可以存取仓库中的数据。其中vuex类似的 还是有Redux,Redux大多用于React,针对Redux后续在做补充,现在就让我们好好了解下Vuex到底是个啥东西?
概念理解性(必读)
Vuex采用MVC模式中的Model层,规定所有的数据必须通过action--->mutaion--->state这个流程进行来改变状态的。再结合Vue的数据视图双向绑定实现页面的更新。统一页面状态管理,可以让复杂的组件交互变的简单清晰,同时在调试时也可以通过DEVtools去查看状态。
在当前前端的spa模块化项目中不可避免的是某些变量需要在全局范围内引用,此时父子组件的传值,子父组件间的传值,兄弟组件间的传值成了我们需要解决的问题。虽然vue中提供了props(父传子)commit(子传父)兄弟间也可以用localstorage和sessionstorage。但是这种方式在项目开发中带来的问题比他解决的问题(难管理,难维护,代码复杂,安全性低)更多。vuex的诞生也是为了解决这些问题,从而大大提高我们vue项目的开发效率。
抛出问题 使用Vuex只需执行 Vue.use(Vuex),并在Vue的配置中传入一个store对象的示例,store是如何实现注入的?state内部是如何实现支持模块配置和模块嵌套的?在执行dispatch触发action(commit同理)的时候,只需传入(type, payload),action执行函数中第一个参数store从哪里获取的?如何区分state是外部直接修改,还是通过mutation方法修改的?调试时的“时空穿梭”功能是如何实现的?
2、vue和vuex的区别与联系
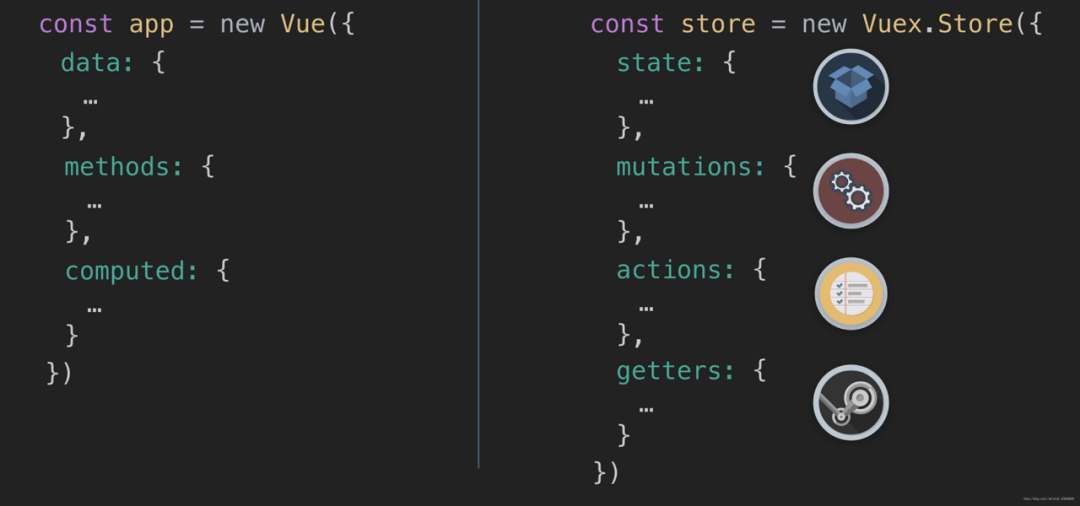
看一下这个vue响应式的例子,vue中的data 、methods、computed,可以实现响应式。
视图通过点击事件,触发methods中的increment方法,可以更改state中count的值,一旦count值发生变化,computed中的函数能够把getCount更新到视图。
<div id="app">
        <button @click="increment"></button>
        {{getcount}}
    </app>
    new Vue({
        el: "#app",
        // state
        data () {
         return {
            count: 0
         }
        },
         // view
        computed: {
            getCount(){
                return this.count
            }
        },
        // actions
        methods: {
         increment () {
            this.count++
         }
        },
    })
我们可以用vuex实现和vue同样的响应式功能。其实他们原理时一样的,vuex中也有四个属性值:state、getters、mutations、actions。。在没有actions的情况下:数据:state --> data 获取数据:getters --> computed 更改数据:mutations --> methods
视图通过点击事件,触发mutations中方法,可以更改state中的数据,一旦state数据发生更改,getters把数据反映到视图。
那么actions,可以理解处理异步,而单纯多加的一层。
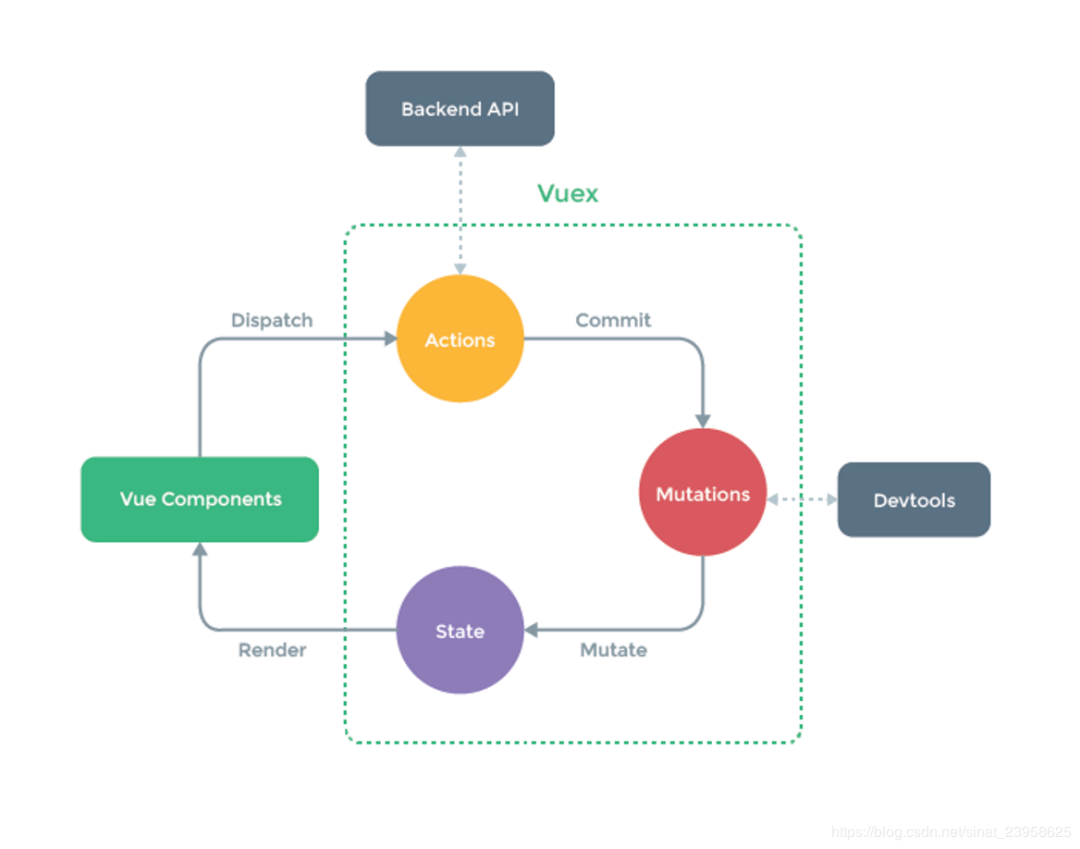
既然提到了mutions actions这时候 就不得不提 commit dispatch,这两个有什么作用呢?
在vue例子中,通过click事件,触发methods中的方法。当存在异步时,而在vuex中需要dispatch来触发actions中的方法,actions中的commit可以触发mutations中的方法。同步,则直接在组件中commit触发vuex中mutations中的方法。
下面我们看下vuex中能像vue中实现改变状态,更新视图的功能:
vuex.js
const store =  new Vuex.Store({

    state: {
        count: 0
    },

    //state的值只能通过mutations来修改
    mutations: {
        increment(state) {
            state.count++
        }
    },

   //this.$store.commit("increment")触发mutations中函数"increment"
    actions: {
        increment({commit}) {
             commit("increment"); //this.$store.commit("increment")
        }

    },

   //通过getter中的方法来获取state值
    getters: {
        getCount(state) {
            return state.count
        }
    }
    })

    export default store
App.vue
 <template>
    <div id="app">
            <button @click="increment">增加</button>
            <!-- 有时候不能直接 强制使用store里面的状态 this.$store.state.count -->
            {{this.$store.getters.getCount}}
    </div>
    </template>

    <script>
    export default {
        methods: {
        increment(){
                //this.$store.dispatch("increment")触发actions函数"increment"
                this.$store.dispatch("increment")
            }
        }
    }
    </script>
现在我们已经了解vuex能实现和像vue双向数据绑定--更新试图的功能,下面我们重点说说vuex源码的实现:
3、store注入组件install方法
3.1、解答问题:vuex的store是如何注入到组件中的?
首先使用vuex,需要安装插件:
Vue.use(Vuex); // vue的插件机制,安装vuex插件当ues(Vuex)时候,会调用vuex中的install方法,装在vuex! 下面时install的核心源码:
Vue.mixin({
    beforeCreate() {
        if (this.$options && this.$options.store) {
            //找到根组件 main 上面挂一个$store
            this.$store = this.$options.store
            // console.log(this.$store);

        } else {
            //非根组件指向其父组件的$store
            this.$store = this.$parent && this.$parent.$store
        }
    }
})
可见,store注入 vue的实例组件的方式,是通过vue的 mixin机制,借助vue组件的生命周期 钩子 beforeCreate 完成的。即 每个vue组件实例化过程中,会在 beforeCreate 钩子前调用 vuexInit 方法。
3.2、解答问题:vuex的state和getters是如何映射到各个组件实例中响应式更新状态呢?
new vue实现双向数据绑定:
this._s = new Vue({
    data: {
        // 只有data中的数据才是响应式
        state: options.state
    }
})
4、getters实现
//实现getters原理
let getters = options.getters || {}
// console.log(getters);
// this.getters = getters; //不是直接挂载到 getters上 这样只会拿到整个 函数体
this.getters = {};
// console.log(Object.keys(getters))  // ["myAge","myName"]
Object.keys(getters).forEach((getterName) => {
    // console.log(getterName)  // myAge
    // 将getterName 放到this.getters = {}中
    // console.log(this.state);
    Object.defineProperty(this.getters, getterName, {
        // 当你要获取getterName(myAge)会自动调用get方法
        // 箭头函数中没有this
        get: () => {
            return getters[getterName](this.state)
        }
    })
})
从上面源码,我们可以看出Vuex的state状态是响应式,是借助vue的data是响应式,将state存入vue实例组件的data中;Vuex的getters则是借助vue的计算属性computed实现数据实时监听。
5、mutations实现
let mutations = options.mutations || {}
// console.log(mutations);
this.mutations = {};
Object.keys(mutations).forEach(mutationName=>{
    // console.log(mutationName);

    this.mutations[mutationName] = (payload) =>{
        this.mutations[mutationName](this.state,payload)
    }
})
6、actions实现
// actions的原理
let actions = options.actions || {}
this.actions = {};
forEach(actions,(actionName,value)=>{
    this.actions[actionName] = (payload)=>{
        value(this,payload)
    }
})
7、commit dispatch的实现
commit(type,payload){
    this.mutations[type](payload)
}
// type是actions的类型
dispatch=(type,payload)=>{
this.actions[type](payload)
}8、原理总结:
Vuex是通过全局注入store对象,来实现组件间的状态共享。在大型复杂的项目中(多级组件嵌套),需要实现一个组件更改某个数据,多个组件自动获取更改后的数据进行业务逻辑处理,这时候使用vuex比较合适。假如只是多个组件间传递数据,使用vuex未免有点大材小用,其实只用使用组件间常用的通信方法即可。
转载于:https://blog.csdn.net/lgno2/article/details/109446547

 浙公网安备 33010602011771号