java责任链设计模式
本节要讲的并非传统意义的责任链:为了避免请求发送者与多个请求处理者耦合在一起,将所有请求的处理者通过前一对象记住其下一个对象的引用而连成一条链;当有请求发生时,可将请求沿着这条链传递,直到有对象处理它为止。也就是说:用户发起一个请求,之后请求上链,如果当前处理者可以处理该请求,那么就直接处理;否则当前处理者把请求转发给下一个处理者。
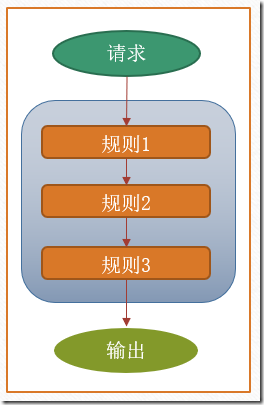
本节要讲的是责任链的一种变形,叫做功能链,这种设计模式特别常用,随处可见,用途十分广泛。这种模式是:一个链上有多个处理逻辑,一个请求到来会被所有逻辑处理,最后返回最终处理的结果,并不是被其中的某一个逻辑处理就结束,并且规则可以动态添加,
1、责任链实战
1、责任链的思想
首先我们要为每一个规则的执行定义一个接口,由实现类具体执行规则,这些规则也就是针对指定请求的处理逻辑单元。其次我们要把规则(处理逻辑)关联起来,最简单的办法就是将规则加入到List中,然后循环遍历执行,当然实际中这也是一种方法,下面我们的这种方式,也是先把每个规则加入到List中去,只是执行的时候,有些不同:编写责任链FilterChain,包含List属性和相关方法,将规则(Filter实现类)加入到List中,之后取出一个规则执行,执行规则的业务逻辑方法之后,再回调FilterChain的doFilter,达到循环的目的。
2、编写请求对象。这里我们假如处理告警信息
package com.yefengyu.entity;

import java.util.Date;


public class Alarm
{
    //告警id
    private Integer id;

    //告警事件总数:这条告警是有几条事件合并而成的
    private Integer eventNumber;

    //告警名称
    private String alarmName;

    //告警发生位置
    private String alarmAddress;

    //是否确认告警 0:确认 1:未确认
    private Integer alarmAck;

    //告警等级 1:可疑 2:高危 3:严重 4:紧急
    private Integer alarmLevel;

    //告警类型 1:停电 2:硬件 3:软件
    private Integer alarmType;

    //告警发送时间
    private Date date;

    private String desc;

    public Alarm()
    {
    }

    public Alarm(Integer id, Integer eventNumber, String alarmName, String alarmAddress, Integer alarmAck,
                 Integer alarmLevel, Integer alarmType, Date date, String desc)
    {
        this.id = id;
        this.eventNumber = eventNumber;
        this.alarmName = alarmName;
        this.alarmAddress = alarmAddress;
        this.alarmAck = alarmAck;
        this.alarmLevel = alarmLevel;
        this.alarmType = alarmType;
        this.date = date;
        this.desc = desc;
    }

    public Integer getId()
    {
        return id;
    }

    public void setId(Integer id)
    {
        this.id = id;
    }

    public Integer getEventNumber()
    {
        return eventNumber;
    }

    public void setEventNumber(Integer eventNumber)
    {
        this.eventNumber = eventNumber;
    }

    public String getAlarmName()
    {
        return alarmName;
    }

    public void setAlarmName(String alarmName)
    {
        this.alarmName = alarmName;
    }

    public String getAlarmAddress()
    {
        return alarmAddress;
    }

    public void setAlarmAddress(String alarmAddress)
    {
        this.alarmAddress = alarmAddress;
    }

    public Integer getAlarmAck()
    {
        return alarmAck;
    }

    public void setAlarmAck(Integer alarmAck)
    {
        this.alarmAck = alarmAck;
    }

    public Integer getAlarmLevel()
    {
        return alarmLevel;
    }

    public void setAlarmLevel(Integer alarmLevel)
    {
        this.alarmLevel = alarmLevel;
    }

    public Integer getAlarmType()
    {
        return alarmType;
    }

    public void setAlarmType(Integer alarmType)
    {
        this.alarmType = alarmType;
    }

    public Date getDate()
    {
        return date;
    }

    public void setDate(Date date)
    {
        this.date = date;
    }

    public String getDesc()
    {
        return desc;
    }

    public void setDesc(String desc)
    {
        this.desc = desc;
    }

    @Override
    public String toString()
    {
        return "Alarm{" +
               "id=" + id +
               ", eventNumber=" + eventNumber +
               ", alarmName='" + alarmName + '\'' +
               ", alarmAddress='" + alarmAddress + '\'' +
               ", alarmAck=" + alarmAck +
               ", alarmLevel=" + alarmLevel +
               ", alarmType=" + alarmType +
               ", date=" + date +
               ", desc='" + desc + '\'' +
               '}';
    }
}
3、过滤器接口
package com.yefengyu.filter;

import com.yefengyu.entity.Alarm;


public interface Filter
{
    void execute(Alarm alarm, FilterChain chain);
}
4、责任链
package com.yefengyu.filter;

import com.yefengyu.entity.Alarm;

import java.util.ArrayList;
import java.util.List;


public class FilterChain
{
    //规则过滤器列表,实现Filter接口的过滤器将真正执行对事件的处理
    private List<Filter> filters = new ArrayList<>();

    //过滤器列表的索引
    private int index = 0;

    //向责任链中加入过滤器(单个)
    public FilterChain addFilter(Filter filter)
    {
        this.filters.add(filter);
        return this;
    }

    //向责任链中加入过滤器(多个)
    public FilterChain addFilters(List<Filter> filters)
    {
        this.filters.addAll(filters);
        return this;
    }

    //处理事件(alarm)从FilterChain中获取过滤器,进行处理,处理完成之后过滤器会再调用该方法,
    //继续执行下一个filter.这就需要在每个Filter接口的实现类中最后一句需要回调FilterChain的doFilter方法。
    public void doFilter(Alarm alarm, FilterChain chain)
    {
        if (index == filters.size())
        {
            return;
        }
        Filter filter = filters.get(index);
        index++;
        filter.execute(alarm, chain);
    }
}
5、新增两个规则,处理告警的逻辑单元
Rule1:
package com.yefengyu.rule;

import com.yefengyu.entity.Alarm;
import com.yefengyu.filter.Filter;
import com.yefengyu.filter.FilterChain;


public class Rule1 implements Filter
{
    @Override
    public void execute(Alarm alarm, FilterChain chain)
    {
        //规则内容:如果是政府发生告警。告警等级设为最高
        if (alarm.getAlarmAddress().contains("政府"))
        {
            alarm.setAlarmLevel(4);
            System.out.println("执行规则1");
        }

        //注意回调FilterChain的doFilter方法,让FilterChain继续执行下一个Filter
        chain.doFilter(alarm, chain);
    }
}
Rule2
package com.yefengyu.rule;

import com.yefengyu.entity.Alarm;
import com.yefengyu.filter.Filter;
import com.yefengyu.filter.FilterChain;


public class Rule2 implements Filter
{
    @Override
    public void execute(Alarm alarm, FilterChain chain)
    {
        //规则内容:告警名称为:光功率衰耗,描述信息为:割接 则该告警变为确认状态
        if (alarm.getAlarmName().contains("光功率衰耗") && alarm.getDesc().contains("割接"))
        {
            alarm.setAlarmAck(0);
            System.out.println("执行规则2");
        }

        //注意回调FilterChain的doFilter方法,让FilterChain继续执行下一个Filter
        chain.doFilter(alarm, chain);
    }
}
6、客户端
package com.yefengyu;

import com.yefengyu.entity.Alarm;
import com.yefengyu.filter.FilterChain;
import com.yefengyu.rule.Rule1;
import com.yefengyu.rule.Rule2;

import java.util.Date;


public class Client
{
    public static void main(String[] args)
    {
        //构造告警事件
        Alarm alarm = new Alarm(1, 10, "光功率衰耗", "省政府23号楼", 1, 1, 1, new Date(), "割接");

        //将规则加入责任链
        FilterChain filterChain = new FilterChain();
        filterChain.addFilter(new Rule1()).addFilter(new Rule2());

        //执行责任链
        filterChain.doFilter(alarm, filterChain);

        //输出结果
        System.out.println(alarm);
    }
}
结果:
执行规则1
执行规则2
Alarm{id=1, eventNumber=10, alarmName='光功率衰耗', alarmAddress='省政府23号楼', alarmAck=0, alarmLevel=4, alarmType=1, date=Sat Jun 29 17:47:27 CST 2019, desc='割接'}
上面的代码已经是使用责任链来完成了功能,如果我们想新添加一个规则,只需实现Filter接口,并且重写execute方法,将新添加的规则过滤器加入责任链中即可。也就是完成以下两步即可:
-
实现Filter接口并重写execute方法:Rule3
-
客户端添加该规则过滤器到责任链即可。filterChain.addFilter(new Rule1()).addFilter(new Rule2()).addFilter(new Rule3());
上面代码完成了我们开始的预想,如果新添加规则,不需要在原有规则的基础修改,而是新添加一个规则,并且加入到责任链中,这样就可以执行对应的规则,但是这样也有个问题,我们并不想显示的将规则加入到责任链,如果继承接口即可自动加入到责任链,这样的话可以把核心逻辑与规则分开,其实通过注解即可完成这项需求。
2、责任链和注解配合使用
1、添加依赖
<dependency>
    <groupId>org.reflections</groupId>
    <artifactId>reflections</artifactId>
    <version>0.9.10</version>
</dependency>
2、自定义注解
package com.yefengyu.annotation;

import java.lang.annotation.ElementType;
import java.lang.annotation.Retention;
import java.lang.annotation.RetentionPolicy;
import java.lang.annotation.Target;


@Target({ElementType.TYPE})
@Retention(RetentionPolicy.RUNTIME)
public @interface EnableFilter
{
    String value() default "";
}
3、在每个规则(Rule1 Rule2)上面都加上EnableFilter注解。
4、增加一个扫描注解修饰的类,并将这些类实例对象返回
package com.yefengyu.factory;

import com.yefengyu.annotation.EnableFilter;
import com.yefengyu.filter.Filter;
import org.reflections.Reflections;

import java.util.ArrayList;
import java.util.List;
import java.util.Set;


public class FilterFactory
{
    public static List<Filter> getFilters(String packages)
    {
        List<Filter> filterList = new ArrayList<>();
        //通过注解扫描指定的包
        Reflections reflections = new Reflections(packages);
        //如果该包下面有被EnableFilter注解修饰的类,那么将该类的实例加入到列表中,并最终返回
        Set<Class<?>> filters = reflections.getTypesAnnotatedWith(EnableFilter.class);
        for (Class filter : filters)
        {
            try
            {
                filterList.add((Filter)filter.newInstance());
            }
            catch (Exception e)
            {
                e.printStackTrace();
            }
        }

        return filterList;
    }
}
5、修改客户端
package com.yefengyu;

import com.yefengyu.entity.Alarm;
import com.yefengyu.factory.FilterFactory;
import com.yefengyu.filter.FilterChain;
import com.yefengyu.rule.Rule1;
import com.yefengyu.rule.Rule2;

import java.util.Date;


public class Client
{
    public static void main(String[] args)
    {
        //构造告警事件
        Alarm alarm = new Alarm(1, 10, "光功率衰耗", "省政府23号楼", 1, 1, 1, new Date(), "割接");

        //将规则加入责任链中,通过注解扫描指定的包,此处无需指定执行哪个规则(FIlter的实现类)
        FilterChain filterChain = new FilterChain();
        filterChain.addFilters(FilterFactory.getFilters("com.yefengyu.rule"));

        //执行责任链
        filterChain.doFilter(alarm, filterChain);

        //输出结果
        System.out.println(alarm);
    }
}
其中
//将规则加入责任链中,通过注解扫描指定的包,此处无需指定执行哪个规则(FIlter的实现类)
FilterChain filterChain = new FilterChain();
filterChain.addFilters(FilterFactory.getFilters("com.yefengyu.rule"));
把下面的代码替换了:
//将规则过滤器加入责任链中
FilterChain filterChain = new FilterChain();
filterChain.addFilter(new Rule1()).addFilter(new Rule2());
这个时候,如果想增加一个规则,那么就只需要在 com.yengyu.rule的包下面新增一个规则,然后加上注解@EnableFilter即可将该规则加入到责任链中。
6、上面客户端的责任链并没有手动添加规则过滤器的实现类,通过FilterFactory自动扫描指定的包下面的被EnableFilter注解修饰的类,这样达到了动态添加规则,又不影响主体代码的效果。
7、如果想排除某些规则该怎么办?需要使用配置文件,添加一个工具类,读取配置文件的内容,然后去除对应的过滤器,实现略。
代码详见:设计模式


