Linux多线程编程
1 线程的基本操作
1.1 线程的创建
Linux平台上使用pthread_create来创建线程,其签名如下:
int pthread_create(pthread_t *thread,
                   const pthread_attr_t *attr,
                   void *(*start_routine) (void *),
                   void *arg);
参数说明:
- 参数thread,是一个输出参数,如果线程创建成功,通过这个参数可以得到创建成功的线程ID;
- 参数attr,指定了该线程的属性,一般设置为NULL,表示使用默认属性;
- 参数start_routine,指定了线程函数,这里需要注意的是这个函数的调用方式必须是_cdel调用,即C Declaration的缩写,这是C/C++中定义函数时默认的调用方式,一般很少有人注意到这一点。
补充说明
//代码片段: 不显式指定函数调用方式,其调用方式为默认的__cdecl
void *start_routine(void *args) {
}

//代码片段2:显式指定函数调用方式为默认的__cdecl,等价于代码片段1
void *__cdecl start_routine(void *args) {

}
- 参数arg,通过这一个参数可以在创建线程时将某个参数传入线程函数中,由于这是一个void*类型,可以方便我们最大化地传入任意多的信息给线程函数。
返回值
如果成功创建线程,返回0;否则,返回相应的错误码,常见的错误码有EAGAIN、EINVAL、EPERM。
例程:
#include <stdio.h>
#include <unistd.h>
#include <pthread.h>


void* thread_func(void *arg) {
    while(1) {
        sleep(1);
        printf("I am New Thread.\n");
    }

    return NULL;
}

int main() {
    pthread_t tid;
    pthread_create(&tid, NULL, thread_func, NULL);

    while (1) { //死循环,防止主线程提前退出(权宜之计)
        sleep(1);
    }
    return 0;
}
1.2 线程ID
一个县城创建成功以后,我们可以拿到一个线程ID,线程ID是在整个操作系统范围内是唯一的。我们可以使用线程ID来标识和区分线程,例如我们 在日志文件中,把打印日志所在的线程ID也一同打印出来,这样方便我们判断和排查问题。创建线程时,上文也介绍了可以通过pthread_create函数的第一个参数thread得到线程ID。大多数时候,我们需要在当前调用线程中获取当前线程的ID,在Linux平台上就可以使用pthread_self函数获取线程ID,其签名如下:
pthread_t pthread_self(void);
这个函数比较简单,不多做介绍,pthread_t是一个32位无符号整型值。
1.2.1 pstack命令
Linux系统中可以通过pstack命令查看一个进程的线程数量和每个线程的调用堆栈情况。
pstack pid
pid设置为要查看的进程的ID即可。以我的云服务器上,以我要查看nginx的worker进程为例。首先使用ps命令查看nginx worker进程的进程ID,然后再使用pstack即可查看该进程每个县城的调用堆栈:
ydqun@ydqhost ~ % ps -elf | grep nginx                                                                                                                                                      [130]
1 S root     1061443       1  0  80   0 -  4214 -       2024 ?        00:00:00 nginx: master process nginx
5 S nobody   2721581 1061443  0  80   0 -  4512 -       2024 ?        00:00:27 nginx: worker process
0 S ydqun    3971492 3970845  0  80   0 -  2303 pipe_r 15:37 pts/16   00:00:00 grep --color=auto --exclude-dir=.bzr --exclude-dir=CVS --exclude-dir=.git --exclude-dir=.hg --exclude-dir=.svn --exclude-dir=.idea --exclude-dir=.tox nginx
root@ydqhost:/home/ydqun# pstack 2721581
#0  0x00007f338a831dea in epoll_wait (epfd=13, events=0x563b475e7f00, maxevents=512, timeout=timeout@entry=5000) at ../sysdeps/unix/sysv/linux/epoll_wait.c:30
#1  0x0000563b4629f79a in ngx_epoll_process_events (cycle=0x563b475faad0, timer=5000, flags=1) at src/event/modules/ngx_epoll_module.c:800
#2  0x0000563b4629595a in ngx_process_events_and_timers (cycle=cycle@entry=0x563b475faad0) at src/event/ngx_event.c:248
#3  0x0000563b4629dbd7 in ngx_worker_process_cycle (cycle=0x563b475faad0, data=<optimized out>) at src/os/unix/ngx_process_cycle.c:721
#4  0x0000563b4629c1cf in ngx_spawn_process (cycle=cycle@entry=0x563b475faad0, proc=proc@entry=0x563b4629dac7 <ngx_worker_process_cycle>, data=data@entry=0x0, name=name@entry=0x563b4634456b "worker process", respawn=respawn@entry=-4) at src/os/unix/ngx_process.c:199
#5  0x0000563b4629d336 in ngx_start_worker_processes (cycle=cycle@entry=0x563b475faad0, n=1, type=type@entry=-4) at src/os/unix/ngx_process_cycle.c:344
#6  0x0000563b4629e72c in ngx_master_process_cycle (cycle=0x563b475faad0, cycle@entry=0x563b475979a0) at src/os/unix/ngx_process_cycle.c:234
1.2.2 Linux系统线程ID的本质
Linux系统中有三种方式可以获取一个线程的ID:
方法一
调用pthread_createh函数时,第一个参数在函数调用成功后得到线程ID:
#include <pthread.h>

pthread_t tid;
pthread_create(&tid, NULL, func, NULL);
方法二
在需要获取ID的线程中调用pthread_self()函数获取。
#include <pthread.h>

pthread_t tid = pthread_self();
方法三
通过系统调用获取线程ID。
#include <sys/syscall.h>
#include <unistd.h>

int tid = syscall(SYS_gettid);
方法一和方法二获取的线程ID结果是一样的,是一个pthread_t,输出时本质上是一块内存空间地址,示意图如下:
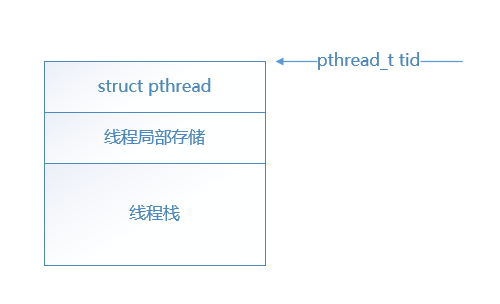
但是由于不同的进程可能有相同的内存地址,因此方法一和方法二获取的线程ID可能不是全系统唯一的,一般是一个很大的数字(内存地址)。而方法三获取的线程ID是系统范围内全局唯一的,一般是一个不会太大的整数,这个数字就是所谓的LWP(Light Weight Process,轻量级进程,早期的Linux系统的线程是通过进程来实现的,所以线程被成为轻量级进程)的ID。
#include <stdio.h>
#include <sys/syscall.h>
#include <stdio.h>
#include <pthread.h>
#include <stdbool.h>
#include <unistd.h>

void *thread_proc(void *arg) {
    pthread_t *tid1 = (pthread_t*)arg;
    int tid2 = syscall(SYS_gettid); //LWP id
    pthread_t tid3 = pthread_self();

    while (true) {
        printf("tid1: %lu, tid2: %d, tid3: %lu\n", *tid1, tid2, tid3);
        sleep(3);
    }

    return 0;
}

int main() {
    pthread_t tid;
    pthread_create(&tid, NULL, thread_proc, &tid);
    pthread_join(tid, NULL);
    return 0;
}
编译并运行,输出结果如下:
ydqun@ydqhost thread % ./a.out                                                                                           [130]
tid1: 139753255179840, tid2: 4019278, tid3: 139753255179840
tid2即LWP的ID,而tid1和tid3是一个内存地址,转换成16进制即:
0X7F1AD7219640
这与我们用pstack命令看到的线程ID是一样的:
root@ydqhost:/home/ydqun# pstack 4019277
Thread 2 (Thread 0x7f1ad7219640 (LWP 4019278) "a.out"):
#0  0x00007f1ad73027f8 in __GI___clock_nanosleep (clock_id=clock_id@entry=0, flags=flags@entry=0, req=req@entry=0x7f1ad7218de0, rem=rem@entry=0x7f1ad7218de0) at ../sysdeps/unix/sysv/linux/clock_nanosleep.c:78
#1  0x00007f1ad7307677 in __GI___nanosleep (req=req@entry=0x7f1ad7218de0, rem=rem@entry=0x7f1ad7218de0) at ../sysdeps/unix/sysv/linux/nanosleep.c:25
#2  0x00007f1ad73075ae in __sleep (seconds=0) at ../sysdeps/posix/sleep.c:55
#3  0x00005559f62ad26b in thread_proc ()
#4  0x00007f1ad72b1ac3 in start_thread (arg=<optimized out>) at ./nptl/pthread_create.c:442
#5  0x00007f1ad7343850 in clone3 () at ../sysdeps/unix/sysv/linux/x86_64/clone3.S:81
Thread 1 (Thread 0x7f1ad721a740 (LWP 4019277) "a.out"):
#0  __futex_abstimed_wait_common64 (private=128, cancel=true, abstime=0x0, op=265, expected=4019278, futex_word=0x7f1ad7219910) at ./nptl/futex-internal.c:57
#1  __futex_abstimed_wait_common (cancel=true, private=128, abstime=0x0, clockid=0, expected=4019278, futex_word=0x7f1ad7219910) at ./nptl/futex-internal.c:87
#2  __GI___futex_abstimed_wait_cancelable64 (futex_word=futex_word@entry=0x7f1ad7219910, expected=4019278, clockid=clockid@entry=0, abstime=abstime@entry=0x0, private=private@entry=128) at ./nptl/futex-internal.c:139
#3  0x00007f1ad72b3624 in __pthread_clockjoin_ex (threadid=139753255179840, thread_return=0x0, clockid=0, abstime=0x0, block=<optimized out>) at ./nptl/pthread_join_common.c:105
#4  0x00005559f62ad2b8 in main ()
1.3 等待线程结束
Linux线程库提供了pthread_join函数,用来等待某线程的退出并接收它的返回值。这种操作被称为连接(joining),pthread_join函数签名如下:
int pthread_join(pthread_t thread, void **reval);
- 参数thread,需要等待的线程ID。
- 参数retval,输出参数,用于接收等待推出的线程的退出码(Exit Code),线程退出码可以通过调用
pthread_exit退出线程时指定,也可以在线程函数中通过return语句返回。pthread_exit函数的签名如下:
#include <pthread.h>

void pthread_exit(void *value_ptr);
参数value_ptr的值可以在pthread_join中拿到,如果不需要使用这个参数,可以设置薇NULL。
pthread_join函数等待目标线程退出期间会挂起当前线程(调用pthread_join的线程),被挂起的线程处于等待状态,不会消耗任何CPU时间片。直到目标线程退出后,调用pthread_join的线程会被唤醒,继续执行接下来的逻辑。
我们会通过一个实例来演示一下这个函数的使用方法,例程如下:
程序启动时,开启一个工作线程工作线程将当前系统时间写入文件中后退出,主线程等待工作线程退出后,从文件中读取出时间并显示在屏幕上。
#include <stdio.h>
#include <string.h>
#include <pthread.h>

#define TIME_FILENAME "time.txt"

void *fileThreadFunc(void *arg) {
    time_t now = time(NULL);
    struct tm *t = localtime(&now);
    char timeStr[32] = { 0 };
    snprintf(timeStr, 32, "%04d/%02d/%02d %02d:%02d:%02d",
             t->tm_year + 1900,
             t->tm_mon + 1,
             t->tm_mday,
             t->tm_hour,
             t->tm_min,
             t->tm_sec);
    FILE* fp = fopen(TIME_FILENAME, "w");
    if (fp == NULL) {
        printf("Failed to create time.txt.\n");
        return NULL;
    }

    size_t sizeToWrite = strlen(timeStr) + 1;
    size_t ret = fwrite(timeStr, 1, sizeToWrite, fp);
    if (ret != sizeToWrite) {
        printf("Write file error.\n");
    }
    fclose(fp);
    return NULL;
}

int main() {
    pthread_t tid;
    int ret = pthread_create(&tid, NULL, fileThreadFunc, NULL);
    if (ret == -1) {
        printf("Failed to create fileThread.\n");
        return 0;
    }

    int *retval;
    pthread_join(tid, (void **)&retval);

    FILE *fp = fopen(TIME_FILENAME, "r");
    if (fp == NULL) {
        printf("open file error.\n");
        return -2;
    }

    char buf[32] = { 0 };
    int sizeRead = fread(buf, 1, 32, fp);
    if (sizeRead == 0) {
        printf("read file error.\n");
        fclose(fp);
        return -3;
    }

    printf("Current Time is: %s\n", buf);
    fclose(fp);

    return 0;
}
编译并执行如下:
ydqun@ydqhost thread % gcc 03_pthread_join.c                                                                               [0]
ydqun@ydqhost thread % ./a.out                                                                                             [0]
Current Time is: 2025/03/02 19:47:10
ydqun@ydqhost thread %
2 Linux线程同步对象
2.1 Linux互斥体
Linux互斥体时通过限制多个线程同时执行某段代码来达到保护资源的目的。在Linux中使用数据结构pthread_mutex_t来表示一个互斥体对象(定义于pthread.h头文件中)。互斥体对象我们可以使用两种方式来初始化:
- 使用
PTHREAD_MUTEX_INITIALIZER直接给互斥体变量赋值
#include <pthread.h>
pthread_mutex_t mymutex = PTHREAD_MUTEX_INITIALIZER;
- 使用
pthread_mutex_init函数初始化
如果互斥体时动态分配的或者需要给互斥体设置属性,则需要使用pthread_mutex_init函数来初始化结构体,这个函数的签名如下:
int pthread_mutex_init(pthread_mutex_t *mutex,
                       const pthread_mutexattr_t *attr);
参数mutex即我们需要初始化的mutex对象的指针,参数attr是需要设置的互斥体属性,通常情况下,我们使用默认属性可以将这个参数设置为NULL,后面我们会详细介绍每一个属性的用法。如果函数执行成功会返回0,如果执行失败会返回一个错误码。pthread_mutex_init代码示例如下:
#include <pthread.h>
pthread_mutex_t my_mutex;
pthread_mutex_init(&my_mutex, NULL);
当我们不再需要一个互斥体对象时,可以使用pthread_mutex_destroy函数来销毁它,pthread-mutex_destroy函数的签名如下:
int pthread_mutex_destroy(pthread_mutex_t* mutex);
参数mutex是需要销毁的互斥体对象,函数执行成功返回0,如果执行失败会返回一个错误码表示出错原因。这里我们需要注意的两点为:
- 使用PTHREAD_MUTEX_INITIALIZER初始化的互斥体无须销毁
- 不要去销毁一个已经枷锁或者正在被条件变量使用的互斥体对象,当互斥体处于已枷锁的状态或者正在和条件变量配合使用的状态是,调用
pthread_mutex_destroy函数会返回EBUSY错误。
#include <stdio.h>
#include <pthread.h>
#include <unistd.h>
#include <errno.h>

int main() {
    pthread_mutex_t mymutex;
    pthread_mutex_init(&mymutex, NULL);

    pthread_mutex_lock(&mymutex);

    int ret = pthread_mutex_destroy(&mymutex);
    if (ret != 0) {
        if (ret == EBUSY)
            printf("EBUSY\n");
        printf("Failed to destriy mutex\n");
    }

    ret = pthread_mutex_unlock(&mymutex);

    ret = pthread_mutex_destroy(&mymutex);
    if (ret == 0)
        printf("Succeeded to destroy mutex.\n");

    return 0;
}
编译并执行
ydqun@ydqhost thread % gcc 04_pthread_destroy.c                                                                            [0]
ydqun@ydqhost thread % ./a.out                                                                                             [0]
EBUSY
Failed to destriy mutex
Succeeded to destroy mutex.
在实际开发中,如果我们严格执行使用mutex的规范,如创建mutex对象后再对其加锁,加锁后才对其进行解锁操作,并在解锁后才销毁mutex,那么使用mutex接口编程时一般不用考虑它们的返回值。
对于互斥体的加锁和解锁操作我们一般使用一下三个函数:
int pthread_mutex_lock(pthread_mutex_t *mutex);
int pthread_mutex_trylock(pthread_mutex_t *mutex);
int pthread_mutex_unlock(pthread_mutex_t *mutex);
参数mutex设置为我们需要加锁和解锁的互斥体对象,上述执行成功返回0,执行失败则返回一个错误码表示具体出错的原因。具体错误码随互斥体的对象属性不同而不同。
设置互斥体对象的属性需要创建一个pthread_mutexattr_t类型的对象,和互斥体对象一样,需要使用pthread_mutexattr_init函数初始化之,当不需要这个属性对象时,记得使用pthread_mutexattr_destroy去销毁它,这两个函数的签名如下:
int pthread_mutexattr_init(pthread_mutexattr_t *attr);
int pthread_mutexattr_destroy(pthread_mutexattr_t *attr);
使用pthread_mutexattr_settype/pthread_mutexattr_gettype设置或获取你想要的属性类型:
int pthread_mutexattr_settype(pthread_mutexattr_t *attr, int type);
int pthread_mutexattr_gettype(const pthread_mutexattr_t *attr, int *type);
属性类型一般有如下取值:
- 2.1.1 PTHREAD_MUTEX_NORMAL(普通锁)
这是互斥体对象的默认属性(即上文中介绍的pthread_mutex_init函数第二个函数参数设置为NULL)。当一个线程对一个普通锁加锁以后,其他线程会阻塞在pthread_mutex_lock调用处,直到对互斥体加锁的线程释放了锁。
#include <stdio.h>
#include <pthread.h>
#include <errno.h>
#include <unistd.h>
#include <stdbool.h>

pthread_mutex_t mymutex;
int resourceNo = 0;

void *worker_thread(void *param)
{
    pthread_t threadID = pthread_self();
    printf("thread start, ThreadID: %lu\n", threadID);

    while (true) {
        pthread_mutex_lock(&mymutex);
        printf("Mutex lock, resourceNo: %d, ThreadID: %lu\n", resourceNo, threadID);
        resourceNo++;

        printf("Mutex unlock, resourceNo: %d, ThreadID: %lu\n", resourceNo, threadID);

        pthread_mutex_unlock(&mymutex);

        sleep(1);
    }

    return NULL;
}

int main() {
    pthread_mutexattr_t mutex_attr;
    pthread_mutexattr_init(&mutex_attr);
    pthread_mutexattr_settype(&mutex_attr, PTHREAD_MUTEX_NORMAL);
    pthread_mutex_init(&mymutex, &mutex_attr);

    pthread_t threadID[5];

    for (int i = 0; i < 5; i++) {
        pthread_create(&threadID[i], NULL, worker_thread, NULL);
    }

    for (int i = 0; i < 5; i++) {
        pthread_join(threadID[i], NULL);
    }

    pthread_mutex_destroy(&mymutex);
    pthread_mutexattr_destroy(&mutex_attr);

    return 0;
}
上述代码创建了五个工作线程,由于使用了互斥体保护资源resourceNo,所以每次在pthread_mutex_lock与pthread_mutex_unlock之间的输出都是连续的,一个线程必须完成临界区的工作,其他线程才有机会获取执行自己临界区代码的机会。当一个线程拿到锁后,其他线程会阻塞在pthread_mutex_lock处。
例程执行结果如下:
ydqun@ydqhost thread % gcc 05_pthread_mutex_lock.c                                            [0]
ydqun@ydqhost thread % ./a.out                                                                [0]
thread start, ThreadID: 140183417697856
Mutex lock, resourceNo: 0, ThreadID: 140183417697856
Mutex unlock, resourceNo: 1, ThreadID: 140183417697856
thread start, ThreadID: 140183426090560
Mutex lock, resourceNo: 1, ThreadID: 140183426090560
Mutex unlock, resourceNo: 2, ThreadID: 140183426090560
thread start, ThreadID: 140183409305152
Mutex lock, resourceNo: 2, ThreadID: 140183409305152
Mutex unlock, resourceNo: 3, ThreadID: 140183409305152
thread start, ThreadID: 140183400912448
Mutex lock, resourceNo: 3, ThreadID: 140183400912448
Mutex unlock, resourceNo: 4, ThreadID: 140183400912448
thread start, ThreadID: 140183392519744
Mutex lock, resourceNo: 4, ThreadID: 140183392519744
Mutex unlock, resourceNo: 5, ThreadID: 140183392519744
Mutex lock, resourceNo: 5, ThreadID: 140183417697856
Mutex unlock, resourceNo: 6, ThreadID: 140183417697856
Mutex lock, resourceNo: 6, ThreadID: 140183426090560
Mutex unlock, resourceNo: 7, ThreadID: 140183426090560
Mutex lock, resourceNo: 7, ThreadID: 140183409305152
Mutex unlock, resourceNo: 8, ThreadID: 140183409305152
Mutex lock, resourceNo: 8, ThreadID: 140183400912448
Mutex unlock, resourceNo: 9, ThreadID: 140183400912448
Mutex lock, resourceNo: 9, ThreadID: 140183392519744
Mutex unlock, resourceNo: 10, ThreadID: 140183392519744
^C
一个线程如果对一个已经加锁的普通锁再次使用pthread_mutex_lock加锁,程序会阻塞在第二次调用pthread_mutex_lock代码处。测试代码如下:
#include <pthread.h>
#include <stdio.h>
#include <errno.h>
#include <unistd.h>

int main()
{
    pthread_mutex_t mymutex;
    pthread_mutexattr_t mutex_attr;
    pthread_mutexattr_init(&mutex_attr);
    pthread_mutexattr_settype(&mutex_attr, PTHREAD_MUTEX_NORMAL);
    pthread_mutex_init(&mymutex, &mutex_attr);

    int ret = pthread_mutex_lock(&mymutex);
    printf("ret = %d\n", ret);

    ret = pthread_mutex_lock(&mymutex);
    printf("ret = %d\n", ret);

    pthread_mutex_destroy(&mymutex);
    pthread_mutexattr_destroy(&mutex_attr);

    return 0;
}
编译并使用gdb将程序运行起来,并进行调式,结果如下:
ydqun@ydqhost thread % gcc 06_pthread_lock.c -g                                               [0]
ydqun@ydqhost thread % gdb a.out                                                              [0]
GNU gdb (Ubuntu 12.1-0ubuntu1~22.04) 12.1
Copyright (C) 2022 Free Software Foundation, Inc.
License GPLv3+: GNU GPL version 3 or later <http://gnu.org/licenses/gpl.html>
This is free software: you are free to change and redistribute it.
There is NO WARRANTY, to the extent permitted by law.
Type "show copying" and "show warranty" for details.
This GDB was configured as "x86_64-linux-gnu".
Type "show configuration" for configuration details.
For bug reporting instructions, please see:
<https://www.gnu.org/software/gdb/bugs/>.
Find the GDB manual and other documentation resources online at:
    <http://www.gnu.org/software/gdb/documentation/>.

For help, type "help".
Type "apropos word" to search for commands related to "word"...
Reading symbols from a.out...
(gdb) r
Starting program: /home/ydqun/workspace/study/cppnetwork/thread/a.out
[Thread debugging using libthread_db enabled]
Using host libthread_db library "/lib/x86_64-linux-gnu/libthread_db.so.1".
ret = 0
^C
Program received signal SIGINT, Interrupt.
futex_wait (private=0, expected=2, futex_word=0x7fffffffe280) at ../sysdeps/nptl/futex-internal.h:                                                                                                                 146
146     ../sysdeps/nptl/futex-internal.h: No such file or directory.
(gdb) bt
#0  futex_wait (private=0, expected=2, futex_word=0x7fffffffe280)
    at ../sysdeps/nptl/futex-internal.h:146
#1  __GI___lll_lock_wait (futex=futex@entry=0x7fffffffe280, private=0)
    at ./nptl/lowlevellock.c:49
#2  0x00007ffff7e23002 in lll_mutex_lock_optimized (mutex=0x7fffffffe280)
    at ./nptl/pthread_mutex_lock.c:48
#3  ___pthread_mutex_lock (mutex=0x7fffffffe280) at ./nptl/pthread_mutex_lock.c:93
#4  0x00005555555552a8 in main () at 06_pthread_lock.c:17
(gdb)
从gdb的调试结果看,发现程序确实阻塞在第二个pthread_mutex_lock函数调用处。
- 2.1.2 PTHREAD_MUTEX_RECURSIVE(嵌套锁)
该属性允许同一个线程对其持有的互斥体重复加锁,每次成功调用pthread_mutex_lock一次,该互斥体对象的所引用计数就会增加一次,相反,每次成功调用pthread_mutex_unlock一次,锁引用计数就会减少一次,当锁引用计数值为0时允许其他线程获得该锁,否则其他线程调用pthread_mutex_lock时就会阻塞在调用处。
例程
#include <stdio.h>
#include <pthread.h>
#include <errno.h>
#include <unistd.h>

static pthread_mutex_t mymutex;
static pthread_mutexattr_t mutex_attr;

void *func(void *arg) {

    int ret = pthread_mutex_lock(&mymutex);
    printf("lock once, ret : %d\n", ret);

    ret = pthread_mutex_lock(&mymutex);
    printf("lock twice, ret : %d\n", ret);


    /*
    ret = pthread_mutex_unlock(&mymutex);
    printf("unlock once, ret : %d\n", ret);

    pthread_mutex_unlock(&mymutex);
    printf("unlock twice, ret : %d\n", ret);
    */

    return NULL;
}

int main()
{
    pthread_mutexattr_init(&mutex_attr);
    pthread_mutexattr_settype(&mutex_attr, PTHREAD_MUTEX_RECURSIVE);
    pthread_mutex_init(&mymutex, &mutex_attr);

    pthread_t tid;
    pthread_create(&tid, NULL, func, NULL);

    sleep(1);//确保子线程先获得锁

    printf("main thread before get lock.\n");
    int ret = pthread_mutex_lock(&mymutex);
    printf("ret = %d\n", ret);

    ret = pthread_mutex_lock(&mymutex);
    printf("ret = %d\n", ret);

    pthread_mutex_destroy(&mymutex);
    pthread_mutexattr_destroy(&mutex_attr);

    return 0;
}
编译并测试:
ydqun@ydqhost thread % gcc 06_pthread_lock.c                                                  [0]
ydqun@ydqhost thread % ./a.out                                                                [0]
lock once, ret : 0
lock twice, ret : 0
main thread before get lock.
删除子线程的注释并编译测试:
ydqun@ydqhost thread % gcc 06_pthread_lock.c                                                  [0]
ydqun@ydqhost thread % ./a.out                                                                [0]
lock once, ret : 0
lock twice, ret : 0
unlock once, ret : 0
unlock twice, ret : 0
main thread before get lock.
ret = 0
ret = 0
补充
虽然我们在上文演示了同一个线程对一个互斥体对象反复进行加锁,但实际开发中,我们需要用到这种场景的情形非常少。
- PTHREAD_MUTEX_ERRORCHECK(检错锁)
如果一个线程使用pthread_mutex_lock对已经加锁的互斥体对象再次加锁,pthread_mutex_lock会返回EDEADLK。我们验证一下对已经加锁(检错锁)的互斥体对象再次加锁会是什么行为?
#include <stdio.h>
#include <pthread.h>
#include <errno.h>
#include <unistd.h>

int main() {
    pthread_mutex_t mymutex;
    pthread_mutexattr_t mutex_attr;
    pthread_mutexattr_init(&mutex_attr);
    pthread_mutexattr_settype(&mutex_attr, PTHREAD_MUTEX_ERRORCHECK);
    pthread_mutex_init(&mymutex, &mutex_attr);

    int ret = pthread_mutex_lock(&mymutex);
    printf("ret = %d\n", ret);

    ret = pthread_mutex_lock(&mymutex);
    printf("ret = %d\n", ret);
    if (ret == EDEADLK) {
        printf("EDEADLK\n");
    }
    pthread_mutex_destroy(&mymutex);
    pthread_mutexattr_destroy(&mutex_attr);

    return 0;
}
编译并运行程序,输出结果如下:
ydqun@ydqhost thread % gcc 07_errorcheck_lock.c                                               [0]
ydqun@ydqhost thread % ./a.out                                                                [0]
ret = 0
ret = 35
EDEADLK
再来看一下,如果一个线程加锁,其他线程再次加锁的情况:
#include <pthread.h>
#include <stdio.h>
#include <errno.h>
#include <unistd.h>

pthread_mutex_t mymutex;

void *worker_thread(void *param) {
    pthread_t thread_id = pthread_self();

    printf("thread start, thread_id: %lu\n", thread_id);

    while (1) {
        int ret = pthread_mutex_lock(&mymutex);
        if (ret == EDEADLK) {
            printf("EDEADLK, thread_id: %lu\n", thread_id);
        } else {
            printf("ret = %d, thread_id: %lu\n", ret, thread_id);
        }
        sleep(1);
    }
    return NULL;
}

int main() {
    pthread_mutexattr_t mutex_attr;
    pthread_mutexattr_init(&mutex_attr);
    pthread_mutexattr_settype(&mutex_attr, PTHREAD_MUTEX_ERRORCHECK);
    pthread_mutex_init(&mymutex, &mutex_attr);

    int ret = pthread_mutex_lock(&mymutex);
    printf("ret = %d\n", ret);

    pthread_t thread_id[5];
    for (int i = 0; i < 5; i++) {
        pthread_create(&thread_id[i], NULL, worker_thread, NULL);
    }

    for (int i = 0; i < 5; i++) {
        pthread_join(thread_id[i], NULL);
    }

    pthread_mutex_destroy(&mymutex);
    pthread_mutexattr_destroy(&mutex_attr);

    return 0;
}
编译并用gdb运行程序,进入gdb,首先输入r让程序运行起来,再按键盘Ctrl+C中断程序,然后输入info thread命令,再选择进入其中一个线程,在这里我选择了编号为2的线程,所以输入t 2,最后再输入bt,就可以看到工作线程阻塞再pthread_mutex_lock函数调用处。操作及输出结果如下:
ydqun@ydqhost thread % gcc 08_errorcheck_lock.c   -g
ydqun@ydqhost thread % gdb a.out                                                                                                                                                                               [0]
GNU gdb (Ubuntu 12.1-0ubuntu1~22.04) 12.1
Copyright (C) 2022 Free Software Foundation, Inc.
License GPLv3+: GNU GPL version 3 or later <http://gnu.org/licenses/gpl.html>
This is free software: you are free to change and redistribute it.
There is NO WARRANTY, to the extent permitted by law.
Type "show copying" and "show warranty" for details.
This GDB was configured as "x86_64-linux-gnu".
Type "show configuration" for configuration details.
For bug reporting instructions, please see:
<https://www.gnu.org/software/gdb/bugs/>.
Find the GDB manual and other documentation resources online at:
    <http://www.gnu.org/software/gdb/documentation/>.

For help, type "help".
Type "apropos word" to search for commands related to "word"...
Reading symbols from a.out...
(gdb) r
Starting program: /home/ydqun/workspace/study/cppnetwork/thread/a.out
[Thread debugging using libthread_db enabled]
Using host libthread_db library "/lib/x86_64-linux-gnu/libthread_db.so.1".
ret = 0
[New Thread 0x7ffff7d87640 (LWP 4111868)]
thread start, thread_id: 140737351546432
[New Thread 0x7ffff7586640 (LWP 4111869)]
thread start, thread_id: 140737343153728
[New Thread 0x7ffff6d85640 (LWP 4111870)]
thread start, thread_id: 140737334761024
[New Thread 0x7ffff6584640 (LWP 4111871)]
thread start, thread_id: 140737326368320
[New Thread 0x7ffff5d83640 (LWP 4111872)]
thread start, thread_id: 140737317975616
^C
Thread 1 "a.out" received signal SIGINT, Interrupt.
__futex_abstimed_wait_common64 (private=128, cancel=true, abstime=0x0, op=265, expected=4111868, futex_word=0x7ffff7d87910) at ./nptl/futex-internal.c:57
57      ./nptl/futex-internal.c: No such file or directory.
(gdb) bt
#0  __futex_abstimed_wait_common64 (private=128, cancel=true, abstime=0x0, op=265, expected=4111868, futex_word=0x7ffff7d87910) at ./nptl/futex-internal.c:57
#1  __futex_abstimed_wait_common (cancel=true, private=128, abstime=0x0, clockid=0, expected=4111868, futex_word=0x7ffff7d87910) at ./nptl/futex-internal.c:87
#2  __GI___futex_abstimed_wait_cancelable64 (futex_word=futex_word@entry=0x7ffff7d87910, expected=4111868, clockid=clockid@entry=0, abstime=abstime@entry=0x0, private=private@entry=128)
    at ./nptl/futex-internal.c:139
#3  0x00007ffff7e21624 in __pthread_clockjoin_ex (threadid=140737351546432, thread_return=0x0, clockid=0, abstime=0x0, block=<optimized out>) at ./nptl/pthread_join_common.c:105
#4  0x0000555555555410 in main () at 08_errorcheck_lock.c:40
(gdb) info thread
  Id   Target Id                                   Frame
* 1    Thread 0x7ffff7d88740 (LWP 4111865) "a.out" __futex_abstimed_wait_common64 (private=128, cancel=true, abstime=0x0, op=265, expected=4111868, futex_word=0x7ffff7d87910) at ./nptl/futex-internal.c:57
  2    Thread 0x7ffff7d87640 (LWP 4111868) "a.out" futex_wait (private=0, expected=2, futex_word=0x555555558040 <mymutex>) at ../sysdeps/nptl/futex-internal.h:146
  3    Thread 0x7ffff7586640 (LWP 4111869) "a.out" futex_wait (private=0, expected=2, futex_word=0x555555558040 <mymutex>) at ../sysdeps/nptl/futex-internal.h:146
  4    Thread 0x7ffff6d85640 (LWP 4111870) "a.out" futex_wait (private=0, expected=2, futex_word=0x555555558040 <mymutex>) at ../sysdeps/nptl/futex-internal.h:146
  5    Thread 0x7ffff6584640 (LWP 4111871) "a.out" futex_wait (private=0, expected=2, futex_word=0x555555558040 <mymutex>) at ../sysdeps/nptl/futex-internal.h:146
  6    Thread 0x7ffff5d83640 (LWP 4111872) "a.out" futex_wait (private=0, expected=2, futex_word=0x555555558040 <mymutex>) at ../sysdeps/nptl/futex-internal.h:146
(gdb) t 2
[Switching to thread 2 (Thread 0x7ffff7d87640 (LWP 4111868))]
#0  futex_wait (private=0, expected=2, futex_word=0x555555558040 <mymutex>) at ../sysdeps/nptl/futex-internal.h:146
146     ../sysdeps/nptl/futex-internal.h: No such file or directory.
(gdb) bt
#0  futex_wait (private=0, expected=2, futex_word=0x555555558040 <mymutex>) at ../sysdeps/nptl/futex-internal.h:146
#1  __GI___lll_lock_wait (futex=futex@entry=0x555555558040 <mymutex>, private=0) at ./nptl/lowlevellock.c:49
#2  0x00007ffff7e23002 in lll_mutex_lock_optimized (mutex=0x555555558040 <mymutex>) at ./nptl/pthread_mutex_lock.c:48
#3  ___pthread_mutex_lock (mutex=0x555555558040 <mymutex>) at ./nptl/pthread_mutex_lock.c:93
#4  0x00005555555552ec in worker_thread (param=0x0) at 08_errorcheck_lock.c:14
#5  0x00007ffff7e1fac3 in start_thread (arg=<optimized out>) at ./nptl/pthread_create.c:442
#6  0x00007ffff7eb1850 in clone3 () at ../sysdeps/unix/sysv/linux/x86_64/clone3.S:81
(gdb)
通过以上实验,如果互斥体的属性时PTHREAD_MUTEX_ERRORCHECK,当前线程重复调用pthread_mutex_lock会直接返回EDEADLK,其他线程如果对这个互斥体再次调用pthread_mutex_lock则仍然是阻塞在函数的调用处。
2.2 Linux的信号量
- 用途:控制对共享资源的并发访问,管理资源实例的数量(如数据库连接池)。
- 类型:
- 二进制信号量:值为0或1,实现互斥锁(类似互斥锁,但有区别)。
- 计数信号量:值>=0,表示可用资源数量。
- 操作:
- P(wait): 尝试获取资源,信号量减1(若值为0则阻塞)。
- V(post): 释放资源,信号量加1(唤醒等待着)。
Linux信号量API函数如下:
#include <semaphore.h>
int sem_init(sem_t *sem, int pshared, unsigned int value);
int sem_destroy(sem_t *sem);
int sem_post(sem_t *sem);
int sem_wait(sem_t *sem);
int sem_trywait(sem_t *sem);
int sem_timewait(sem_t *sem, const struct timespec* abs_timeout);
sem_init
- 作用:用于初始化一个信号量
- 参数
- sem:传入需要初始化的信号量对象的地址;
- pshared: 表示该信号量是否可以被共享,0表示该信号量可以在同意进程的多个线程之间共享,非0表示可以在多个进行之间共享;
- value:用于设置信号量初始状态下资源的数量。
- 返回值
- sem_init函数调用成功返回0,失败返回-1。
sem_destroy
- 作用:用于销毁一个信号量
- 参数
- sem:准备销毁的信号量。
sem_post
- 作用:将信号量的资源计数递增1,并解锁该信号量对象。
- 参数
- sem:需要递增资源计数的信号量。
sem_wait
- 作用:如果信号量的资源计数值大于0,则递减信号量计数值,并立即返回;如果信号量当前值为0,则调用会被阻塞,直到信号量可以递减(其他进程或线程调用sem_post递增信号量资源计数值)。
sem_trywait
- 作用:sem_wait的非阻塞版本,即使当前信号量对象的资源计数等于0,sem_trywait也会立即返回不会阻塞调用线程,返回值为-1,错误码为EAGAIN。
sem_timedwait
- 作用:sem_wait带有超时时间的版本,在参数abs_timeout设置的时间内等待信号量对象的资源计数大于0,若大于0,则递减1,并返回0,否则则超市返回,返回值为1,并设置errno为ETIMEOUT。(abs_timeout必须设置,且不能设置为NULL,否则程序会在运行时产生崩溃。)
- 参数
- abs_timeout: 超时时间
- 该结构体的定义如下:
struct timespec {
    time_t tv_sec;   /*秒*/
    long tv_nsec;    /*纳秒,取值范围[0...999999999]*/
}
注意
1.sem_wait、sem_trywait、sem_timedwait函数将资源计数递减一时会同时锁定信号量对象,因此当资源计数为1时,如果有多个线程调用sem_wait等好书等待该信号量时,只有一个线程会被线程唤醒。sem_wait函数返回时,会释放对该信号量的锁。
2.sem_wait、sem_trywait、sem_timedwait函数调用成功后返回均为0,调用失败返回-1,可以通过错误吗errno获取失败原因。
3.sem_wait、sem_trywait、sem_timedwait可以被Linux信号中断,被信号中断后,函数立即返回,返回值为-1,错误码errno为EINTR。
4.虽然信号量函数没有以pthread_作为前缀,实际使用这个系列的函数时需要连接pthread库。
现在,我们来看一个信号量的具体示例:
#include <iostream>
#include <pthread.h>
#include <errno.h>
#include <unistd.h>
#include <list>
#include <semaphore.h>

class Task {
public:
    Task(int taskID)
    {
        this->taskID = taskID;
    }

    void doTask()
    {
        std::cout << ", handle a task, taskID: " << taskID << ", threadID: " << pthread_self() << std::endl;
    }
private:
    int taskID;
};


pthread_mutex_t mymutex;
std::list<Task*> tasks;
sem_t mysemaphore;

void *consumer_thread(void *param)
{
    Task* pTask = NULL;
    while (true)
    {
        if (sem_wait(&mysemaphore) != 0)
            continue;
        if (tasks.empty())
            continue;

        pthread_mutex_lock(&mymutex);
        pTask = tasks.front();
        tasks.pop_front();
        pthread_mutex_unlock(&mymutex);

        pTask->doTask();
        delete pTask;
    }
    return NULL;
}

void* producer_thread(void *param)
{
    int taskID = 0;
    Task* pTask = NULL;

    while (true)
    {
        pTask = new Task(taskID);
        pthread_mutex_lock(&mymutex);
        tasks.push_back(pTask);
        std::cout << "produce a task, taskID: " << taskID << ", threadID: " << pthread_self() << std::endl;
        pthread_mutex_unlock(&mymutex);
        sem_post(&mysemaphore);
        taskID++;

        sleep(1);
    }
    return NULL;
}

int main() {
    pthread_mutex_init(&mymutex, NULL);
    sem_init(&mysemaphore, 0, 0);

    pthread_t consumerThreadID[5];
    for (int i = 0; i < 5; i++) {
        pthread_create(&consumerThreadID[i], NULL, consumer_thread, NULL);
    }

    pthread_t producerThreadID;
    pthread_create(&producerThreadID, NULL, producer_thread, NULL);

    pthread_join(producerThreadID, NULL);

    for (int i = 0; i < 5; i++) {
        pthread_join(consumerThreadID[i], NULL);
    }

    sem_destroy(&mysemaphore);
    pthread_mutex_destroy(&mymutex);

    return 0;
}
上述的代码中,我们创建1个生产者线程和5个消费者线程,初始信号量计数为0,代表开始没有可执行任务,所以5个消费者均阻塞在sem_wait调用处,接着生产者每隔1秒产生一个任务,然后通过调用sem_post将信号量计数减少1,此时其中一个线程会被唤醒,然后我们从任务队列中取出任务,执行任务。
在生产者和消费者线程中,我们需要加锁来保护任务队列tasks,因为任务队列tasks存在多个线程对它进行读写,需要加锁保护。
编译并执行:
ydqun@ydqhost thread % g++ 09_semaphore.cpp                                                                                                                                                                    [0]                                                                                                                                                                                                            ydqun@ydqhost thread % ./a.out                                                                                                                                                                                 [0]
produce a task, taskID: 0, threadID: 139866116081216
, handle a task, taskID: 0, threadID: 139866149652032
produce a task, taskID: 1, threadID: 139866116081216
, handle a task, taskID: 1, threadID: 139866158044736
produce a task, taskID: 2, threadID: 139866116081216
, handle a task, taskID: 2, threadID: 139866141259328
produce a task, taskID: 3, threadID: 139866116081216
, handle a task, taskID: 3, threadID: 139866132866624
^C
2.3 条件变量
- 用途:线程间协调,等待某个条件成立(如生产者-消费者模型中的缓冲区非空)。
- 依赖:必须配个互斥锁使用,避免竞态条件。
- 操作:
- wait: 释放互斥锁并阻塞,直到条件被触发。
- signal/broadcast:唤醒一个(signal)或所有(broadcast)等待的线程。
2.3.1 为何需要条件变量?
当我们需要检查某个复合条件时,条件变量几乎时唯一的选择。比如:
- 示例:
- 等待“缓冲区非空且用户权限验证通过”
- 等待“任务队列有数据且系统未处于关闭状态”
诸如以上的复合条件问题,就需要条件变量来解决。我们可以用流程图来表示此类问题的逻辑。
![]()

2.3.2 条件变量的使用
条件变量的初始化和销毁可以使用如下API函数:
int pthread_cond_init(pthread_cond_t* cond, const pthread_condattr_t* attr);
int pthread_cond_destroy(pthread_cond_t* cond);
在 Linux 系统中 pthread_cond_t 即是条件变量的类型,当然和前面介绍的互斥体一样,你也可以使用如下方式去初始化一个条件变量:
pthread_cond_t cond = PTHREAD_COND_INITIALIZER;
等待条件变量的满足可以使用如下 API 函数:
int pthread_cond_wait(pthread_cond_t* restrict cond, pthread_mutex_t* restrict mutex);
int pthread_cond_timedwait(pthread_cond_t* restrict cond, pthread_mutex_t* restrict mutex, const struct timespec* restrict abstime);
一般情况下如果条件变量代表的条件不会满足,调用 pthread_cond_wait 的线程会一直等待下去;pthread_cond_timedwait 是 pthread_cond_wait 非阻塞版本,它会在指定时间内等待条件满足,超过参数 abstime 设置的时候后 pthread_cond_timedwait 函数会立即返回。
注意:对于参数 abstime,正如其名字暗示的,这是一个 absolute time(绝对时间),也就是说,如果你打算让函数等待 5 秒,那么你应该先得到当前系统的时间,然后加上 5 秒计算出最终的时间作为参数 abstime 的值。
调用 pthread_cond_wait 等待的线程可以被以下 API 函数唤醒:
int pthread_cond_signal(pthread_cond_t* cond);
int pthread_cond_broadcast(pthread_cond_t* cond);
pthread_cond_signal 一次唤醒一个线程,如果有多个线程调用 pthread_cond_wait 等待,具体哪个线程被唤醒是不确定的(可以认为是随机的);pthread_cond_broadcast 可以同时唤醒多个调用 pthread_cond_wait 等待的线程。前者相当于发送一次条件通知,后者广播一次条件通知。成功等待到条件信号,pthread_cond_signal 和 pthread_cond_broadcast 返回 0,反之返回非0值,具体错误原因可以通过错误码 errno 获得。
我们继续通过例程来看一下条件变量如何使用:
#include <iostream>
#include <pthread.h>
#include <unistd.h>
#include <list>
#include <semaphore.h>
#include <iostream>

class Task
{
public:
    Task(int taskID)
    {
        this->taskID = taskID;
    }

    void doTask()
    {
        std::cout << "handle a task, taskID: " << taskID << ", taskID: " << pthread_self() << std::endl;
    }
private:
    int taskID;
};

pthread_mutex_t mymutex;
std::list<Task*> tasks;
pthread_cond_t mycv;

void *consumer_thread(void *param)
{
    Task* pTask = NULL;
    while (true) {
        pthread_mutex_lock(&mymutex);
        while (tasks.empty())
        {
            pthread_cond_wait(&mycv, &mymutex);
        }

        pTask = tasks.front();
        tasks.pop_front();

        pthread_mutex_unlock(&mymutex);

        if (pTask == NULL)
        {
           continue;
        }

        pTask->doTask();
        delete pTask;
        pTask = NULL;

    }
    return NULL;
}

void *producer_thread(void *param)
{
    int taskID = 0;
    Task* pTask = NULL;

    while (true)
    {
        pTask = new Task(taskID);

        pthread_mutex_lock(&mymutex);
        tasks.push_back(pTask);
        std::cout << "produce a task, taskID: " << taskID << ", threadID: " << pthread_self() << std::endl;
        pthread_mutex_unlock(&mymutex);
        pthread_cond_signal(&mycv);

        taskID++;
        sleep(1);
    }
    return NULL;
}


int main() {
    pthread_mutex_init(&mymutex, NULL);
    pthread_cond_init(&mycv, NULL);

    pthread_t consumerThreadID[5];
    for (int i = 0; i < 5; i++) {
        pthread_create(&consumerThreadID[i], NULL, consumer_thread, NULL);
    }

    pthread_t producerThreadID;
    pthread_create(&producerThreadID, NULL, producer_thread, NULL);

    pthread_join(producerThreadID, NULL);

    for (int i = 0; i < 5; i++) {
        pthread_join(consumerThreadID[i], NULL);
    }

    pthread_cond_destroy(&mycv);
    pthread_mutex_destroy(&mymutex);

    return 0;
}
编译并运行:
ydqun@ydqhost thread % g++ 10_cond.cpp                                                                                                                                                                                            [130]
ydqun@ydqhost thread % ./a.out                                                                                                                                                                                                      [0]
produce a task, taskID: 0, threadID: 140253481674304
handle a task, taskID: 0, taskID: 140253523637824
produce a task, taskID: 1, threadID: 140253481674304
handle a task, taskID: 1, taskID: 140253515245120
produce a task, taskID: 2, threadID: 140253481674304
handle a task, taskID: 2, taskID: 140253506852416
produce a task, taskID: 3, threadID: 140253481674304
handle a task, taskID: 3, taskID: 140253498459712
produce a task, taskID: 4, threadID: 140253481674304
handle a task, taskID: 4, taskID: 140253490067008
produce a task, taskID: 5, threadID: 140253481674304
handle a task, taskID: 5, taskID: 140253523637824
produce a task, taskID: 6, threadID: 140253481674304
handle a task, taskID: 6, taskID: 140253515245120
produce a task, taskID: 7, threadID: 140253481674304
handle a task, taskID: 7, taskID: 140253506852416
^C
ydqun@ydqhost thread %
条件变量最关键的地方时要清楚记住pthread_cond_wait在条件满足与不满足时的两种行为,这是重难点:
- 当
pthread_cond_wait函数阻塞时,它会释放其绑定的互斥锁,并阻塞线程,因此调用该函数前应该对互斥体进行加锁操作。 - 当收到条件信号时,
pthread_cond_wait会返回并对其绑定的互斥锁进行加锁,因此在其下面一定有一个互斥锁解锁的操作。
条件变量的虚假唤醒(为何必须用while而非if检查条件?)
例程代码中有以下代码:
while (tasks.empty())
{
    pthread_cond_wait(&mycv, &mymutex);
}
这是因为即使生产者线程没有调用pthread_cond_signal或pthread_cond_broadcast,pthread_cond_wait也有可能被唤醒(我们称其为虚假唤醒)。所以在这种情况下唤醒条件变量时,tasks.empty()可能仍然为true,所以应当将条件放在while循环中判断,而不是只用if判断一次。
条件变量信号丢失问题
当我们调用pthread_cond_signal或pthread_cond_broad产生一个条件变量信号时,如果没有相关线程调用pthread_cond_wait去捕获该信号,那么该信号条件就会永久性地丢失了,再次调用pthread_cond_wait会导致永久性的阻塞。这种情况在设计那些条件变量信号只产生一次的代码中需要尤其注意。
2.4 读写锁
2.4.1 读写锁的应用场景
在大多数情况下,线程只是进行读取共享变量的操作,并不修改,只有在少数情况下,线程才会真正地修改共享变量的值。
对于这种青龙,读请求之间是无需同步的,它们之间的并发访问是安全的。而写请求就必须锁住读请求和其他写请求。
在实际开发中,存在读取一个共享变量的状态属性,而这个共享变量的状态值大多数情况下是不会发生改变的,只有偶尔才会出现被修改的情况,此时,如果我们使用互斥锁,那么会完全阻止读请求的并发,导致性能的损失。所以读写锁就被开发出来了。
2.4.2 读写说的使用
读写锁的初始化和销毁API如下:
#include <pthread.h>

int pthread_rwlock_init(pthread_rwlock_t* rwlock, const pthread_rwlockattr_t* attr);
int pthread_rwlock_destroy(pthread_rwlock_t* rwlock);
参数 rwlock 即你需要初始化和销毁的读写锁对象的地址, 参数 attr 用于设置读写锁的属性,一般设置未 NULL 表示使用默认属性。函数调用成功返回 0,调用失败返回非 0 值,你可以通过检测错误码 errno 获取错误原因。
当然,如果你不需要动态创建或者设置非默认属性的读写锁对象,你也可以使用如下语法初始化一个读写锁对象:
pthread_rwlock_t myrwlock = PTHREAD_RWLOCK_INITIALIZER;
下面是三个请求读锁的系统 API 接口:
int pthread_rwlock_rdlock(pthread_rwlock_t* rwlock);
int pthread_rwlock_tryrdlock(pthread_rwlock_t* rwlock);
int pthread_rwlock_timedrdlock(pthread_rwlock_t* rwlock, const struct timespec* abstime);
而下面三个请求写锁的系统 API 接口:
int pthread_rwlock_wrlock(pthread_rwlock_t* rwlock);
int pthread_rwlock_trywrlock(pthread_rwlock_t* rwlock);
int pthread_rwlock_timedwrlock(pthread_rwlock_t* rwlock, const struct timespec* abstime);
读锁用于共享模式:
- 如果当前读写锁已经被某线程以读模式占有了,其他线程调用
pthread_rwlock_rdlock(请求读锁)会立刻获得读锁; - 如果当前读写锁已经被某线程以读模式占有了,其他线程调用
pthread_rwlock_wrlock(请求写锁)会陷入阻塞。
写锁用的是独占模式: - 如果当前读写锁被某线程以写模式占有,无论调用
pthread_rwlock_rdlock还是pthread_rwlock_wrlock都会陷入阻塞,即写模式下不允许任何读锁请求和写锁请求通过,读锁请求和写锁请求都会陷入阻塞,直到占用写模式的线程释放写锁。
将上述读写锁逻辑总结成如下表格:
| 锁当前状态/其他线程请求锁类型 | 请求读锁 | 请求写锁 |
|---|---|---|
| 无锁 | 通过 | 通过 |
| 已经获得读锁 | 通过 | 阻止 |
| 已经获得写锁 | 阻止 | 阻止 |
读锁和写锁的释放都是一个接口:
int pthread_rwlock_unlock (pthread_rwlock_t* rwlock);
无论是请求读锁还是写锁,都提供了trylock的功能(pthread_rwlock_tryrdlock 和 pthread_rwlock_trywrlock),调用线程不会阻塞,而会立即返回。如果能成功获得读锁或者写锁,函数返回 0,如果不能获得读锁或写锁时,函数返回非 0 值,此时错误码 errno 是 EBUSY。
当然,无论是请求读锁还是写锁都提供了限时等待功能,如果不能获取读写锁,则会陷入阻塞,最多等待到参数 abstime 设置的时间,如果仍然无法获得锁,则返回,错误码 errno 是 ETIMEOUT。
2.4.3 读写锁的属性
上文介绍 pthread_rwlock_init 函数时,提到其第二个参数可以设置读写锁的属性,读写锁的属性类型是 pthread_rwlockattr_t ,glibc 引入了如下接口来查询和改变读写锁的类型:
#include <pthread.h>

int pthread_rwlockattr_setkind_np(pthread_rwlockattr_t* attr, int pref);
int pthread_rwlockattr_getkind_np(const pthread_rwlockattr_t* attr, int* pref);
pthread_rwlockattr_setkind_np 的第二个参数 pref 即设置读写锁的类型,其取值有如下几种:
enum
{
    //读者优先(即同时请求读锁和写锁时,请求读锁的线程优先获得锁)
    PTHREAD_RWLOCK_PREFER_READER_NP,
    //不要被名字所迷惑,也是读者优先
    PTHREAD_RWLOCK_PREFER_WRITER_NP,
    //写者优先(即同时请求读锁和写锁时,请求写锁的线程优先获得锁)
    PTHREAD_RWLOCK_PREFER_WRITER_NONRECURSIVE_NP,
    PTHREAD_RWLOCK_DEFAULT_NP = PTHREAD_RWLOCK_PREFER_READER_NP
};
当然,为了得到一个有效的 pthread_rwlockattr_t 对象,你需要调用 pthread_rwlockattr_init 函数初始化这样一个属性对象,在你不需要的时候记得使用 pthread_rwlockattr_destroy 销毁之:
int pthread_rwlockattr_init(pthread_rwlockattr_t* attr);
int pthread_rwlockattr_destroy(pthread_rwlockattr_t* attr);
以下代码片段演示了如何初始化一个写者优先的读写锁:
pthread_rwlockattr_t attr;
pthread_rwlockattr_init(&attr);
pthread_rwlockattr_setkind_np(&attr, PTHREAD_RWLOCK_PREFER_WRITER_NONRECURSIVE_NP);
pthread_rwlock_t rwlock;
pthread_rwlock_init(&rwlock, &attr);
读写锁使用示例
#include <iostream>
#include <pthread.h>
#include <unistd.h>

int resourceID = 0;
pthread_rwlock_t mymutex;

void *read_thread(void *param) {
    while (true) {
        pthread_rwlock_rdlock(&mymutex);
        //std::cout << "read thread ID: " << pthread_self() << ", resourceID: " << resourceID << std::endl;
        printf("read threadID: %lu, resourceID: %d\n", pthread_self(), resourceID);
        //睡眠1秒,模拟读线程得过程消耗了很多时间
        sleep(1);

        pthread_rwlock_unlock(&mymutex);
    }
    return NULL;
}

void *write_thread(void *param) {
    while (true) {
        //请求锁
        pthread_rwlock_wrlock(&mymutex);
        ++resourceID;
        //std::cout << "write threadID: " << pthread_self() << ", resourceID: " << resourceID << std::endl;
        printf("write threadID: %lu, resourceID: %d\n", pthread_self(), resourceID);
        sleep(1);
        pthread_rwlock_unlock(&mymutex);
    }
    return NULL;
}

int main() {
    pthread_rwlock_init(&mymutex, NULL);

    pthread_t readThreadID[5];
    for (int i = 0; i < 5; i++) {
        pthread_create(&readThreadID[i], NULL, read_thread, NULL);
    }

    pthread_t writeThreadID;
    pthread_create(&writeThreadID, NULL, write_thread, NULL);

    pthread_join(writeThreadID, NULL);

    for (int i = 0; i < 5; i++) {
        pthread_join(readThreadID[i], NULL);
    }

    pthread_rwlock_destroy(&mymutex);

    return 0;
}
例程创建了五个请求读锁得线程和一个请求写锁得线程,读写线程共享整型变量resourceID,我们编译并执行得到输出结果:
ydqun@ydqhost thread % g++ 11_rwlock.cpp                                                                                                                                                                                            [0]
.%                                                                                                                                                                                                                                      ydqun@ydqhost thread % ./a.out                                                                                                                                                                                                      [0]
read threadID: 140295672358464, resourceID: 0
read threadID: 140295680751168, resourceID: 0
read threadID: 140295663965760, resourceID: 0
read threadID: 140295655573056, resourceID: 0
read threadID: 140295647180352, resourceID: 0
read threadID: 140295672358464, resourceID: 0
read threadID: 140295680751168, resourceID: 0
read threadID: 140295663965760, resourceID: 0
read threadID: 140295655573056, resourceID: 0
read threadID: 140295647180352, resourceID: 0
read threadID: 140295672358464, resourceID: 0
read threadID: 140295680751168, resourceID: 0
read threadID: 140295663965760, resourceID: 0
read threadID: 140295655573056, resourceID: 0
read threadID: 140295647180352, resourceID: 0
^C
输出结果,我们得出结论:
- 读写锁对象mymutex使用了默认属性,其行为是请求读锁得线程优先获得锁,请求写锁的线程write_thread很难获得锁的机会,因此结果中几乎没有请求写锁线程的输出结果。
此时,如果我们将读写锁对象mymutex的属性修改成请求写锁优先,再来试一试:
**#include <iostream>
#include <pthread.h>
#include <unistd.h>
#include <stdio.h>

int resourceID = 0;
pthread_rwlock_t mymutex;

void *read_thread(void *param) {
    while (true) {
        pthread_rwlock_rdlock(&mymutex);
        //std::cout << "read thread ID: " << pthread_self() << ", resourceID: " << resourceID << std::endl;
        printf("read threadID: %lu, resourceID: %d\n", pthread_self(), resourceID);
        sleep(1);

        pthread_rwlock_unlock(&mymutex);
    }
    return NULL;
}

void *write_thread(void *param) {
    while (true) {
        //请求锁
        pthread_rwlock_wrlock(&mymutex);
        ++resourceID;
        //std::cout << "write threadID: " << pthread_self() << ", resourceID: " << resourceID << std::endl;
        printf("write threadID: %lu, resourceID: %d\n", pthread_self(), resourceID);
        sleep(1);
        pthread_rwlock_unlock(&mymutex);
    }
    return NULL;
}

int main() {
    pthread_rwlockattr_t attr;
    pthread_rwlockattr_init(&attr);
    pthread_rwlockattr_setkind_np(&attr, PTHREAD_RWLOCK_PREFER_WRITER_NONRECURSIVE_NP);
    pthread_rwlock_init(&mymutex, &attr);

    pthread_t readThreadID[5];
    for (int i = 0; i < 5; i++) {
        pthread_create(&readThreadID[i], NULL, read_thread, NULL);
    }

    pthread_t writeThreadID;
    pthread_create(&writeThreadID, NULL, write_thread, NULL);

    pthread_join(writeThreadID, NULL);

    for (int i = 0; i < 5; i++) {
        pthread_join(readThreadID[i], NULL);
    }

    pthread_rwlock_destroy(&mymutex);

    return 0;
}
编译程序并运行,输出如下:
ydqun@ydqhost thread % g++ 12_rwlock_wr_pref.cpp                                                                                                                                                                                    [1]
ydqun@ydqhost thread % ./a.out                                                                                                                                                                                                      [0]
read threadID: 140144249980480, resourceID: 0
read threadID: 140144258373184, resourceID: 0
write threadID: 140144241587776, resourceID: 1
read threadID: 140144258373184, resourceID: 1
read threadID: 140144249980480, resourceID: 1
read threadID: 140144266765888, resourceID: 1
read threadID: 140144275158592, resourceID: 1
read threadID: 140144283551296, resourceID: 1
write threadID: 140144241587776, resourceID: 2
read threadID: 140144249980480, resourceID: 2
read threadID: 140144283551296, resourceID: 2
read threadID: 140144275158592, resourceID: 2
read threadID: 140144266765888, resourceID: 2
read threadID: 140144258373184, resourceID: 2
^C
由于将 myrwlock 设置成请求写锁优先,上述结果中就出现了 write_thread 的输出结果。
3 多线程使用锁实践经验总结
3.1 减少锁的使用
实际开发中能不使用锁尽量不使用锁,当然这不是绝对的,如果使用锁也能满足性能要求,使用锁也无妨,一般使用了锁的代码会带来如下性能损失:
- 加锁和解锁操作,本身有一定的开销;
- 临界区的代码不能并发执行;
- 进入临界区的次数过于频繁,线程之间对临界区的争夺太过激烈,若线程竞争互斥量失败,就会陷入阻塞,让出 CPU,所以执行上下文切换的次数要远远多于不使用互斥量的版本。
替代锁的方式有很多,如无锁队列。
3.2 明确锁的范围
看下面这段代码:
if(hashtable.is_empty())
{
    pthread_mutex_lock(&mutex);
    htable_insert(hashtable, &elem);
    pthread_mutex_unlock(&mutex);
}
上述代码是新手典型犯错的代码,虽然调用了mutex对htable_insert进行保护,但是判断hash_table是否为空也是需要锁保护,所以这是属于临界区判断失误,正确做法应该是:
pthread_mutex_lock(&mutex);
if(hashtable.is_empty())
{
    htable_insert(hashtable, &elem);
}
pthread_mutex_unlock(&mutex);
3.3 减少锁的粒度
所谓减小锁使用粒度指的是尽量减小锁作用的临界区代码范围,临界区的代码范围越小,多个线程排队进入临界区的时间就会越短。这就类似高速公路上堵车,如果堵车的路段越长,那么后续过来的车辆通行等待时间就会越长。
我们来看两个具体的例子:
示例一
void TaskPool::addTask(Task* task)
{
    std::lock_guard<std::mutex> guard(m_mutexList);
    std::shared_ptr<Task> spTask;
    spTask.reset(task);
    m_taskList.push_back(spTask);

    m_cv.notify_one();
}
上述代码中guard锁是保护m_taskList,其他代码没有必要作为临界区的代码,所以需挪到临界区外区,修改如下:
void TaskPool::addTask(Task* task)
{
    std::shared_ptr<Task> spTask;
    spTask.reset(task);

    {
        std::lock_guard<std::mutex> guard(m_mutexList);
        m_taskList.push_back(spTask);
    }

    m_cv.notify_one();
}
示例二
void EventLoop::doPendingFunctors()
{
    std::unique_lock<std::mutex> lock(mutex_);
    for (size_t i = 0; i < pendingFunctors_.size(); ++i)
    {
        pendingFunctors_[i]();
    }
}
上述代码中 pendingFunctors_ 是被锁保护的对象,它的类型是 std::vector,这样的代码效率比较低,必须等当前线程挨个处理完 pendingFunctors_ 中的元素后其他线程才能操作 pendingFunctors_ 。修改代码如下:
void EventLoop::doPendingFunctors()
{
    std::vector<Functor> functors;

    {
        std::unique_lock<std::mutex> lock(mutex_);
        functors.swap(pendingFunctors_);
    }

    for (size_t i = 0; i < functors.size(); ++i)
    {
        functors[i]();
    }
}
修改之后的代码使用了一个局部变量 functors,然后把 pendingFunctors_ 中的内容倒换到 functors 中,这样就可以释放锁了,允许其他线程操作 pendingFunctors_ ,现在只要继续操作本地对象 functors 就可以了,提高了效率。
3.4 线程退出时一定要及时释放其持有的锁
实际开发中会因一些特殊需求创建一些临时线程,这些线程执行完相应的任务后就会退出。对于这类线程,如果其持有了锁,一定记得在线程退出时记得释放其持有的锁对象。
3.5 多线程请求锁的方向要一致,以避免死锁
假设现在有两个锁 A 和 B,线程 1 在请求了锁 A 之后再请求 B,线程 2 在请求了锁 B 后再请求锁 A,这种线程请求锁的方向就不一致了,线程 1 的方向是从 A 到 B,线程 2 的方向是从 B 到 A,多个线程请求锁的方向不一致容易造成死锁。所以建议的方式是 线程 1 和 线程 2 请求锁的方向保持一致,要么都从 A 到 B,要么都从 B 到 A。

 浙公网安备 33010602011771号