Django操作mongo数据库二(MongoClient方式)
一、基本环境
1、开发环境:
Python环境:Python 3.8.16
Django环境:4.1
2、需要安装的包
pip install pymongo
pip install mongoengine
二、开发参数配置
1、先创建一个mongoApp的应用

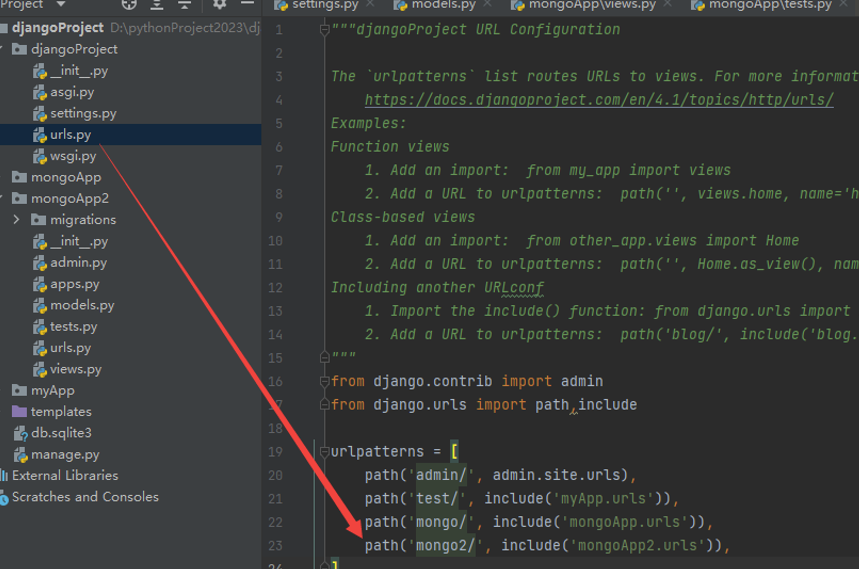
2、引入mongoApp2的urls
3、编写对mongo库的增删改查方法(核心)
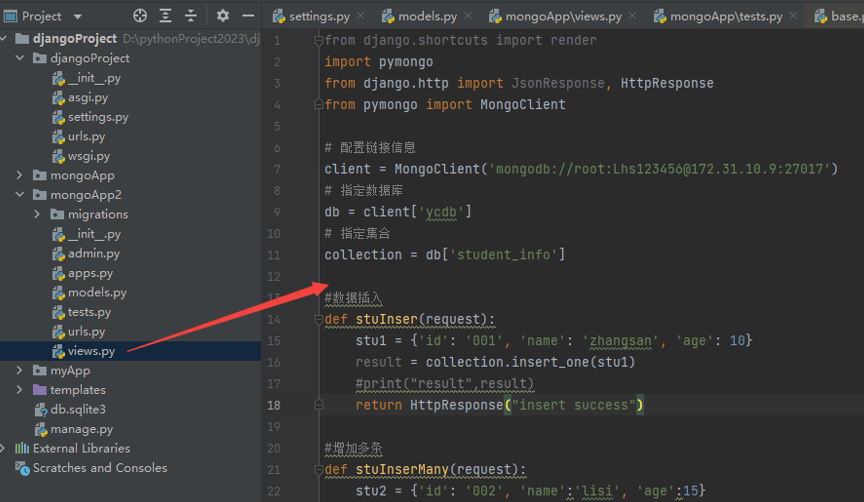
from django.shortcuts import render
import pymongo
from django.http import JsonResponse, HttpResponse
from pymongo import MongoClient

# 配置链接信息
client = MongoClient('mongodb://root:Lhs123456@172.31.10.9:27017')
# 指定数据库
db = client['ycdb']
# 指定集合
collection = db['student_info']


#数据插入
def stuInser(request):
    stu1 = {'id': '001', 'name': 'zhangsan', 'age': 10}
    result = collection.insert_one(stu1)
    #print("result",result)
    return HttpResponse("insert success")

#增加多条
def stuInserMany(request):
    stu2 = {'id': '002', 'name':'lisi', 'age':15}
    stu3 = {'id': '003', 'name':'wangwu', 'age':20}
    result = collection.insert_many([stu2, stu3])
    return HttpResponse("insert many success")


#删除多条数据
def stuDeleteMany(request):
    result = collection.delete_many({"name": "zhangsan"})
    return HttpResponse("delete many success")

# 删除一条数据
def stuDeleteOne(request):
    result = collection.delete_one({"id": "001"})
    return HttpResponse("delete single success")

#修改一条数据
#update_one,第 2 个参数需要使用$类型操作符作为字典的键名
#姓名为zhangsan的记录,age修改为22
def stuUpdateOne(request):
    condition = {'name': 'zhangsan'}
    res = collection.find_one(condition)
    res['age'] = 22
    result = collection.update_one(condition, {'$set': res})
    print(result.matched_count,result.modified_count) #获得匹配的数据条数、影响的数据条数
    return HttpResponse("update single success")

#修改多条
#update_many,所有年龄为15的name修改为xixi
def stuUpdateMany(request):
    condition = {'age': 15}
    result = collection.update_many(condition, {'$set': {'name': 'xixi'}})
    print(result)  # 返回结果是UpdateResult类型
    print(result.matched_count, result.modified_count)  # 获得匹配的数据条数、影响的数据条数
    return HttpResponse("update many success")

#查询多条
def stuSelectMany(request):
    rets = collection.find({"age": 20})
    for ret in rets:
        print(ret)

    # 查询结果按年龄升序排序
    results = collection.find().sort('age', pymongo.ASCENDING)
    print([result['age'] for result in results])
    return HttpResponse("select many success")

#查询单条
def stuSelectOne(request):
    ret = collection.find_one({'name': 'zhangsan'})
    print(ret)
    return HttpResponse("select one success")
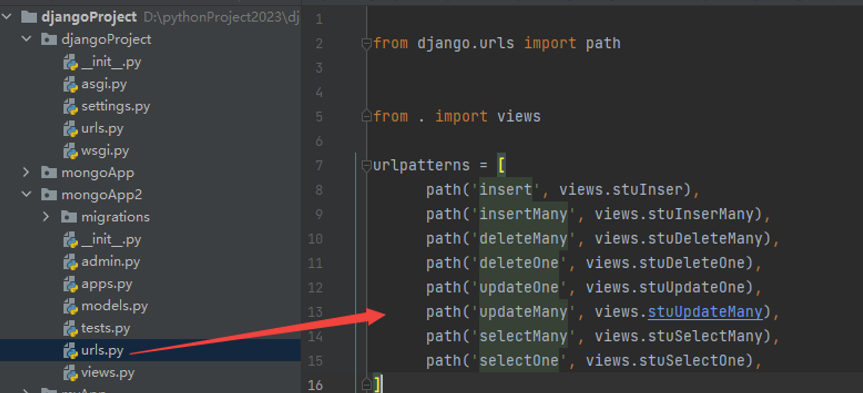
4、配置方法的访问路径

 浙公网安备 33010602011771号