创建python项目镜像,Windows Desktop Docker
1、下载安装 Windows Desktop Docker
https://www.docker.com/get-started/

2、配置镜像加速
参考:https://www.cnblogs.com/ychun/p/16460332.html
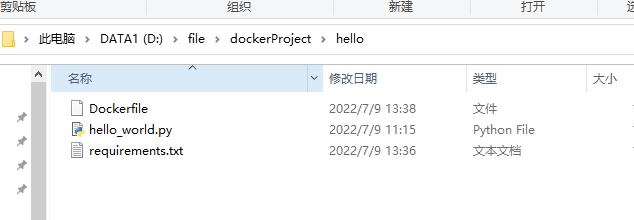
3、创建Dockerfile文件,用来存放python项目和启动文件
1)比如:我的Dockerfile文件为:hello

2) 接着创建Dockerfile文件,文件名是固定的,文件内容如下
# 基于python镜像
FROM python

# 工作目录
WORKDIR /code

# 拷贝py文件和requirements.txt文件
ADD . /code
# 也可使用以下两句实现
#COPY hello_world.py /code/
#COPY requirements.txt /code/

# 更新pip
RUN pip install --upgrade pip --index-url https://pypi.douban.com/simple

# pip安装依赖包
RUN pip install -r requirements.txt

# 执行python文件,
CMD ["python","hello.py"]
3)接着创建Dockerfile文件,文件名是固定的,文件内容如下,这里存放的是python项目需要的module
numpy==1.23.1
pycryptodome==3.15.0
pycryptodome==3.15.0
4)创建python.py,也就是程序的入口,执行文件
from time import sleep

while True:
    print('hello world')
    sleep(3)
4、构建镜像
进入项目所在文件夹,也就是创建的hello文件夹,在cmd中输入命令,hello是项目名,v1是版本号
docker build -t hello:v1 .
5、执行镜像
docker run -it hello:v1

同时注意
1)在创建Dockerfile时,文件名一定是“Dockerfile”,注意大小写。类型为文件,无后缀。
2)在Dockerfile文件中,以 # 开头的视为注释,但如果在有效指令后同一行用 # 注释,会将其作为参数处理导致报错
参考:https://blog.csdn.net/qq_14997473/article/details/107841757


【推荐】国内首个AI IDE,深度理解中文开发场景,立即下载体验Trae
【推荐】编程新体验,更懂你的AI,立即体验豆包MarsCode编程助手
【推荐】抖音旗下AI助手豆包,你的智能百科全书,全免费不限次数
【推荐】轻量又高性能的 SSH 工具 IShell:AI 加持,快人一步
· 被坑几百块钱后,我竟然真的恢复了删除的微信聊天记录!
· 【自荐】一款简洁、开源的在线白板工具 Drawnix
· 没有Manus邀请码?试试免邀请码的MGX或者开源的OpenManus吧
· 园子的第一款AI主题卫衣上架——"HELLO! HOW CAN I ASSIST YOU TODAY
· 无需6万激活码!GitHub神秘组织3小时极速复刻Manus,手把手教你使用OpenManus搭建本