HarmonyOS-基础之组件数据传递
1、父传子@State和@Prop
父组件
// 导入子组件
import Child01 from '../components/Child01'

@Entry
@Component
struct StateExample {
  @State count: number = 0
  build() {
    Column() {
      Text("计数器 count:" + this.count)
      Button('count + 1').onClick(() => {
        // 这里使用 this.count++ 会有问题
        this.count += 1
      })
      Child01({ a: this.count }).margin({ top: 10 })
    }.width('100%')
    .height(300)
  }
}
子组件
@Component
export default struct Child01 {
  // 使用@Prop定义父传子数据,数据单向流动
  @Prop a: number;
  build() {
    Column() {
      Text('我是子组件Child1')
      Text('父组件传递的count:  ' + this.a)
      Button('修改父组件count数据').onClick(() => {
        this.a -= 1
      }).margin({bottom:5})
    }.width('100%').border({ width: 1, color: Color.Black })
  }
}
注意:使用@State和@Prop进行父子组件数据通信时,数据流是单向的;父组件修改count子组件可以动态更新,而子组件无法修改父组件的数据
2、父子通信@Link($state属性)
父组件
// 导入子组件
import Child02 from '../components/Child02'

@Entry
@Component
struct StateExample {
  @State count1: number = 199

  build() {
    Column() {
      Text("计数器 count1:" + this.count1)
      Button('count1 + 1').onClick(() => {
        // 这里使用 this.count++ 会有问题
        this.count1 += 1
      }).margin({ top: 5 })
      Child02({ b: $count1 }).margin({ top: 10 })
    }.width('100%')
    .height(300)
  }
}
子组件
@Component
export default struct Child02 {
  // @Link 实现父子组件的双向流动
  @Link b:number ;
  build() {
    Column({space:10}){
      Text('我是子组件Child2')
      Text('父组件传递过来的count1:  '+this.b)
      Button('修改父组件count1数据').onClick(() => {
        this.b -= 1
      }).margin({bottom:5})
    }.width('100%')
    .border({width:1,color:Color.Pink})
  }
}

注意:此方式父子数据传递,数据流是双向的;父修改数据子跟这边,同理子修改数据父也跟着变
3、父子通信@Provide和@Consume
顾名思义:提供数据,消费数据
父组件
// 导入子组件
import Child03 from '../components/Child03'

@Entry
@Component
struct StateExample {
  @Provide money: number = 10000000

  build() {
    Column() {
      Text("父组件的钱数 money:" + this.money)
      Button('money + 3').onClick(() => {
        // 这里使用 this.count++ 会有问题
        this.money += 3
      }).margin({ top: 5 })
      Child03().margin({top:10})
    }.width('100%')
    .height(300)
  }
}
子组件
@Component
export default struct Child03 {
  @Consume money:number;
  build() {
    Column() {
      Text(`孙子组件有的money:${this.money}`)
      Button('修改money').onClick(() => {
        this.money -=1
      }).margin({top:10,bottom:10})
    }
    .width('100%')
    .border({ width: 1, color: Color.Pink })
  }
}
注意:此方式祖孙数据传递,数据流是双向的;和@Link很像,但是它可以实现祖孙之间的数据双向流动
4、组件传递引用数据类型-对象
父组件
import Child04 from '../components/Child04'
import Child05 from '../components/Child05'
import Child06 from '../components/Child06'
@Entry
@Component
struct CompoundExample {
// @State定义复杂类型
@State obj: {
a: number,
b: { c: number }
} = { a: 100, b: { c: 200 } }
// 数组类型
@State arr: [{
a: number,
b: { c: number }
}] = [{ a: 11, b: { c: 22 } }]
build() {
Column() {
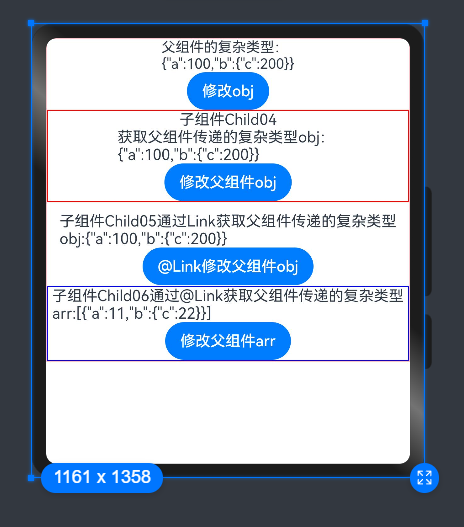
Text('父组件的复杂类型:\r\n' + JSON.stringify(this.obj)).fontSize(15)
Button('修改obj').onClick(() => {
// this.obj = {a:99,b:{c:19}} // 监听到
// this.obj.a = 199 // 监听到
this.obj.b = { c: 111 } // 监听到
// this.obj.b.c = 21 // 超过一层则无法监听到
})
Child04({ obj: this.obj })
// 通过@Link方式传递
Child05({ obj: $obj }).margin({ top: 10 })
// 数组类型传递
// Child06({ arr: this.arr })
Child06({ arr: $arr })
}.width('100%')
.border({ width: 1, color: Color.Pink })
}
}
子组件
@Component
export default struct Child04 {
  @Prop obj: {
    a: number,
    b: { c: number }
  }
  build() {
    Column() {
      Text('子组件Child04')
      Text('获取父组件传递的复杂类型:\r\n' + JSON.stringify(this.obj))
      Button('修改父组件obj').onClick(() => {
        // this.obj.a = 99 // 监听到,数据单向传递
        // this.obj.b = { c: 101 } // 监听到
        this.obj.b.c = -1 // 超过一层,无法监听

      })
    }.width('100%')
    .border({ width: 1, color: Color.Red })
  }
}
5、组件传递引用数据类型-数组
父组件
import Child04 from '../components/Child04'
import Child05 from '../components/Child05'
import Child06 from '../components/Child06'

@Entry
@Component
struct CompoundExample {

  // @State定义复杂类型
  @State obj: {
    a: number,
    b: { c: number }
  } = { a: 100, b: { c: 200 } }

  // 数组类型
  @State arr: [{
    a: number,
    b: { c: number }
  }] = [{ a: 11, b: { c: 22 } }]

  build() {
    Column() {
      Text('父组件的复杂类型:\r\n' + JSON.stringify(this.obj)).fontSize(15)
      Button('修改obj').onClick(() => {
        // this.obj = {a:99,b:{c:19}} // 监听到
        // this.obj.a = 199 // 监听到
        this.obj.b = { c: 111 } // 监听到
        // this.obj.b.c = 21 // 超过一层则无法监听到
      })
      Child04({ obj: this.obj })
      // 通过@Link方式传递
      Child05({ obj: $obj }).margin({ top: 10 })
      // 数组类型传递
      // Child06({ arr: this.arr })
      Child06({ arr: $arr })
    }.width('100%')
    .border({ width: 1, color: Color.Pink })
  }
}
子组件
@Component
export default struct Child06 {
  // @Prop arr: [{
  //   a: number,
  //   b: { c: number }
  // }]

  @Link arr: [{
    a: number,
    b: { c: number }
  }]

  build() {
    Column() {
      Text('子组件Child06通过@Link获取父组件传递的复杂类型arr:' + JSON.stringify(this.arr))
      Button('修改父组件arr').onClick((event: ClickEvent) => {
        // 替换
        // this.arr = [{ a: 101, b: { c: 202 } }]
        // 修改
        this.arr[0].a = 909 // 无效的
      })
    }.width('100%')
    .border({ width: 1, color: Color.Blue })
  }
}

 浙公网安备 33010602011771号