SpringBoot自定义starter
1、先来一个简单的案例
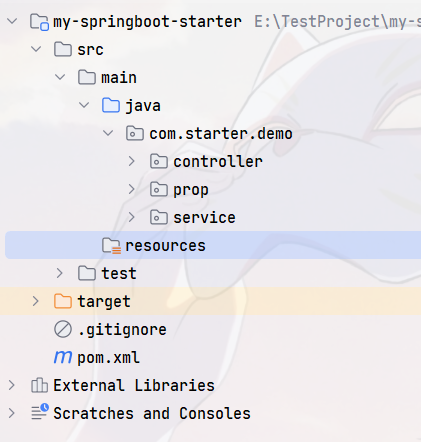
非常简单的工程结构

controller
package com.ly.demo.controller;
import com.ly.demo.service.MyStarterService;
import org.springframework.beans.factory.annotation.Autowired;
import org.springframework.web.bind.annotation.GetMapping;
import org.springframework.web.bind.annotation.RestController;
/**
* @author ly (个人博客:https://www.cnblogs.com/ybbit)
* @date 2023-06-27 21:37
* @tags 喜欢就去努力的争取
*/
@RestController
public class MyStarterController {
@Autowired
private MyStarterService myStarterService;
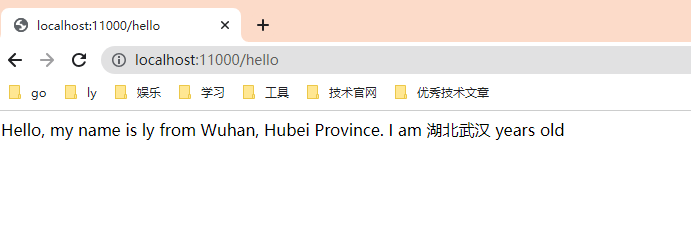
@GetMapping("/hello")
public String hello(){
return myStarterService.hello();
}
}
service
package com.ly.demo.service;
/**
* @author ly (个人博客:https://www.cnblogs.com/ybbit)
* @date 2023-06-27 21:38
* @tags 喜欢就去努力的争取
*/
public interface MyStarterService {
String hello();
}
package com.ly.demo.service.impl;
import com.ly.demo.prop.MyStarterProperties;
import com.ly.demo.service.MyStarterService;
import org.springframework.beans.factory.annotation.Autowired;
import org.springframework.stereotype.Service;
/**
* @author ly (个人博客:https://www.cnblogs.com/ybbit)
* @date 2023-06-27 21:39
* @tags 喜欢就去努力的争取
*/
@Service
public class MyStarterServiceImpl implements MyStarterService {
@Autowired
private MyStarterProperties myStarterProperties;
@Override
public String hello() {
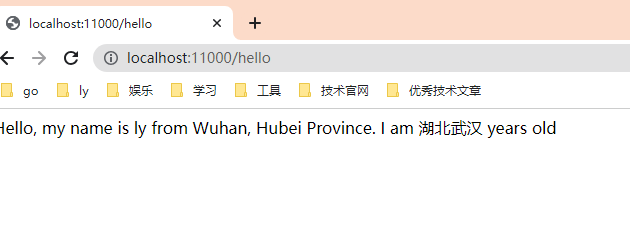
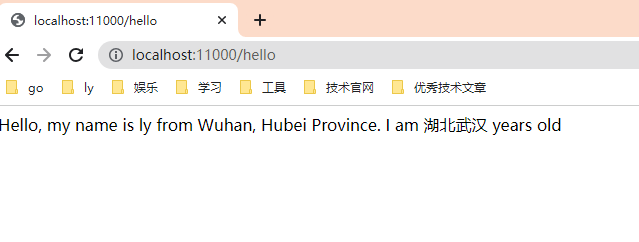
return "Hello, my name is " + myStarterProperties.getName() + " from Wuhan, Hubei Province. I am " + myStarterProperties.getAddress() + " years old";
}
}
properties
package com.ly.demo.prop;

import lombok.Data;
import org.springframework.boot.context.properties.ConfigurationProperties;
import org.springframework.context.annotation.Configuration;

/**
 * @author ly (个人博客:https://www.cnblogs.com/ybbit)
 * @date 2023-06-27  21:40
 * @tags 喜欢就去努力的争取
 */
@ConfigurationProperties(prefix = "ly")
@Configuration
@Data
public class MyStarterProperties {

    private String name;
    private Integer age;
    private String address;

}
yml
ly:
  name: ly
  age: 25
  address: 湖北武汉
2、简单抽取
我们再创建一个新的工程(注意:不要继承原来的工程),把前面旧工程中的demo文件夹全部copy过来
pom.xml
<?xml version="1.0" encoding="UTF-8"?>
<project xmlns="http://maven.apache.org/POM/4.0.0"
         xmlns:xsi="http://www.w3.org/2001/XMLSchema-instance"
         xsi:schemaLocation="http://maven.apache.org/POM/4.0.0 http://maven.apache.org/xsd/maven-4.0.0.xsd">
    <modelVersion>4.0.0</modelVersion>

    <groupId>com.ly</groupId>
    <artifactId>my-springboot-starter</artifactId>
    <version>1.0-SNAPSHOT</version>

    <parent>
        <groupId>org.springframework.boot</groupId>
        <artifactId>spring-boot-starter-parent</artifactId>
        <version>3.1.0</version>
    </parent>

    <properties>
        <maven.compiler.source>17</maven.compiler.source>
        <maven.compiler.target>17</maven.compiler.target>
        <project.build.sourceEncoding>UTF-8</project.build.sourceEncoding>
    </properties>

    <dependencies>
        <dependency>
            <groupId>org.springframework.boot</groupId>
            <artifactId>spring-boot-starter-web</artifactId>
        </dependency>

        <dependency>
            <groupId>org.projectlombok</groupId>
            <artifactId>lombok</artifactId>
            <version>1.18.28</version>
        </dependency>
    </dependencies>

</project>
别忘了install一下

然后把旧工程的demo文件夹全部删除
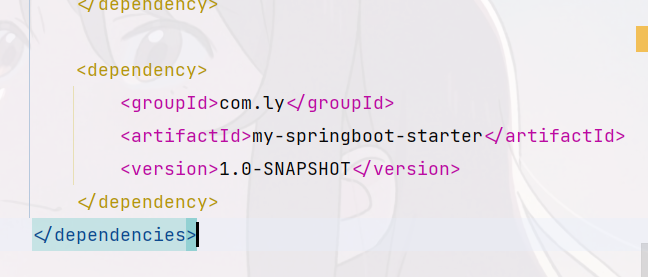
在pom.xml导入我们自定义的starter依赖
 <dependency>
	 <groupId>com.ly</groupId>
	 <artifactId>my-springboot-starter</artifactId>
	 <version>1.0-SNAPSHOT</version>
</dependency>
再来启动老项目测试一下
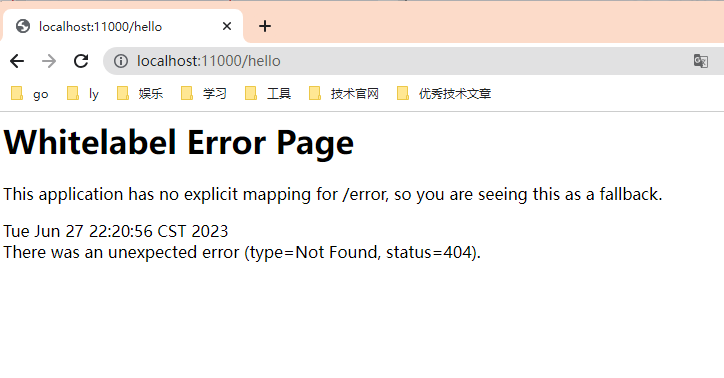
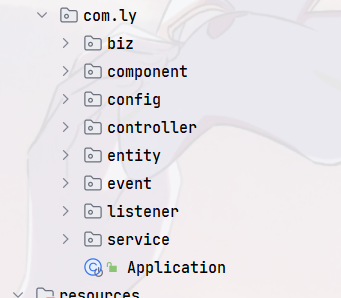
意料之中:注意我项目的目录结构
旧项目:com.ly.xxx
新项目:com.starter.demo.xxx
springboot默认扫描的是入口文件的同目录及子目录
所以,前面出现404情理之中
解决办法1:我们指定一下basePackages就好了
// 方式一:
@ComponentScans({
        @ComponentScan(basePackages = "com.starter.demo")
})
解决办法2:自定义一个xxxAutoConfiguration,然后导入我们的组件
package com.starter.demo.config;

import com.starter.demo.controller.MyStarterController;
import com.starter.demo.prop.MyStarterProperties;
import com.starter.demo.service.impl.MyStarterServiceImpl;
import org.springframework.context.annotation.Configuration;
import org.springframework.context.annotation.Import;

/**
 * @author ly (个人博客:https://www.cnblogs.com/ybbit)
 * @date 2023-06-27  22:27
 * @tags 喜欢就去努力的争取
 */
@Import({MyStarterController.class, MyStarterProperties.class, MyStarterServiceImpl.class})
@Configuration
public class StarterAutoConfiguration {
}
在旧工程中导入我们的自动配置即可
// 方式二:
@Import(StarterAutoConfiguration.class)

3、使用@EnableXxx机制
我们也可以自定义一个注解实现开启关闭我们的starter
package com.starter.demo.anno;

import com.starter.demo.config.StarterAutoConfiguration;
import org.springframework.context.annotation.Import;

import java.lang.annotation.*;

/**
 * @author ly (个人博客:https://www.cnblogs.com/ybbit)
 * @date 2023-06-27  22:33
 * @tags 喜欢就去努力的争取
 */
@Retention(RetentionPolicy.RUNTIME)
@Target(ElementType.TYPE)
@Documented
@Import(StarterAutoConfiguration.class)
public @interface EnableMyStarter {
}
然以我们再旧的工程中使用注解@EnableMyStarter导入即可
// 方式三:
@EnableMyStarter

4、使用SpringBoot的SPI机制
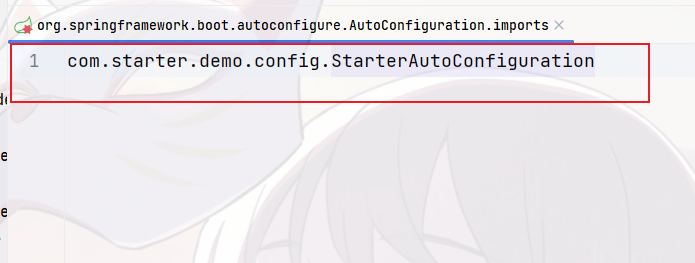
在resources下创建META-INF/spring/org.springframework.boot.autoconfigure.AutoConfiguration.imports文件,SpringBoot项目启动会自动加载我们的自动配置类
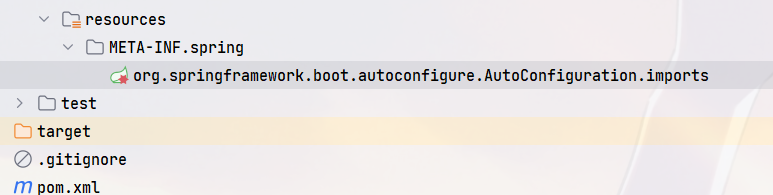
文件内容就写我们的配置类
com.starter.demo.config.StarterAutoConfiguration
测试发现依旧是没问题的

 浙公网安备 33010602011771号