《Spring Boot 实战派》--07.切面、容器、Filter、Listener、Exception、单元测试
7. Spring Boot 进阶
本章首先介绍AOP. loC、Servlet容器;然后深入讲解自动配置原理、自定义Starter、自定义注解;最后讲解异常的处理,以及如何进行单元测试。
7.1.1 认识 Spring AOP
1.什么是AOP
AOP (Aspect Oriented Program,面向切面编程)把业务功能分为核心、非核心两部分。
・核心业务功能:用户登录、增加数据、删除数据。
・非核心业务功能:性能统计、日志、事务管理。
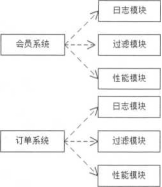
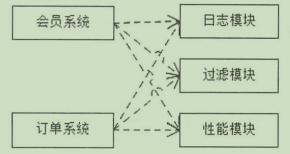
在Spring的面向切面编程(AOP)思想里,非核心业务功能被定义为切面。核心业务功能和 切面功能先被分别进行独立开发,然后把切面功能和核心业务功能“编织”在一起,这就是AOP;
未使用AOP的程序如图7-1所示,使用AOP的程序如图7-2所示。由此可见,AOP将那 些与业务无关,却为业务模块所共同调用的逻辑封装起来,以便减少系统的重复代码,降低模块间 的耦合度,利于未来的拓展和维护。这正是AOP的目的,它是Spring最为重要的功能之一,被广 泛使用。
2. AOP中的概念
- 切入点(pointcut):在哪些类、哪些方法上切入。
- 通知(advice):在方法前、方法后、方法前后做什么。
- 切面(aspect):切面=切入点+通知。即在什么时机、什么地方、做什么。
- 织入(weaving ):把切面加入对象,并创建出代理对象的过程。
- 环绕通知:AOP中最强大、灵活的通知,它集成了前置和后置通知,保留了连接点原有的 方法。
实例:用AOP方式管理日志
package com.example.demo.aop;
/**
 * Description:使之成为切面类
 */
@Aspect
/**
 * Description:把切面类加入loC容器中
 */
@Component
public class AopLog (

  private Logger logger = LoggerFactory.getLogger(this.getClass());
  //线程局部的变量,用于解决多线程中相同变量的访问冲突问题 ThreadLocal<Long> startTime = new ThreadLocal<>();
  //定义切点
  @Pointcut("execution(public * com.example..*.*(..))")
  public void aopWebLog {
  }

  @Before("aopWebLog()")
  public void doBefore(JoinPoint joinPoint) throws Throwable{
    startTime.set(System.currentTimeMillis());
    //接收到请求,记录请求内容
    ServletRequestAttributes attributes = (ServletRequestAttributes) RequestContextHolder.getRequestAttributes();
    HttpServletRequest request = attributes.getRequest();
    //记录下请求内容
    logger.info("URL :" + request.getRequestURL().toString());
    logger.info("HTTP 方法:"+ request.getMethod());
    logger.info("IP 地址:"+ request.getRemoteAddr());
    logger.info("类的方法:"+ joinPoint.getSignature().getDeclaringTypeName() +	+ joinPoint.getSignature().getName());
    logger.info("参数:"+ request.getQueryString());
  }

  @AfterReturning(pointcut = "aopWebLog()", returning = "retObject")
  public void doAfterReturning(Object retObject) throws Throwable {
    //处理完请求,返回内容
    logger.info("应答值:"+retObject);
    logger.info("费时:"+ (System.currentTimeMillis() - startTime.get()));
  }

  //方法抛出异常退岀时执行的通知
  @AfterThrowing(pointcut = "aopWebLog()", throwing = "ex")
  public void addAfterThrowingLogger(JoinPoint joinPoint, Exception ex) (
    logger.error("执行" + "异常", ex);
  }
}
代码解释如下。
• @Before:在切入点开始处切入内容。
• @After:在切入点结尾处切入内容。
• @AfterReturning:在切入点返回(return )内容之后切入内容,可以用来对处理返回值做 一些加工处理。
• @Around:在切入点前后切入内容,并控制何时执行切入点自身的内容。
• @AfterThrowing:用来处理当切入内容部分抛出异常之后的处理逻辑。
• @Aspect:标记为切面类。
• @Component:把切面类加入loC容器中,让Spring进行管理。
2.编写控制器用于测试
下面的控制器构造了一个普通的Rest风格的页面:
package com.example.demo.controller;
//省略
@RestController
public class AopLogController {
  @GetMapping("/aoptest")
  public String aVoid()(
    return "hello aop test";
  }
}
启动项目,在浏览器中访问 “http://localhost:8080/aoptest”,在控制台会输岀以下信息:
URL: http ://loca!host:8080/aoptest
HTTP 方法:GET
IP 地址:  0:0:0:0:0:0:0:1
类的方法:com.example.demo.controller.AopLogController.aVbid 参数:null
应答值: hello aop test
费时: 4
7.2 认识loC容器和Servlet容器
7.2.1认识容器
1.介绍loC容器
loC (Inversion of Control)容器,是面向对象编程中的一种设计原则,意为控制反转(也被 称为“控制反向”或“控制倒置”)。它将程序中创建对象的控制权交给Spring框架来管理,以便降 低计算机代码之间的耦合度。
控制反转的实质是获得依赖对象的过程被反转了。这个过程由自身管理变为由loC容器主动注 入。这正是loC实现的方式之一:依赖注入(dependency injection, DI),由loC容器在运行期 间动态地将某种依赖关系注入对象之中。
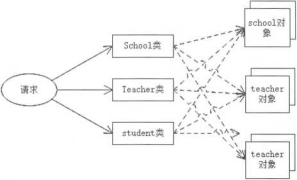
在传统编程方式中,要实现某种功能一般都需要几个对象相互作用。在主对象中要保存其他类 型对象的引用,以便在主对象中实例化对象,然后通过调用这些引用的方法来完成任务,其运行方 式如图7-3所示。
而loC容器是在主对象中设置Setter方法,通过调用Setter方法或构造方法传入所需引用(即 依赖注入),如图7-4所示。
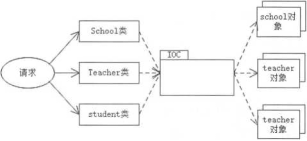
要使用某个对象,只需要从loC容器中获取需要使用的对象,不需要关心对象的创建过程,即 把创建对象的控制权反转给了 Spring框架。
2. loC的实现方法
loC的实现方法主要有两种一一依赖注入与依赖查找。
(1) 依赖注入。
loC容器通过类型或名称等信息将不同对象注入不同属性中。组件不做定位查询,只提供普通 的Java方法让容器去决定依赖关系。这是最流行的loC方法。依赖注入主要有以下几种方式。
• 设值注入(setter injection ): 让loC容器调用注入所依赖类型的对象。
• 接口注入(interface injection ): 实现特定接口,以供loC容器注入所依赖类型的对象。
•构造注入(constructor injection): 实现特定参数的构造函数,在创建对象时让loC容器 注入所依赖类型的对象。
•基于注解:通过Java的注解机制让loC容器注入所依赖类型的对象,例如,使用 @Autowired
loC是通过第三方容器来管理并维护这些被依赖对象的,应用程序只需要接收并使用loC容器 注入的对象。
()依赖查找。
在传统实现中,需要用户使用API来管理依赖的创建、查找资源和组装对象。这会对程序有侵 入性。
依赖查找则通过调用容器提供的回调接口和上下文环境来获取对象,在获取时需要提供相关的 配置文件路径、key等信息来确定获取对象的状态。依赖查找通常有两个方法一一依赖拖拽(DP) 和上下文化依赖查找(CDL )。
3.认识Servlet容器
Servlet是在javax.serlvet包中定义的一个接口。在开发Spring Boot应用程序时,使用 Controller基本能解决大部分的功能需求。但有时也需要使用Servlet,比如实现拦截和监听功能。
Spring Boot的核心控制器DispatcherServlet会处理所有的请求。如果自定义Servlet,则需 要进行注册,以便DispatcherServlet核心控制器知道它的作用,以及处理请求url-pattem
实例14:用loC管理Bean
1, 创建一个Bean
创建一个名为“User”的Bean,代码如下:
@Data
public class User implements Serializable {

  private int id;
  private String name;

}
2. 编写User的配置类
编写配置类,并实例化一个对象,代码如下:
@Configuration
public class UserConfig {

  //将此返回的值生成一个bean
  @Bean("user1")
  public User user(){
    User user = new User();
    user.setld(1);
    user.setName("longzhiran");
    return user;
  }
}
代码解释如下。
•©Configuration:用于标注配置类,让Spring来加载该类配置作为Bean的载体。在运行 时,将为这些Bean生成BeanDefinition和服务请求。
•@Bean:产生一个Bean,并交给Spring管理。目的是封装用户、数据库中的数据,一般 有 Setter、Getter 方法。
3.编写测试类
下面实例化一个User对象,然后通过上下文获取Bean对象user1,代码如下:
@RunWith(SpringRunner.class)
@SpringBootTest
public class loCTest {

  @Autowired
  private Applicationcontext applicationcontext;

  @Test
  public void testloC() (
    //实例化User对象,通过上下文获取Bean对象userl
    User user = (User) applicationContext.getBean("user1");
    //在控制台中打印User数据
    System.out.println(user);
  }
}
代码解释如下。
• @SpringBootTest: Spring Boot用于测试的注解,可指定入口类或测试环境等。
• @RunWith(SpringRunner.class):让测试运行于 Spring 测试环境。
• @Test: 一个测试方法。
• Applicationcontext:获取Spring容器中已初始化的Bean,这里是user1
运行testloC方法,在控制台输岀以下结果:
User{id=1, name=longzhiran}
7.2.3 实例15:用Servlet处理请求
使用Servlet处理请求,可以直接通过注解@WebServlet(urlPattern, descript)注册 Servlet,
然后在入口类中添加注解 @ServletComponentScan ,以扫描该注解指定包下的所有Servlet
下面实例演示如何创建一个Servlet来处理请求。
1、注册Servlet类
package com.example.demo;
/**
 * Description:添加注解逬行修饰
 */
@WebServlet(urlPatterns = "/ServletDemo02/*")
public class ServletDemo02 extends HttpServlet{
  /**
   * Description:
   * 重写doGet方法,父类的HttpServlet的doGet方法是空的,没有实现任何代码,子类需要重写此方法
   * 客户使用GET方法请求Servlet时,Web容器会调用doGet方法处理请求
   */
  @Override
  protected void doGet(HttpServletRequest req, HttpServletResponse resp) throws ServletException, lOException {
    System.out.println("doGetH);
    resp.getWriter().print("Servlet ServletDemo02");
  }
}
代码解释如下。
• @WebServlet(urlPatterns = "/ServletDemo02/*") : 属性 urlPattems 指定 WebServlet 的作用范围,这里代表ServletDemo02下的所有子路径。
• doGet :父类HttpServlet的doGet方法是空的,没有实现任何代码,子类需要重写此方法。
2、开启Servlet支持
在入口类上添加注解 @ServletComponentScan,以使Servlet生效。
package com.example.demo;
//省略
@ServletComponentScan
@SpringBootApplication
public class ServletDemoApplication {

  public static void main(String[] args) {
     SpringApplication.run(ServletDemoApplication.class, args);
  }
)
代码解释如下:
- @ComponentScan:组件扫描,可自动发现和装配一些Bean,并根据定义的扫描路径把符合扫描规则的类装配到Spring容器中。
- @SpringBootApplication : 入口类 Application 的启动注解。
在运行程序后,使用GET方法访问 http://localhost:8080/ServletDemo02/*,会返回重写 doGET方法的值:
Servlet ServletDemo02
同时,控制台会输出doGet里定义的值:
doGet
7.3、过滤器与监听器
在很多Web项目中,都会用到过滤器(Filter), 如参数过滤、防止SQ L注入、防止页面攻击、 空参数矫正、Token验证、Session验证、点击率统计等。
7.3.1认识过滤器
1.为什么要使用过滤器
在Web开发中,常常会有这样的需求:在所有接口中去除用户输入的非法字符,以防止引起业 务异常。要实现这个功能,可以有很多方法,如:
- 在前端参数传入时进行校验,先过滤掉非法字符,然后,返回用户界面提示用户重新输入。
- 后端接收前端没有过滤的数据,然后过滤非法字符。
- 利用Filter处理项目中所有非法字符。
很明显,前两种实现方法会存在重复代码,因为每个前端页面或后端都需要处理,这样会导致 代码极难维护。
如果用过滤器来实现,则只需要用过滤器对所有接口进行过滤处理。这样非常方便, 同时不会出现冗余代码。
2.使用Filter的步骤
(1 )新建类,实现Filter抽象类。
(2)重写 init、doFilter、destroy 方法
(3)在 Spring Boot 入口中添加注解@ServletComponentScan,以注册 Filter。
在重写3个方法后,还可以进一步修改request参数使用的封装方式,如:
(1 )编写 ParameterRequestWrapper 类继承 HttpServletRequestWrapper 类。
(2 )编写 ParameterRequestWrapper 类构造器。
(3 )在构造器中覆写父类构造器,并将request.getParameterMap加入子类的成员 变量。
(4 )编写addParam方法。
(5 )修改参数并调用ParameterRequestWrapper实例,并保存params
(6 )调用doFilter方法中的 FilterChain变量,以重新封装修改后的request。
详细用法见以下步骤。
(1 )编写过滤器类。
编写过滤器类,并通过注解@Order设置过滤器的执行顺序。
// 如果有多个Filter,则序号越小,越早被执行
@Order(1)
//URL过滤配置
@WebFilter(filterName = "FilterDemo", urlPatterns = "/*")
public class FilterDemo implements Filter{

  @Override
  public void init(FilterConfig filterConfig) throws ServletException {
    //init逻辑,该init将在服务器启动时被调用
  }

  @Override
  public void doFilter(ServletRequest request, ServletResponse response, FilterChain chain) throws lOException, ServletException (
    //请求(request)处理逻辑
    //请求(request)封装逻辑
    //chain 重新写回 request 和 response

  }

  @Override
  public void destroy() {
    //重写destroy逻辑,该逻辑将在服务器关闭时被调用
  }
}
(2)在 Spring Boot 入口类中注册 Filter
要在Spring Boot入口类中注册Filter, 只需要添加注解@ServletComponentScan
7.3.2 实例16:实现过滤器
下面通过实例演示如何实现过滤器。
本实例的源代码可以在“/07/Servlet”目录下找到。
1、新建拦截器类
新建拦截器类FilterDemo01, 然后在FilterDemo01类中加入以下代码:
package com.example.book.controller.example.Servlet.Filter;
//省略
//作用范围
@WebFilter(urlPattems = "/*")
public class FilterDemoOl implements Filter (

  @Override
  public void init(FilterConfig filterConfig) throws ServletException {
  }

  @Override
  public void doFilter(ServletRequest servletRequest, ServletResponse servletResponse, FilterChain filterChain) throws lOException, ServletException (
    System.out.println("拦截器”);
    filterChain.doFilter(servletRequest,servletResponse);
  }

  @Override
  public void destroy() {
  }
}
2、 在入口类中开启Servlet支持
直接在入口类加入@ServletComponentScan即可。因为通过注解@WebFilter(urlPatterns ="/*") 定义了 urlPatterns的变量值为“*”,代表“所有的路径”。
所以,用户在访问本项目下的任何路径的页面时,此过滤器都会在控制台输出以下信息:
拦截器
7.3.3 认识监听器
监听器(Listener)用于监听Web应用程序中某些对象或信息的创建、销毁、增加、修改、删 除等动作,然后做岀相应的响应处理。
当对象的状态发生变化时,服务器自动调用监听器的方法, 监听器常用于 统计在线人数、在线用户、系统加载时的信息初始化等。
Servlet中的监听器分为以下3种类型。
1、监听ServletContext、Request、Session作用域的创建和销毁
- ServletContextListener : 监听 ServeltContexto
- HttpSessionListener :监听新的 Session 创建事件。
- ServletRequestListener :监听 ServletRequest 的初始化和销毁。
2、 监听ServletContext、Requests Session作用域中属性的变化(增加、修改、删除)
- ServletContextAttributeListener :监听 Se「vlet 上下文参数的变化。
- HttpSessionAttributeListener : 监听 HttpSession 参数的变化。
- ServletRequestAttributeListener :监听 ServletRequest 参数的变化。
3、监听HttpSession中对象状态的改变(被绑定、解除绑定、钝化、活化)
- HttpSessionBindingListener :监听 HttpSession,并绑定及解除绑定。
- HttpSessionActivationListener :监听钝化和活动的 HttpSession 状态改变。
7.3.4 实例17:实现监听器
下面通过实例演示如何实现监听器。
1.创建监听类
通过注解@WebListener标注此类是监听类,代码如下:
package com.example.book.controller.example.Servlet.listener;

@WebListener
public class listenerDemo02 implements ServletContextListener{

  @Override
  public void contextlnitialized(ServletContextEvent servletContextEvent) {
    System.out.println("ServletContext 初始化');
    System.out.println(servletContextEvent.getServletContext().getServerlnfo());
  }

  @Override
  public void contextDestroyed(ServletContextEvent servletContextEvent) {
    System.out.println("ServletContext 销毁”);
  }
}
2、开启监听器Bean扫描
在入口类上,添加注解@ServletComponentScan
启动项目后,在控制台中会输出以下信息:
ServletContex 初始化
Apache Tomcat/9.0.14
如果不停止,在端口被占用的情况下重新启动,则显示以下信息:
2019-01-21 15:58:59.433 INFO 13668 --- [restartedMain] o.apache.catalina.core.StandardService: Stopping service [Tomcat]
ServletContex 销毁
7.4 自动配置
7.4.1自定义入口类
在4.1.2节已经讲解了入口类,下面来看看如何自定义入口类。
入口类默认提供了注解@SpringBootApplication,它用于标注Spring Boot项目的入口。
这 个注解被©Configurations、 @EnableAutoConfiguration 、@ComponentScan 三个注解所修饰, 即Spring Boot提供了统一的注解来替代这三个注解。
用这三个注解替代注解@SpringBootApplication也是合法的,见以下代码:
package com.example.demo;

//用下面三个注解替代注解@SpringBootApplication
@Configuration
@EnableAutoConfiguration
@ComponentScan
public class HelloWorldApplication (
  public static void main(String[| args) {
    SpringApplication.run(HelloWorldApplication.class, args);
  }
}
上面的“run”方法实例化了一个“SpringApplication”对象。执行Run方法,见以下代码:
public static ConfigurableApplicationContext run(Class<?> primarySource, String... args) (
  return run(new Class<?>[](primarysource), args);
}
如果把入口类的“run”方法改成下方的代码,则效果也是一样的:
public static void main(String[] args) {
  SpringApplication springApplication = new SpringApplication(HelloWorldApplication.class);
  //springApplication.run();
  springApplication.run(args);
)
如果需要创建多层次的"Applicationcontext",则可以使用“SpringApplicationBuilder”将 多个方法调用串联起来,然后通过“parent()和child()”来创建,见以下代码:
public static void main(String[] args) (
  new SpringApplicationBuilder()
  .sources(Parent.class)
  .child(HelloWorldApplication.class)
  .run(args);
}
如果覚得这些启动方法麻烦,还可以直接通过配置application.properties文件来添加一些自定义逻辑方案
7.4.2 自动配置的原理
7.4.1节讲解了自定义入口类。下面通过入口类来分析Spring Boot是如何实现自动配置的。
在入口类中,默认使用了注解@EnableAutoConfiguration, Spring Boot也正是通过它来完 成自动配置的。
注解@EnableAutoConfiguration借助注解@lmport,将所有符合自动配置条件的Bean都加载到loC容器中,其关键代码如下:
package org.springframework.boot.autoconfigure;
import org.springframework.core.io.support.SpringFactoriesLoader;

@Target(ElementType.TYPE)
@Retention(RetentionPolicy.RUNTIME)
@Documented
@Inherited
@AutoConfigurationPackage
@lmport(AutoConfigurationlmportSelector.class)
public @interface EnableAutoConfiguration {

  String ENABLED_OVERRIDE_PROPERTY = "spring.boot.enableautoconfiguration";
  Class<?>[] exclude() default {);
  String[] excludeName() default {};
}
从上述代码可以看到,在 EnableAutoConfiguration 类中导入了 " AutoConfigurationlmportSelector.class", Spring Boot借助它将所有符合条件的@Configuration配置都加载到loC容器中。
EnableAutoConfiguration 类还会导入 SpringFactoriesLoader 类。进入 SpringFactoriesLoader类中可以看到,其关键代码如下:
public final class SpringFactoriesLoader {
  public static final String FACTORIES_RESOURCE_LOCATION ="META-INF/spring.factories";
  private static final Log logger = LogFactory.getLog(SpringFactoriesLoader.class);
}
从上述代码可以看到,SpringFactoriesLoader从classpath中寻找所有的META-INF/spring.factories 配置文件。
具体工作原理如图:
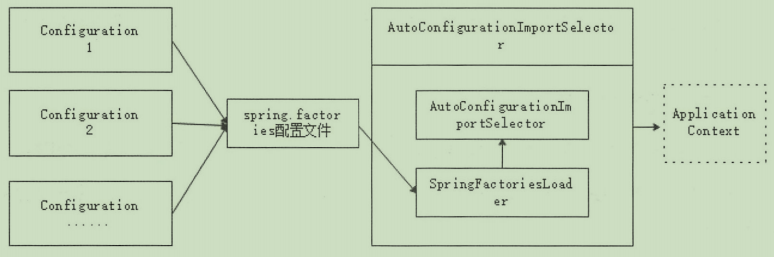
通过上面的SpringFactoriesLoader 代码和图7-5可以看出Spring Boot自动配置原理 (EnableAutoConfiguration 类)的工作原理:
它借助 AutoConfigurationlmportSelector,调用 SpringFactoriesLoader 的 loadFactoryNames 方法,从 classpath 中寻找所有的 META-INF/spring.factories配置文件(spring.factories配置了自动装配的类);
然后,再借助 AutoConfigurationlmportSelector,将所有符合条件的@Configuration 配置(如图所示的 Configuration 1 )都加载到loC容器中。
7.4.3 实例18:自定义Starter
如果Spring Boot自带的入口类不能满足要求,则可以自定义Starter。自定义Starter的步骤 如下。
自定义的Starter的项目:StarterDemo。
测试自定义Starter的项目:TestStarterDemo
1. 创建项目
在创建项目时要确定artifactld值。Spring官方的Starter通常被命名为 " spring-boot-starter-(名字)”,如 " spring-boot-starter-web"; Spring 官方建议非官方的 Starter 命名遵循 "(名字)-spring-boot-starter 的格式”,
如 " myxxx-spring-boot-starter" ;
2. 引入必要的依赖
要创建自定义的Starter需要引入以下依赖:
<dependencies>
  <dependency>
    <groupld>org.springframework.boot</groupld>
    <artifactld>spring-boot-starter-web</artifactld>
  </dependency>
  <dependency>
    <groupld>org.projectlombok</groupld>
    <artifactld>lombok</artifactld>
  </dependency>
  <dependency>
    <groupld>org.springframework.boot</groupld>
    <artifactld>spring-boot-starter-test</artifactld>
    <scope>test</scope>
  </dependency>
</dependencies>
注: 自定义的Starter是不能有启动入口的,即它只能作为工具类。所以,不要把自定义的 pom.xml写成一个可启动的项目;
3、自定义Properties类
在使用Spring官方的Starter时,可以在application.properties文件中配置参数,以覆盖默 认值。
在自定义starter 时,也可以根据需要来配置Properties类,以保存配置信息,见以下代码:
@ConfigurationProperties(prefix = "spring.mystarter")
public class MyStarterProperties {
  //参数
  private String parameter;

  public String getParameter() (
    return parameter;
  }

  public void setParameter(String parameter) (
    this.parameter = parameter;
  }
)
4、定义核心服务类
每个Starter都需要有自己的功能,所以需要定义服务类,如:
public class MyStarter {

  private MyStarterProperties myproperties;

  public MyStarter() {
  }

  public MyStarter (MyStarterProperties myproperties) {
    this.myproperties = myproperties;
  }
  public String print(){
    System.out.println("参数:" + myproperties.getParameterO);
    String s = myproperties.getParameter();
    return s;
  }
)
5、 定义自动配置类
每个Starter —般至少有一个自动配置类,命名规则为“ 名字+AutoConfiguration", 如 “MyStarterServiceAutoConfiguration”。配置方法见以下代码:
©Configuration
@EnableConfigurationProperties(MyStarterProperties.class)
/**
 * Description:在类路径classpath下有指定的类的情况下进行自动配置
 */
@ConditionalOnClass(MyStarter.class)
/**
 * Description:属性 matchlfMissing =true 时进行自动配置
 */
@ConditionalOnProperty(prefix = "spring.mystarter", value = "enabled", matchlfMissing = true)
public class MyStarterServiceAutoConfiguration {

  @Autowired
  //使用配置
  private MyStarterProperties myproperties;

  @Bean
  /**
   * Description:在容器中没有指定Bean的情况下自动配置MyStarter类
   */
  @ConditionalOnMissingBean(MyStarter.class)
  public MyStarter MyStarterService(){
    MyStarter myStarterService = new MyStarter(myproperties);
    return myStarterService;
  }
)
最后,在resources文件夹下新建目录META-INF,在目录中新建spring.factories文件, 并且在spring.factories中配置 AutoConfiguration, 加入以下代码:
org.springframework.boot.autoconfigure.EnableAutoConfiguration=\
  com.example.demo.MyStarterServiceAutoConfiguration
6、 打包发布
在完成上面的配置后,打包生成JAR文件,然后就可以像使用官方Starter那样使用了。如果 不发布到Maven中心仓库,则需要用户手动添加依赖。
7、创建用于测试Starter的项目
在创建新项目后,如果要添加自定义的Starter依赖,则不能用添加官方Starter的方法,因为 此时还未将Starter发布到Maven中心仓库。
只能通过开发工具导入此依赖JAR文件(在IDEA 中,通过单击菜单栏的 "File-->ProjectStructure--->Module--->Dependencies", 然后单击 "+” 号,选择 ”JARs or directories..."选项添加依赖)。
然后,配置application.properties文件,加入以下参数:
spring.mystarter.parameter=longzhonghua
8、使用 Starter
在需要使用的地方注入依赖即可,具体使用见以下代码:
@Autowired
private MyStarter myStarterService;

@Test
public void hello() (
  System.out.println(myStarterService.print());
}
运行上面的单元测试,则输出以下结果:
参数:longzhiran
        longzhiran
正规的Starter是一个独立的工程,可以在Maven中的新仓库注册发布,以便开发人员使用。
自定义Starter包括以下几个方面的内容。
• 自动配置文件:根据classpath是否存在指定的类来决定是否要执行该功能的自动配置。
• spring.factories:指导Spring Boot找到指定的自动配置文件。
• endpoint:包含对服务的描述、界面、交互(业务信息的查询)。
• health indicator:该Starter提供的服务的健康指标。
7.5元注解
7.5.1 了解元注解
元注解就是定义注解的注解,是Java提供的用于定义注解的基本注解,见表:
| 注 解 | 说 明 |
| @Retention | 是注解类,实现声明类Class,声明类别Category,声明扩展Extension |
| @Target | 放在自定义注解的上边,表明该注解可以使用的范围 |
| @Inherited | 允许子类继承父类的注解,在子类中可以获取使用父类注解 |
| @Documented | 表明这个注释是由Javadoc记录的 |
| @interface | 用来自定义注释类型 |
1. @Target
该注解的作用是告诉Java将自定义的注解放在什么地方,比如类、方法、构造器、变量上等。 它的值是一个枚举类型,有如下属性值。
- ElementType.CONSTRUCTOR:用于描述构造器。
- ElementType.FIELD:用于描述成员变量、对象、属性(包括enum实例)。
- ElementType.LOCAL_VARIABLE:用于描述局部变量。
- ElementType.METHOD:用于描述方法。
- ElementType.PACKAGE:用于描述包。
- ElementType.PARAMETER:用于描述参数。
- ElementType.TYPE:用于描述类、接口(包括注解类型)或enum声明。
2、@Retention
该注解用于说明自定义注解的生命周期,在注解中有三个生命周期。
- RetentionPolicy.RUNTIME:始终不会丟弃,运行期也保留该注解,可以使用反射机制读 取该注解的信息。自定义的注解通常使用这种方式。
- RetentionPolicy.CLASS:类加载时丢弃,默认使用这种方式。
- RetentionPolicy.SOURCE:编译阶段丢弃,自定义注解在编译结束之后就不再有意义, 所以它们不会写入字节码。©Override. @SuppressWarnings都属于这类注解。
3、@Inherited
该注解是一个标记注解,表明被标注的类型是可以被继承的。如果一个使用了©Inherited修饰 的Annotation类型被用于一个Class,贝U这个Annotation将被用于该Class的子类。
4、@Documented
该注解表示是否将注解信息添加在Java文档中。
5、@interface
该注解用来声明一个注解,其中的每一个方法实际上是声明了一个配置参数。方法的名称就是 参数的名称,返回值类型就是参数的类型(返回值类型只能是基本类型、Class、String、enum)。
可以通过default来声明参数的默认值。
定义注解格式见以下代码:
public @interface注解名 { 定义体 }
7.5.2 实例19:自定义注解
有时需要自定义注解来快捷地实现功能。本实例演示如何自定义注解,以及实现业务逻辑处理。
1.创建自定义注解类
@Target({ElementType.METHOD, ElementType.TYPE})
@Retention(RetentionPolicy.RUNTIME)
@Documented
@Component
public @interface MyTestAnnotation{
  String value();
}
代码解释如下:
• 使用@Target注解标注作用范围。
• 使用@Retention注解标注生命周期。
• 使用@Documented将注解信息添加在Java文档中。
2、实现业务逻辑
以AOP的方式实现业务逻辑,见以下代码:
@Aspect
@Component
public class TestAnnotationAspect {

  //拦截被TestAnnotation注解的方法;如果需要拦截指定包(package)指定规则名称的方法,则可以使用表达式 execution。..)
  @Pointcut("@annotation(com.example.demo.MyTestAnnotation)")
  public void myAnnotationPointCut() {
  }

  @Before("myAnnotationPointCut()")
  public void before(JoinPoint joinPoint) throws Throwable {
    Methodsignature sign = (Methodsignature) joinPoint.getSignature();
    Method method = sign.getMethod();
    MyTestAnnotation annotation = method.getAnnotation(MyTestAnnotation.class);
    //获取注解参数
    System.out.print("TestAnnotation 参数:"+ annotation.value。);
  }
}
3、 使用自定义注解
在需要使用的地方使用自定义注解,直接添加注解名即可,见以下代码:
@MyTestAnnotation("测试Annotation参数")
public void testAnnotation(){
}
运行上面代码,愉岀如下结果:
TestAnnotation 参数:测试 Annotation 参数
7.6 异常处理
7.6.1认识异常处理
异常处理是编程语言的机制,用来处理软件系统中出现的异常状况,增强代码可读性。
1、异常处理的必要性
异常处理用于解决一些程序无法掌控,但又必须面对的情况。例如,程序需要读取文件、连接 网络、使用数据库等,但可能文件不存在、网络不畅通' 数据库无效等情况。
为了程序能继续运行, 此时就需要把这些情况进行异常处理。异常处理的方法通常有以下几种:
- 将异常通知给开发人员、运维人员或用户。
- 使因为异常中断的程序以适当的方式继续运行,或者退出。
- 保存用户的当前操作,或者进行数据回滚。
- 释放资源。
2、异常的分类
- Error:代表编译和系统的错误,不允许捕获。
- Exception:标准Java库的方法所激发的异常,包含运行异常Runtime_Exception和非 运行异常Non_RuntimeException的子类。
- Runtime Exception:运行时异常。
- Non_RuntimeException:非运行时可检测的异常,Java编译器利用分析方法或构造方法 中可能产生的结果来检测程序中是否含有检测异常的处理程序,每个可能的可检测异常、方 法或构造方法的throws子句必须列岀该异常对应的类。
- Throw:用户自定义异常。
3、如何处理异常
(1)捕获异常。
捕获异常的格式,见以下代码:
try{

}catch{

}finally{

}
代码解释如下。
- try :在try语句中编写可能发生异常的代码,即正常的业务功能代码。如果执行完try语句 不发生异常,则执行finally语句(如果有的话)和finally后面的代码;如果发生异常,则 尝试去匹配catch语句。
- catch : 捕捉错误并处理。
- finally : finally语句是可选的,无论异常是否发生、是否匹配、是否被处理,finally都会执行。
—个try至少要有一个catch语句,或至少要有1个finally语句。finally不是用来处理异常的, 也不会捕获异常,是为了做一些清理工作,如流的关闭、数据库连接的关闭等。
(2) 抛出异常。
除用try语句处理异常外,还可以用throwx throws抛出异常。执行throw语句的地方是一个异常抛出点,后面必须是一个异常对象,且必须写在函数中。
throw 、 throws的用法见以下代码。
- throw 语法:
throw (异常对象);
- throws 语法:
语法:[(修饰符)](返回值类型)(方法名)([参数列表])[throws(异常类)]{......}
(3) 自定义异常
在应用程序的开发过程中,经常会自定义异常类,以避免使用try产生重复代码。自定义异常类 —般是通过扩展Exception类来实现的。这样的自定义异常属于检查异常(checked exception );
如果要自定义非检查异常,则需要继承RuntimeException
4、Spring Boot默认的异常处理
Spring Boot提供了一个默认处理异常的映射。在Spring Boot的Web项目中,尝试访问一 个不存在的 URL ( http://localhost:8080/longzhiran ),会得到 Spring Boot 中内置的异常处理, 如下提示:
This application has no explicit mapping for /error, so you are seeing this as a fallback.
Sat May 18 22:49:20 CST 2019
There was an unexpected error (type=Not Found, status=404).
No message available
同样的地址,如果发送的请求带有"Content-Type—>application/json;charset=UTF-8". 则返回的是JSON格式的错误结果,见以下输出结果:
{
  ”timestamp”: "2019-05-18T14:47:46.722+0000",
  "status": 404,
  "error": nNot Found",
  "message": "No message available",
  "path": "/longzhiran"
}
从上面结果可以看出,Spring Boot会根据消费者发送的“Content-Type”来返回相应的异 常内容,如果"Content-Type"是“application/json”,则返回 JSON 文件;如果"Content-Type" 是“text/html”,则返回HTML文件。
7.6.2 使用控制器通知
在编写代码时,需要对异常进行处理。进行异常处理的普通的代码是try-catch结构。但在开发业务时,只想关注业务正常的代码,对于catch语句中的捕获异常,希望交给异常捕获来处理,
不单独在每个方法中编写。这样不仅可以减少冗余代码,还可以减少因忘记写catch而出现错误的概率。
Spring正好提供了一个非常方便的异常处理方案一一控制器通知(@ControllerAdvice 或 @RestcontrollerAdvice),它将所有控制器作为一个切面,利用切面技术来实现。
通过基于@ControllerAdvice或@RestControllerAdvice的注解可以对异常进行全局统一处 理,默认对所有的Controller有效。如果要限定生效范围,则可以使用ControllerAdvice支持的限 定范围方式。
- 按注解:@ControllerAdvice(annotations = RestController.class)
- 按包名:@ControllerAdvice("org.example.controller")
- 按类型:@ControllerAdvice(assignableTypes = {Controllerinterface.class, Abstract- Controller.class})
这是ControllerAdvice进行统一异常处理的优点,它能够细粒度地控制该异常处理器针对哪些 Controller、包或类型有效。
可以利用这一特性在一个系统实现多个异常处理器,然后Controller可以有选择地决定使用哪 个,使得异常处理更加灵活、降低侵入性。
异常处理类会包含以下一个或多个方法。
- @lnitBinder:对表单数据进行绑定,用于定义控制器参数绑定规则。如转换规则、格式化 等。可以通过这个注解的方法得到WebDataBinder对象,它在参数转换之前被执行。
- @ModelAttribute:在控制器方法被执行前,对所有Controller的Model添加属性进行 操作。
- @ExceptionHandler:定义控制器发生异常后的操作,可以拦截所有控制器发生的异常。
- @ControllerAdvice:统一异常处理,通过 @ExceptionHandler(value = Exception.class) 来指定捕获的异常。"@ControllerAdvice + @ExceptionHandle "可以处理除“404” 以外的运行异常。
7.6.3实例20:自定义错误处理控制器
下面通过实例演示如何自定义错误处理控制器。
1.自定义一个错误的处理控制器
以下代码演示如何自定义一个错误的处理控制器。
package com.example.demo.Controller;

@RestController
//Spring Boot提供了默认的错误映射地址 "error"
//@RequestMapping("${server.error.path:${error.path:/error}}")
//@RequestMapping("/error")
//上面两种写法都可以

@RequestMapping("error")
//继承 Spring Boot 提供的 ErrorController
public class TestErrorController implements ErrorController {

  //必须重写getErrorPath方法。默认返回null就可以,否则报错
  @Override
  public String getErrorPath() {
    return null;
  }

  //一定要添加URL映射,指向error
  @RequestMapping
  public Map<String, Object> handleError() (
    //用Map容器返回信息
    Map<String, Object> map = new HashMap<String, Object>();
    map.put("code", 404);
    map.put("msg", ”不存在,
    return map;
  }

  /**在这里加一个能正常访问的页面,作为比较因为该页面写在一个控制器中,所以它的访问路径是
    http://localhost:8080/error/ok
  */
  @RequestMapping("/ok")
  @ResponseBody
  public Map<String, Object> noError() {
    //用Map容器返回信息
    Map<String, Object> map = new HashMap<String, Object>();
    map.put("code", 200);
    map.put("msg","正常,这是测试页面”);
    return map;
  }
}
启动项目,访问一个不存在的网址,则返回下方信息:
{ "msg":"不存在, "code":404 }
访问正确定义的映射 "http://localhost:8080/error/ok", 则返回下方正确信息:
{"msg":"正常,这是测试页面", "code":200}
2.根据请求返回相应的数据格式
如果要针对不同的请求方式,返回不同类型的响应,则需要使用下方代码:
//这里不要加consumes="text/html;charset=utf-8", 否则不成功,有部分浏览器提交的是空值
@RequestMapping( value = "".produces = "text/html;charset=UTF-8")
@ResponseBody
public String errorHtml4040(HttpServletRequest request, HttpServletResponse response) (
  //跳转到error 目录下的404模板
  return "404错误,不存在”;
}

@RequestMapping(value = "", consumes="application/json;charset=UTF-8", produces = "application/json;charset=UTF-8")
@ResponseBody
public Map<String, Object> errorJson() {
  //用Map容器返回信息
  Map<String, Object> map = new HashMap<String, Object>();
  map.put("code", 404);
  map.put("msg", "不存在");
  return map;
)
当用PC端的浏览器访问时,会返回HTML格式的“404错误” 提示,因为消费者(浏览器) 发送的 Content-Type 是 text/html。而当消费者的Content-Type 是 application/json 时,会返回JSON格式的错误提示,见下方信息:
{ "msg":"不存在","code":"404" }
7.6.4 实例21:自定义业务异常类
本实例演示如何自定义业务异常类,如何抛出异常信息。
1.自定义异常类
自定义异常类需要继承Exception (异常)类。这里继承RuntimeException,代码如下:
package com.example.demo.exception;

public class BusinessException extends RuntimeException(
  //自定义错误码
  private Integer code;
  //自定义构造器,必须输入错误码及内容

  public BusinessException(int code,String msg) {
    super(msg);
    this.code = code;
  }

  public Integer getCode() {
    return code;
  }

  public void setCode(lnteger code) {
    this.code = code;
  }
}
关于异常,在面试时被提问的概率会比较大,还可能会被问及你知道的异常类有哪些。
RuntimeException和Error是非检查异常,其他的都是检查异常。
所有方法都可以在不声明"throws”方法的情况下抛出RuntimeException及其子类,不可以在不声明的情况下抛出非RuntimeException,
即:非RuntimeException要自己写catch语句处理,如果RuntimeException不使用" try..catch "进行捕捉,则会导致程序运行中断;
2.自定义全局捕获异常
package com.example.demo.exception;

@ControllerAdvice
public class CustomerBusinessExceptionHandler (
  /**
   * 自定义业务处理业务异常类
   */
  @ResponseBody
  @ExceptionHandler(BusinessException.class)
  public Map<String, Object> businessExceptionHandler(BusinessException e) {
    Map<String, Object> map = new HashMap<String, Object>();
    map.put("code", e.getCodeO);
    map.put("message", e.getMessageO);
    //此处省略发生异常进行日志记录的代码,请在随书代码中查看
    return map;
  }
)
3.测试自定义异常类
创建控制器,以抛出BusinessException的自定义异常,代码如下:
@RestController
public class Testcontroller {

  @RequestMapping("/BusinessException")
  public String testResponseStatusExceptionResolver(@RequestParam("i") int i)(
    if (i == 0)(
      throw new BusinessException(600,"自定义业务错误");
    }
    return "success";
  }
}
启动项目,访问uhttp://localhost:8080/BusinessException?i=0,5测试异常处理情况,则拋 岀下方错误信息:
{ "code":600, "message": "自定义业务错误" }
7.7单元测试
7.7.1 了解单元测试
单元测试(unit test)是为了检验程序的正确性。一个单元可能是单个程序、类、对象' 方法 等,它是应用程序的最小可测试部件。
单元测试的必要性如下:
- 预防Bug。
- 快速定位Bug。
- 提高代码质量,减少耦合。
- 减少调试时间。
- 减少重构的风险。
7.7.2 Spring Boot 的测试库
Spring Boot提供了 spring-boot-starter-test启动器。通过它,能引入一些有用的测试库, 如下所示。
- Spring Test&Spring Boot Test : Spring Boot提供的应用程序功能集成化测试支持。
- Junit : Java应用程序单元测试标准类库。
- AssertJ : 轻量级的断言类库。
- Hamcrest :对象匹配器类库。
- Mockito : Java Mock 测试框架。
- JsonPath : JSON 操作类库。
- JSONassert :用于JSON的断言库。
1、了解回归测试框架 : JUnit
JUnit是对程序代码进行单元测试的Java框架。它用来编写自动化测试工具,降低测试的难度、 减少烦琐性,并有效避免出现程序错误。
JUnit测试是白盒测试(因为知道测试如何完成功能和完成什么样的功能)。要使用JUnit,则 只需要继承TestCase类。
JUnit提供以下注解。
- @BeforeClass:在所有测试单元前执行一次,一般用来初始化整体的代码。
- @AfterClass:在所有测试单元后执行一次,一般用来销毁和释放资源。
- @Before:在每个测试单元前执行,一般用来初始化方法。
- @After:在每个测试单元后执行,一般用来回滚测试数据。
- @Test :编写测试用例。
- @Test(timeout=1000):对测试单元进行限时。这里的“1000”表示若超过1s则超时, 测试失败。
- @Test(expected=Exception.class):指定测试单元期望得到的异常类。如果执行完成后 没有抛出指定的异常,则测试失败。
- ©Ignore:执行测试时将忽略掉此方法。如果用于修饰类,则忽略整个类。
- @RunWith:在JUnit中有很多Runner,它们负责调用测试代码。每个Runner都有特殊 功能,应根据需要选择不同的Runner来运行测试代码。
2、了解 assertThat
Unit 4.4结合Hamcrest提供了一个新的断言语法 assertThato使用assertThat的一个断言语句结合Hamcrest提供的匹配符,就可以表达全部的测试思想。
(1 ) assertThat的基本语法如下。
assertThat([value], [matcher statement])
- value:要测试的变量值。
- matcher statement:如果value值与matcher statement所表达的期望值相符,则测试成功,否则失败。简单地说,就是“两个值进行比较”。
(2) —般匹配符。
- "assertThat(testNumber, allOf( greaterThan(5), lessThan(8)));" : allOf 表示,所有条件必须都成立,测试才能通过。
- "assertThat(testNumber, anyOf( greaterrhan(5), lessThan(8)));" : anyOf 表示,所有条件只要有一个成立,则测试通过。
- "assertThat(testNumber, anything());" anything : 表示,无论什么条件,结果永远为“true”。
(3) 字符串相关匹配符。
- “assertThat(testString, is(”longzhiran”));” : is 表示,如果前面待测的 teststring 等于后 面给岀的String,则测试通过。
- "assertThat(testString, not( ”zhiranlong”));” : not 表示,如果前面待测的 String 不等于 后面给出的String,则测试通过。
- "assertThat(testSt「ing,containsString("zhiranlong”));” : containsString 表示,如果测 试的字符串teststring包含子字符串“zhiranlong”,则测试通过。
- "assertThat(testString,endsWith( "ran" ));" : endsWith 表示,如果测试的字符串 teststring以子字符串“ran”结尾,则测试通过。
- "assertThat(testString,startsWith("long"));" : startsWith 表示,如果测试的字符串 teststring以子字符串“long”开始,则测试通过。
- "assertThat(testValue,equalTo(Value) );” : equalTo 表示,如果测试的 testValue 等 TValue,则测试通过。equalTo可以用来测试数值、字符串和对象。
- “assertThat(testString,equalTolgnoringCase("Ran”));” : equalToIgnoringCase 表示, 如果测试的字符串teststring在忽略大小写的情况下等于“Ran”,则测试通过。
- "assertThat(testString,equalTolgnoringWhiteSpace(”zhiraN”));” : equalToIgnoring- WhiteSpace表示,如果测试的字符串teststring在忽略头尾的任意一个空格的情况下等于 “zhiraN”,则测试通过。字符串中的空格不能被忽略。
(4) 数值相关匹配符。
- "assertThat(testDouble,closeTo(1.0,8.8));” : closeTo 表示,如果测试的浮点型数 testDouble在1.0 ~ 8.8之间,则测试通过。
- "assertThat(testNumber,greaterThan(2.0) );” : greaterThan 表示,如果测试的数值 testNumber大于2.0,则测试通过。
- "assertThat(testNumber,lessThan(35.0));" : lessThan 表示,如果测试的数值 testNumber小于35.0,则测试通过。
- "assertThat(testNumber,greaterThanOrEqualTo(2.0) );” : greaterThanOrEqualTo
表示,如果测试的数值estNumber大于或等于2.0,则测试通过。
- “assertThat(testNumber, lessThanOrEqualTo(35.0));” : lessThanOrEqualTo 表示, 如果测试的数值testNumber小于或等于35.0,则测试通过。
(5) collection相关匹配符。
- "assertThat(mObject,hasEntry("key","value"));" : hasEntry 表示,如果测试的 Map 对象mObject含有一个键值为“key”对应元素值为“value”的Entry项,则测试通过。
- "assertThat(mObject,hasKey("key"));” : hasKey 表示,如果测试的 Map 对象 mObject 含有键值“key”,则测试通过。
- "assertThat(mObject,hasValue(”key”));” :hasValue 表示,如果测试的 Map 对象 mObject含有元素值“value”,则测试通过。
- "assertThat(iterableObject,hasltem("zhi")); : hasltem 表示,如果测试的迭代对象 iterableObject含有元素“zhi”项,则测试通过。
3、了解 Mockito
Mockito是GitHub上使用最广泛的Mocking框架。它提供简洁的API用来测试。Mockito简 单易学、可读性强、验证语法简洁。
与JUnit结合使用,Mockito框架可以创建和配置Mock对象。
4、了解 JSONPath
JSONPath是xPath在JSON中的应用。它的数据结构通常不一定有根元素,它用一个抽象 的名字“$”来表示最外层对象,而且允许使用通配符“*”表示所有的子元素名和数组索引。
JSONPath表达式可以使用符号解析JSON,如以下代码:
$.person.card[0].num
或使用“[]”符号,如以下代码:
$['person']['card'][0]['num']
5、测试的回滚
在单元测试中可能会产生垃圾数据,可以开启事务功能进行回滚一一在方法或类头部添加注解 ©Transactional即可。用法见以下代码:
@RunWith(SpringRunner.class)
@SpringBootTest
©Transactional
public class CardRepositoryTest (

  @Autowired
  private CardRepository cardRepository;

  @Test
  public void testRol旧ank() {
    //查询操作
    Card card=new Card();
    card.setNum(3);
    cardRepository.save(card);
  }
}
上述代码在类上添加了注解©Transactional,测试完成后就会回滚,不会产生垃圾数据。如果 要关闭回滚,则只要加上注解@Rollback(false)即可。
如果使用的数据库是MySQL,有时会发现加了注解@Transactional也不会回滚,多数情况下是因为默认引擎不是InnoDB。,
7.7.3快速创建测试单元
在Spring Boot中进行单元测试很简单,它已经自动添加好了 Test的Starter依赖,见下方依 赖元素:
<dependency>
  <groupld>org.springframework.boot</groupld>
  <artifactld>spring-boot-starter-test</artifactld>
  <scope>test</scope>
</dependency>
只要在“src/test/java”目录下新建一个测试类即可,格式见以下代码:
package com.example.demo;

@RunWith(SpringRunner.class)
public class test {

  @Test
  public void contextLoads() {
    //测试代码
  }
}
代码解释如下。
- @SpringBootTest :是Spring Boot用于测试的注解,可指定入口类或测试环境等。
- @RunWith(SpringRunner.class) : 让测试运行于 Spring 的测试环境。
- @Test:表示为一个测试单元。在要测试的方法上加注解@Test,然后鼠标右击“Run” (或单击其左边的绿色三角箭头)即可进行测试。
除用这种方式创建测试单元外,还可以通过IDEA的快捷键快速完成创建。
在IDEA中,快速创建测试单元主要有以下3种方式:
- 通过快捷键Ctrl+Shift+T (在Windows系统中)来创建测试。
- 单击菜单栏中的"NavigatoLTest”命令。
- 在方法处单击鼠标右键,在弹出的菜单中选择“GoTofTest”命令。
接下来运行测试。直接单击"测试”按钮,或将鼠标光标放在对应的方法上,单击鼠标右键, 在弹出的菜单中选择“Run xxx”命令,如图7-6所示。
7.7.4 实例22: Controller层的单元测试
下面通过实例演示如何在控制器中使用MockMvc进行单元测试。
1.创建一个用于测试的控制器
在控制器中写入以下代码:
package com.example.demo.controller;

@RestController
public class HelloController(

  @RequestMapping("/hello")
  public String hello(String name)(
    return "hello " + name;
  }
}
代码解释如下。
• @RestController:代表这个类是REST风格的控制器,返回JSON/XML类型的数据。
• @RequestMapping:用于配置URL和方法之间的映射。可用在类和方法上。用在方法上, 则其路径会继承用在类上的路径。
2.编写测试
package com.example.demo.controller;

@SpringBootTest
@RunWith(SpringRunner.class)
public class HelloControllerTest {
  〃启用Web上下文
  @Autowired
  private WebApplicationContext webApplicationContext;
  private MockMvc mockMvc;
  ©Before
  public void setUp() throws Exception!
    〃使用上下文构建MockMvc
    mockMvc = MockMvcBuilders.webAppContextSetup(webApplicationContext).build();
  }

  @Test
  public void hello() throws Exception {
    〃得到MvcResult自定义验证,执行请求
    MvcResult mvcResult= mockMvc.perform(MockMvcRequestBuilders.get("/hello")
    //.postC'/hello")发送 POST 请求
    .contentType(MediaType.APPLICATION_JSON_UTF8)
    〃传入参数
    .param("name","longzhonghua")
    //.accept(MediaType.TEXT_HTML_VALUE))
    //接收的类型
    ,accept(MediaType.APPLICATION_JSON_UTF8))
    //等同于 Assert.assertEquals(200,status);
    〃判断接收到的状态是否是200
    .andExpect(MockMvcResultMatchers.status().isOk())
    〃等同于 Assert.assertEquals("hello longzhonghua",content);
    .andExpect(MockMvcResultMatchers.content().string("hello longzhonghua")) .andDo(MockMvcResultHandlers.printO)
    〃返回 MvcResult
    .andRetum();
    〃得到返回代码
    int status=mvcResult.getResponse().getStatus();
    〃得到返回结果
    String content=mvcResult.getResponse().getContentAsString();
    //断言,判断返回代码是否正确

    Assert.assertEquals(200,status);
    〃断言,判断返回的值是否正确
    Assert.assertEquals("hello longzhonghua",content);
  }
}
代码解释如下:
• @SpringBootTest:是Spring Boot用于测试的注解,可指定入口类或测试环境等。
• @RunWith(SpringRunner.class):让测试运行于 Spring 的测试环境。
• @Test:表示一个测试单元。
• WebApplicationContext:启用Web ±下文,用于获取Bean中的内容。
• @Before:表示在测试单元执行前执行。这里使用上下文构建MockMvc
• MockMvcRequestBuilders.get:指定请求方式是GET。一般用浏览器打开网页就是GET 方式。
测试代码不能写在上面的控制器中,而需要新建测试类。
运行测试,在控制器中会输岀以下结果:
MockHttpServletRequest:
HTTP Method = GET
Request URI = /hello
Parameters = (name=[longzhonghua])
Headers = [Accept:"application/json;charset=UTF-8"]
Body = <no character encoding set>
Session Attrs = {)
Handler:
Type = com.example.demo.controller.HelloController
Method = public java.Iang.String com.example.demo.controller.HelloController.helloOava.lang.String) Async:
Async started = false
Async result = null
Resolved Exception:
Type = null
ModelAndView:
View name = null
View = null
Model = null
FlashMap:
Attributes = null
MockHttpServletResponse:
Status = 200
Error message 二 null
Headers = [Content-Type:"application/json;charset=UTF-8", Content-Length:"18"]
Content type = application/json;charset=UTF-8
Body = hello longzhonghua
Forwarded URL = null
Redirected URL = null
Cookies = □
在上述结果中可以看到访问方式、路径、参数、访问头、ModelAndView、FlashMap、MockHttpServletResponse
7.7.5实例23: Service层的单元测试
本实例演示如何在Service中使用Assert进行单元测试。
1、创建实体类
先创建一个实体类用于测试。
package com.example.demo.entity;

@Getter
©Setter
public class User{

  private String name;
  private int age;
}
2、创建服务类
这里用@Service来标注服务类,并实例化了一个User对象,见以下代码。
package com.example.demo.service;

©Service
public class UserService {
  public User getUserlnfo(){
    User user = new User();
    user.setName("zhonghua");
    user.setAge(18);
    return user;
  }
}
3.编写测试
编写测试用于比较实例化的实体User和测试预期值是否一样,见以下代码:
package com.example.demo.service;

//表明要在Spring测试环境中运行
@RunWith(SpringRunner.class)
//启动整个Spring Boot工程
@SpringBootTest
public class UserServiceTest {

  @Autowired
  private UserService userService;

  @Test
  public void getUserlnfo() (
    User user = userService.getUserlnfo();
    //比较实际的值和用户预期的值是否一样
    Assert.assertEquals(18,user.getAge());
    Assert.assertThat(user.getName(), is("zhonghualong"));
  }
)
运行测试,结果显示出错,表示期望的值和实际值不一样,如下所示。
java.Iang.AssertionError:
Expected: is "zhonghualong"
but: was "zhonghua"
Expected :zhonghualong
Actual :zhonghua
7.7.6实例24: Repository层的单元测试
Repository层主要用于对数据逬行增加、删除、修改和查询操作。它相当于仓库管理员的进出 货操作。
下面通过实例演示如何在Repository中进行单元测试,以及使用@Transactional注解进行回 滚操作。
package com.example.demo.repository;
//表明要在Spring测试环境中运行
@RunWith(SpringRunner.class)
//启动整个Spring Boot工程
@SpringBootTest
©Transactional
public class CardRepositoryTest {

  @Autowired
  private CardRepository cardRepository;

  @Test
  public void testQuery(){
    //查询操作
    List<Card> list = cardRepository.findAII();
    for (Card card : list) {
      System.out.println(card);
    }
  }

  @Test
  public void testRollBank() {
    //查询操作
    Card card=new Card();
    card.setNum(3);
    cardRepository.save(card);
  }
}
代码解释如下。
- @Transactional:即回滚的意思。所有方法执行完之后,回滚成原来的样子。
- testRollBank方法:执行添加一条记录。如果开启T@Transactional,则会在添加之后进 行回滚,删除刚添加的数据,如果注释掉©Transactional,则完成添加后不回滚。
大家在 测试时可以尝试去掉和添加©Transactional状态下的不同效果。这里的@Transactional 放在类上,也可以加在方法上以作用于方法。
运行testRollBank测试,可以看到控制台中输出以下信息:
Hibernate: insert into cardtestjpa (num) values (?)
2019-04-28 16:08:51.616 INFO 6756 [ main] o.s.t.c.transaction.TransactionContext: Rolled back
transaction for test:
上述结果表示先添加,然后操作被立即回滚了

 浙公网安备 33010602011771号