springboot系列02:web特性
Web 开发:
常用的 json 输出、filters、property、log等
1、Json 接口开发
使用 Spring 开发项目,需要提供 json 接口时需要做哪些配置?
添加 jackjson 等相关 jar 包
配置 Spring Controller 扫描
对接的方法添加 @ResponseBody
package com.example.demo.controller;

import com.example.demo.model.Customer;
import org.springframework.web.bind.annotation.RequestMapping;
import org.springframework.web.bind.annotation.RestController;

@RestController
public class CustomerController {

    @RequestMapping("/getCustomer")
    public Customer getCustomer() {
        Customer customer=new Customer();
        customer.setUserName("张亮");
        customer.setPassWord("13128600812");
        return customer;
    }
}
上一篇有介绍的!
package com.example.demo.model;
public class Customer {
    private String userName;
    private String passWord;

    public String getUserName() {
        return userName;
    }

    public void setUserName(String userName) {
        this.userName = userName;
    }

    public String getPassWord() {
        return passWord;
    }

    public void setPassWord(String passWord) {
        this.passWord = passWord;
    }
}
2、自定义Filter
在项目中常常会使用 filters 用于录调用日志、排除有 XSS 威胁的字符、执行权限验证等,Springboot 自动添加了OrderedCharacterEncodingFilter 和 HiddenHttpMethodFilter,并且可以自定义 Filter
两个步骤:
实现 Filter 接口,实现 Filter 方法
添加
@Configuration注解,将自定义Filter加入过滤链package com.example.demo; import org.springframework.boot.web.servlet.FilterRegistrationBean; import org.springframework.context.annotation.Bean; import org.springframework.context.annotation.Configuration; import javax.servlet.*; import javax.servlet.http.HttpServletRequest; import java.io.IOException; @Configuration public class WebConfiguration { @Bean public FilterRegistrationBean testFilterRegistration() { FilterRegistrationBean registration = new FilterRegistrationBean(); registration.setFilter(new MyFilter()); registration.addUrlPatterns("/*"); registration.addInitParameter("paramName", "paramValue"); registration.setName("MyFilter"); registration.setOrder(1); return registration; } public class MyFilter implements Filter { @Override public void destroy() { } @Override public void doFilter(ServletRequest srequest, ServletResponse sresponse, FilterChain filterChain) throws IOException, ServletException { HttpServletRequest request = (HttpServletRequest) srequest; System.out.println("this is MyFilter,url :"+request.getRequestURI()); filterChain.doFilter(srequest, sresponse); } @Override public void init(FilterConfig arg0) throws ServletException { } } }浏览器访问 http://localhost:8080/getCustomer
3、自定义Property
在 Web 开发的过程中,我经常需要自定义一些配置文件,如何使用?配置在
application.properties
com.demo.title=张亮
com.demo.phone=13128600812
com.demo.description=分享生活和技术
数据模型:
package com.example.demo.model;

import org.springframework.beans.factory.annotation.Value;
import org.springframework.stereotype.Component;

@Component
@PropertySource(value="classpath:application.properties")
public class Properties {

    @Value("${com.demo.title}")
    private String title;
    @Value("${com.demo.phone}")
    private String phone;
    @Value("${com.demo.description}")
    private String description;

    public String getTitle() {
        return title;
    }

    public void setTitle(String title) {
        this.title = title;
    }

    public String getPhone() {
        return phone;
    }

    public void setPhone(String phone) {
        this.phone = phone;
    }

    public String getDescription() {
        return description;
    }

    public void setDescription(String description) {
        this.description = description;
    }
}
请求控制类:
package com.example.demo.controller;

import com.example.demo.model.Customer;
import com.example.demo.model.Properties;
import org.springframework.beans.factory.annotation.Autowired;
import org.springframework.beans.factory.annotation.Value;
import org.springframework.web.bind.annotation.RequestMapping;
import org.springframework.web.bind.annotation.RestController;

@RestController
public class CustomerController {

    @Autowired
    private  Properties properties;

    @RequestMapping("/getProperties")
    public Properties getProperties() {
        return properties;
    }

}
浏览器访问 http://localhost:8080/getProperties
{"title":"张亮","phone":"13128600812","description":"分享生活和技术"}若出现乱码情况,可以有以下几种解决方法
将application.properites的文件类型修改为UTF-8的编码类型
#application.properites设置spring-boot 编码格式
banner.charset=UTF-8
server.tomcat.uri-encoding=UTF-8
spring.http.encoding.charset=UTF-8
spring.http.encoding.enabled=true
spring.http.encoding.force=true
spring.messages.encoding=UTF-8
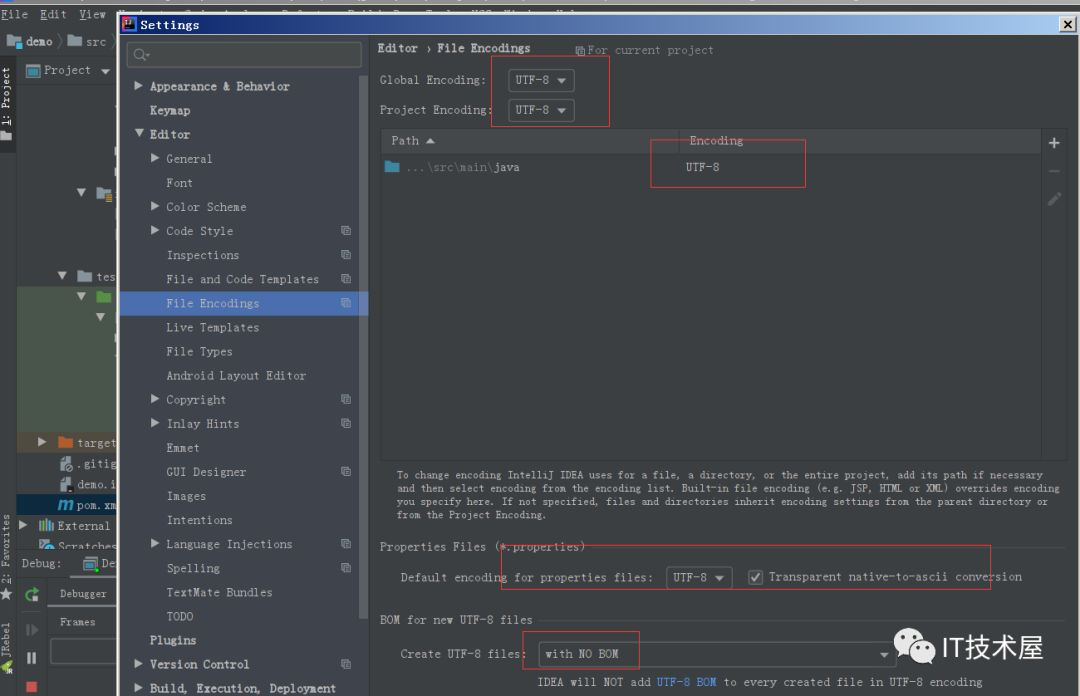
idea中File Encodings的Transparent native-to-ascii conversion为true,
File -> Settings -> Editor -> File Encodings
将Properties Files (*.properties)下的Default encoding for properties files设置为UTF-8,将Transparent native-to-ascii conversion前的勾选上
4、log配置
logging.file = logs/demo.log
logging.pattern.console = %d{yyyy-MMM-dd HH:mm:ss.SSS} %-5level [%thread] %logger{15} - %msg%n
logging.level.com.favorites = DEBUG
logging.level.org.springframework.web = INFO
logging.level.org.hibernate = DEBUG
-
会在项目路径下创建文件 logs/demo.log ,也可以配置绝对路径;
-
logging.level后面可以根据包路径配置不同资源的 log 级别

 浙公网安备 33010602011771号