4 组件,插槽,过滤器
1、声明与挂载组件
子组件一定要在父组件之前进行注册,否则无法使用
使用组件三步:
1、声明组件
2、挂载组件
3、使用组件


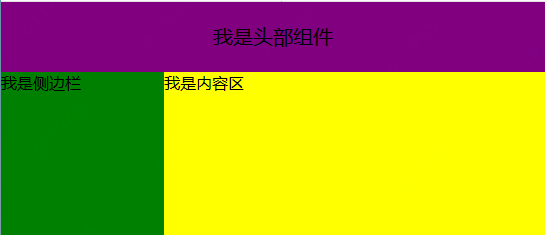
<!DOCTYPE html>
<html lang="en">
<head>
    <meta charset="UTF-8">
    <title>02-组件</title>
    <style type="text/css">
        *{
            padding: 0;
            margin: 0;

        }
        .main{
            width: 100%;
        }
        .head{
            width: 100%;
            height: 70px;
            line-height: 70px;
            background-color: purple;
            text-align: center;
            font-size: 20px;
        }
        .wrap{
            height: 1200px;
            width: 100%;
        }
        .wrap .aside{
            width: 30%;
            height: 1200px;
            background-color: green;
            float: left;
        }
        .wrap .content{
            float: left;
            width: 70%;
            height: 1200px;
            background-color: yellow;
        }
    </style>
</head>
<body>

<div id="app">

</div>


<script src="./node_modules/vue/dist/vue.js"></script>

<script type="application/javascript">


    //声明头部组件
    var Vheader = {
        template: `<div class="head">我是头部组件</div>`,
    };

    //声明侧边栏
    var Vaside={
        template:`<div class="aside">我是侧边栏</div>`
    };

    //声明侧边栏
    var VContent={
        template:`<div class="content">我是内容区</div>`
    };

    //声明入口组件
    var Vmain = {
        template: `<div class="main">
                        <Vheader></Vheader>
                        <div class="wrap">
                            <Vaside></Vaside>
                            <VContent/>
                        </div>
                    </div>`,
        components: {
            //等价于Vheader:Vheader
            Vheader,
            Vaside:Vaside,
            VContent
        }
    };

    var app = new Vue({
        el: "#app",
        //使用子组件
        template: `<Vmain></Vmain>`,
        data: {},
        components: {
            //挂载子组件
            Vmain: Vmain,
        }
    })
</script>
</body>
</html>
2、prop传值(父组件向子组件传递数据)
prop是可以在组件上注册的一些自定义特性,当一个值传递给一个prop特性的时候,它就变成了那个组件实例的一个属性。
一个组件默认可以拥有任意数量的prop,任何值都可以传递给任何prop。在组件实例中访问这个prop,就像访问data中的值一样。
在子组件中通过v-for渲染时,需要绑定一个key
完整代码
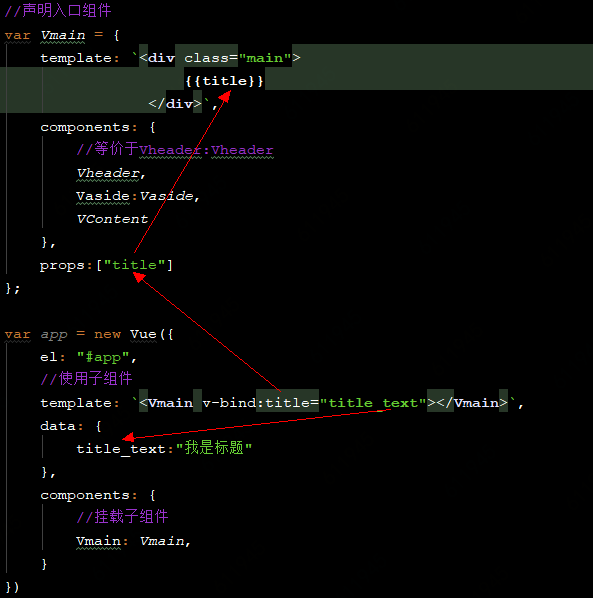
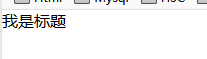
<!DOCTYPE html>
<html lang="en">
<head>
    <meta charset="UTF-8">
    <title>02-组件</title>
    <style type="text/css">
        *{
            padding: 0;
            margin: 0;

        }
        .main{
            width: 100%;
        }
        .head{
            width: 100%;
            height: 70px;
            line-height: 70px;
            background-color: purple;
            text-align: center;
            font-size: 20px;
        }
        .wrap{
            height: 1200px;
            width: 100%;
        }
        .wrap .aside{
            width: 20%;
            height: 1200px;
            background-color: green;
            float: left;
        }
        .wrap .content{
            float: left;
            width: 80%;
            height: 1200px;
            background-color: yellow;
        }
        ul{
            list-style: none;
        }
    </style>
</head>
<body>

<div id="app">

</div>


<script src="./node_modules/vue/dist/vue.js"></script>

<script type="application/javascript">


    //声明侧边栏
    var Vaside={
        template:`<div class="aside">我是侧边栏</div>`
    };

    //声明内容栏
    var VContent={
        template:`<div class="content">
                    <ul>
                        <li v-for="item in blogs" v-bind:key="item.id">
                            <p>标题:{{item.title}}</p>
                            <p>内容:{{item.content}}</p>
                        </li>
                    </ul>
                   </div>`,
        props:["blogs"]
    };
    //声明头部组件
    var Vheader = {
        template: `<div class="head"><h3>{{title}}</h3></div>`,
        props:['title']
    };
    //声明入口组件
    var Vmain = {
        template: `<div class="main">
                        <Vheader v-bind:title="title"></Vheader>
                        <div class="wrap">
                            <Vaside></Vaside>
                            <VContent v-bind:blogs="blogs"/>
                        </div>
                    </div>`,
        components: {
            //等价于Vheader:Vheader
            Vheader,
            Vaside:Vaside,
            VContent
        },
        props:["title","blogs"]
    };

    var app = new Vue({
        el: "#app",
        //使用子组件
        template: `<Vmain v-bind:title="title_text" :blogs="blogs"></Vmain>`,
        data: {
            title_text:"我是标题",
            blogs:[
                {id:1,title:"测试标题1",content:"测试内容1"},
                {id:2,title:"测试标题2",content:"测试内容2"},
                {id:3,title:"测试标题3",content:"测试内容3"},
                {id:4,title:"测试标题4",content:"测试内容4"},
                {id:5,title:"测试标题5",content:"测试内容5"}
            ]
        },
        components: {
            //挂载子组件
            Vmain: Vmain,
        }
    })
</script>
</body>
</html>

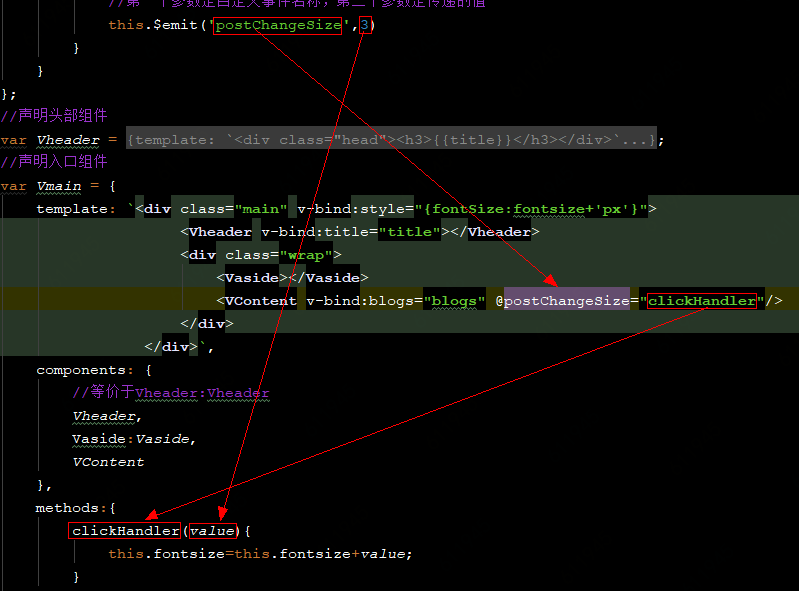
3、由子组件向父组件传递数据(事件)
需求:子组件中点击按钮来放大所有文本字体
通过this.$emit()触发事件给父组件,第一个参数为父组件绑定监听的事件名称(@),第二个参数为方法参数吗,在父组件中定义一个方法来处理。
<!DOCTYPE html>
<html lang="en">
<head>
    <meta charset="UTF-8">
    <title>02-组件</title>
    <style type="text/css">
        *{
            padding: 0;
            margin: 0;

        }
        .main{
            width: 100%;
        }
        .head{
            width: 100%;
            height: 70px;
            line-height: 70px;
            background-color: purple;
            text-align: center;
            font-size: 20px;
        }
        .wrap{
            height: 1200px;
            width: 100%;
        }
        .wrap .aside{
            width: 20%;
            height: 1200px;
            background-color: green;
            float: left;
        }
        .wrap .content{
            float: left;
            width: 80%;
            height: 1200px;
            background-color: yellow;
        }
        ul{
            list-style: none;
        }
    </style>
</head>
<body>

<div id="app">

</div>


<script src="./node_modules/vue/dist/vue.js"></script>

<script type="application/javascript">


    //声明侧边栏
    var Vaside={
        template:`<div class="aside">我是侧边栏</div>`
    };

    //声明内容栏
    var VContent={
        template:`<div class="content">
                    <ul>
                        <li v-for="item in blogs" v-bind:key="item.id">
                            <p>标题:{{item.title}}</p>
                            <p>内容:{{item.content}}</p>
                        </li>
                    </ul>
                    <button v-on:click="changeSize">改变字体大小</button>
                   </div>`,
        props:["blogs"],
        methods:{
            changeSize(){
                //通过$emit来触发组定义事件
                //第一个参数是自定义事件名称,第二个参数是传递的值
                this.$emit('postChangeSize',3)
            }
        }
    };
    //声明头部组件
    var Vheader = {
        template: `<div class="head"><h3>{{title}}</h3></div>`,
        props:['title']
    };
    //声明入口组件
    var Vmain = {
        template: `<div class="main" v-bind:style="{fontSize:fontsize+'px'}">
                        <Vheader v-bind:title="title"></Vheader>
                        <div class="wrap">
                            <Vaside></Vaside>
                            <VContent v-bind:blogs="blogs" @postChangeSize="clickHandler"/>
                        </div>
                    </div>`,
        components: {
            //等价于Vheader:Vheader
            Vheader,
            Vaside:Vaside,
            VContent
        },
        methods:{
            clickHandler(value){
                this.fontsize=this.fontsize+value;
            }
        },
        props:["title","blogs"],
        data(){
            return {fontsize:18}
        }
    };

    var app = new Vue({
        el: "#app",
        //使用子组件
        template: `<Vmain v-bind:title="title_text" :blogs="blogs"></Vmain>`,
        data: {
            title_text:"我是标题",
            blogs:[
                {id:1,title:"测试标题1",content:"测试内容1"},
                {id:2,title:"测试标题2",content:"测试内容2"},
                {id:3,title:"测试标题3",content:"测试内容3"},
                {id:4,title:"测试标题4",content:"测试内容4"},
                {id:5,title:"测试标题5",content:"测试内容5"}
            ]
        },
        components: {
            //挂载子组件
            Vmain: Vmain,
        }
    })
</script>
</body>
</html>
4、公共组件
公共组件全局注册后,在子组件中无需用components来挂在,可直接使用。data必须是一个函数,返回一个对象。
//创建公共组件
//第一个参数是公共组件的名称,第二个参数是options
Vue.component("Vbtn",{
    template:`<button>登陆</button>`,
    data:function(){
        return {}
    }
});
slot内容分发:solt即插槽的意思
子组件中部分内容需要通过父组件来替换
需求:自定义btn按钮和文字

<!DOCTYPE html>
<html lang="en">
<head>
    <meta charset="UTF-8">
    <title>公共组件</title>
    <style type="text/css">
        *{
            padding: 0;
            margin: 0;
        }
        #head{
            width: 100%;
            height: 60px;
            background-color: green;
            padding: 10px;
        }
        .btn-default{
            display: inline-block;
            line-height: 1;
            white-space: nowrap;
            cursor: pointer;
            background: #fff;
            border: 1px solid #dcdfe6;
            color: #606266;
            text-align: center;
            box-sizing: border-box;
            margin: 0;
            transition: .1s;
            font-weight: 500;
            padding: 12px 20px;
            font-size: 14px;
            border-radius: 4px;
        }
        .primary{
            color: #fff;
            background-color: #409eff;
            border-color: #409eff;
        }
        .success{
            color: #fff;
            background-color: #67c23a;
            border-color: #67c23a;
        }
        .danger {
            color: #fff;
            background-color: #f56c6c;
            border-color: #f56c6c;
        }
        .warning {
            color: #fff;
            background-color: #e6a23c;
            border-color: #e6a23c;
        }
    </style>
</head>
<body>

<div id="app">

</div>

<script src="./node_modules/vue/dist/vue.js"></script>

<script type="application/javascript">
    //创建公共组件
    //第一个参数是公共组件的名称,第二个参数是options
    Vue.component("Vbtn",{
        template:`<button class="btn-default" v-bind:class="type"><slot></slot></button>`,
        data:function () {
            return {}
        },
        props:["type"]
    });
    var Vheader={
        template:`<div id="head">
                    <Vbtn type="primary">主要</Vbtn>
                    <Vbtn type="success">成功</Vbtn>
                    <Vbtn type="danger">危险</Vbtn>
                    <Vbtn type="warning">警告</Vbtn>
                    <Vbtn>默认</Vbtn>
                  </div>`,
    };
    var App={
        template:`<div>
            <Vheader></Vheader>
        </div>`,
        components:{
            Vheader,
        }
    };
    var app=new Vue({
        el:"#app",
        data:{},
        template:`<App/>`,
        components:{
            App,
        }
    })
</script>
</body>
</html>
5、过滤器
使用地方:双花括号插值和v-bind,使用管道符分隔
注册局部过滤器:
局部过滤器在当前组件中什么过滤器,使用filters,可同时声明多个过滤器,key为过滤器名称,值为function
<!DOCTYPE html>
<html lang="en">
<head>
    <meta charset="UTF-8">
    <title>过滤器</title>
</head>
<body>

<div id="app">
    <input type="text" v-model="price">
    <h3>{{price | currentPrice}}</h3>
</div>

<script src="./node_modules/vue/dist/vue.js"></script>

<script type="application/javascript">
    new Vue({
        el:"#app",
        data:{
            price:0
        },
        //局部声明过滤器
        filters:{
            currentPrice:function (value) {
                //value为被过滤字符
                return "$"+value
            }
        }
    })
</script>
</body>
</html>
注册全局过滤器:
Vue.filter("reverse",function (value) {
     //全局翻转字符串过滤器
    return value.split("").reverse().join("")
});
