# 在LVS服务主机中分别测试两台RS的web服务是否正常# 测试RS1
[root@NET-lvs-133network-scripts]# curl 10.0.0.7:80rs110.10.2.134192.168.2.134172.16.2.134# 测试RS2
[root@NET-lvs-133network-scripts]# curl 10.0.0.17:80rs210.10.2.135192.168.2.135172.16.2.135# 需要启用ip_forward
[root@NET-lvs-133network-scripts]# cat /etc/sysctl.conf # sysctl settings are defined through files in# /usr/lib/sysctl.d/, /run/sysctl.d/, and /etc/sysctl.d/.## Vendors settings live in /usr/lib/sysctl.d/.# To override a whole file, create a new file with the same in# /etc/sysctl.d/ and put new settings there. To override# only specific settings, add a file with a lexically later# name in /etc/sysctl.d/ and put new settings there.## For more information, see sysctl.conf(5) and sysctl.d(5).net.ipv4.ip_forward=1//添加参数
[root@NET-lvs-133network-scripts]# sysctl -p //加载参数net.ipv4.ip_forward=1# 使用internet client测试VIP 能否访问两台RS服务
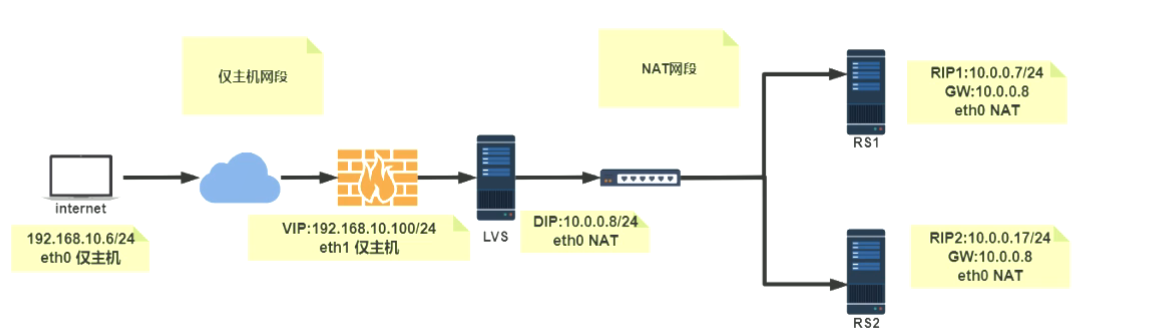
[root@Internet-132~]# curl 192.168.10.100 rs110.10.2.134192.168.2.134172.16.2.134//显示访问RS1
[root@Internet-132~]# curl 192.168.10.100rs210.10.2.135192.168.2.135172.16.2.135//显示访问RS2# 在LVS 主机上抓取ETH0流量包
[root@NET-lvs-133network-scripts]# tcpdump -i eth0 -nn port 80tcpdump:verboseoutputsuppressed,use-vor-vvforfullprotocoldecodelisteningoneth0,link-typeEN10MB(Ethernet),capturesize262144bytes14:27:43.030163IP192.168.10.6.39104>10.0.0.7.80:Flags [S],seq1303448505,win29200,options [mss1460,sackOK,TSval2632751ecr0,nop,wscale7],length014:27:43.030579IP10.0.0.7.80>192.168.10.6.39104:Flags [S.],seq2237309274,ack1303448506,win28960,options [mss1460,sackOK,TSval2643199ecr2632751,nop,wscale7],length014:27:43.030826IP192.168.10.6.39104>10.0.0.7.80:Flags [.],ack1,win229,options [nop,nop,TSval2632752ecr2643199],length014:27:43.030975IP192.168.10.6.39104>10.0.0.7.80:Flags [P.],seq1:79,ack1,win229,options [nop,nop,TSval2632752ecr2643199],length 78: HTTP:GET/HTTP/1.114:27:43.031121IP10.0.0.7.80>192.168.10.6.39104:Flags [.],ack79,win227,options [nop,nop,TSval2643200ecr2632752],length014:27:43.032237IP10.0.0.7.80>192.168.10.6.39104:Flags [P.],seq1:286,ack79,win227,options [nop,nop,TSval2643201ecr2632752],length 285: HTTP:HTTP/1.1200OK14:27:43.032368IP192.168.10.6.39104>10.0.0.7.80:Flags [.],ack286,win237,options [nop,nop,TSval2632753ecr2643201],length014:27:43.032533IP192.168.10.6.39104>10.0.0.7.80:Flags [F.],seq79,ack286,win237,options [nop,nop,TSval2632753ecr2643201],length014:27:43.032645IP10.0.0.7.80>192.168.10.6.39104:Flags [F.],seq286,ack80,win227,options [nop,nop,TSval2643201ecr2632753],length014:27:43.032768IP192.168.10.6.39104>10.0.0.7.80:Flags [.],ack287,win237,options [nop,nop,TSval2632754ecr2643201],length0# 抓取ETH1流量包
[root@NET-lvs-133network-scripts]# tcpdump -i eth1 -nn port 80tcpdump:verboseoutputsuppressed,use-vor-vvforfullprotocoldecodelisteningoneth1,link-typeEN10MB(Ethernet),capturesize262144bytes14:28:03.560256IP192.168.10.6.39106>192.168.10.100.80:Flags [S],seq3372440983,win29200,options [mss1460,sackOK,TSval2653281ecr0,nop,wscale7],length014:28:03.560634IP192.168.10.100.80>192.168.10.6.39106:Flags [S.],seq932208910,ack3372440984,win28960,options [mss1460,sackOK,TSval2663679ecr2653281,nop,wscale7],length014:28:03.560826IP192.168.10.6.39106>192.168.10.100.80:Flags [.],ack1,win229,options [nop,nop,TSval2653282ecr2663679],length014:28:03.560872IP192.168.10.6.39106>192.168.10.100.80:Flags [P.],seq1:79,ack1,win229,options [nop,nop,TSval2653282ecr2663679],length 78: HTTP:GET/HTTP/1.114:28:03.561003IP192.168.10.100.80>192.168.10.6.39106:Flags [.],ack79,win227,options [nop,nop,TSval2663679ecr2653282],length014:28:03.562294IP192.168.10.100.80>192.168.10.6.39106:Flags [P.],seq1:286,ack79,win227,options [nop,nop,TSval2663680ecr2653282],length 285: HTTP:HTTP/1.1200OK14:28:03.562407IP192.168.10.6.39106>192.168.10.100.80:Flags [.],ack286,win237,options [nop,nop,TSval2653283ecr2663680],length014:28:03.562561IP192.168.10.6.39106>192.168.10.100.80:Flags [F.],seq79,ack286,win237,options [nop,nop,TSval2653283ecr2663680],length014:28:03.562689IP192.168.10.100.80>192.168.10.6.39106:Flags [F.],seq286,ack80,win227,options [nop,nop,TSval2663681ecr2653283],length014:28:03.562753IP192.168.10.6.39106>192.168.10.100.80:Flags [.],ack287,win237,options [nop,nop,TSval2653284ecr2663681],length0


【推荐】国内首个AI IDE,深度理解中文开发场景,立即下载体验Trae
【推荐】编程新体验,更懂你的AI,立即体验豆包MarsCode编程助手
【推荐】抖音旗下AI助手豆包,你的智能百科全书,全免费不限次数
【推荐】轻量又高性能的 SSH 工具 IShell:AI 加持,快人一步
· winform 绘制太阳,地球,月球 运作规律
· 超详细:普通电脑也行Windows部署deepseek R1训练数据并当服务器共享给他人
· TypeScript + Deepseek 打造卜卦网站:技术与玄学的结合
· AI 智能体引爆开源社区「GitHub 热点速览」
· 写一个简单的SQL生成工具