第一节:ShardingSphere-Proxy简介、环境搭建、分表、数据分片算法(int取模、字符串hash取模、范围)
一. ShardingSphere-Proxy简介
1. 简介
Apache ShardingSphere 是一款开源分布式数据库生态项目,旨在碎片化的异构数据库上层构建生态,在最大限度的复用数据库原生存算能力的前提下,进一步提供面向全局的扩展和叠加计算能力。其核心采用可插拔架构,对上以数据库协议及 SQL 方式提供诸多增强功能,包括数据分片、访问路由、数据安全等
ShardingSphere-Proxy是跨语言的数据库代理服务端,主要用来处理:分表、分库、读写分离 等。 【默认端口 3307 】
官网地址:https://shardingsphere.apache.org/index_zh.html
2. 什么是分表?
MySQL的InnoDB引擎采用B+ Tree的结构进行数据存储,单张表的极限为2000w,超过这个数量,性能就会下降,从而引出分表的方案。
比如原先将原先的Order订单表可以拆分为 Order1 、Order2 等多张表。
3. 什么是分库?
从并发量角度思考,如果客户端查询数据并发量比较大,超过了数据库的并发处理能力,就会导致数据库性能下降(因为数据库本身使用的系统资源还是有限的,例如内存资源,CPU资源,磁盘资源等等,都有限,所以导致数据库并发处理能力有限),从而引出分库的概念。
比如原先的商品数据库 GoodsDB,可以拆分为 GoodsDB1、GoodsDB2 等多个数据库。
4. 什么是分库分表?
当分库后,但表中的数据量依旧很大,超过2000w,这个时候就需要在分库的基础上,进行分表。
通常分库分表同时使用。
即: GoodsDB1库中有:Order1 、Order2表, GoodsDB2库中也有:Order1 、Order2表,
PS:更详细的分库分表概念参考:https://www.cnblogs.com/yaopengfei/p/13263597.html
5. 常用方案
(1). 进程内方案
使用EFCore进行链接,可以实现分库分表、读写分离。 缺点:资源竞争
(参考:https://www.cnblogs.com/yaopengfei/p/13263597.html)
(2). 进程外方案
A. MyCat 缺点:配置麻烦
B. ShardingSphere 优点:配置简单
二. 环境准备
实现分库分表准备以下环境:
1. 数据库: MySQL5.7
2. Jdk环境: jdk1.8 (在windows环境下jdk11无法运行shardingsphere,目前尚未解决 https://github.com/apache/shardingsphere/issues/14941)
ps:shardingsphere-proxy 5.4 版本可以和jdk11一块运行了 【20230911测试】
3. 代理程序:shardingsphere-proxy 5.0.0 (下载地址: https://shardingsphere.apache.org/document/current/cn/downloads/)
4. 连接MySQL的驱动:mysql-connector-java-8.0.11.jar (下载地址:https://repo1.maven.org/maven2/mysql/mysql-connector-java/)
将下载好的驱动 mysql-connector-java-8.0.11.jar 拷贝到 shardingsphere中的lib文件夹下。

三. 实操
1. 如何开启Shardingsphere-proxy?
(1). 配置shardingsphere的访问账户和密码,详见 conf/server.yaml。
账号为:ypf,密码为:12345678, 该账号用于客户端连接该代理程序使用,与数据库的账号密码没有任何关系。
rules:
  - !AUTHORITY
    users:
      - ypf@%:12345678
      - sharding@:sharding
    provider:
      type: ALL_PRIVILEGES_PERMITTED
  - !TRANSACTION
    defaultType: XA
    providerType: Atomikos
(2). 配置分表规则,详见 conf/config-sharding.yaml
假设需要实际数据库为shopdb,配置如下:
root 123456,为mysql的账号密码;
schemaName: shopDB_Proxy ,表示客户端连接到代理程序中显示的数据库名称。
myDBStr_0 : 连接的一个别名,后面配置会用到
# 1. 声明proxy中的代理数据库名称
schemaName: shopDB_Proxy

#2. 连接mysql
dataSources:
  myDBStr_0:
    url: jdbc:mysql://localhost:3306/shopdb?serverTimezone=UTC&useSSL=false
    username: root
    password: 123456
    connectionTimeoutMilliseconds: 30000
    idleTimeoutMilliseconds: 60000
    maxLifetimeMilliseconds: 1800000
    maxPoolSize: 50
    minPoolSize: 1
(3). 启动代理程序

(4). 通过客户端连接代理程序, 默认端口为3307,用户名:ypf,密码:12345678,连接成功后,显示shopDB_Proxy数据库

2. 分表-基于自增主键取模算法进行分片
(1). 配置分表规则,详见 conf/config-sharding.yaml
# 1. 声明proxy中的代理数据库名称
schemaName: shopDB_Proxy

#2. 连接mysql
dataSources:
  #2.1 连接别名
  myDBStr_0:
    url: jdbc:mysql://localhost:3306/shopdb?serverTimezone=UTC&useSSL=false
    username: root
    password: 123456
    connectionTimeoutMilliseconds: 30000
    idleTimeoutMilliseconds: 60000
    maxLifetimeMilliseconds: 1800000
    maxPoolSize: 50
    minPoolSize: 1

#3. 分片规则
rules:
- !SHARDING
  tables:
    #对test1_tb表继续分表
    test1_tb:
      # myDBStr_0对应上述的连接别名,test1_tb_${0..1}表示生成两张表,分别为test1_tb1、test2_tb2
      actualDataNodes: myDBStr_0.test1_tb_${0..1}
      tableStrategy:
        standard:
          shardingColumn: classId            #分表字段
          shardingAlgorithmName: my_MOD      #分表算法别名
  #定义分片算法
  shardingAlgorithms:
    #1.取模算法(针对int类型)
    my_MOD:
      type: MOD
      props:
        sharding-count: 2   #代表数据分片到两张表,与上述的actualDataNodes中定义的表个数需要对应
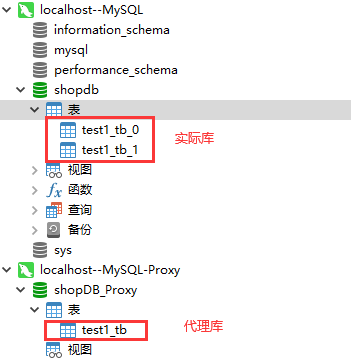
(2). 在3307端口下的代理库中生成,运行下面语句生成test1_tb,我们会发现实际的数据库中生了两张表,分别为test1_tb1,test2_tb2.
CREATE TABLE `test1_tb`  (
  `id` int(11) NOT NULL AUTO_INCREMENT,
  `userName` varchar(255) CHARACTER SET utf8mb4 COLLATE utf8mb4_general_ci NULL DEFAULT NULL,
  `userAge` int(255) NULL DEFAULT NULL,
  `classId` int(11) NULL DEFAULT NULL,
  `addTime` datetime(0) NULL DEFAULT NULL,
  PRIMARY KEY (`id`) USING BTREE
) ENGINE = InnoDB AUTO_INCREMENT = 2 CHARACTER SET = utf8mb4 COLLATE = utf8mb4_general_ci ROW_FORMAT = Dynamic;
运行结果:

(3). 向代理库shopDB_Proxy中的test1_tb表中插入下面数据,观察结果
INSERT INTO `test1_tb`(`userName`, `userAge`, `classId`, `addTime`) VALUES ('ypf1', 18, 1, '2022-08-18 17:01:26');
INSERT INTO `test1_tb`(`userName`, `userAge`, `classId`, `addTime`) VALUES ('ypf1', 18, 2, '2022-08-18 17:01:26');
INSERT INTO `test1_tb`(`userName`, `userAge`, `classId`, `addTime`) VALUES ('ypf1', 18, 3, '2022-08-18 17:01:26');
INSERT INTO `test1_tb`(`userName`, `userAge`, `classId`, `addTime`) VALUES ('ypf1', 18, 4, '2022-08-18 17:01:26');
INSERT INTO `test1_tb`(`userName`, `userAge`, `classId`, `addTime`) VALUES ('ypf1', 18, 5, '2022-08-18 17:01:26');
INSERT INTO `test1_tb`(`userName`, `userAge`, `classId`, `addTime`) VALUES ('ypf1', 18, 6, '2022-08-18 17:01:26');
代理表:test_tb

实际表:test1_tb_0,实现了根据classId数据分片

实际表:test1_tb_1,实现了根据classId数据分片

(4). 总结:
A. 实现了根据classId进行数据分片,2,4,6存放在test1_tb_0中,1,3,5存放在test1_tb_1中。
B. 出现一个问题,代理表test_tb中主键重复了,显然不合理,主键不能重复,所以主键需要用字符串,根据雪花算法生成唯一值。
3. 分表-基于主键雪花算法进行分片
(1). 配置分表规则,详见 conf/config-sharding.yaml
keyGenerateStrategy:代表某个字段的生成规则
keyGenerators- snowflake: 代表定义了雪花算法
查看代码
 # 1. 声明proxy中的代理数据库名称
schemaName: shopDB_Proxy

#2. 连接mysql
dataSources:
  myDBStr_0:
    url: jdbc:mysql://localhost:3306/shopdb?serverTimezone=UTC&useSSL=false
    username: root
    password: 123456
    connectionTimeoutMilliseconds: 30000
    idleTimeoutMilliseconds: 60000
    maxLifetimeMilliseconds: 1800000
    maxPoolSize: 50
    minPoolSize: 1

#3. 分片规则
rules:
- !SHARDING
  tables:
    # 表1
    test1_tb:
      actualDataNodes: myDBStr_0.test1_tb_${0..1}
      tableStrategy:
        standard:
          shardingColumn: classId
          shardingAlgorithmName: my_MOD
     # 表2
    test2_tb:
      actualDataNodes: myDBStr_0.test2_tb_${0..1}
      tableStrategy:
        standard:
          shardingColumn: classId
          shardingAlgorithmName: my_MOD
      # 定义某个字段的生成规则(这里的id为主键)
      keyGenerateStrategy:
        column: id
        keyGeneratorName: snowflake
  #定义分片算法
  shardingAlgorithms:
    my_MOD:
      type: MOD
      props:
        sharding-count: 2   #代表数据分片到两张表,与上述的actualDataNodes中定义的表个数需要对应
  #定义key的生成规则
  keyGenerators:
    snowflake:
      type: SNOWFLAKE    #雪花算法
      props:
        worker-id: 00000000
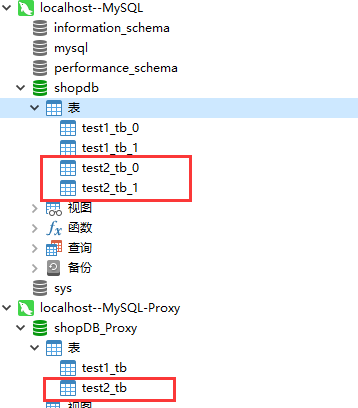
(2). 在3007端口下的代理库中生成,运行下面语句生成test2_tb,我们会发现实际的数据库中生了两张表,分别为test2_tb1,test2_tb2.
CREATE TABLE `test2_tb`  (
  `id` varchar(255) CHARACTER SET utf8mb4 COLLATE utf8mb4_general_ci NOT NULL,
  `userName` varchar(255) CHARACTER SET utf8mb4 COLLATE utf8mb4_general_ci NULL DEFAULT NULL,
  `userAge` int(255) NULL DEFAULT NULL,
  `classId` int(11) NULL DEFAULT NULL,
  `addTime` datetime(0) NULL DEFAULT NULL,
  PRIMARY KEY (`id`) USING BTREE
) ENGINE = InnoDB CHARACTER SET = utf8mb4 COLLATE = utf8mb4_general_ci ROW_FORMAT = Dynamic;
运行结果:

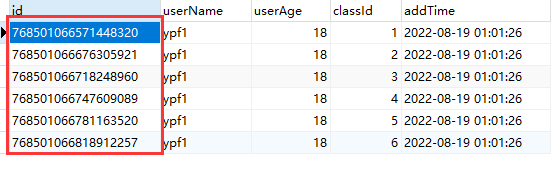
(3). 向代理库shopDB_Proxy中的test2_tb表中插入下面数据,观察结果
INSERT INTO `test2_tb`(`userName`, `userAge`, `classId`, `addTime`) VALUES ('ypf1', 18, 1, '2022-08-18 17:01:26');
INSERT INTO `test2_tb`(`userName`, `userAge`, `classId`, `addTime`) VALUES ('ypf1', 18, 2, '2022-08-18 17:01:26');
INSERT INTO `test2_tb`(`userName`, `userAge`, `classId`, `addTime`) VALUES ('ypf1', 18, 3, '2022-08-18 17:01:26');
INSERT INTO `test2_tb`(`userName`, `userAge`, `classId`, `addTime`) VALUES ('ypf1', 18, 4, '2022-08-18 17:01:26');
INSERT INTO `test2_tb`(`userName`, `userAge`, `classId`, `addTime`) VALUES ('ypf1', 18, 5, '2022-08-18 17:01:26');
INSERT INTO `test2_tb`(`userName`, `userAge`, `classId`, `addTime`) VALUES ('ypf1', 18, 6, '2022-08-18 17:01:26');
代理表:test2_tb

实际表:test2_tb_0,实现了根据classId数据分片

实际表:test2_tb_1,实现了根据classId数据分片

(4). 总结:
A. 实现了根据classId进行数据分片,2,4,6存放在test2_tb_0中,1,3,5存放在test2_tb_1中。
B. test2_tb中的id主键实现了利用雪花算法进行生成,解决了之前重复的问题。
4. 分表-基于字符串hash取模算法
(1). 配置分表规则,详见 conf/config-sharding.yaml
A. my_HASH_MOD: type: HASH_MOD 代表定义字符串hash取模算法
B. 对test2_tb下的userName进行hash取模,从而实现数据的分片。
# 1. 声明proxy中的代理数据库名称
schemaName: shopDB_Proxy

#2. 连接mysql
dataSources:
  myDBStr_0:
    url: jdbc:mysql://localhost:3306/shopdb?serverTimezone=UTC&useSSL=false
    username: root
    password: 123456
    connectionTimeoutMilliseconds: 30000
    idleTimeoutMilliseconds: 60000
    maxLifetimeMilliseconds: 1800000
    maxPoolSize: 50
    minPoolSize: 1

#3. 分片规则
rules:
- !SHARDING
  tables:
    # 表1
    test1_tb:
      actualDataNodes: myDBStr_0.test1_tb_${0..1}
      tableStrategy:
        standard:
          shardingColumn: classId
          shardingAlgorithmName: my_MOD
     # 表2
    test2_tb:
      actualDataNodes: myDBStr_0.test2_tb_${0..1}
      tableStrategy:
        standard:
          shardingColumn: userName
          shardingAlgorithmName: my_HASH_MOD
      keyGenerateStrategy:
        column: id
        keyGeneratorName: snowflake
  #定义分片算法
  shardingAlgorithms:
    #1. int类型取模算法
    my_MOD:
      type: MOD
      props:
        sharding-count: 2   #代表数据分片到两张表,与上述的actualDataNodes中定义的表个数需要对应
    #2.字符串取模算法(hash取模)
    my_HASH_MOD:
      type: HASH_MOD
      props:
        sharding-count: '2'  #代表两张表
  #定义key的生成规则
  keyGenerators:
    snowflake:
      type: SNOWFLAKE
      props:
        worker-id: 00000000
(2). 向代理库shopDB_Proxy中的test2_tb表中插入下面数据,观察结果
-- truncate table test2_tb
INSERT INTO `test2_tb`(`userName`, `userAge`, `classId`, `addTime`) VALUES ('ypf1', 18, 6, '2022-08-18 17:01:26');
INSERT INTO `test2_tb`(`userName`, `userAge`, `classId`, `addTime`) VALUES ('ypf2', 18, 6, '2022-08-18 17:01:26');
INSERT INTO `test2_tb`(`userName`, `userAge`, `classId`, `addTime`) VALUES ('ypf3', 18, 6, '2022-08-18 17:01:26');
INSERT INTO `test2_tb`(`userName`, `userAge`, `classId`, `addTime`) VALUES ('ypf4', 18, 6, '2022-08-18 17:01:26');
INSERT INTO `test2_tb`(`userName`, `userAge`, `classId`, `addTime`) VALUES ('ypf5', 18, 6, '2022-08-18 17:01:26');
INSERT INTO `test2_tb`(`userName`, `userAge`, `classId`, `addTime`) VALUES ('ypf6', 18, 6, '2022-08-18 17:01:26');
代理表:test2_tb

实际表:test2_tb_0,实现了根据userName数据分片

实际表:test2_tb_1,实现了根据userName数据分片

(3). 总结:
A. 实现类对userName字段通过hash取模算法进行数据分片,ypf1、ypf3、ypf5存储在test2_tb_0表中,ypf2、ypf4、ypf6存储在test2_tb_1表中。
5. 分表-按照范围进行分表
(1). 配置分表规则,详见 conf/config-sharding.yaml

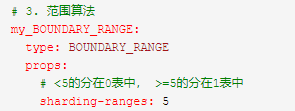
表示定义范围算法,如上图,是针对两张表的范围写法, 如果针对三张表,那么可以 分成3个区间, 如: sharding-ranges:5,20
查看代码
 # 1. 声明proxy中的代理数据库名称
schemaName: shopDB_Proxy

#2. 连接mysql
dataSources:
  myDBStr_0:
    url: jdbc:mysql://localhost:3306/shopdb?serverTimezone=UTC&useSSL=false
    username: root
    password: 123456
    connectionTimeoutMilliseconds: 30000
    idleTimeoutMilliseconds: 60000
    maxLifetimeMilliseconds: 1800000
    maxPoolSize: 50
    minPoolSize: 1

#3. 分片规则
rules:
- !SHARDING
  tables:
    # 表1
    test1_tb:
      actualDataNodes: myDBStr_0.test1_tb_${0..1}
      tableStrategy:
        standard:
          shardingColumn: classId
          shardingAlgorithmName: my_MOD
     # 表2
    test2_tb:
      actualDataNodes: myDBStr_0.test2_tb_${0..1}
      tableStrategy:
        standard:
          shardingColumn: classId
          shardingAlgorithmName: my_BOUNDARY_RANGE
      keyGenerateStrategy:
        column: id
        keyGeneratorName: snowflake
  #定义分片算法
  shardingAlgorithms:
    #1. int类型取模算法
    my_MOD:
      type: MOD
      props:
        sharding-count: 2   #代表数据分片到两张表,与上述的actualDataNodes中定义的表个数需要对应
    #2.字符串取模算法(hash取模)
    my_HASH_MOD:
      type: HASH_MOD
      props:
        sharding-count: '2'
    # 3. 范围算法
    my_BOUNDARY_RANGE:
      type: BOUNDARY_RANGE
      props:
        # <5的分在0表中, >=5的分在1表中
        sharding-ranges: 5
  #定义key的生成规则
  keyGenerators:
    snowflake:
      type: SNOWFLAKE
      props:
        worker-id: 00000000
(2). 向代理库shopDB_Proxy中的test2_tb表中插入下面数据,观察结果
INSERT INTO `test2_tb`(`userName`, `userAge`, `classId`, `addTime`) VALUES ('ypf1', 18, 1, '2022-08-18 17:01:26');
INSERT INTO `test2_tb`(`userName`, `userAge`, `classId`, `addTime`) VALUES ('ypf2', 18, 2, '2022-08-18 17:01:26');
INSERT INTO `test2_tb`(`userName`, `userAge`, `classId`, `addTime`) VALUES ('ypf3', 18, 3, '2022-08-18 17:01:26');
INSERT INTO `test2_tb`(`userName`, `userAge`, `classId`, `addTime`) VALUES ('ypf4', 18, 4, '2022-08-18 17:01:26');
INSERT INTO `test2_tb`(`userName`, `userAge`, `classId`, `addTime`) VALUES ('ypf5', 18, 5, '2022-08-18 17:01:26');
INSERT INTO `test2_tb`(`userName`, `userAge`, `classId`, `addTime`) VALUES ('ypf6', 18, 6, '2022-08-18 17:01:26');
代理表:test2_tb

实际表:test2_tb_0,实现了根据classId字段通过范围算法进行数据分片

实际表:test2_tb_1,实现了根据classId字段通过范围算法进行数据分片

(3). 总结:
A. 实现类对classId字段通过范围算法进行数据分片,1、2、3、4存储在test2_tb_0表中,5、6存储在test2_tb_1表中。
B. 弊端:最后一张表(这里指test2_tb_1)的数据会无限大,如果被查询的数据都集中在最后一张表,分表则失去了意义。
!
- 作 者 : Yaopengfei(姚鹏飞)
- 博客地址 : http://www.cnblogs.com/yaopengfei/
- 声 明1 : 如有错误,欢迎讨论,请勿谩骂^_^。
- 声 明2 : 原创博客请在转载时保留原文链接或在文章开头加上本人博客地址,否则保留追究法律责任的权利。


【推荐】国内首个AI IDE,深度理解中文开发场景,立即下载体验Trae
【推荐】编程新体验,更懂你的AI,立即体验豆包MarsCode编程助手
【推荐】抖音旗下AI助手豆包,你的智能百科全书,全免费不限次数
【推荐】轻量又高性能的 SSH 工具 IShell:AI 加持,快人一步
· 周边上新:园子的第一款马克杯温暖上架
· Open-Sora 2.0 重磅开源!
· 分享 3 个 .NET 开源的文件压缩处理库,助力快速实现文件压缩解压功能!
· Ollama——大语言模型本地部署的极速利器
· DeepSeek如何颠覆传统软件测试?测试工程师会被淘汰吗?