

第十一节:Spring简介、IOC和DI的各种XML配置、整合MyBatis
一. Spring简介
1. Spring简介
(官网:https://spring.io/)
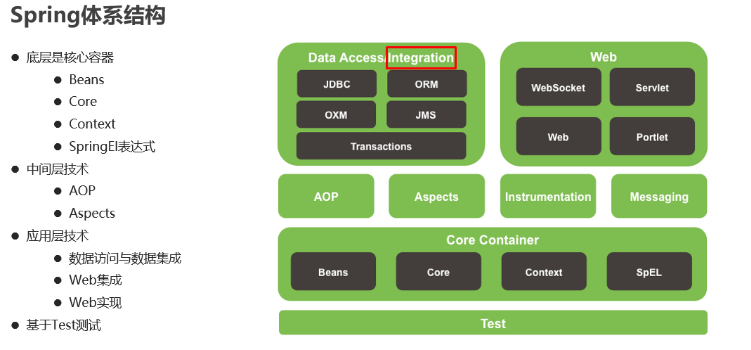
Spring是分层的JavaSE/EE应用full-stack轻量级开源框架。
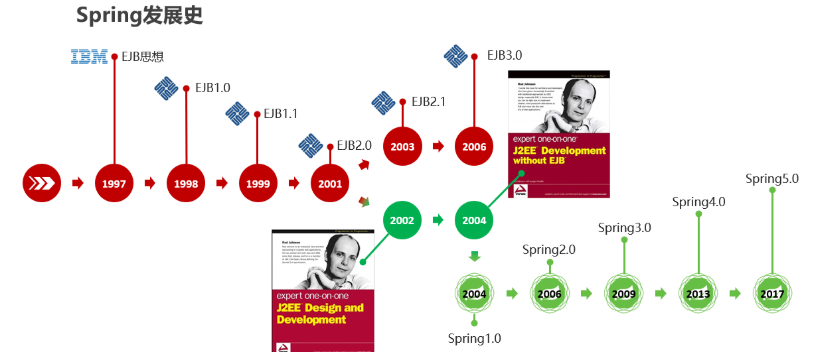
2. Spring发展史
3. IOC简介
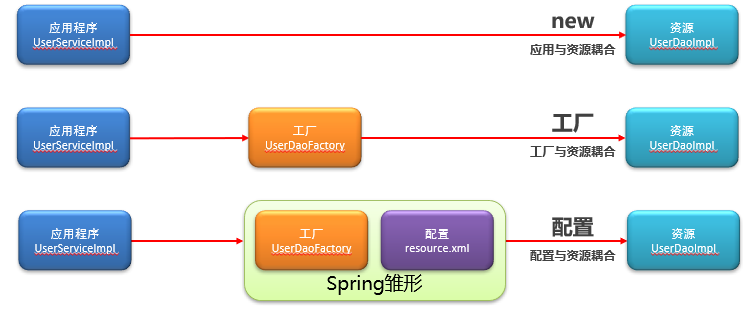
(1). 工厂模式发展史
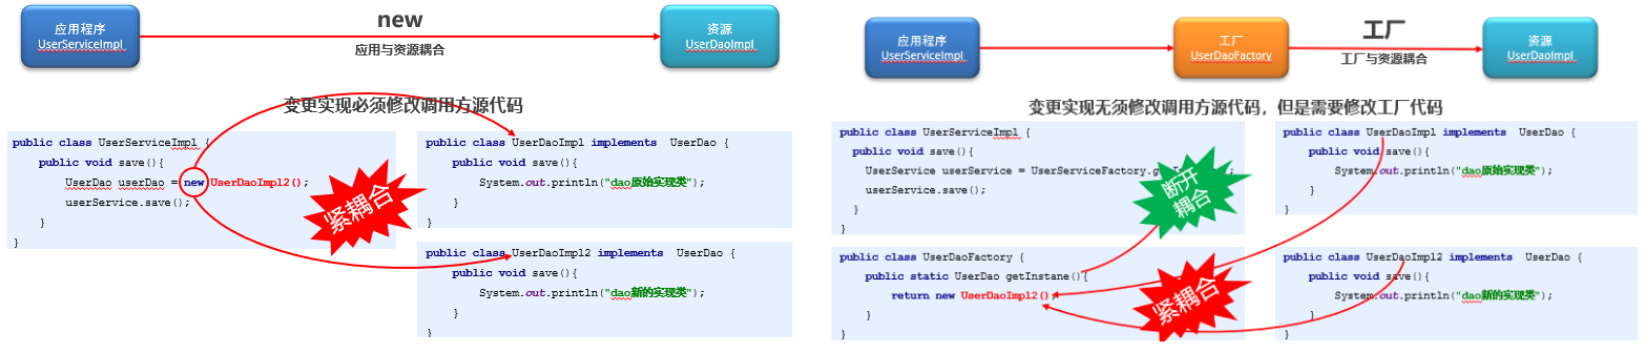
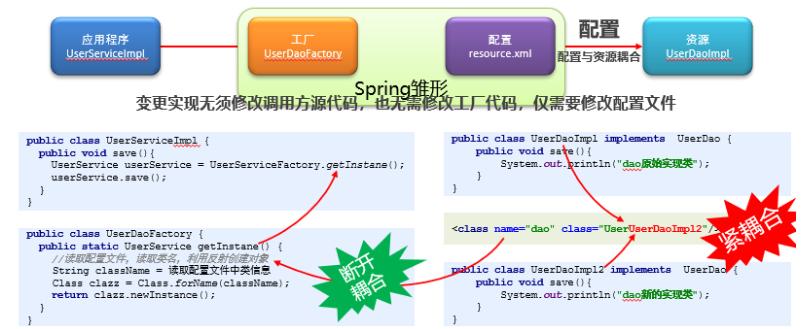
(2). Spring的演化
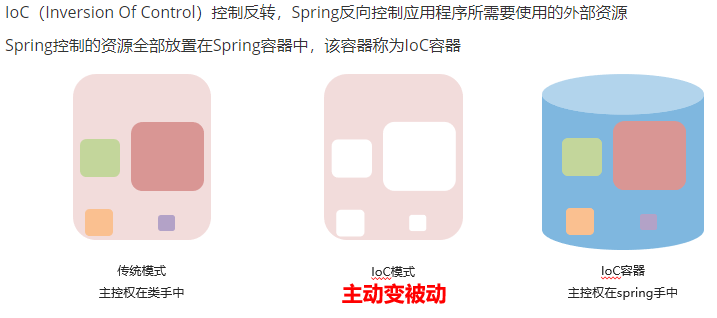
(3). IOC
二. IOC和DI的各种xml配置
前提:
(1). 通过maven导入所需要的所有坐标。


<?xml version="1.0" encoding="UTF-8"?>
<project xmlns="http://maven.apache.org/POM/4.0.0"
         xmlns:xsi="http://www.w3.org/2001/XMLSchema-instance"
         xsi:schemaLocation="http://maven.apache.org/POM/4.0.0 http://maven.apache.org/xsd/maven-4.0.0.xsd">
    <modelVersion>4.0.0</modelVersion>

    <groupId>org.example</groupId>
    <artifactId>SpringDemo3</artifactId>
    <version>1.0-SNAPSHOT</version>

    <properties>
        <project.build.sourceEncoding>UTF-8</project.build.sourceEncoding>
        <maven.compiler.source>11</maven.compiler.source>
        <maven.compiler.target>11</maven.compiler.target>
    </properties>

    <dependencies>
        <!--spring -->
        <dependency>
            <groupId>org.springframework</groupId>
            <artifactId>spring-context</artifactId>
            <version>5.3.7</version>
        </dependency>
        <!--第三方资源配置(阿里数据源方案Druid)-->
        <dependency>
            <groupId>com.alibaba</groupId>
            <artifactId>druid</artifactId>
            <version>1.2.6</version>
        </dependency>
        <!-- Spring整合mybaits相关坐标-->
        <dependency>
            <groupId>mysql</groupId>
            <artifactId>mysql-connector-java</artifactId>
            <version>5.1.6</version>
            <scope>runtime</scope>
        </dependency>
        <dependency>
            <groupId>org.mybatis</groupId>
            <artifactId>mybatis</artifactId>
            <version>3.5.7</version>
        </dependency>
        <dependency>
            <groupId>org.springframework</groupId>
            <artifactId>spring-jdbc</artifactId>
            <version>5.3.7</version>
        </dependency>
        <dependency>
            <groupId>org.mybatis</groupId>
            <artifactId>mybatis-spring</artifactId>
            <version>2.0.6</version>
        </dependency>
    </dependencies>


</project>
(2). 分享一个1个全的spring配置文件的命名空间
<?xml version="1.0" encoding="UTF-8"?>
<beans xmlns="http://www.springframework.org/schema/beans"
       xmlns:xsi="http://www.w3.org/2001/XMLSchema-instance"
       xmlns:p="http://www.springframework.org/schema/p"
       xmlns:context="http://www.springframework.org/schema/context"
       xsi:schemaLocation="http://www.springframework.org/schema/beans
       http://www.springframework.org/schema/beans/spring-beans.xsd
       http://www.springframework.org/schema/context
       https://www.springframework.org/schema/context/spring-context.xsd">


</beans>
复习:什么是IOC和DI
1. IOC入门
目标:通过注入的方式获取UserService对象,并调用save方法。
(1). 创建UserService接口 和 UserServicedImpl实现类
public interface UserService {
    //业务方法
    void save();
}
public class UserServiceImpl implements UserService {
    public void save() {
        System.out.println("user service running...");
    }
}
(2). 配置文件中进行声明
PS:处理通过id标识,还可以通过name起别名以供调用
    <!--1.创建spring控制的资源-->
    <!--id:bean的名称,通过id值获取bean    class:bean的类型-->
    <bean id="userService1" class="com.ypf.service.UserServiceImpl"></bean>

    <!--2.利用name属性起别名 -->
    <!--name:bean的名称,可以通过name值获取bean,用于多人配合时给bean起别名    -->
    <bean id="userService2" name="uS1,uS2" class="com.ypf.service.UserServiceImpl"></bean>
(3). 直接调用
可以通过id获取bean,也可以通过name别名获取bean。
  public static void main(String[] args) {
        //1. 加载配置文件
        ApplicationContext ctx = new ClassPathXmlApplicationContext("applicationContext.xml");
        //2. 获取资源(根据id获取该对象)
        UserService userService = (UserService) ctx.getBean("userService1");
        //3. 运行
        userService.save();

        //也可以根据name别名来获取对象
        UserService uS1 = (UserService) ctx.getBean("uS1");
        UserService uS2 = (UserService) ctx.getBean("uS2");
        uS1.save();
        uS2.save();

    }
2. bean设置是否单例
通过scope属性来设置,常用的有singleton单例、prototype非单例,默认是单例的。
    <!--默认是单例模式    -->
    <bean id="uScope1" class="com.ypf.service.UserServiceImpl"></bean>
    <!--单例-->
    <bean id="uScope2" scope="singleton" class="com.ypf.service.UserServiceImpl"></bean>
    <!--非单例-->
    <bean id="uScope3" scope="prototype" class="com.ypf.service.UserServiceImpl"></bean>3
3. bean生命周期测试
主要通过 init-method,destroy-method 来设置。
 <!--2. init-method,destroy-method   以下两个要分开注释掉,单独使用,否则覆盖 -->
<bean id="ts1" scope="singleton" init-method="TestInit" destroy-method="TestDestory" class="com.ypf.service.UserServiceImpl"></bean>
<bean id="ts2" scope="prototype" init-method="TestInit" destroy-method="TestDestory" class="com.ypf.service.UserServiceImpl"></bean>
-
当scope=“singleton”时,spring容器中有且仅有一个对象,init方法在创建容器时仅执行一次
-
当scope=“prototype”时,spring容器要创建同一类型的多个对象,init方法在每个对象创建时均执行一次
-
当scope=“singleton”时,关闭容器会导致bean实例的销毁,调用destroy方法一次
-
4. bean对象创建方式
(1). 静态方法类和实例方法类
//静态方法
public class UserFactory1 {
    public  static  UserService GetService(){
        System.out.println("Static Factory is running");
        return  new UserServiceImpl();
    }
}
//实例方法
public class UserFactory2 {
    public  UserService GetService(){
        System.out.println("Instance Factory is running");
        return  new UserServiceImpl();
    }
}
(2). xml配置
    <!-- 三. 创建bean对象 了解  以下两个要分开注释掉,单独使用,否则覆盖 -->
    <!--1. 静态方法-->
    <bean id="staticFactory" class="com.ypf.service.UserFactory1" factory-method="GetService"></bean>

    <!--2. 实例方法-->
    <bean id="instanceFactory" class="com.ypf.service.UserFactory2"></bean>
    <bean id="us5" factory-bean="instanceFactory" factory-method="GetService"></bean>
(3). 调用
  public static void main(String[] args) {
        ApplicationContext ctx = new ClassPathXmlApplicationContext("applicationContext.xml");

        //1. 静态方法
//        UserService u1= (UserService) ctx.getBean("staticFactory");
//        u1.save();

        //2. 实例方法
        UserService u2= (UserService) ctx.getBean("us5");
        u2.save();
    }
5. set属性注入
语法:需要给哪个bean注入,就配置在哪个bean下面,使用<property>标签 。
<property name="propertyName" value="propertyValue" ref="beanId"/>
剖析:
name:对应bean中的属性名,要求该属性必须提供可访问的set方法(严格规范为此名称是set方法对应名称)
value:设定非引用类型属性对应的值,不能与ref同时使用
(1). xml配置样例
给UserServiceImpl类注入UserDao、num、version, 其中后面两个直接赋值,UserDao通过ref链接。
  <bean id="userDao1" class="com.ypf.dao.UserDaoImpl"></bean>
    <!--2.注册 UserServiceImpl   -->
    <bean id="userService1" class="com.ypf.service.UserServiceImpl">
        <!--3.下面表示要在 UserServiceImpl注入userDao、num、version-->
        <!--这里的name中的userDao必须和注入的private UserDao userDao的属性名相同-->
        <property name="userDao" ref="userDao1"></property>
        <!--同上下面的name也是要和注入的属性名相同!!!!-->
        <property name="num" value="10"></property>
        <property name="version" value="v1.2.3"></property>
    </bean>
(2). set属性注入模式
如下,即可注入成功。
public class UserServiceImpl implements UserService {

    //注入以下3个对象(userDao、num、version)--set注入模式
    private UserDao userDao;
    private int num;
    private String version;

    public void setUserDao(UserDao userDao) {
        this.userDao = userDao;
    }
    public void setNum(int num) {
        this.num = num;
    }
    public void setVersion(String version) {
        this.version = version;
    }

    @Override
    public void save() {
        System.out.println("userService is running");
        System.out.println("num:" + num);
        System.out.println("version:" + version);
        userDao.save();
    }
}
(3). 调用测试
        //1.测试set注入
        ApplicationContext ctx = new ClassPathXmlApplicationContext("applicationContext.xml");
        UserService userService = (UserService) ctx.getBean("userService1");
        userService.save();
6. 构造函数注入
语法:通过<constructor-arg>标签控制。
<constructor-arg name="argsName" value="argsValue />
<constructor-arg index="arg-index" type="arg-type" ref="beanId"/>
剖析:
A. 格式1
B. 格式2
ref:设定引用类型构造方法参数对应bean的id ,不能与value同时使用。
type :设定构造方法参数的类型,用于按类型匹配参数或进行类型校验。
index :设定构造方法参数的位置,用于按位置匹配参数,参数index值从0开始计数。
(1). xml配置样例
给UserDaoImpl2类注入三个值,给UserServiceImpl2注入
    <!--二. 构造函数注入  了解 -->
    <!--1.注册 UserDaoImpl2   -->
    <bean id="userDao2" class="com.ypf.dao.UserDaoImpl2">
        <constructor-arg index="1" value="12356"/>
        <constructor-arg index="0" value="root"/>
        <constructor-arg index="2" value="com.mysql.jdbc.Driver"/>
    </bean>
    <!--2.注册 UserServiceImpl2   -->
    <bean id="userService2" class="com.ypf.service.UserServiceImpl2">
        <!--使用构造方法进行注入,需要保障注入的属性与bean中定义的属性一致-->
        <!--一致指顺序一致或类型一致或使用index解决该问题-->
        <constructor-arg name="userDao2" ref="userDao2" index="0"/>
        <constructor-arg name="num" value="666666" index="1"/>
        <constructor-arg name="version" value="v2.0.0" index="2"/>
    </bean>
(2). 两个注入类
public class UserDaoImpl2 implements UserDao2 {

    private String username;
    private String pwd;
    private String driver;

    public UserDaoImpl2(String username, String pwd, String driver) {
        this.username = username;
        this.pwd = pwd;
        this.driver = driver;
    }

    @Override
    public void save() {
        System.out.println("userDaoImpl2 is running, userName:" + username + ",pwd:" + pwd + ",driver:" + driver);
    }
}

public class UserServiceImpl2 implements UserService2 {


    private UserDao2 userDao2;
    private int num;
    private String version;

    public UserServiceImpl2(UserDao2 userDao2, int num, String version) {
        this.userDao2 = userDao2;
        this.num = num;
        this.version = version;
    }

    @Override
    public void save() {
        System.out.println("UserServiceImpl2 is running. num:" + num + ",version:" + version);
        userDao2.save();
    }
}
7. 各种数据类型注入
(1). 五种数据类型的注入:array,list,set,map,props 。
 <!--三.集合类型数据注入 -->
    <bean id="userService3" class="com.ypf.service.UserServiceImpl3">
        <property name="al">
            <list>
                <value>ypf</value>
                <value>66666</value>
            </list>
        </property>
        <property name="properties">
            <props>
                <prop key="name">ypf</prop>
                <prop key="value">666666</prop>
            </props>
        </property>
        <property name="arr">
            <array>
                <value>123456</value>
                <value>66666</value>
            </array>
        </property>
        <property name="hs">
            <set>
                <value>ypf</value>
                <value>66666</value>
            </set>
        </property>
        <property name="hm">
            <map>
                <entry key="name" value="ypf"/>
                <entry key="value" value="6666666666"/>
            </map>
        </property>
    </bean>
(2). 被注入的类
public class UserServiceImpl3 implements UserService3 {

    private ArrayList al;
    private Properties properties;
    private int[] arr;
    private HashSet hs;
    private HashMap hm ;

    public void setAl(ArrayList al) {
        this.al = al;
    }

    public void setProperties(Properties properties) {
        this.properties = properties;
    }

    public void setArr(int[] arr) {
        this.arr = arr;
    }

    public void setHs(HashSet hs) {
        this.hs = hs;
    }

    public void setHm(HashMap hm) {
        this.hm = hm;
    }

    @Override
    public void save() {
        System.out.println("ArrayList:"+al);
        System.out.println("Properties:"+properties);
        for (int i = 0; i < arr.length; i++) {
            System.out.println(arr[i]);
        }
        System.out.println("HashSet:"+hs);
        System.out.println("HashMap:"+hm);
    }
}
8. 使用P命名空间简化配置
    <!--四.使用p命名空间简化配置  了解 -->
    <!-- 需要添加 xmlns:p="http://www.springframework.org/schema/p"   -->
    <bean
            id="userServiceTest"
            class="com.ypf.service.UserServiceImpl"
            p:userDao-ref="userDao1"
            p:num="123456"
            p:version="V2.0.1"
    />
9. SpEL
Spring提供了对EL表达式的支持,统一属性注入格式。所有属性值不区分是否引用类型,统一使用value赋值
-
-
引用bean #{beanId}
-
引用bean属性 #{beanId.propertyName}
-
引用bean方法 beanId.methodName().method2()
-
引用静态方法 T(java.lang.Math).PI
-
运算符支持 #{3 lt 4 == 4 ge 3}
-
正则表达式支持 #{user.name matches‘[a-z]{6,}’}
-
  <bean id="userServiceSpElTest" class="com.ypf.service.UserServiceImpl">
        <!-- 所有属性值不区分是否引用类型,统一使用value赋值-->
        <property name="userDao" value="#{userDao1}"></property>
        <property name="num" value="#{10}"></property>
        <property name="version" value="#{'v1.2.3'}"></property>
    </bean>
10. 加载外部properties文件
(1). 新增1个 data.properties配置文件
username=root
pwd=12345
driver=com.mysql.jdbc.Driver
(2). 在Spring配置文件中引入下面代码,即可使用上面配置文件。
    <!-- 加载外部properties文件的机制    -->
    <!--1.在开头添加命名空间    -->
    <!-- xmlns:context="http://www.springframework.org/schema/context"-->
    <!--2.加载配置文件-->
    <!--    <context:property-placeholder location="classpath*:*.properties"/>-->
    <!-- 或者只加载对应文件即可   -->
    <context:property-placeholder location="classpath*:data.properties"/>
    <!--3.使用加载数据    -->
    <bean id="userService4" class="com.ypf.service.UserServiceImpl4">
        <property name="username" value="${username}"/>
        <property name="pwd" value="${pwd}"/>
        <property name="driver" value="${driver}"/>
    </bean>
11. 导入其它的Spring配置文件
    <!--导入其它配置文件中的项 -->
    <import resource="applicationContextC1.xml"/>
    <import resource="applicationContextC2.xml"/>
测试代码:
         //7. 导入其它配置文件中的项
        //7.1 加载主文件的模式
        ApplicationContext ctx = new ClassPathXmlApplicationContext("applicationContext.xml");
        UserService userServiceC1 = (UserService) ctx.getBean("userServiceC1");
        userServiceC1.save();
        System.out.println("------------------------------------------------");
        UserService userServiceC2 = (UserService) ctx.getBean("userServiceC2");
        userServiceC2.save();
        System.out.println("------------------------------------------------");
        //7.2 加载多个子文件
        ApplicationContext ctx1 = new ClassPathXmlApplicationContext("applicationContextC1.xml","applicationContextC2.xml");
        UserService userServiceC11 = (UserService) ctx.getBean("userServiceC1");
        userServiceC11.save();
        System.out.println("------------------------------------------------");
        UserService userServiceC22 = (UserService) ctx.getBean("userServiceC2");
        userServiceC22.save();
12. 第三方资源配置
(1). 首先导入坐标
        <dependency>
            <groupId>com.alibaba</groupId>
            <artifactId>druid</artifactId>
            <version>1.2.6</version>
        </dependency>
(2). Spring的xml配置
    <!--八 整合第三方配置  阿里数据源方案Druid    -->
    <bean id="dataSource" class="com.alibaba.druid.pool.DruidDataSource">
        <property name="driverClassName" value="com.mysql.jdbc.Driver"></property>
        <property name="url" value="jdbc:mysql://localhost:3306/spring_ioc"></property>
        <property name="username" value="root"></property>
        <property name="password" value="root"></property>
    </bean>
(3). 调用
        ApplicationContext ctx = new ClassPathXmlApplicationContext("applicationContext.xml");
        DruidDataSource dataSource = (DruidDataSource) ctx.getBean("dataSource");
        System.out.println(dataSource);
三. 整合MyBatis
1. 导入相应坐标
<?xml version="1.0" encoding="UTF-8"?>
<project xmlns="http://maven.apache.org/POM/4.0.0"
         xmlns:xsi="http://www.w3.org/2001/XMLSchema-instance"
         xsi:schemaLocation="http://maven.apache.org/POM/4.0.0 http://maven.apache.org/xsd/maven-4.0.0.xsd">
    <modelVersion>4.0.0</modelVersion>

    <groupId>org.example</groupId>
    <artifactId>SpringDemo3</artifactId>
    <version>1.0-SNAPSHOT</version>

    <properties>
        <project.build.sourceEncoding>UTF-8</project.build.sourceEncoding>
        <maven.compiler.source>11</maven.compiler.source>
        <maven.compiler.target>11</maven.compiler.target>
    </properties>

    <dependencies>
        <!--spring -->
        <dependency>
            <groupId>org.springframework</groupId>
            <artifactId>spring-context</artifactId>
            <version>5.3.7</version>
        </dependency>
        <!--第三方资源配置(阿里数据源方案Druid)-->
        <dependency>
            <groupId>com.alibaba</groupId>
            <artifactId>druid</artifactId>
            <version>1.2.6</version>
        </dependency>
        <!-- Spring整合mybatis相关坐标-->
        <dependency>
            <groupId>mysql</groupId>
            <artifactId>mysql-connector-java</artifactId>
            <version>5.1.6</version>
            <scope>runtime</scope>
        </dependency>
        <dependency>
            <groupId>org.mybatis</groupId>
            <artifactId>mybatis</artifactId>
            <version>3.5.7</version>
        </dependency>
        <dependency>
            <groupId>org.springframework</groupId>
            <artifactId>spring-jdbc</artifactId>
            <version>5.3.7</version>
        </dependency>
        <dependency>
            <groupId>org.mybatis</groupId>
            <artifactId>mybatis-spring</artifactId>
            <version>2.0.6</version>
        </dependency>
    </dependencies>


</project>
2. 在com.ypf.domain下新建Account实体类
public class Account implements Serializable {

    private Integer id;
    private String name;
    private Double money;

    public Integer getId() {
        return id;
    }

    public void setId(Integer id) {
        this.id = id;
    }

    public String getName() {
        return name;
    }

    public void setName(String name) {
        this.name = name;
    }

    public Double getMoney() {
        return money;
    }

    public void setMoney(Double money) {
        this.money = money;
    }

    @Override
    public String toString() {
        return "Account{" +
                "id=" + id +
                ", name='" + name + '\'' +
                ", money=" + money +
                '}';
    }
}
3. 在com.ypf.dao下新建AccountDao接口
注:该接口中的命名空间要和下面的sql配置的xml的命名空间相同,且方法名也要和sql配置的xml中的id值相同。
public interface AccountDao {

    void save(Account account);

    void delete(Integer id);

    void update(Account account);

    List<Account> findAll();

    Account findById(Integer id);
}
4. 在com.ypf.service下新建AccountService接口 和 在com.ypf.servcie.impl新建AccountServiceImpl实现类
public interface AccountService {

    void save(Account account);

    void delete(Integer id);

    void update(Account account);

    List<Account> findAll();

    Account findById(Integer id);

}
public class AccountServiceImpl implements AccountService {

    private AccountDao accountDao;

    public void setAccountDao(AccountDao accountDao) {
        this.accountDao = accountDao;
    }

    public void save(Account account) {
        accountDao.save(account);
    }

    public void update(Account account){
        accountDao.update(account);
    }

    public void delete(Integer id) {
        accountDao.delete(id);
    }

    public Account findById(Integer id) {
        return accountDao.findById(id);
    }

    public List<Account> findAll() {
        return accountDao.findAll();
    }
}
5. 在recources资源文件夹下的com.ypf.dao包下新建AccountDao.xml
<?xml version="1.0" encoding="UTF-8"?>
<!DOCTYPE mapper
        PUBLIC "-//mybatis.org//DTD Mapper 3.0//EN"
        "http://mybatis.org/dtd/mybatis-3-mapper.dtd">


<mapper namespace="com.ypf.dao.AccountDao">

    <!--配置根据id查询-->
    <select id="findById" resultType="account" parameterType="int">
        select * from account where id = #{id}
    </select>

    <!--配置查询所有-->
    <select id="findAll" resultType="account">
        select * from account
    </select>

    <!--配置保存-->
    <insert id="save" parameterType="account">
        insert into account(name,money)values(#{name},#{money})
    </insert>

    <!--配置删除-->
    <delete id="delete" parameterType="int">
        delete from account where id = #{id}
    </delete>

    <!--配置更新-->
    <update id="update" parameterType="account">
        update account set name=#{name},money=#{money} where id=#{id}
    </update>
</mapper>
注:
(1). com.ypf.dao 应该是一层层往下的三个文件夹,而不是一个文件夹
(2). xml文件的名称必须和AccountDao接口名称相同。
(3). xml的命名空间需要和AccountDao的相同,而且xml中每个sql对应的id需要和AccountDao接口中的方法名相同。
6. 在recources资源文件夹下新建applicationContext1.xml 和 jdbc.properties
jdbc.properties
jdbc.driver=com.mysql.jdbc.Driver
# 下面配置防止中文乱码
jdbc.url=jdbc:mysql://xxx:3306/db1?useUnicode=true&characterEncoding=utf8&rewriteBatchedStatements=true
jdbc.username=root
jdbc.password=xxxx
applicationContext1.xml
<?xml version="1.0" encoding="UTF-8"?>
<beans xmlns="http://www.springframework.org/schema/beans"
       xmlns:xsi="http://www.w3.org/2001/XMLSchema-instance"
       xmlns:context="http://www.springframework.org/schema/context"
       xsi:schemaLocation="http://www.springframework.org/schema/beans
        https://www.springframework.org/schema/beans/spring-beans.xsd
        http://www.springframework.org/schema/context
        https://www.springframework.org/schema/context/spring-context.xsd">

    <!--加载properties配置文件的信息-->
    <context:property-placeholder location="classpath*:*.properties"/>

    <!--加载druid资源-->
    <bean id="dataSource" class="com.alibaba.druid.pool.DruidDataSource">
        <property name="driverClassName" value="${jdbc.driver}"/>
        <property name="url" value="${jdbc.url}"/>
        <property name="username" value="${jdbc.username}"/>
        <property name="password" value="${jdbc.password}"/>
    </bean>

    <!--配置service作为spring的bean,注入dao   由spring管理,所以ref中不需要单独配置-->
    <bean id="accountService" class="com.ypf.service.impl.AccountServiceImpl">
        <property name="accountDao" ref="accountDao"/>
    </bean>

    <!--spring整合mybatis后控制的创建连接用的对象-->
    <bean class="org.mybatis.spring.SqlSessionFactoryBean">
        <!--数据源        -->
        <property name="dataSource" ref="dataSource"/>
        <!--通用别名配置        -->
        <property name="typeAliasesPackage" value="com.ypf.domain"/>
    </bean>

    <!--加载mybatis映射配置的扫描,将其作为spring的bean进行管理-->
    <bean class="org.mybatis.spring.mapper.MapperScannerConfigurer">
        <property name="basePackage" value="com.ypf.dao"/>
    </bean>


</beans>
7. 测试
public class Test1 {
    public static void main(String[] args) {
        ApplicationContext ctx = new ClassPathXmlApplicationContext("applicationContext1.xml");
        AccountService accountService = (AccountService) ctx.getBean("accountService");
        Account ac = accountService.findById(1);
        System.out.println(ac);
    }
}
8. 运行结果

!
- 作 者 : Yaopengfei(姚鹏飞)
- 博客地址 : http://www.cnblogs.com/yaopengfei/
- 声 明1 : 如有错误,欢迎讨论,请勿谩骂^_^。
- 声 明2 : 原创博客请在转载时保留原文链接或在文章开头加上本人博客地址,否则保留追究法律责任的权利。
