linux运维、架构之路-Nginx提高

一、虚拟主机搭建
1、基于域名的虚拟主机
[root@web01 html]# cat nginx.conf
worker_processes  1;
events {
    worker_connections  1024;
}
http {
    include       mime.types;
    default_type  application/octet-stream;
    sendfile        on;
    keepalive_timeout  65;
    server {
        listen       80;
        server_name  www.etiantian.org;
        location / {
            root   html/www;
            index  index.html index.htm;
        }
    }
    server {
        listen       80;
        server_name  bbs.etiantian.org;
        location / {
            root   html/bbs;
            index  index.html index.htm;
        }
    }
    server {
        listen       80;
        server_name  blog.etiantian.org;
        location / {
            root   html/blog;
            index  index.html index.htm;
        }
    }
}
说明:基于域名的虚拟主机,当输入IP地址访问的时候,默认寻找nginx.conf里配置的第一个虚拟主机,如果使用了include功能,则ll extra目录下显示的第一个文件为寻找的目标
[root@web01 conf]# ll extra/
-rw-r--r-- 1 root root 421 Sep 19 10:37 bbs.conf
-rw-r--r-- 1 root root 708 Sep 19 12:16 blog.conf
-rw-r--r-- 1 root root 388 Sep 19 10:10 www.conf
2、基于端口的虚拟主机
[root@web01 html]# cat nginx.conf
worker_processes  1;
events {
    worker_connections  1024;
}
http {
    include       mime.types;
    default_type  application/octet-stream;
    sendfile        on;
    keepalive_timeout  65;
    server {
        listen       80;
        server_name  www.etiantian.org;
        location / {
            root   html/www;
            index  index.html index.htm;
        }
    }
    server {
        listen       81;    ###由基于域名bbs.etiantian.org的80改为基于端口的81
        server_name  bbs.etiantian.org;
        location / {
            root   html/bbs;
            index  index.html index.htm;
        }
    }
    server {
        listen       80;
        server_name  blog.etiantian.org;
        location / {
            root   html/blog;
            index  index.html index.htm;
        }
    }
}
测试:基于端口配置的虚拟主机成功:
访问过程:网络层(IP地址)====>传输层(端口)====>应用层(域名)
3、基于IP的虚拟主机
http {
              include       mime.types;
              default_type  application/octet-stream;
              sendfile        on;
              keepalive_timeout  65;
              server {
                      listen       10.0.0.8:80;#此处只改了域名bbs.etiantian.org
                      server_name  bbs.etiantian.org;##此处也可以改成对应IP 10.0.0.8
                      location / {
                          root   html/www;
                          index  index.html index.htm;
              }
        }
测试:基于IP配置的虚拟主机,修改完nginx配置文件,都要重新启动nginx服务
4、规范虚拟主机配置文件
cd /application/nginx/conf && mkdir extra
sed -n '10,17p' nginx.conf >./extra/www.conf
sed -n '18,25p' nginx.conf >./extra/blog.conf
sed -n '26,33p' nginx.conf >./extra/bbs.conf
5、精简Nginx主配置文件
cat nginx.conf
worker_processes  3;
events {
    worker_connections  1024;
}
http {
    include       mime.types;
    default_type  application/octet-stream;
    sendfile        on;
    keepalive_timeout  65;
    include extra/www.conf;
    include extra/bbs.conf;
    include extra/blog.conf;
}
二、Nginx日志
1、 错误日志
[root@web01 conf]# cat nginx.conf
worker_processes  3;
error_log logs/error.log error;#增加nginx错误日志模块即可
events {
    worker_connections  1024;
}
http {
    include       mime.types;
    default_type  application/octet-stream;
    sendfile        on;
    keepalive_timeout  65;
    include extra/www.conf;
    include extra/bbs.conf;
    include extra/blog.conf;
    include extra/status.conf;
}
2、访问日志
log_format  main  '$remote_addr - $remote_user [$time_local] "$request" '
                      '$status $body_bytes_sent "$http_referer" '
                      '"$http_user_agent" "$http_x_forwarded_for"';

access_log  logs/access.log  main;
日志格式详细说明:
10.0.0.253 - - [16/Sep/2017:14:15:29 +0800] "GET / HTTP/1.1" 200 13 "-" "Mozilla/5.0 (Windows NT 6.1;
Win64; x64) AppleWebKit/537.36 (KHTML, like Gecko) Chrome/61.0.3163.79 Safari/537.36" "-"
$remote_addr    10.0.0.253                             #客户端IP地址信息
-                 -
$remote_user    -                                      #user name supplied with the Basic authentication
[16/Sep/2017:14:15:29 +0800] [$time_local]             #用户访问时间
"$request"      "GET / HTTP/1.1"                       #http请求报文中的请求行信息
$status         200                                    #服务端返回的状态码信息
$body_bytes_sent   13                                  #服务端返回给客户端的资源大小信息
"$http_referer"    -                                   #记录推荐链接过来的服务器地址信息(暂时忽略)
"$http_user_agent"  Chrome/61.0.3163.79 Safari/537.36  #客户端访问网站方式,利用的软件
"$http_x_forwarded_for"     "-"                        #忽略掉
3、日志切割(定时任务+脚本实现 )
[root@web01 scripts]# cat nginx_log_cut.sh
#!/bin/sh
cd /application/nginx/logs/
/bin/mv access.log access_$(date +%F).log
/application/nginx/sbin/nginx -s reload
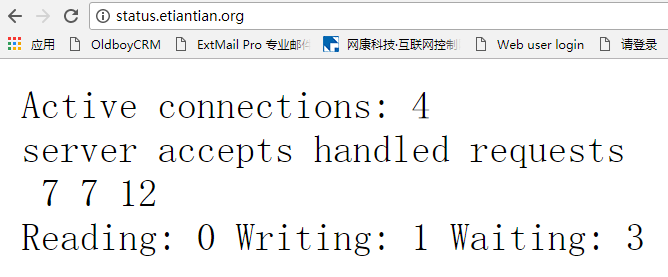
三、Nginx状态模块http_stub_status_module
cat >>/application/nginx/conf/extra/status.conf<<EOF
server{
    listen  80;
    server_name  status.etiantian.org;
    location / {
      stub_status on;
      access_log   off;
    }
  }
EOF
做好本地hosts解析浏览器访问测试
|
参数信息 |
参数说明 |
|
Active connections |
当前活动客户端连接数量包含Waiting连接数量 |
|
accepts |
接收客户端连接的总数量 |
|
handled |
处理连接的总数量 |
|
requests |
客户端请求的总数 |
|
Reading |
当前nginx正在读取请求头的连接数 |
|
Writing |
当前nginx将响应写回客户机的连接数量 |
|
Waiting |
当前空闲客户端连接等待请求的数量 |
四、Nginx location模块
1、语法location [=|~|~*|^~] /uri/ { … }
|
location |
[=|~|~*|^~] / |
uri |
{…} |
|
指令 |
匹配标识 |
匹配的网站网址 |
匹配URI后要执行的配置段 |
2、location匹配优先级
|
不用URI及特殊字符组合匹配顺序 |
匹配说明 |
|
1、“location = / {” |
精确匹配 |
|
2、“location ^~/images/ {” |
匹配常规字符串,不做正则匹配检查,优先匹配路径 |
|
3、“location ~*\.(gif|jpg|jpeg)$ {” |
正则匹配 |
|
4、“location /documents/ {” |
匹配常规字符串,如果有正则优先匹配正则 |
|
5、“location / {” |
所有location都不能匹配后的默认匹配 |
测试location匹配优先级:
server {
        listen       80;
        server_name  www.etiantian.org;
        root   html/www;
        location / {
           return 401;
        }
        location = / {
            return 402;
        }
        location /documents/ {
            return 403;
        }
        location ^~ /images/ {
            return 404;
        }
        location ~* \.(gif|jpg|jpeg)$ {
            return 500;
        }
        access_log logs/access_www.log main
    }
[root@web01 log]# curl -I -s -w "%{http_code}\n" -o /dev/null  www.etiantian.org
402
[root@web01 log]# curl -I -s -w "%{http_code}\n" -o /dev/null  www.etiantian.org/index.html
401
[root@web01 log]# curl -I -s -w "%{http_code}\n" -o /dev/null  www.etiantian.org/documents/
403
[root@web01 log]# curl -I -s -w "%{http_code}\n" -o /dev/null  www.etiantian.org/images/1.jpg
404
[root@web01 log]# curl -I -s -w "%{http_code}\n" -o /dev/null  www.etiantian.org/1.jpg
500
五、Nginx http_rewrite_module模块
1、功能
rewrite的主要功能是实现网站URL地址重写,rewrite规则需要PCRE软件支持,通过Perl兼容表达式语法进行规则匹配,另一个功能就是实现伪静态。
2、实现301跳转
①种写法:通过if和rewrite结合来实现301跳转,避免无限跳转
server {
        listen       80;
        server_name  www.etiantian.org;
        location / {
            root   html/www;
            index  index.html index.htm;
            if ($host ~* "^etiantian.org$") {
            rewrite ^/(.*) http://www.etiantian.org/$1 permanent;
            }
        }
    }
②种写法增加一个server标签
server {
           listen       80;
           server_name etiantian.org;
           rewrite ^/(.*) http://www.etiantian.org/$1 permanent;
    } #在www.etiantian.org标签之上,增加一个server标签
    server {
        listen       80;
        server_name  www.etiantian.org;
        location / {
            root   html/www;
            index  index.html index.htm;
            }
    }
③自己域名跳转博客园实战
server {
        listen       80;
        server_name  www.yanxingjiang.com;
        location / {
            root   html/blog;
            index index.php index.html index.htm;
            if ($host = "www.yanxingjiang.com"){
            rewrite ^/(.*)$ http://www.cnblogs.com/yanxinjiang/$1 permanent;
    }
④Nginx404、500、502等页面优雅显示
#nginx.conf配置文件中server区域加入#
fastcgi_intercept_errors on;#测试不需要此步也可以
error_page 404 = /404.html; 或者error_page 404 = http://www.xxx.com/404.html;
/usr/local/nginx/sbin/nginx –t
/usr/local/nginx/sbin/nginx –s reload
同样error_page 500 502 503 504 = /50x.html;
3、企业应用场景
①可以调整用户浏览URL,看起来更规范,合乎开发及产品人员的需求
②为了让搜索引擎收录网站内容及用户体验更好,企业会将动态URL地址伪装静态地址提供服务
③网站换新域名后,让旧域名的访问跳转到新的域名上,例如京东商城的www.360buy,改成jd.com
④根据特殊变更、目录、客户端的信息进行URL跳转等
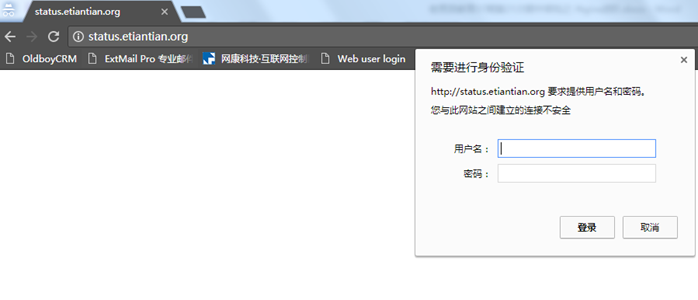
六、 Nginx访问认证
1、修改配置文件
[root@web01 extra]# cat status.conf #以nginx状态虚拟主机为例配置
server{
    listen  80;
    server_name  status.etiantian.org;
    location / {
      stub_status on;
      access_log   off;
      auth_basic           "oldboy training";
      auth_basic_user_file   /application/nginx/conf/htpasswd;
    }
  }
2、创建密码认证文件并进行授权
yum install httpd-tools -y
htpasswd -bc /application/nginx/conf/htpasswd oldboy 123456
chmod 400 /application/nginx/conf/htpasswd
chown -R www.www /application/nginx/conf/htpasswd
浏览器输入地址测试status.etiantian.org
3、htpasswd命令总结
|
-c |
创建一个新文件 |
|
-n |
不更新文件,显示输出结果 |
|
-m |
强制采用MD5加密密码 |
|
-d |
强制采用CRYPT加密密码(默认) |
|
-p |
不加密密码(明文) |
|
-s |
强制采用SHA加密密码 |
|
-b |
使用密码来自命令行,相当于交互方式 |
|
-D |
删除指定用户 |
4、 企业需求案例
1、搭建好一台nginx的web服务器。配置好内网卡地址与外网卡地址
2、web服务的网站域名为www.etiantian.org,站点目录为html/www
3、要求内网用户可以访问网站http://www.etiantian.org/AV资源信息
4、要求外网用户禁止访问网站http://www.etiantian.org/AV资源信息
解决方案
①定位资源信息
uri== /AV
②进行策略控制
allow
deny
③修改配置文件
[root@web01 www]# cat /application/nginx/conf/extra/www.conf
    server {
        listen       80;
        server_name  www.etiantian.org;
        location / {
            root   html/www;
            index  index.html index.htm;
        }
        location /AV/ {
            root   html/www;
            index  index.html index.htm;
            allow  172.16.1.0/24;
            deny   all;
        }
   }
④创建测试资源信息
cd /application/nginx/html/www/
mkdir AV
echo oldboy_AV >AV/oldboy.html
⑤客户端进行测试
[root@nfs01 ~]# curl 10.0.0.8/AV/oldboy.html #模拟外网地址测试
<html>
<head><title>403 Forbidden</title></head>
<body bgcolor="white">
<center><h1>403 Forbidden</h1></center>
<hr><center>nginx/1.10.3</center>
</body>
</html>
[root@nfs01 ~]# curl 172.16.1.8/AV/oldboy.html #模拟内网地址测试
oldboy_AV
